Page 3938 of 4331
MTC
N
O P
YES >> GO TO 6.
NO >> Adjust or replace air mix door cable. Refer to MTC-64, " Air Mix Door Cable Adjustment " .
OK >> GO TO 7.
NG >> Repair air leaks. YES >> GO TO 8.
NO >> Both hoses warm: GO TO 9. Component Inspection " (MR TYPE 1),
EC-1196," Component Inspection " (MR TYPE 2) or
EC-169, " Component Inspection " (HR16DE).
OK or NG OK >> System OK.
NG >> Repair or replace as necessary. Retest. OK >> GO TO 10.
NG >> Repair /replace as necessary. Retest GO TO 7. Changing Engine Coolant " (HR16DE) or
CO-35, " Changing Engine Coolant " (MR18DE) .
4. Start engine and warm it up to normal operating temperature.
5. Touch both the inlet and outlet heater hoses.
Is the inlet hose hot and the outlet hose warm? YES >> System OK.
NO >> Replace heater core and refill engine coolant. Refer to MTC-67, " Removal and Installation " .
Noise INFOID:0000000004307075
SYMPTOM: Noise
INSPECTION FLOW
Page 3943 of 4331
Changing Engine Coolant " .
3. Remove cowl top cover. Refer to EI-22, " Removal and Installation " .
4. Remove upper clip and position the lower dash insulator aside.
5. Remove bolt (A), and then disconnect low-pressure flexible hose (1) and high-pressure pipe (2) from evaporator.
CAUTION:
Cap or wrap the joint of the pi pe with suitable material such
as vinyl tape to avoid the entry of air.
6. Remove clamps (A), and then disconnect heater hoses (1) from heater core.
7. Remove console box assembly. Refer to IP-11, " Component Parts " .
A. A/C unit assembly bolts B. Steering member bolts C. Steering column nuts
SJIA0645E
Page 3944 of 4331

MTC
N
O P
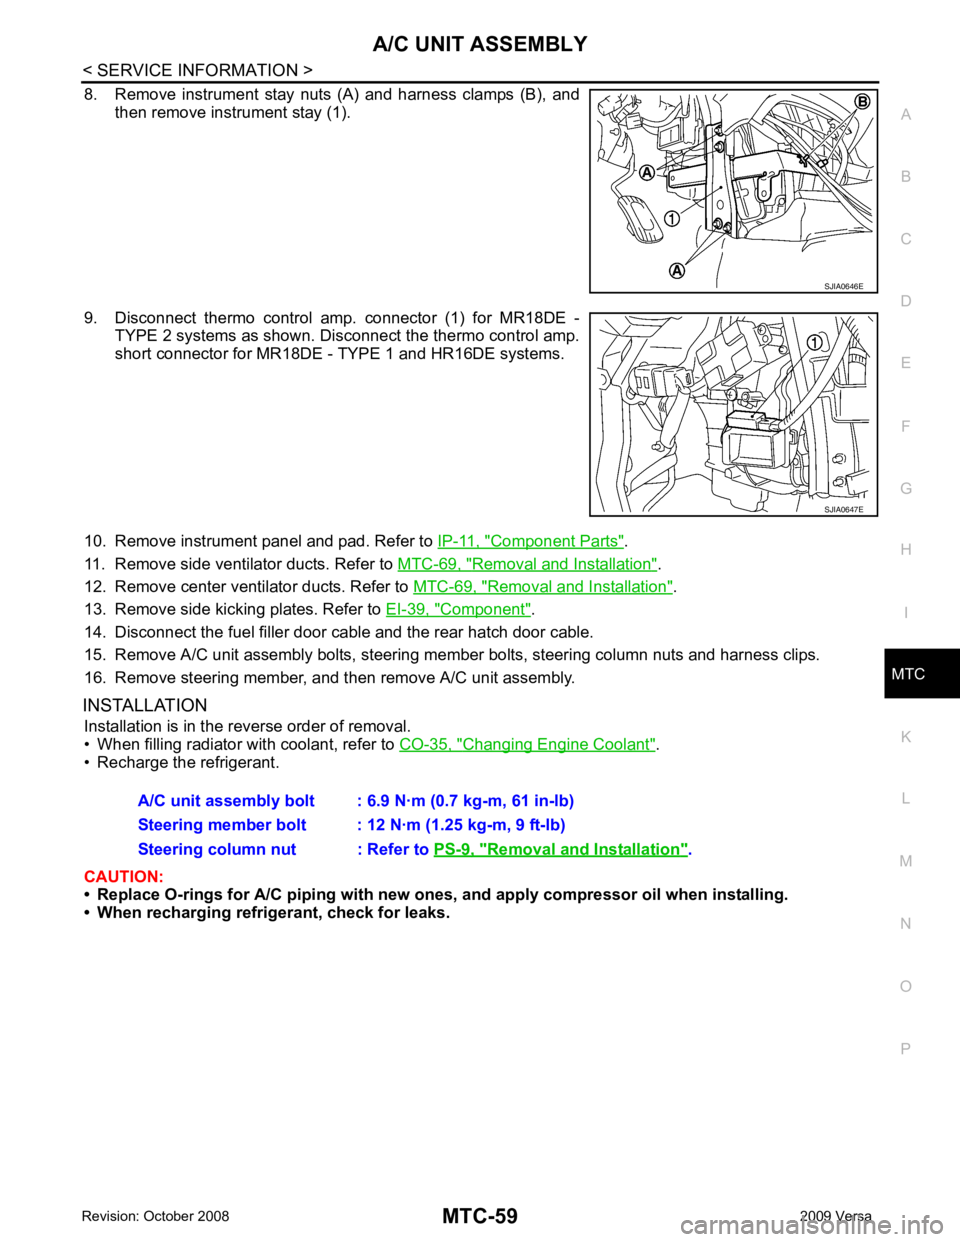
8. Remove instrument stay nuts (A) and harness clamps (B), and
then remove instrument stay (1).
9. Disconnect thermo control amp. connector (1) for MR18DE - TYPE 2 systems as shown. Disconnect the thermo control amp.
short connector for MR18DE - TYPE 1 and HR16DE systems.
10. Remove instrument panel and pad. Refer to IP-11, " Component Parts " .
11. Remove side ventilator ducts. Refer to MTC-69, " Removal and Installation " .
12. Remove center ventilator ducts. Refer to MTC-69, " Removal and Installation " .
13. Remove side kicking plates. Refer to EI-39, " Component " .
14. Disconnect the fuel filler door cable and the rear hatch door cable.
15. Remove A/C unit assembly bolts, steering member bolts, steering column nuts and harness clips.
16. Remove steering member, and then remove A/C unit assembly.
INSTALLATION Installation is in the reverse order of removal.
• When filling radiator with coolant, refer to CO-35, " Changing Engine Coolant " .
• Recharge the refrigerant.
CAUTION:
• Replace O-rings for A/C piping with new on es, and apply compressor oil when installing.
• When recharging refrigerant, check for leaks. Removal and Installation " .
Page 4028 of 4331

PG
N
O P
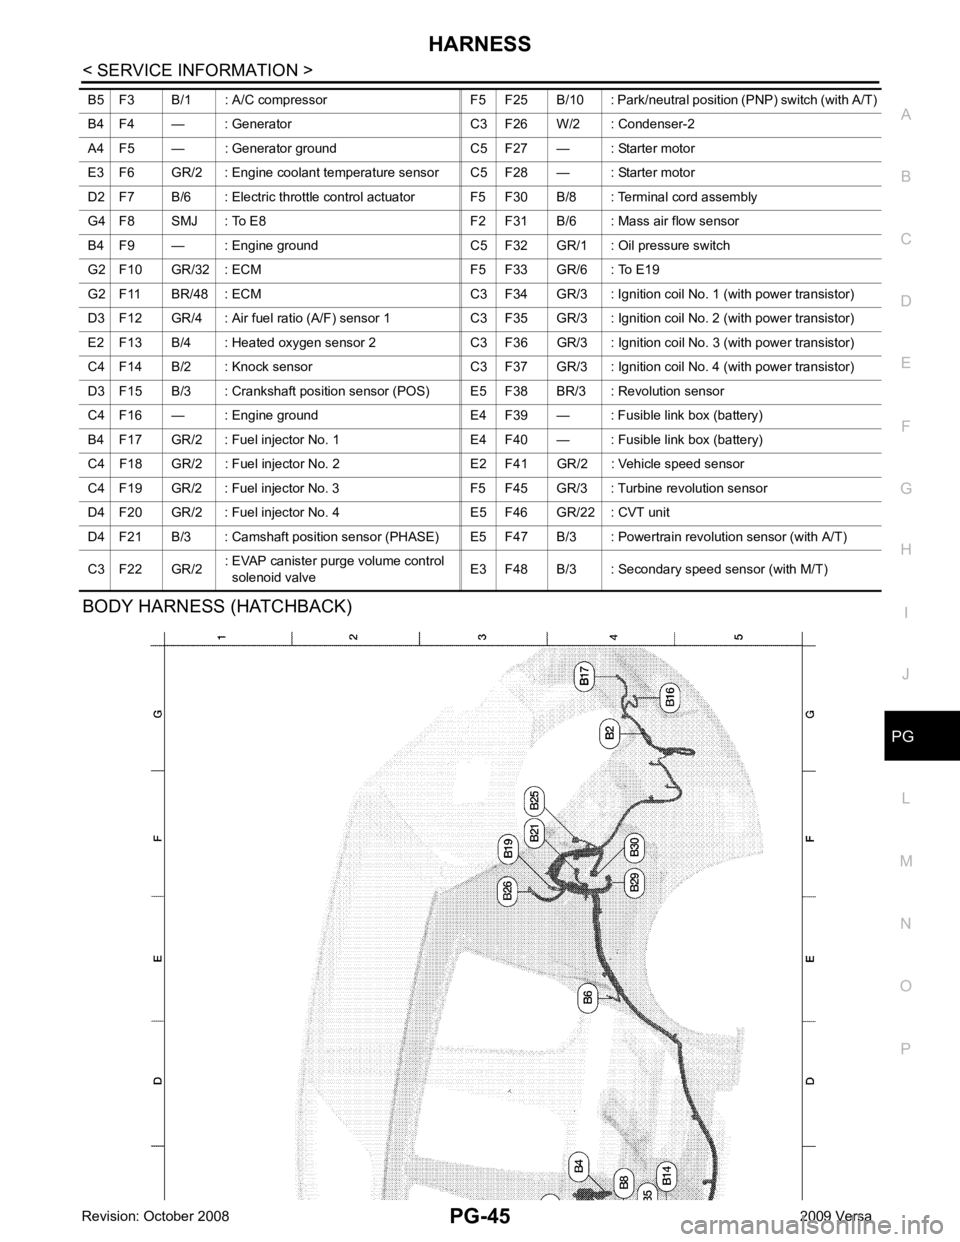
BODY HARNESS (HATCHBACK) B5 F3 B/1 : A/C compressor F5 F25 B/10 : Park/n
eutral position (PNP) switch (with A/T)
B4 F4 — : Generator C3 F26 W/2 : Condenser-2
A4 F5 — : Generator ground C5 F27 — : Starter motor
E3 F6 GR/2 : Engine coolant temperature sensor C5 F28 — : Starter motor
D2 F7 B/6 : Electric throttle control actuator F5 F30 B/8 : Terminal cord assembly
G4 F8 SMJ : To E8 F2 F31 B/6 : Mass air flow sensor
B4 F9 — : Engine ground C5 F32 GR/1 : Oil pressure switch
G2 F10 GR/32 : ECM F5 F33 GR/6 : To E19
G2 F11 BR/48 : ECM C3 F34 GR/3 : Ignition coil No. 1 (with power transistor)
D3 F12 GR/4 : Air fuel ratio (A/F) sensor 1 C3 F35 GR/3 : Ignition coil No. 2 (with power transistor)
E2 F13 B/4 : Heated oxygen sensor 2 C3 F36 GR/3 : Ignition coil No. 3 (with power transistor)
C4 F14 B/2 : Knock sensor C3 F37 GR/3 : Ignition coil No. 4 (with power transistor)
D3 F15 B/3 : Crankshaft position sensor (POS) E5 F38 BR/3 : Revolution sensor
C4 F16 — : Engine ground E4 F39 — : Fusible link box (battery)
B4 F17 GR/2 : Fuel injector No. 1 E4 F40 — : Fusible link box (battery)
C4 F18 GR/2 : Fuel injector No. 2 E2 F41 GR/2 : Vehicle speed sensor
C4 F19 GR/2 : Fuel injector No. 3 F5 F45 GR/3 : Turbine revolution sensor
D4 F20 GR/2 : Fuel injector No. 4 E5 F46 GR/22 : CVT unit
D4 F21 B/3 : Camshaft position sensor (PHASE) E5 F4 7 B/3 : Powertrain revolution sensor (with A/T)
C3 F22 GR/2 : EVAP canister purge volume control
solenoid valve E3 F48 B/3 : Secondary speed sensor (with M/T)
Page 4040 of 4331

PG
N
O P
Wiring Diagram Codes (Cell Codes)
INFOID:0000000004306667
Use the chart below to find out what each wiring diagram code stands for.
Refer to the wiring diagram code in the alphabetical index to find the location (page number) of each wiring
diagram. D4 D405 W/4 : Back door lock assembly C2 D413 B/1 : Rear window defogger (-)
D4 D406 W/2 : Back door request switch F3 D414 — : Body ground
E2 D407 W/2 : High mounted stop lamp Code Section Wiring Diagram Name
ABS BRC Anti-lock Brake System
A/C,M MTC Manual Air Conditioner
APPS1 EC Accelerator Pe dal Position Sensor
A/F EC Air Fuel Ratio Sensor 1
A/FH EC Air Fuel Ratio Sensor 1 Heater
APPS2 EC Accelerator Pe dal Position Sensor
APPS3 EC Accelerator Pe dal Position Sensor
ASC/BS EC ASCD Brake Switch
ASC/SW EC ASCD Steering Switch
ASCBOF EC ASCD Brake Switch
ASCIND EC ASCD Indicator
AT/IND DI A/T Indicator Lamp
AUDIO AV Audio
BACK/L LT Back-up Lamp
BA/FTS AT A/T Fluid Temperature Sensor and TCM Power Supply
B/DOOR BL Back Door Opener
BRK/SW EC Brake Switch
CAN AT CAN Communication Line
CAN CVT CAN Comm unication Line
CAN EC CAN Communication Line
CAN LAN CAN System
CHARGE SC Charging System
CHIME DI Warning Chime
COOL/F EC Cooling Fan Control
COMBSW LT Combination Switch
CVTIND DI CVT Indicator Lamp
D/LOCK BL Power Door Lock
DEF GW Rear Window Defogger
DTRL LT Headlamp - Wi th Daytime Light System
ECTS EC Engine Coolant Temperature Sensor
ENGSS AT Engine Speed Signal
EPS STC Electronic Controlled Power Steering
ETC1 EC Electric Throttle Control Function
ETC2 EC Throttle Control Motor Relay
ETC3 EC Throttle Control Motor
F/FOG LT Front Fog Lamp
F/PUMP EC Fuel Pump
FTS AT A/T Fluid Temperature Sensor
FTS CVT CVT Fluid Temperature Sensor Circuit
FTTS EC Fuel Tank Temperature Sensor
FUEL EC Fuel Ignition System Function
HEATER MTC Heater System
Page 4114 of 4331
RSU
N
O P
5. When the repair work is completed, return the ignition switch to the
″LOCK ″ position before connecting
the battery cables. (At this time, the steering lock mechanism will engage.)
6. Perform a self-diagnosis check of al l control units using CONSULT-III.
Precaution for Rear Suspension INFOID:0000000004305875
• When installing the rubber bushings, the final tightening must be done under unladen condition and with the tires on level ground. Oil will shorten the life of the rubber bushings, so wipe off any spilled oil immediately.
• Unladen condition means the fuel tank, engine coolant and l ubricants are at the full specification. The spare
tire, jack, hand tools, and mats are in their designated positions.
• After installing suspension components, check the wheel alignment.
• Caulking nuts are not reusable. Always use new caulking nuts for installation. New caulking nuts are pre-
oiled, do not apply any additional lubrication.
Page 4124 of 4331

RSU
N
O P
SERVICE DATA AND SPECIFICATIONS (SDS)
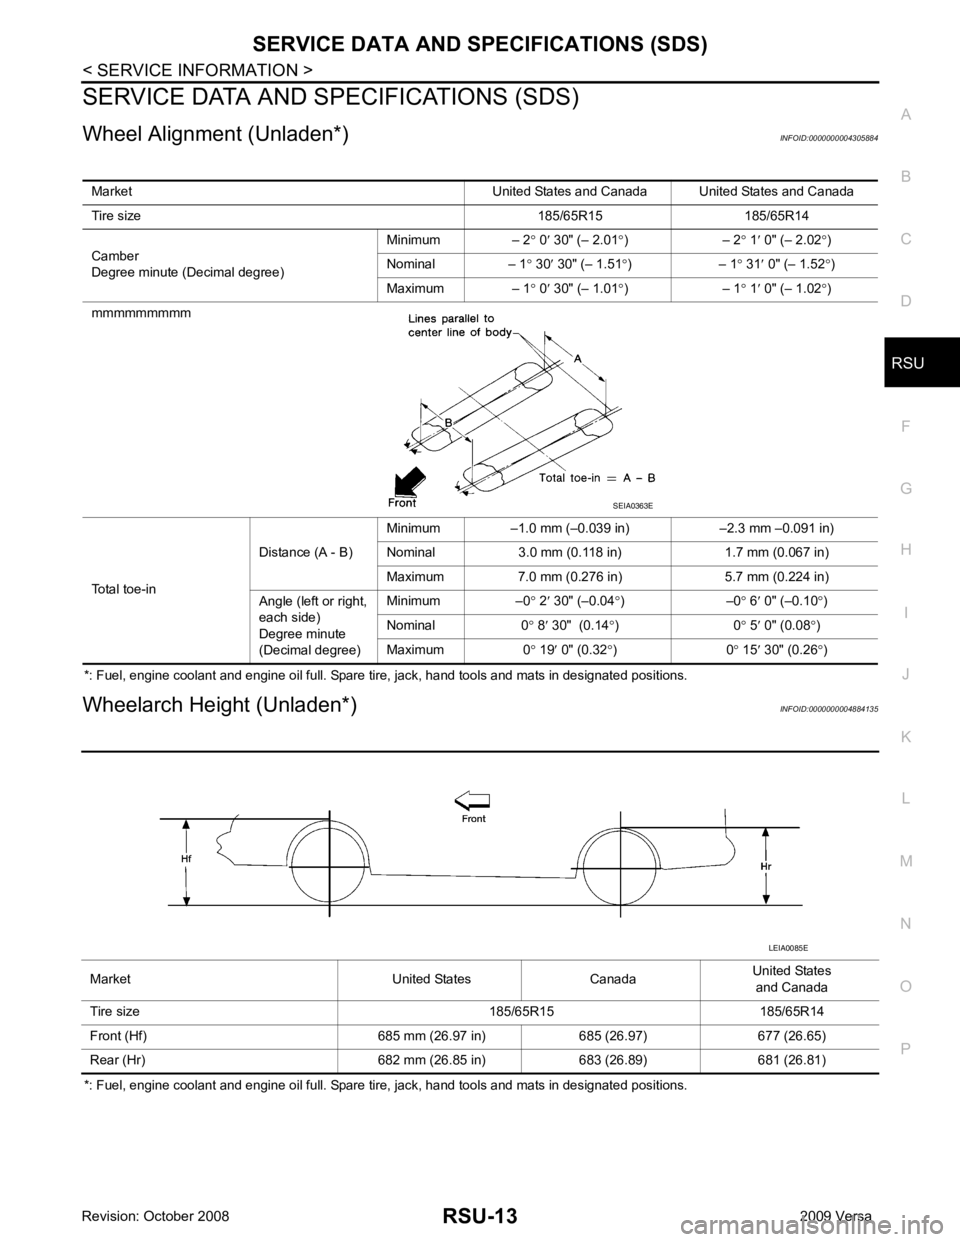
Wheel Alignment (Unladen*) INFOID:0000000004305884
*: Fuel, engine coolant and engine oil full. Spare tire, jack, hand tools and mats in designated positions.
Wheelarch Height (Unladen*) INFOID:0000000004884135
*: Fuel, engine coolant and engine oil full. Spare tire, jack, hand tools and mats in designated positions. Market United States and Canada United States and Canada
Tire size 185/65R15 185/65R14
Camber
Degree minute (Decimal degree) Minimum – 2
° 0 ′ 30" (– 2.01 °) – 2 ° 1 ′ 0" (– 2.02 °)
Nominal – 1 ° 30 ′ 30" (– 1.51 °) – 1 ° 31 ′ 0" (– 1.52 °)
Maximum – 1 ° 0 ′ 30" (– 1.01 °) – 1 ° 1 ′ 0" (– 1.02 °)
mmmmmmmmm
Total toe-in Distance (A - B)
Minimum –1.0 mm (–0.039 in) –2.3 mm –0.091 in)
Nominal 3.0 mm (0.118 in) 1.7 mm (0.067 in)
Maximum 7.0 mm (0.276 in) 5.7 mm (0.224 in)
Angle (left or right,
each side)
Degree minute
(Decimal degree) Minimum –0
° 2 ′ 30" (–0.04 °) –0 ° 6 ′ 0" (–0.10 °)
Nominal 0 ° 8 ′ 30" (0.14 °) 0 ° 5 ′ 0" (0.08 °)
Maximum 0 ° 19 ′ 0" (0.32 °) 0 ° 15 ′ 30" (0.26 °)
Page 4155 of 4331
SC
N
O P
• 10A fuse (No. 49, M/T model
s, located in the IPDM E/R)
• 15A fuse (No. 52, located in the IPDM E/R)
• 20A fuse (No. 53, located in the IPDM E/R)
• PNP switch, clutch interlock switch or TCM depending on equipment
• Ignition switch
• Ignition relay IPDM E/R
• Starter relay IPDM E/R
• Starter relay request ON signal from BCM
• Harness for open or short circuit OK >> Magnetic switch circuit is
OK. Further inspection is nec-
essary. Refer to "WORK FLOW".
NG >> Check harness, components and connections between the battery and the magnetic switch for poor continuity.
MINIMUM SPECIFICATION OF CRANKING VO LTAGE REFERENCING COOLANT TEMPERA-
TURE
Removal and Installation HR16DE INFOID:0000000004803454
Ignition switch in
START : Less than 1V1. Cylinder block 2. "B" terminal harness 3. "S" terminal harness
4. Starter motor Engine front