2009 MITSUBISHI ASX change time
[x] Cancel search: change timePage 110 of 368

2. This informs you that a periodic inspection is
due. We recommend you to consult a
MITSUBISHI MOTORS Authorized Service
Point.
At that time, when the ignition switch is
switched from the “LOCK” position to the
“ON” position or the operation mode is
changed from OFF to ON, the warning dis-
play is displayed for a few seconds on the in-
formation screen.
Type 1 Type 2
3. After
your vehicle is inspected at a
MITSUBISHI MOTORS Authorized Service
Point, it displays the time until the next peri-
odic inspection.
To reset
The “---” display can be reset while the ignition
switch or the opertion mode is in OFF. When the
display is reset, the time until the next periodic in-
spection is displayed and the warning display is no
longer displayed when the ignition switch is turned
from the “LOCK” position to the “ON” position or
the operation mode is changed from OFF to ON. 1. When
you lightly press the multi-informa-
tion meter switch a few times, the informa-
tion screen switches to the service reminder
display screen.
Type 1
Type 2 2. Press
and hold the multi-information meter
switch for about 2 seconds or more to dis-
play “ ”
and make it flash. (If there is no op-
eration for about 10 seconds with flashing,
the display returns to the previous screen.) 3. Lightly
press the multi-information meter
switch while the icon is flashing to change
the display from “---” to “CLEAR”. After
this, the time until the next periodic inspec-
tion will be displayed.
Type 1
Type 2 CAUTION
l
The
customer is responsible for making
sure that periodic inspection and mainte-
nance are performed. Inspections and
maintenance must be performed to pre-
vent accidents and malfunctions.
NOTE l “---”display
cannot be reset when the igni-
tion switch or the operation mode is in ON. Instruments and controls
3-16
3
Page 112 of 368

4. Select the item to change on the menu screen
and change to the desired setting. Refer to
the following items for further details on the
operation methods.
Refer to “Changing the reset mode for aver-
age fuel consumption and average speed” on
page 3-18.
Refer to “Changing the fuel consumption dis-
play unit” on page 3-19.
Refer to “Changing the temperature unit” on
page 3-20.
Refer to “Changing the display language” on
page 3-20.
Refer to “Changing the language cooperative
control” on page 3-21.
Refer to “Operation sound setting” on page
3-21.
Refer to “Changing the time until “REST RE-
MINDER” is displayed” on page 3-22.
Refer to “Changing the turn-signal sound”
on page 3-23.
Refer to “Changing the momentary fuel con-
sumption display” on page 3-23.
Refer to “Returning to the factory settings”
on page 3-23.
Changing the reset mode for average fuel con-
sumption and average speed E00522900601
The mode conditions for the average fuel consump-
tion
and average speed display can be switched be-
tween “Auto reset” and “Manual reset”. 1. Press
and hold the multi-information meter
switch for about 2 seconds or more to switch
from the setting mode screen to the menu
screen.
Refer to “Changing the function settings
(when the ignition switch or the operation
mode is ON)” on page 3-17.
2. Lightly press the multi-information meter switch to select “AVG” (average fuel con-
sumption and average speed setting).
Type 1
Type 2 3. Press
and hold the multi-information meter
switch for about 2 seconds or more to switch
in sequence from A (Auto reset mode) → M
(Manual reset mode) → A (Auto reset mode).
The setting is changed to the selected mode
condition. Manual reset mode
• When
the average fuel consumption and
average speed are being displayed, if you
hold down the multi-information meter
switch, the average fuel consumption and
average speed displayed at that time are
reset.
• When the following operation is per- formed, the mode setting is automatically
switched from manual to auto.
[Except for vehicles equipped with key-
less operation system]
Turn the ignition switch from the “ACC”
or “LOCK” position to the “ON” position.
[For vehicles equipped with the keyless
operation system] Change the operation
mode from ACC or OFF to ON.
Switching to auto occurs automatically.
If switching to manual mode is done, how-
ever, the data from the last reset is dis-
played.
Auto reset mode l When the average fuel consumption and aver-
age speed are being displayed, if you hold
down the multi-information meter switch,
the average fuel consumption and average
speed displayed at that time are reset. Instruments and controls
3-18
3
Page 115 of 368

4. Lightly press the multi-information meter
switch to switch in sequence from JAPA-
NESE → ENGLISH → GERMAN →
FRENCH → SPANISH → ITALIAN →
“---” (do not display warning message) → RE-
TURN → JAPANESE.
Type 1
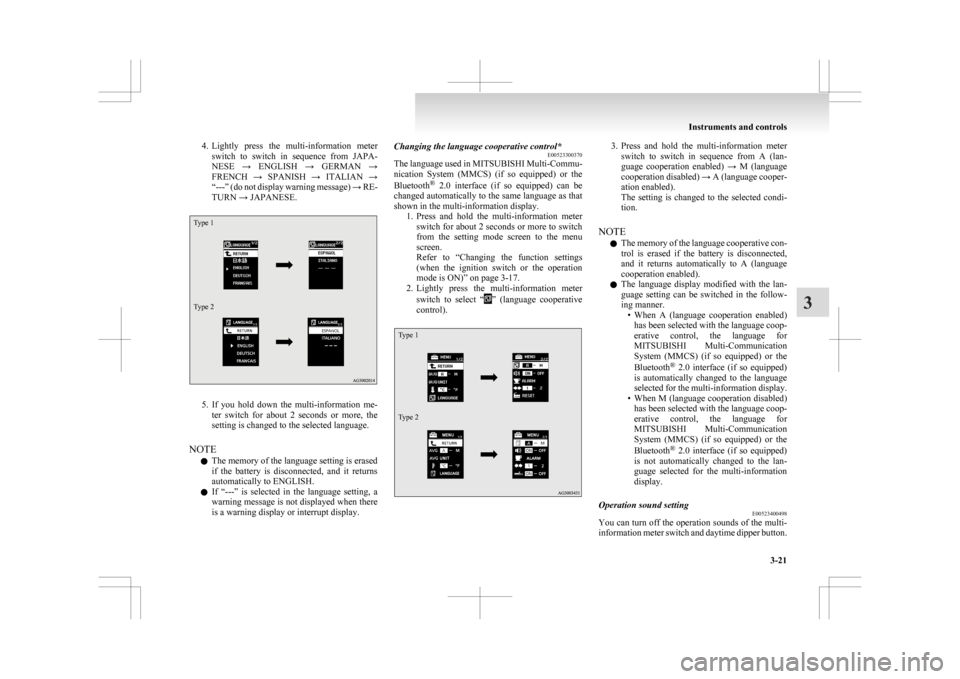
Type 2 5. If
you hold down the multi-information me-
ter switch for about 2 seconds or more, the
setting is changed to the selected language.
NOTE l The memory of the language setting is erased
if the battery is disconnected, and it returns
automatically to ENGLISH.
l If “---” is selected in the language setting, a
warning message is not displayed when there
is a warning display or interrupt display. Changing the language cooperative control*
E00523300370
The
language used in MITSUBISHI Multi-Commu-
nication System (MMCS) (if so equipped) or the
Bluetooth ®
2.0 interface (if so equipped) can be
changed automatically to the same language as that
shown in the multi-information display. 1. Press and hold the multi-information meterswitch for about 2 seconds or more to switch
from the setting mode screen to the menu
screen.
Refer to “Changing the function settings
(when the ignition switch or the operation
mode is ON)” on page 3-17.
2. Lightly press the multi-information meter
switch to select “ ”
(language cooperative
control).
Type 1
Type 2 3. Press
and hold the multi-information meter
switch to switch in sequence from A (lan-
guage cooperation enabled) → M (language
cooperation disabled) → A (language cooper-
ation enabled).
The setting is changed to the selected condi-
tion.
NOTE l The memory of the language cooperative con-
trol is erased if the battery is disconnected,
and it returns automatically to A (language
cooperation enabled).
l The language display modified with the lan-
guage setting can be switched in the follow-
ing manner.
• When A (language cooperation enabled)has been selected with the language coop-
erative control, the language for
MITSUBISHI Multi-Communication
System (MMCS) (if so equipped) or the
Bluetooth ®
2.0 interface (if so equipped)
is automatically changed to the language
selected for the multi-information display.
• When M (language cooperation disabled) has been selected with the language coop-
erative control, the language for
MITSUBISHI Multi-Communication
System (MMCS) (if so equipped) or the
Bluetooth ®
2.0 interface (if so equipped)
is not automatically changed to the lan-
guage selected for the multi-information
display.
Operation sound setting E00523400498
You can turn off the operation sounds of the multi-
information
meter switch and daytime dipper button. Instruments and controls
3-21 3
Page 116 of 368

1. Press and hold the multi-information meter
switch for about 2 seconds or more to switch
from the setting mode screen to the menu
screen.
Refer to “Changing the function settings
(when the ignition switch or the operation
mode is ON)” on page 3-17.
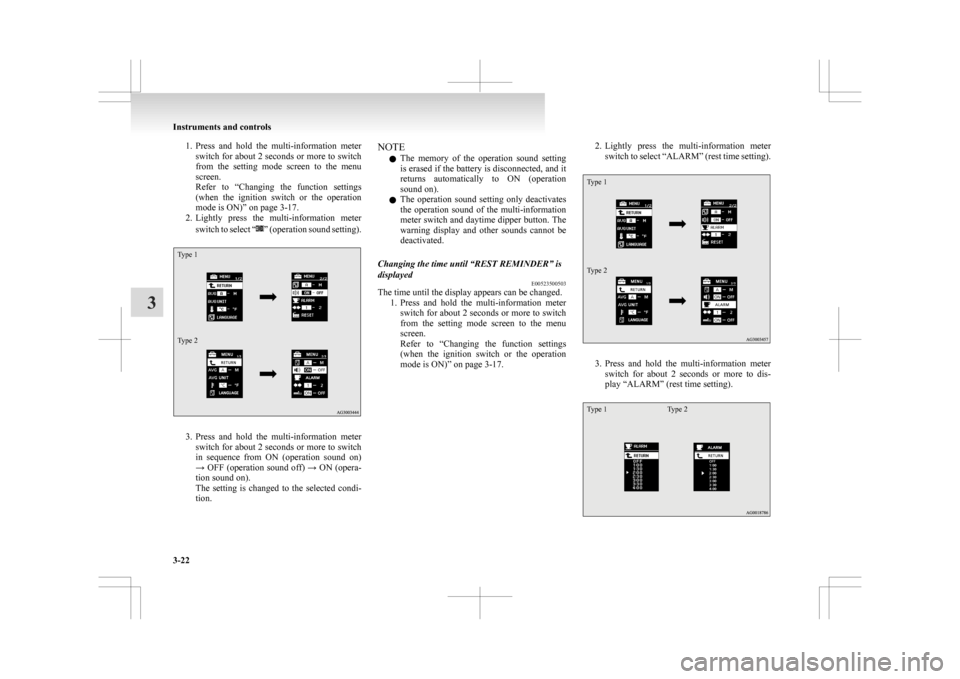
2. Lightly press the multi-information meter
switch to select “ ”
(operation sound setting).
Type 1
Type 2
3. Press
and hold the multi-information meter
switch for about 2 seconds or more to switch
in sequence from ON (operation sound on)
→ OFF (operation sound off) → ON (opera-
tion sound on).
The setting is changed to the selected condi-
tion. NOTE
l The
memory of the operation sound setting
is erased if the battery is disconnected, and it
returns automatically to ON (operation
sound on).
l The operation sound setting only deactivates
the operation sound of the multi-information
meter switch and daytime dipper button. The
warning display and other sounds cannot be
deactivated.
Changing the time until “REST REMINDER” is
displayed E00523500503
The time until the display appears can be changed.
1. Press
and hold the multi-information meter
switch for about 2 seconds or more to switch
from the setting mode screen to the menu
screen.
Refer to “Changing the function settings
(when the ignition switch or the operation
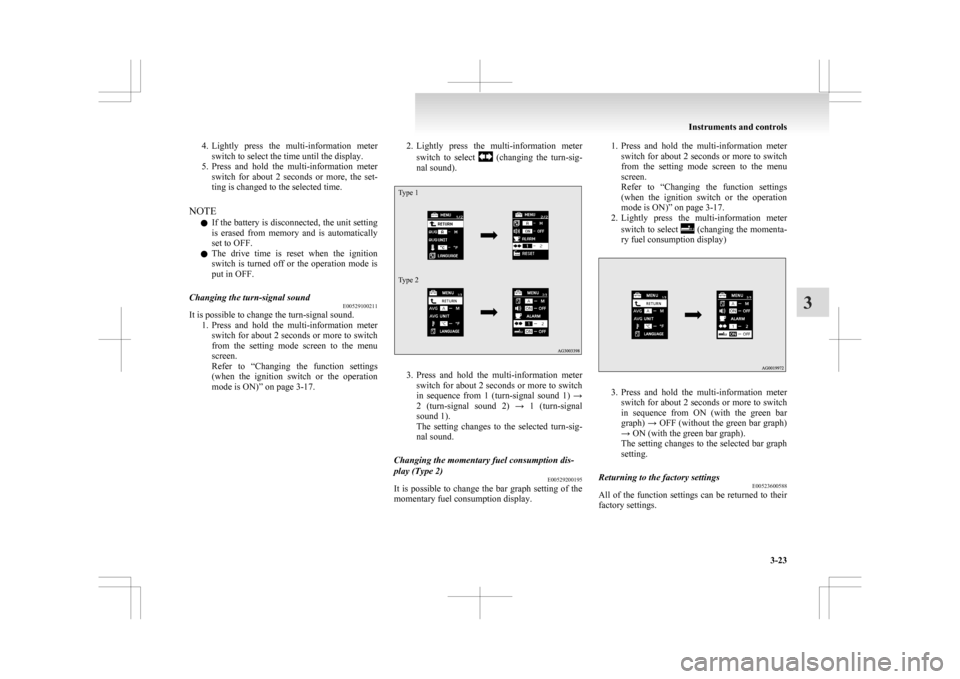
mode is ON)” on page 3-17. 2. Lightly
press the multi-information meter
switch to select “ALARM” (rest time setting).
Type 1
Type 2 3. Press
and hold the multi-information meter
switch for about 2 seconds or more to dis-
play “ALARM” (rest time setting).
Type 1 Type 2Instruments and controls
3-22
3
Page 117 of 368

4. Lightly press the multi-information meter
switch to select the time until the display.
5. Press and hold the multi-information meter switch for about 2 seconds or more, the set-
ting is changed to the selected time.
NOTE l If the battery is disconnected, the unit setting
is erased from memory and is automatically
set to OFF.
l The drive time is reset when the ignition
switch is turned off or the operation mode is
put in OFF.
Changing the turn-signal sound E00529100211
It is possible to change the turn-signal sound.
1. Press
and hold the multi-information meter
switch for about 2 seconds or more to switch
from the setting mode screen to the menu
screen.
Refer to “Changing the function settings
(when the ignition switch or the operation
mode is ON)” on page 3-17. 2. Lightly
press the multi-information meter
switch to select (changing the turn-sig-
nal sound).
Type 1
Type 2 3. Press
and hold the multi-information meter
switch for about 2 seconds or more to switch
in sequence from 1 (turn-signal sound 1) →
2 (turn-signal sound 2) → 1 (turn-signal
sound 1).
The setting changes to the selected turn-sig-
nal sound.
Changing the momentary fuel consumption dis-
play (Type 2) E00529200195
It is possible to change the bar graph setting of the
momentary fuel consumption display. 1. Press
and hold the multi-information meter
switch for about 2 seconds or more to switch
from the setting mode screen to the menu
screen.
Refer to “Changing the function settings
(when the ignition switch or the operation
mode is ON)” on page 3-17.
2. Lightly press the multi-information meter
switch to select (changing the momenta-
ry fuel consumption display) 3. Press
and hold the multi-information meter
switch for about 2 seconds or more to switch
in sequence from ON (with the green bar
graph) → OFF (without the green bar graph)
→ ON (with the green bar graph).
The setting changes to the selected bar graph
setting.
Returning to the factory settings E00523600588
All of the function settings can be returned to their
factory settings. Instruments and controls
3-23 3
Page 133 of 368

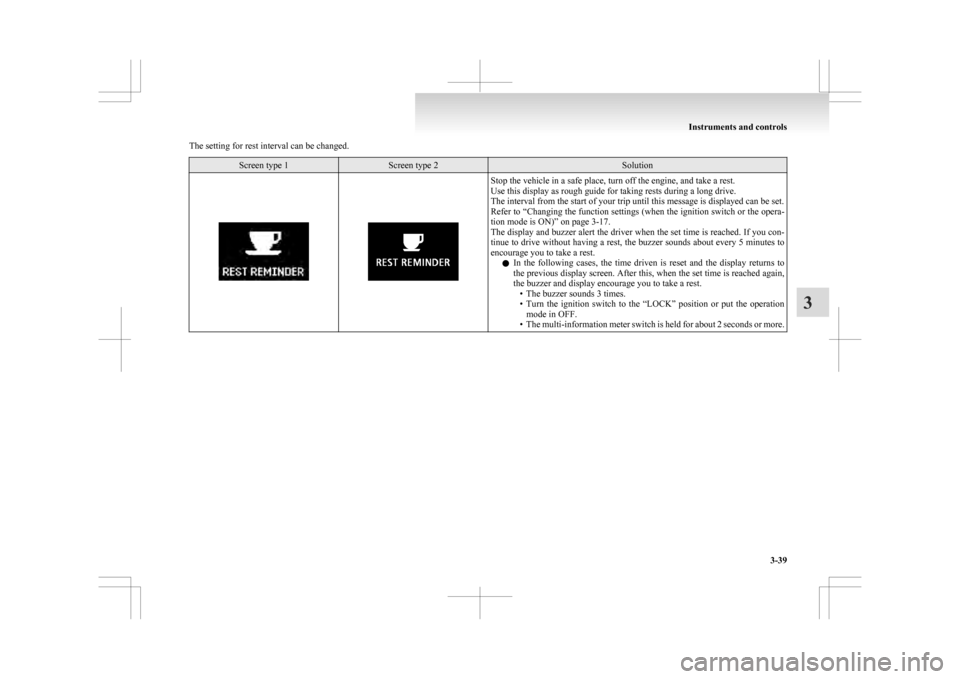
The setting for rest interval can be changed.
Screen type 1 Screen type 2 Solution
Stop the vehicle in a safe place, turn off the engine, and take a rest.
Use this display as rough guide for taking rests during a long drive.
The interval from the start of your trip until this message is displayed can be set.
Refer
to “Changing the function settings (when the ignition switch or the opera-
tion mode is ON)” on page 3-17.
The display and buzzer alert the driver when the set time is reached. If you con-
tinue to drive without having a rest, the buzzer sounds about every 5 minutes to
encourage you to take a rest.
l In the following cases, the time driven is reset and the display returns to
the previous display screen. After this, when the set time is reached again,
the buzzer and display encourage you to take a rest.
• The buzzer sounds 3 times.
• Turn the ignition switch to the “LOCK” position or put the operationmode in OFF.
• The multi-information meter switch is held for about 2 seconds or more. Instruments and controls
3-39 3
Page 141 of 368

Dipper (High/Low beam change)
E00506200329
When
the lamp switch is in the “ ”
position, the
beam changes from high to low (or low to high)
each time the lever is pulled fully (1). While the high-
beam is on, the high-beam indication lamp in the in-
strument cluster will also illuminate. Headlamp flasher
E00506300199
The high-beams flash when the lever is pulled slight-
ly (2), and will go off when it is released.
When
the high-beam is on, the high-beam indica-
tion lamp in the instrument cluster will illuminate.
NOTE
l The high-beams can also flash when the
lamp switch is OFF.
l If you turn the lamps off with the headlamps
set to high-beam, the headlamps are automat-
ically returned to their low-beam setting
when the lamp switch is next turned to the
“ ” position. Welcome light*
E00528900254
This
function turns on the position and tail lamps
for about 30 seconds after the UNLOCK switch
(A) on the remote control transmitter is pressed
when the combination headlamps and dipper
switch is in the “OFF” or “AUTO” position (for ve-
hicles equipped with the automatic lamp control).
On vehicles equipped with automatic lamp control,
the welcome light function will operate only when
it is dark outside the vehicle. NOTE
l While
the welcome light function is operat-
ing, perform one of the following operations
to cancel the function. • Push the LOCK switch (B) on the remotecontrol transmitter. • Turn the combination headlamps and dip-
per switch to the “ ” or “ ” position.
• Turn
the ignition switch to the “ON” po-
sition or put the operation mode in ON.
l It is possible to modify functions as follows:
• The headlamps can be set to come on inthe low beam setting instead of the posi-
tion and tail lamps.
• The welcome light function can be deacti- vated.
For further information, please contact
your MITSUBISHI MOTORS Author-
ized Service Point.
On vehicles equipped with MITSUBISHI
Multi-Communication System (MMCS),
screen operations can be used to make
the adjustment. Refer to the separate own-
er’s manual for details.
Coming home light E00529000236
This function turns on the headlamps in the low
beam
setting for about 30 seconds after the ignition
switch is turned to the “OFF” position or the opera-
tion mode is put in OFF. Instruments and controls
3-47 3
Page 142 of 368

1. Turn the combination headlamps and dipper
switch to the “OFF” or “AUTO” position
(for vehicles equipped with the automatic
lamp control).
2. Turn the ignition switch to the “LOCK” posi- tion or put the operation mode in OFF. Also,
if a key was used to start the engine, remove
the key from the ignition switch.
3. Within 60 seconds of turning the ignition switch to the “OFF” position or putting the
operation mode in OFF, pull the turn signal
lever towards you. 4. The
headlamps will come on in the low
beam setting for about 30 seconds. After the
headlamps go off, the headlamps can be
turned on again in the low beam setting for
about 30 seconds by pulling the turn signal
lever towards you within 60 seconds of turn-
ing the ignition switch to the “OFF” position
or putting the operation mode in OFF.
To turn on the headlamps again after 60 sec-
onds of turning the ignition switch to the
“OFF” position or putting the operation
mode in OFF, repeat the process from step 1. NOTE
l While
the coming home light function is op-
erating, perform one of the following opera-
tions to cancel the function. • Pull the lever towards you.
• Turn the combination headlamps and dip-
per switch to the “ ” or “ ” position.
• Turn
the ignition switch to the “ON” po-
sition or put the operation mode in ON.
l It is possible to modify functions as follows:
• The time that the headlamps remain oncan be changed.
• The coming home light function can be deactivated.
For further information, please contact your
MITSUBISHI MOTORS Authorized Service
Point.
On vehicles equipped with MITSUBISHI
Multi-Communication System (MMCS),
screen operations can be used to make the ad-
justment. Refer to the separate owner’s man-
ual for details. Headlamp levelling
E00517400031
Headlamp levelling switch (except for
vehicles with discharge headlamps) E00517500465
The angle of the headlamp beam varies depending
on the load carried by the vehicle.
The
headlamp levelling switch can be used to ad-
just the headlamp illumination distance (when the
lower beam is illuminated) so that the headlamps’
glare does not distract other drivers.
Set the switch according to the following table. CAUTION
l
Always
perform adjustments before driv-
ing.
Do not attempt to adjust while driving, as
it could cause an accident. Instruments and controls
3-48
3