2009 MITSUBISHI ASX change time
[x] Cancel search: change timePage 52 of 368
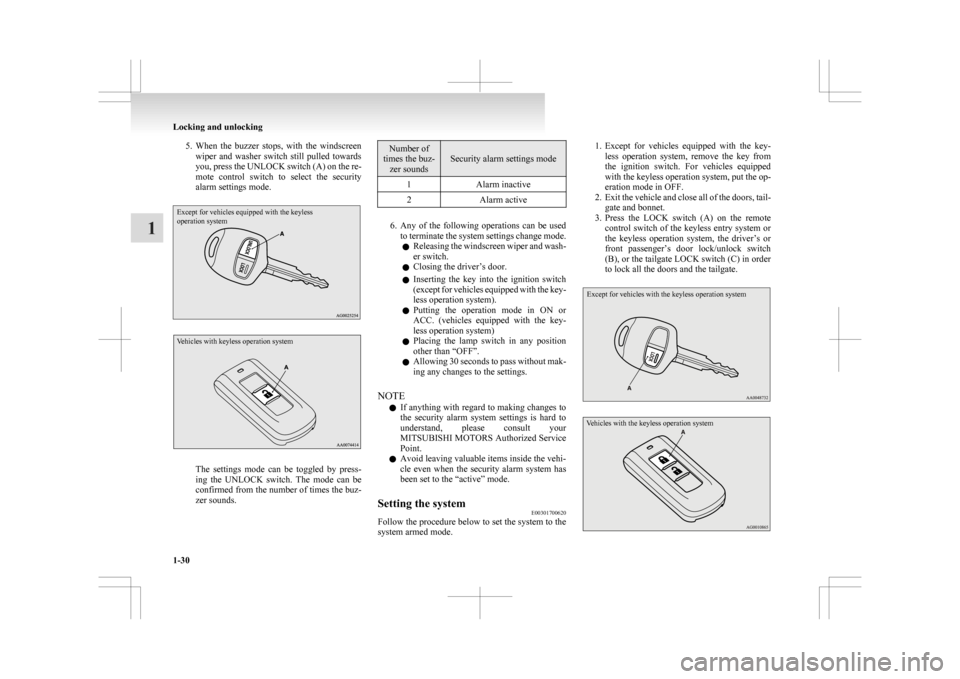
5. When the buzzer stops, with the windscreen
wiper and washer switch still pulled towards
you, press the UNLOCK switch (A) on the re-
mote control switch to select the security
alarm settings mode.
Except for vehicles equipped with the keyless
operation system
Vehicles with keyless operation system The settings mode can be toggled by press-
ing
the UNLOCK switch. The mode can be
confirmed from the number of times the buz-
zer sounds. Number of
times the buz- zer sounds Security alarm settings mode
1 Alarm inactive
2 Alarm active 6. Any
of the following operations can be used
to terminate the system settings change mode.
l Releasing the windscreen wiper and wash-
er switch.
l Closing the driver’s door.
l Inserting the key into the ignition switch
(except for vehicles equipped with the key-
less operation system).
l Putting the operation mode in ON or
ACC. (vehicles equipped with the key-
less operation system)
l Placing the lamp switch in any position
other than “OFF”.
l Allowing 30 seconds to pass without mak-
ing any changes to the settings.
NOTE l If anything with regard to making changes to
the security alarm system settings is hard to
understand, please consult your
MITSUBISHI MOTORS Authorized Service
Point.
l Avoid leaving valuable items inside the vehi-
cle even when the security alarm system has
been set to the “active” mode.
Setting the system E00301700620
Follow the procedure below to set the system to the
system armed mode. 1. Except
for vehicles equipped with the key-
less operation system, remove the key from
the ignition switch. For vehicles equipped
with the keyless operation system, put the op-
eration mode in OFF.
2. Exit the vehicle and close all of the doors, tail- gate and bonnet.
3. Press the LOCK switch (A) on the remote control switch of the keyless entry system or
the keyless operation system, the driver’s or
front passenger’s door lock/unlock switch
(B), or the tailgate LOCK switch (C) in order
to lock all the doors and the tailgate.
Except for vehicles with the keyless operation system
Vehicles with the keyless operation system Locking and unlocking
1-30
1
Page 67 of 368
CAUTION
l
Be careful not to catch your hands or feet
when arranging the seat. Personal injury
could result.
Folding the rear seatbacks forward E00403500492
The passenger and luggage compartments can be
joined
by folding the seatback forward. This is use-
ful for carrying long objects.
The seatbacks can be folded with the rear seat re-
lease button.
NOTE
l The seatbacks can be folded one side at a time.
To fold the seatbacks
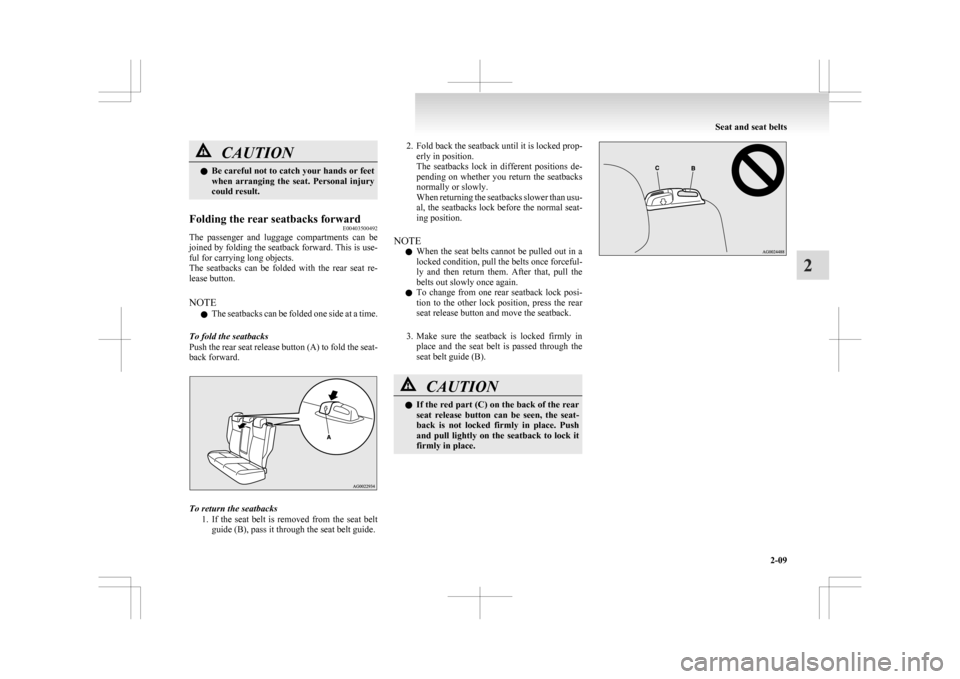
Push the rear seat release button (A) to fold the seat-
back forward. To return the seatbacks
1. If
the seat belt is removed from the seat belt
guide (B), pass it through the seat belt guide. 2. Fold
back the seatback until it is locked prop-
erly in position.
The seatbacks lock in different positions de-
pending on whether you return the seatbacks
normally or slowly.
When returning the seatbacks slower than usu-
al, the seatbacks lock before the normal seat-
ing position.
NOTE l When the seat belts cannot be pulled out in a
locked condition, pull the belts once forceful-
ly and then return them. After that, pull the
belts out slowly once again.
l To change from one rear seatback lock posi-
tion to the other lock position, press the rear
seat release button and move the seatback.
3. Make sure the seatback is locked firmly in place and the seat belt is passed through the
seat belt guide (B). CAUTION
l
If
the red part (C) on the back of the rear
seat release button can be seen, the seat-
back is not locked firmly in place. Push
and pull lightly on the seatback to lock it
firmly in place. Seat and seat belts
2-09 2
Page 96 of 368
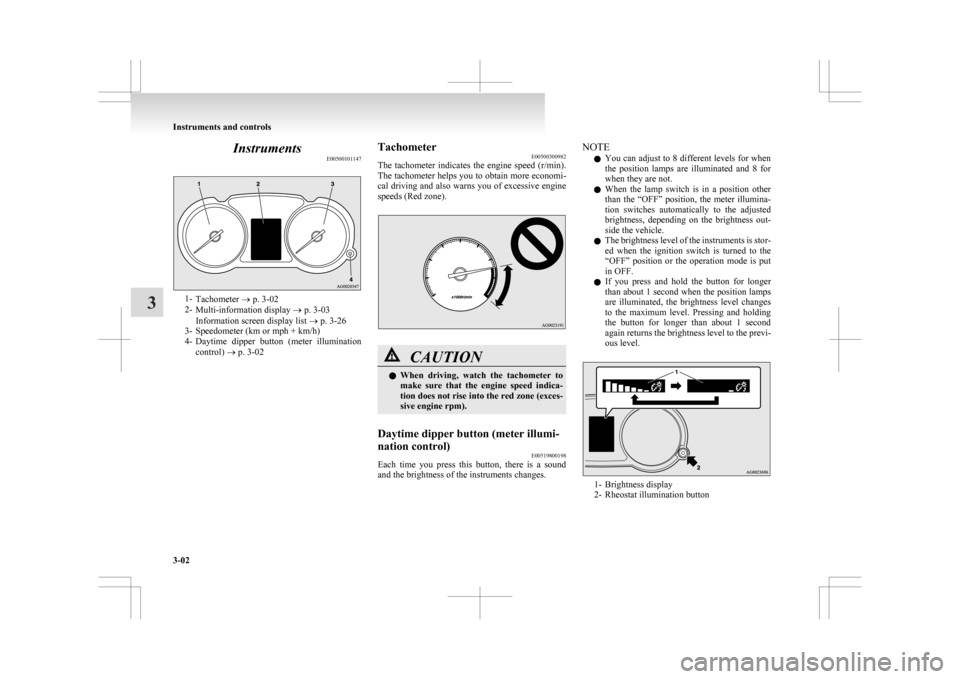
Instruments
E005001011471-
Tachometer ® p. 3-02
2- Multi-information display ® p. 3-03
Information screen display list ® p. 3-26
3- Speedometer (km or mph + km/h)
4- Daytime dipper button (meter illumination
control) ® p. 3-02 Tachometer
E00500300982
The
tachometer indicates the engine speed (r/min).
The tachometer helps you to obtain more economi-
cal driving and also warns you of excessive engine
speeds (Red zone). CAUTION
l
When
driving, watch the tachometer to
make sure that the engine speed indica-
tion does not rise into the red zone (exces-
sive engine rpm).
Daytime dipper button (meter illumi-
nation control) E00519800198
Each time you press this button, there is a sound
and the brightness of the instruments changes. NOTE
l You
can adjust to 8 different levels for when
the position lamps are illuminated and 8 for
when they are not.
l When the lamp switch is in a position other
than the “OFF” position, the meter illumina-
tion switches automatically to the adjusted
brightness, depending on the brightness out-
side the vehicle.
l The brightness level of the instruments is stor-
ed when the ignition switch is turned to the
“OFF” position or the operation mode is put
in OFF.
l If you press and hold the button for longer
than about 1 second when the position lamps
are illuminated, the brightness level changes
to the maximum level. Pressing and holding
the button for longer than about 1 second
again returns the brightness level to the previ-
ous level. 1- Brightness display
2-
Rheostat illumination button Instruments and controls
3-02
3
Page 99 of 368
Multi-information meter switch
E00520000608
Each
time the multi-information meter switch is op-
erated, a sound is emitted and the multi-informa-
tion display changes between information such as
warnings, odometer (Type 1), tripmeter, service re-
minder, engine coolant temperature (Type 1), aver-
age and momentary fuel consumption, driving
range, and average speed.
It is also possible to change elements such as the
language and units used on the multi-information
display by operating the multi-information meter
switch. mark display screen (when
the ignition switch or the oper-
ation mode is OFF) E00520100553
If
you press the multi-information meter
switch and return from the warning dis-
play screen to the previous screen, the mark is displayed.
Refer
to “To return to the screen dis-
played before the warning display” on
page 3-06. This mark is also displayed if there is an-
other
warning other than the one dis-
played. When the cause of the warning
display is eliminated, the mark goes
out automatically.
NOTE
l When
the mark is displayed,
the
warning display screen can be
redisplayed on the information
screen.
Refer to “Information screen
(when the ignition switch or the op-
eration mode is OFF)” on page
3-05.
Refer to “Information screen
(when the ignition switch or the op-
eration mode is ON)” on page
3-09. Information screen (when the ignition
switch or the operation mode is OFF)
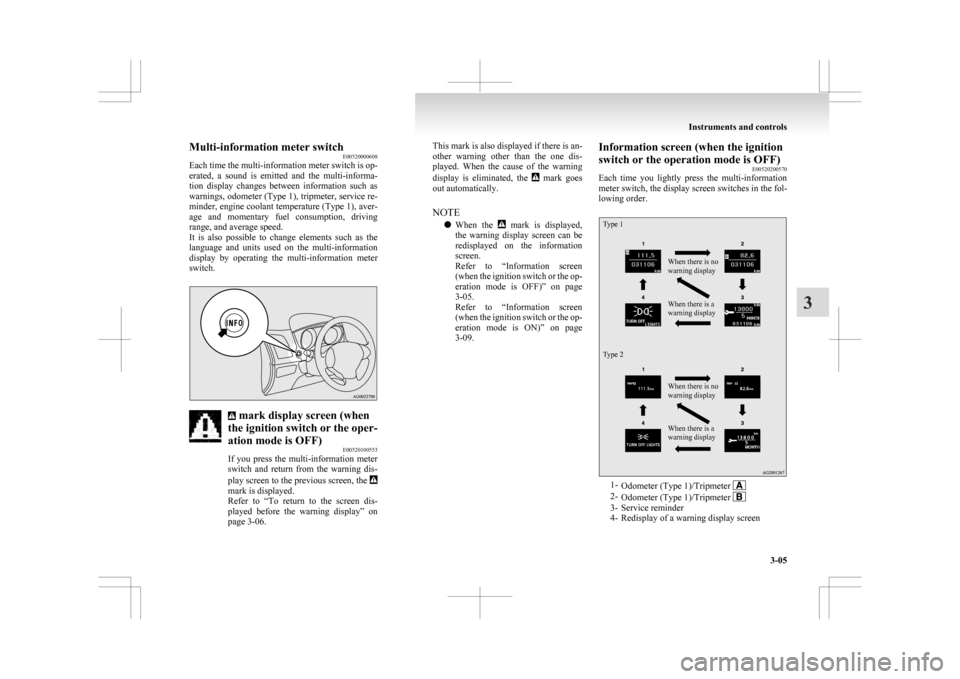
E00520200570
Each
time you lightly press the multi-information
meter switch, the display screen switches in the fol-
lowing order.
Type 1
Type 2 When there is no
warning display
When there is a
warning display
When there is no
warning display
When there is a
warning display
1-
Odometer (Type 1)/Tripmeter 2-
Odometer (Type 1)/Tripmeter 3- Service reminder
4-
Redisplay of a warning display screen Instruments and controls
3-05 3
Page 102 of 368
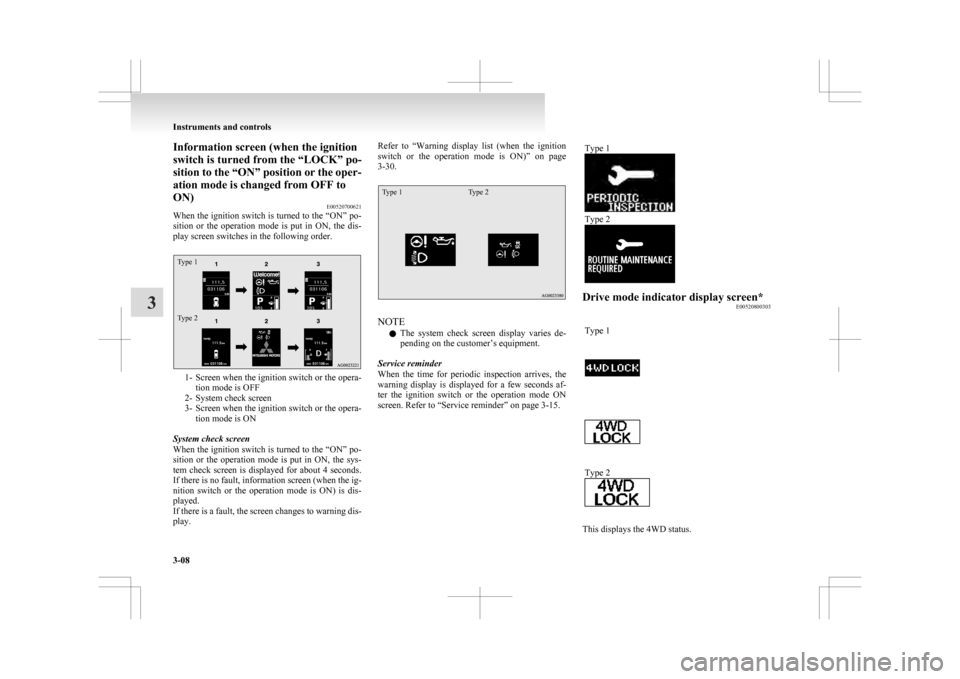
Information screen (when the ignition
switch is turned from the “LOCK” po-
sition
to the “ON” position or the oper-
ation mode is changed from OFF to
ON) E00520700621
When the ignition switch is turned to the “ON” po-
sition or the operation mode is put in ON, the dis-
play screen switches in the following order.
Type 1
Type 2 1- Screen when the ignition switch or the opera-
tion mode is OFF
2-
System check screen
3- Screen when the ignition switch or the opera- tion mode is ON
System check screen
When the ignition switch is turned to the “ON” po-
sition or the operation mode is put in ON, the sys-
tem check screen is displayed for about 4 seconds.
If there is no fault, information screen (when the ig-
nition switch or the operation mode is ON) is dis-
played.
If there is a fault, the screen changes to warning dis-
play. Refer to “Warning
display list (when the ignition
switch or the operation mode is ON)” on page
3-30.
Type 1 Type 2 NOTE
l The
system check screen display varies de-
pending on the customer’s equipment.
Service reminder
When the time for periodic inspection arrives, the
warning display is displayed for a few seconds af-
ter the ignition switch or the operation mode ON
screen. Refer to “Service reminder” on page 3-15. Type 1 Type 2
Drive mode indicator display screen*
E00520800303
Type 1 Type 2
This displays the 4WD status.Instruments and controls
3-08
3
Page 105 of 368

Refuel as soon as possible.Type 1
Type 2NOTE
l The
driving range is determined based on the
fuel consumption data. This may vary depend-
ing on the driving conditions and habits.
Treat the distance displayed as just a rough
guideline.
l When you refuel, the driving range display is
updated.
However, if you only add a small amount of
fuel, the correct value will not be displayed.
Fill with a full tank whenever possible.
l On rare occasions, the value displayed for
the driving range may change if you are
parked on an extremely steep incline. This is
due to the movement of fuel in the tank and
does not indicate a malfunction. l
The
display setting can be changed to the pre-
ferred units (km or miles). Refer to “Chang-
ing the function settings (when the ignition
switch or the operation mode is ON)” on
page 3-17.
Average speed display E00521600656
This displays the average speed from the last reset
to the present time.
There are the following 2 mode settings.
For
the method for changing the average speed dis-
play setting, refer to “Changing the function set-
tings (when the ignition switch or the operation
mode is ON)” on page 3-17.
Type 1 Type 2 Manual reset mode
l When
the average speed is being displayed,
if you hold down the multi-information me-
ter switch, the average speed displayed at
that time is reset. l
When
the following operation is performed,
the mode setting is automatically switched
from manual to auto.
[Except for vehicles equipped with keyless
operation system]
Turn the ignition switch from the “ACC” or
“LOCK” position to the “ON” position.
[For vehicles equipped with keyless opera-
tion system]
Change the operation mode from ACC or
OFF to ON.
Switching to auto occurs automatically. If
switching to manual mode is done, however,
the data from the last reset is displayed.
Auto reset mode l When the average speed is being displayed,
if you hold down the multi-information me-
ter switch, the average speed displayed at
that time is reset.
l When the engine switch or the operation
mode is in the following conditions, the aver-
age speed display is automatically reset.
[Except for vehicles equipped with keyless
operation system]
The ignition switch is in the “ACC” or
“LOCK” position for about 4 hours or longer.
[For vehicles equipped with keyless opera-
tion system]
The operation mode is in ACC or OFF for
about 4 hours or longer. Instruments and controls
3-11 3
Page 106 of 368

NOTE
l The
average speed display and the average
fuel consumption display can be reset individ-
ually for the auto reset mode and manual re-
set mode.
l “---” is displayed when the average speed can-
not be measured.
l The initial (default) setting is “Auto reset
mode”.
l The display setting can be changed to the pre-
ferred units (km/h or mph).
Refer to “Changing the function settings
(when the ignition switch or the operation
mode is ON)” on page 3-17.
l The memory of the auto reset mode or man-
ual reset mode for the average speed display
is erased if the battery is disconnected.
Average fuel consumption display E00521700628
This displays the average fuel consumption from
the last reset to the present time.
There are the following 2 mode settings. For information on how to change the average fuel
consumption
display setting, refer to “Changing
the function settings (when the ignition switch or
the operation mode is ON)” on page 3-17.
Type 1 Type 2 The “ ”
mark (A) in the momentary fuel gauge
shows the average fuel consumption. (Type 2)
Manual reset mode
l When the average fuel consumption is being
displayed, if you hold down the multi-infor-
mation meter switch, the average fuel con-
sumption displayed at that time is reset. l
When
the following operation is performed,
the mode setting is automatically switched
from manual to auto.
[Except for vehicles equipped with keyless
operation system]
Turn the ignition switch from the “ACC” or
“LOCK” position to the “ON” position.
[For vehicles equipped with keyless opera-
tion system]
Change the operation mode from ACC or
OFF to ON.
Switching to auto occurs automatically. If
switching to manual mode is done, however,
the data from the last reset is displayed.
Auto reset mode l When the average fuel consumption is being
displayed, if you hold down the multi-infor-
mation meter switch, the average fuel con-
sumption displayed at that time is reset.
l When the engine switch or the operation
mode is in the following conditions, the aver-
age fuel consumption display is automatical-
ly reset.
[Except for vehicles equipped with keyless
operation system]
The ignition switch is in the “ACC” or
“LOCK” position for about 4 hours or longer.
[For vehicles equipped with keyless opera-
tion system]
The operation mode is in ACC or OFF for
about 4 hours or longer. Instruments and controls
3-12
3
Page 108 of 368
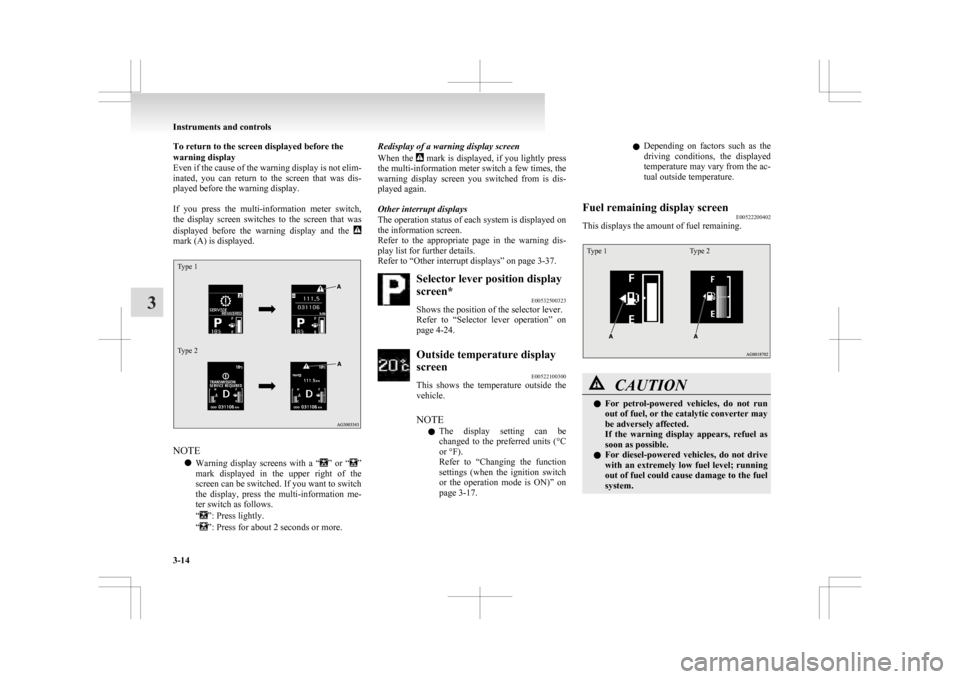
To return to the screen displayed before the
warning display
Even
if the cause of the warning display is not elim-
inated, you can return to the screen that was dis-
played before the warning display.
If you press the multi-information meter switch,
the display screen switches to the screen that was
displayed before the warning display and the mark (A) is displayed.
Type 1
Type 2
NOTE
l Warning
display screens with a “ ”
or “ ”
mark
displayed in the upper right of the
screen can be switched. If you want to switch
the display, press the multi-information me-
ter switch as follows.
“ ”: Press lightly.
“ ”: Press for about 2 seconds or more. Redisplay of a warning display screen
When
the mark is displayed, if you lightly press
the
multi-information meter switch a few times, the
warning display screen you switched from is dis-
played again.
Other interrupt displays
The operation status of each system is displayed on
the information screen.
Refer to the appropriate page in the warning dis-
play list for further details.
Refer to “Other interrupt displays” on page 3-37. Selector lever position display
screen*
E00532500323
Shows the position of the selector lever.
Refer
to “Selector lever operation” on
page 4-24. Outside temperature display
screen
E00522100300
This
shows the temperature outside the
vehicle.
NOTE
l The display setting can be
changed to the preferred units (°C
or °F).
Refer to “Changing the function
settings (when the ignition switch
or the operation mode is ON)” on
page 3-17. l
Depending
on factors such as the
driving conditions, the displayed
temperature may vary from the ac-
tual outside temperature.
Fuel remaining display screen E00522200402
This displays the amount of fuel remaining.
Type 1 Type 2 CAUTION
l
For
petrol-powered vehicles, do not run
out of fuel, or the catalytic converter may
be adversely affected.
If the warning display appears, refuel as
soon as possible.
l For diesel-powered vehicles, do not drive
with an extremely low fuel level; running
out of fuel could cause damage to the fuel
system. Instruments and controls
3-14
3