2009 MITSUBISHI ASX brake light
[x] Cancel search: brake lightPage 4 of 368
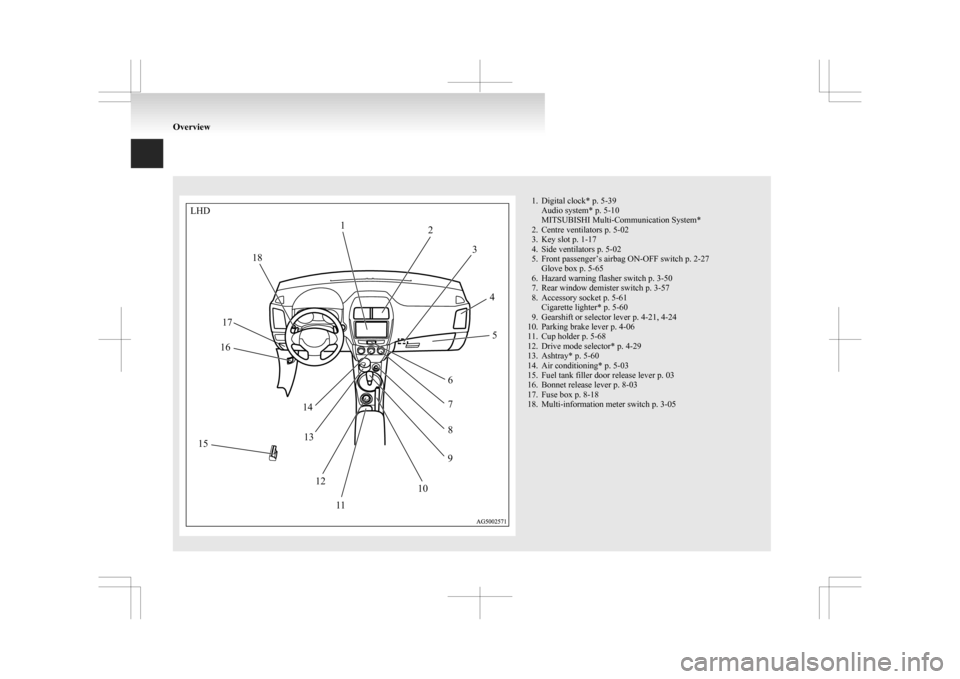
1. Digital clock* p. 5-39
Audio system* p. 5-10
MITSUBISHI Multi-Communication System*
2.
Centre ventilators p. 5-02
3. Key slot p. 1-17
4. Side ventilators p. 5-02
5. Front passenger’s airbag ON-OFF switch p. 2-27 Glove box p. 5-65
6. Hazard warning flasher switch p. 3-50
7. Rear window demister switch p. 3-57
8. Accessory socket p. 5-61 Cigarette lighter* p. 5-60
9. Gearshift or selector lever p. 4-21, 4-24
10. Parking brake lever p. 4-06
11. Cup holder p. 5-68
12. Drive mode selector* p. 4-29
13. Ashtray* p. 5-60
14. Air conditioning* p. 5-03
15. Fuel tank filler door release lever p. 03
16. Bonnet release lever p. 8-03
17. Fuse box p. 8-18
18. Multi-information meter switch p. 3-05 OverviewLHD
12
3
45
6 7
8
9
10
1
1
12
13
14
15 16
17 18
Page 37 of 368
NOTE
l When
the following operation is performed
with the operation mode in OFF, the steering
wheel is locked. • Open or close one of the doors (exceptthe tailgate).
• Lock all doors and the tailgate with the keyless entry system or the keyless opera-
tion function.
l When the steering wheel does not unlock,
the warning will be displayed on the informa-
tion screen in the multi-information display.
Press the engine switch again while moving
the steering wheel slightly. Starting and stopping the engine
E00306900395
Tips for starting l The
operation mode can be in any mode to
start the engine. l
The
starter motor will be turning for up to ap-
proximately 15 seconds if the engine switch
is released at once. Pressing the engine
switch again while the starter motor is still
turning will stop the starter motor. The start-
er motor will be turning for up to approxi-
mately 30 seconds while the engine switch is
pressed.
If the engine does not start, wait for a while
and then attempt to start the engine again. Try-
ing repeatedly with the starter motor still run-
ning will damage the starter mechanism.
l [Diesel-powered vehicles]
While the vehicle is stationary with the
clutch pedal fully depressed, the engine revo-
lutions do not rise to over 3,000 rpm in order
to protect the engine even if the accelerator
pedal is depressed. WARNING
l Never
run the engine in a closed or poor-
ly ventilated area any longer than is nee-
ded to move your vehicle in or out of the
area. Carbon monoxide gases are odour-
less and can be fatal. CAUTION
l
Never
attempt to start the engine by push-
ing or pulling the vehicle.
l Do not run the engine at high rpm or
drive the vehicle at high speed until the en-
gine has had a chance to warm up. Starting the engine (petrol-powered vehicles)
E00307000478
The starting procedure is as follows:
1.
Fasten the seat belt.
2. Make sure the parking brake is applied.
3. Depress and hold the brake pedal.
4. Fully depress the clutch pedal (M/T).
NOTE l On vehicles with the Auto Stop & Go
(AS&G) system, the starter will not operate
unless the clutch pedal is fully depressed
(Clutch interlock).
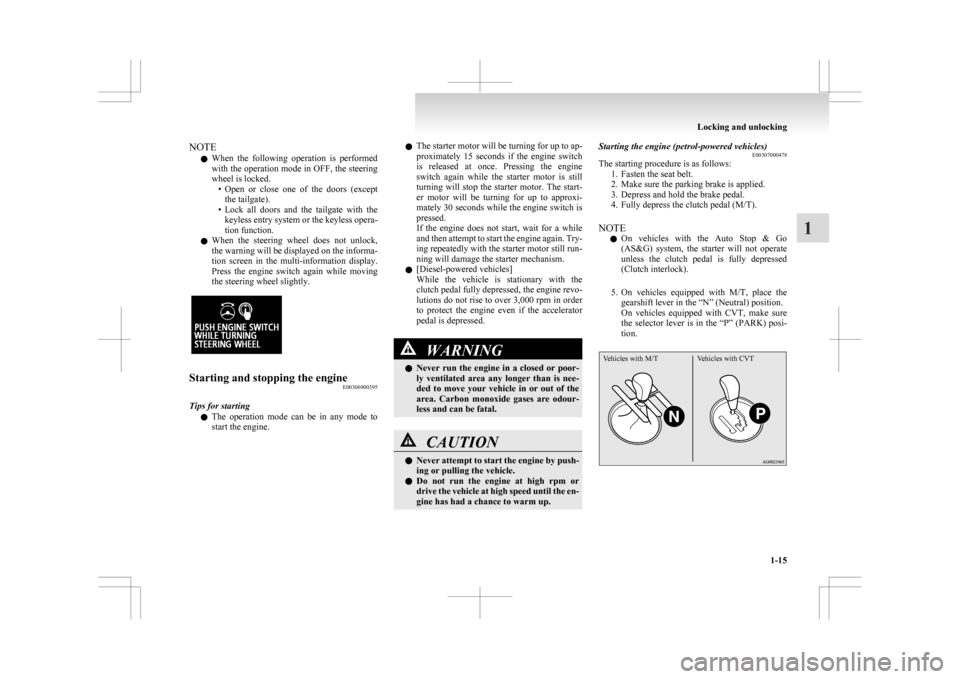
5. On vehicles equipped with M/T, place the gearshift lever in the “N” (Neutral) position.
On vehicles equipped with CVT, make sure
the selector lever is in the “P” (PARK) posi-
tion.
Vehicles with M/T Vehicles with CVT Locking and unlocking
1-15 1
Page 111 of 368

l
When “---” is displayed, after a certain dis-
tance and a certain period of time, the dis-
play is reset and the time until the next peri-
odic inspection is displayed.
l If you accidentally reset the display, we rec-
ommend you to consult a MITSUBISHI
MOTORS Authorized Service Point.
Door ajar warning display screen
(when the ignition switch or the opera-
tion mode is ON) E00522600565
Type 1 Type 2
If any of the doors or the tailgate is not completely
closed, this displays the open door or tailgate.
If
the vehicle speed exceeds approximately 8 km/h
(5 mph) while a door is ajar, a buzzer sounds 4
times. This notifies the driver that a door is ajar. CAUTION
l
Before
moving your vehicle, check that
the warning lamp is OFF.
Changing the function settings (when
the ignition switch or the operation
mode is ON) E00522700348
1. Stop the vehicle in a safe place.
Firmly
apply the parking brake and put the
gearshift lever into the “N” (Neutral) posi-
tion (M/T) or the selector lever into the “P”
(PARK) position (CVT).
2. Lightly press the multi-information meter switch a few times to switch the information
screen to the function setting screen.
Refer to “Information screen (when the igni-
tion switch or the operation mode is ON)” on
page 3-09.
Type 1 Type 2 CAUTION
l
For
safety, stop the vehicle before operat-
ing.
While driving, even if you operate the mul-
ti-information meter switch, the function
setting screen is not displayed.
3. Press
and hold the multi-information meter switch for about 2 seconds or more to switch
from the setting mode screen to the menu
screen.
Type 1
Type 2 NOTE
l To
return the menu screen to the function set-
ting screen, press and hold the multi-informa-
tion meter switch for about 2 seconds or more.
l If no operations are made within about 15 sec-
onds of the menu screen being displayed, the
display returns to the function setting screen. Instruments and controls
3-17 3
Page 154 of 368

Economical driving
E00600101076
For
economical driving, there are some technical re-
quirements that have to be met. The prerequisite
for low fuel consumption is a properly adjusted en-
gine. In order to achieve longer life of the vehicle
and the most economical operation, we recommend
you to have the vehicle checked at regular intervals
in accordance with the service standards.
Fuel economy and generation of exhaust gas and
noise are highly influenced by personal driving hab-
its as well as the particular operating conditions.
The following points should be observed in order
to minimize wear of brakes, tyres and engine as
well as to reduce environmental pollution.
Starting the engine
Avoid sudden acceleration and sudden starts, as
they will increase fuel consumption.
Shifting
Shift only at an appropriate speed and engine
speed. Always use the highest shift position possible.
Selecting the 4WD drive mode (4WD
vehicles)
The drive mode-selector should be set to “2WD”
when driving on normal roads and express ways to
obtain best possible fuel economy.
City traffic
Frequent starting and stopping increases the aver-
age fuel consumption. Use roads with smooth traf-
fic flow whenever possible. When driving on con-
gested roads, avoid use of a low shift position at
high engine speeds. Idling
The
vehicle consumes fuel even during idling.
Avoid extended idling whenever possible.
Speed
At higher vehicle speed, more fuel is consumed.
Avoid driving at full speed. Even a slight release of
the accelerator pedal will save a significant amount
of fuel.
Tyre inflation pressure
Check the tyre inflation pressures at regular inter-
vals. Low tyre inflation pressure increases road re-
sistance and fuel consumption. In addition, low
tyre pressures adversely affect tyre wear and driv-
ing stability.
Cargo loads
Do not drive with unnecessary articles in the lug-
gage compartment. Especially during city driving
where frequent starting and stopping is necessary,
the increased weight of the vehicle will greatly af-
fect fuel consumption. Also avoid driving with un-
necessary luggage or carriers, etc., on the roof; the
increased air resistance will increase fuel consump-
tion.
Cold engine starting
Starting of a cold engine consumes more fuel.
Unnecessary fuel consumption is also caused by
keeping a hot engine running. After the engine is
started, commence driving as soon as possible.
Air conditioning
The use of the air conditioning will increase the
fuel consumption. Driving, alcohol and drugs
E00600200070
Driving
after drinking alcohol is one of the most fre-
quent causes of accidents.
Your driving ability can be seriously impaired even
with blood alcohol levels far below the legal mini-
mum. If you have been drinking, don’t drive. Ride
with a designated non-drinking driver, call a cab or
a friend, or use public transportation.
Drinking coffee or taking a cold shower will not
make you sober.
Similarly, prescription and nonprescription drugs af-
fect your alertness, perception and reaction time.
Consult with your doctor or pharmacist before driv-
ing while under the influence of any of these medi-
cations. WARNING
l NEVER DRINK AND DRIVE.
Your
perceptions are less accurate, your
reflexes are slower and your judgment is
impaired. Starting and driving
4-02
4
Page 158 of 368
Parking brake
E00600501243
To
park the vehicle, first bring it to a complete
stop, fully engage the parking brake.
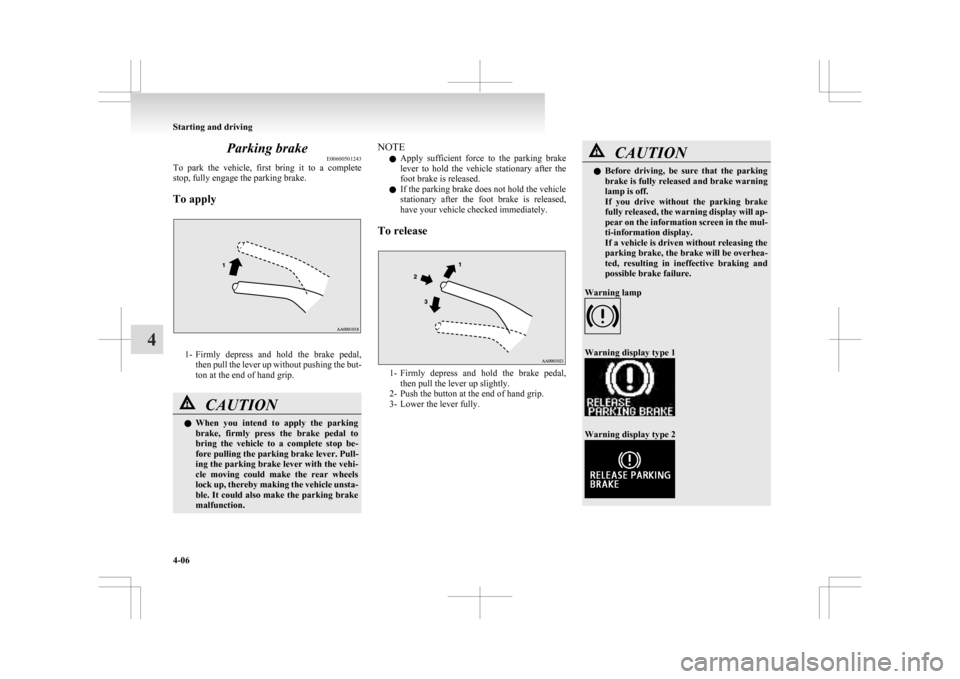
To apply 1- Firmly
depress and hold the brake pedal,
then pull the lever up without pushing the but-
ton at the end of hand grip. CAUTION
l
When
you intend to apply the parking
brake, firmly press the brake pedal to
bring the vehicle to a complete stop be-
fore pulling the parking brake lever. Pull-
ing the parking brake lever with the vehi-
cle moving could make the rear wheels
lock up, thereby making the vehicle unsta-
ble. It could also make the parking brake
malfunction. NOTE
l Apply
sufficient force to the parking brake
lever to hold the vehicle stationary after the
foot brake is released.
l If the parking brake does not hold the vehicle
stationary after the foot brake is released,
have your vehicle checked immediately.
To release 1- Firmly
depress and hold the brake pedal,
then pull the lever up slightly.
2- Push the button at the end of hand grip.
3- Lower the lever fully. CAUTION
l
Before
driving, be sure that the parking
brake is fully released and brake warning
lamp is off.
If you drive without the parking brake
fully released, the warning display will ap-
pear on the information screen in the mul-
ti-information display.
If a vehicle is driven without releasing the
parking brake, the brake will be overhea-
ted, resulting in ineffective braking and
possible brake failure.
Warning lamp Warning display type 1
Warning display type 2Starting and driving
4-06
4
Page 164 of 368
screen operations can be used to make the ad-
justment.
Refer
to the separate owner’s manual for de-
tails.
To remove the key E00620400326
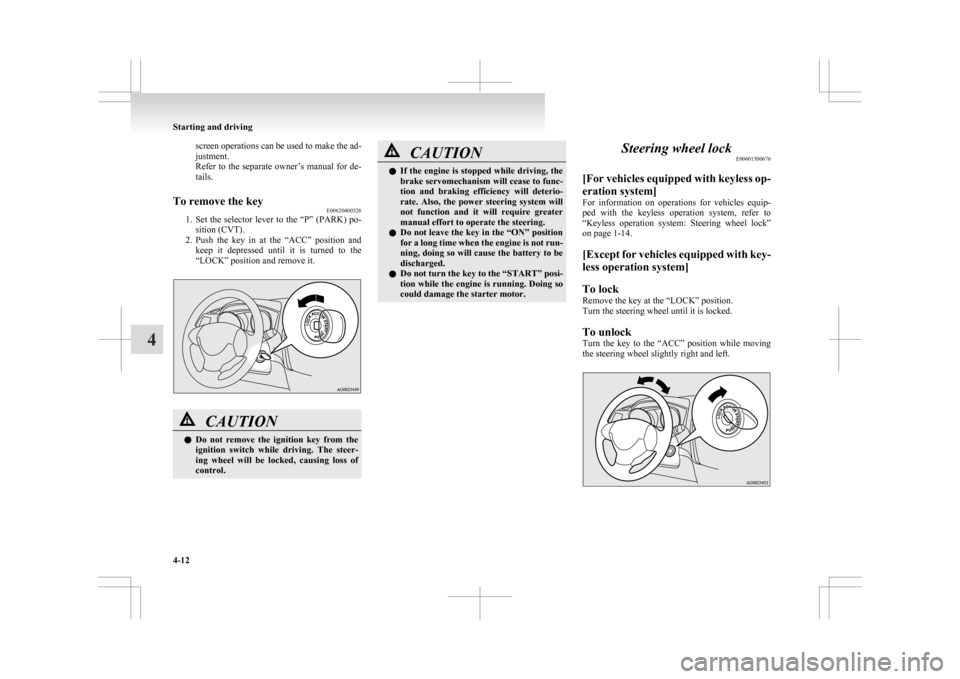
1. Set
the selector lever to the “P” (PARK) po-
sition (CVT).
2. Push the key in at the “ACC” position and keep it depressed until it is turned to the
“LOCK” position and remove it. CAUTION
l
Do
not remove the ignition key from the
ignition switch while driving. The steer-
ing wheel will be locked, causing loss of
control. CAUTION
l
If
the engine is stopped while driving, the
brake servomechanism will cease to func-
tion and braking efficiency will deterio-
rate. Also, the power steering system will
not function and it will require greater
manual effort to operate the steering.
l Do not leave the key in the “ON” position
for a long time when the engine is not run-
ning, doing so will cause the battery to be
discharged.
l Do not turn the key to the “START” posi-
tion while the engine is running. Doing so
could damage the starter motor. Steering wheel lock
E00601500676
[For
vehicles equipped with keyless op-
eration system]
For information on operations for vehicles equip-
ped with the keyless operation system, refer to
“Keyless operation system: Steering wheel lock”
on page 1-14.
[Except for vehicles equipped with key-
less operation system]
To lock
Remove the key at the “LOCK” position.
Turn the steering wheel until it is locked.
To unlock
Turn the key to the “ACC” position while moving
the steering wheel slightly right and left. Starting and driving
4-12
4
Page 169 of 368
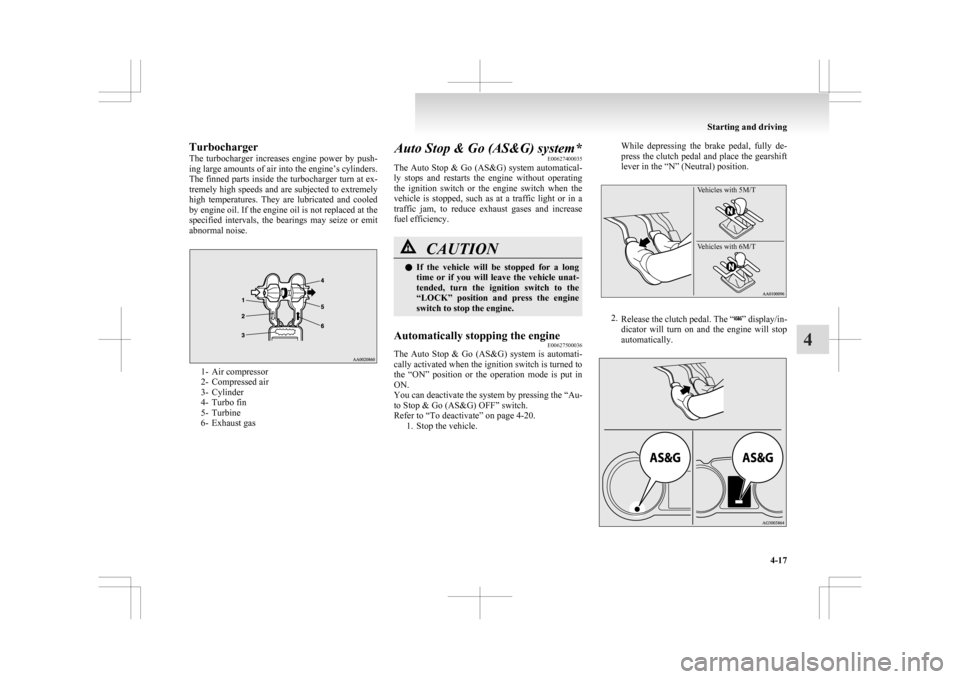
Turbocharger
The
turbocharger increases engine power by push-
ing large amounts of air into the engine’s cylinders.
The finned parts inside the turbocharger turn at ex-
tremely high speeds and are subjected to extremely
high temperatures. They are lubricated and cooled
by engine oil. If the engine oil is not replaced at the
specified intervals, the bearings may seize or emit
abnormal noise. 1- Air compressor
2-
Compressed air
3- Cylinder
4- Turbo fin
5- Turbine
6- Exhaust gas Auto Stop & Go (AS&G) system*
E00627400035
The
Auto Stop & Go (AS&G) system automatical-
ly stops and restarts the engine without operating
the ignition switch or the engine switch when the
vehicle is stopped, such as at a traffic light or in a
traffic jam, to reduce exhaust gases and increase
fuel efficiency. CAUTION
l
If
the vehicle will be stopped for a long
time or if you will leave the vehicle unat-
tended, turn the ignition switch to the
“LOCK” position and press the engine
switch to stop the engine.
Automatically stopping the engine E00627500036
The Auto Stop & Go (AS&G) system is automati-
cally activated when the ignition switch is turned to
the
“ON” position or the operation mode is put in
ON.
You can deactivate the system by pressing the “Au-
to Stop & Go (AS&G) OFF” switch.
Refer to “To deactivate” on page 4-20. 1. Stop the vehicle. While depressing the brake pedal, fully de-
press
the clutch pedal and place the gearshift
lever in the “N” (Neutral) position.
Vehicles with 5M/T
Vehicles with 6M/T 2.
Release
the clutch pedal. The “ ” display/in-
dicator
will turn on and the engine will stop
automatically. Starting and driving
4-17 4
Page 183 of 368

4-wheel drive operation
E00606600887
Your
vehicle has been designed primarily for use
on paved roads.
But its unique 4-wheel drive system allows you to
occasionally travel on unpaved roads, to camp-
grounds, picnic sites, and similar locations.
Not only does this ensure better handling on dry,
paved roads but also permits better traction when
driving on slippery, wet or snow-covered roads and
when moving out of mud.
But it is not suitable for heavy off road use or tow-
ing in rough conditions.
It is particularly important to note that 4-wheel
drive may not give sufficient hill climbing ability
and engine braking on steep slopes. You should try
to avoid driving on steep slopes.
Also, you must exercise caution when driving on
sand and mud and when driving through water be-
cause sufficient traction may not be available in cer-
tain circumstances.
Please avoid driving the vehicle through areas
where the tyres may get stuck in deep sand or mud. WARNING
l Do
not over-rely on the 4-wheel drive ve-
hicles. Even 4-wheel drive vehicles have
limits to the system and ability to main-
tain control and traction. Reckless driv-
ing may lead to accidents. Always drive
carefully, taking account of the road con-
ditions.
l Improperly operating this vehicle on or
off-paved roads can cause an accident or
rollover in which you and your passen-
gers could be seriously injured or killed. WARNING
• Follow
all instructions and guidelines in the owner’s manual.
• Keep your speed low and do not drive faster than conditions allow you to.
NOTE l Driving
on rough roads can be hard on a ve-
hicle. Before you leave paved roads, be sure
all scheduled maintenance and service has
been done, and that you have inspected your
vehicle. Pay special attention to the condi-
tion of the tyres, and check the tyre pressures.
l MITSUBISHI MOTORS is not responsible
to the operator for any damage or injury
caused or liability incurred by improper and
negligent operation of a vehicle. All techni-
ques of vehicle operation depend on the skill
and experience of the operator and other par-
ticipating parties. Any deviation from the rec-
ommended operating instructions above is at
their own risk.
l Note that the stopping distance required of a
4-wheel drive vehicle differs very little from
that of a 2-wheel drive vehicle. When driv-
ing on a snow-covered road or a slippery,
muddy surface, make sure that you keep a suf-
ficient distance between your vehicle and the
one ahead of you.
l The driving posture should be more upright;
adjust the seat to a good position for easy
steering and pedal operation. Be sure to wear
the seat belt. l
After
driving on rough roads, check each
part of the vehicle and wash it thoroughly
with water. Refer to the “Inspection and main-
tenance following rough road operation” sec-
tion and “Maintenance” section. CAUTION
l
Setting
the drive mode-selector to “4WD
LOCK” to drive on dry paved road will
increase fuel consumption, with possible
noise generation.
Turning sharp corners
When
turning a sharp corner in “4WD LOCK” po-
sition at low speed, a slight difference in steering
may be experienced similar to as if the brakes were
applied. This is called tight corner braking and re-
sults from each of the 4 tyres being at a different
distance from the corner. The phenomenon is typi-
cal of 4-wheel drive vehicles. If this occurs, either
straighten out the steering wheel, or change to
“2WD” or “4WD AUTO” mode.
On snowy or icy roads
Set the drive mode-selector to “4WD AUTO” or
“4WD LOCK” in accordance with the road condi-
tions, and then gradually depress the accelerator ped-
al for a smooth start.
NOTE
l The use of snow tyres is recommended.
l Maintain a safe distance between vehicles,
avoid sudden braking, and use engine brak-
ing (downshifting). Starting and driving
4-31 4