2009 MITSUBISHI ASX manual transmission
[x] Cancel search: manual transmissionPage 153 of 368

Economical driving.......................................................................4-02
Driving, alcohol and drugs
........................................................... 4-02
Safe driving techniques ................................................................ 4-03
Running-in recommendations
.......................................................4-04
Parking brake................................................................................ 4-06
Parking.......................................................................................... 4-07
Steering wheel height and reach adjustment ................................4-08
Inside rear-view mirror ................................................................. 4-08
Outside rear-view mirrors ............................................................. 4-09
Ignition switch .............................................................................. 4-11
Steering wheel lock ...................................................................... 4-12
Starting..........................................................................................4-13
Diesel particulate filter (DPF)* .................................................... 4-15
Turbocharger operation* .............................................................. 4-16
Auto Stop & Go (AS&G) system*............................................... 4-17
Manual transmission* ................................................................... 4-21
Automatic transmission INVECS-III Sports Mode 6CVT (Intelligent & Innovative Vehicle Electronic
Control System III)*................................................................. 4-24
Electronically controlled 4WD system* .......................................4-29
4-wheel drive operation ................................................................ 4-31
Inspection and maintenance following rough road oper- ation.......................................................................................... 4-33
Cautions on handling of 4-wheel drive vehicles ..........................4-33
Braking......................................................................................... 4-34
Hill start assist* ............................................................................ 4-35
Brake assist system....................................................................... 4-36
Emergency stop signal system ...................................................... 4-37
Anti-lock brake system (ABS) ..................................................... 4-38
Electric power steering system (EPS) ..........................................4-40 Active stability control (ASC)*
.................................................... 4-40
Cruise control* ............................................................................. 4-43
Reversing sensor system*............................................................. 4-47
Rear-view camera* ....................................................................... 4-50
Cargo loads................................................................................... 4-52
Trailer towing ............................................................................... 4-54Starting and driving
4
Page 173 of 368

Manual transmission*
E00602000535
The
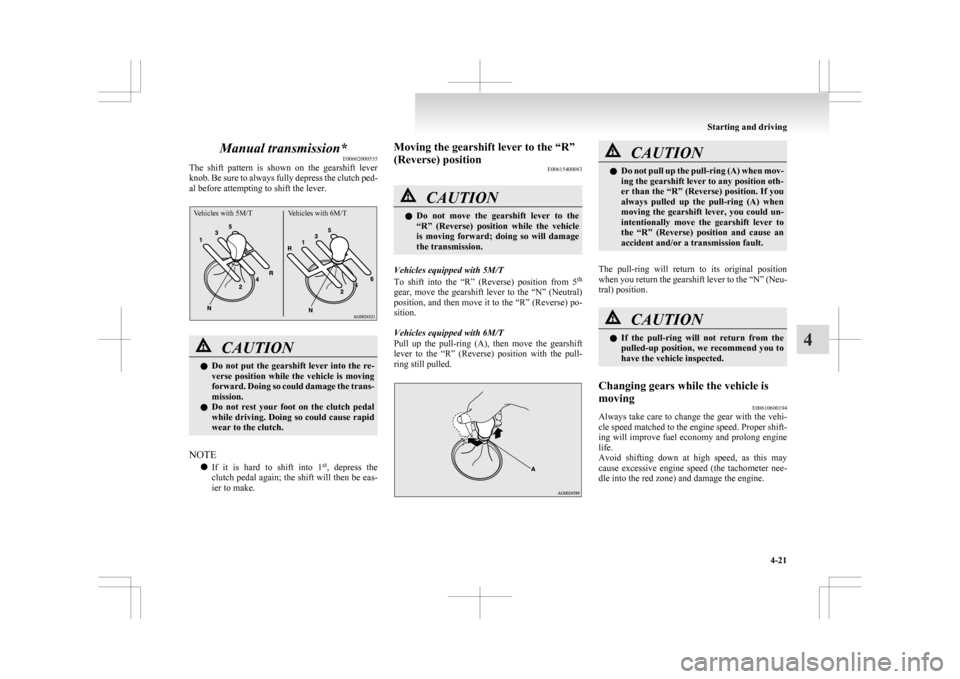
shift pattern is shown on the gearshift lever
knob. Be sure to always fully depress the clutch ped-
al before attempting to shift the lever.
Vehicles with 5M/T Vehicles with 6M/T CAUTION
l
Do
not put the gearshift lever into the re-
verse position while the vehicle is moving
forward. Doing so could damage the trans-
mission.
l Do not rest your foot on the clutch pedal
while driving. Doing so could cause rapid
wear to the clutch.
NOTE l If
it is hard to shift into 1 st
, depress the
clutch pedal again; the shift will then be eas-
ier to make. Moving the gearshift lever to the “R”
(Reverse) position
E00615400083 CAUTION
l
Do
not move the gearshift lever to the
“R” (Reverse) position while the vehicle
is moving forward; doing so will damage
the transmission.
Vehicles equipped with 5M/T
To
shift into the “R” (Reverse) position from 5 th
gear, move the gearshift lever to the “N” (Neutral)
position, and then move it to the “R” (Reverse) po-
sition.
Vehicles equipped with 6M/T
Pull up the pull-ring (A), then move the gearshift
lever to the “R” (Reverse) position with the pull-
ring still pulled. CAUTION
l
Do
not pull up the pull-ring (A) when mov-
ing the gearshift lever to any position oth-
er than the “R” (Reverse) position. If you
always pulled up the pull-ring (A) when
moving the gearshift lever, you could un-
intentionally move the gearshift lever to
the “R” (Reverse) position and cause an
accident and/or a transmission fault.
The pull-ring will return to its original position
when
you return the gearshift lever to the “N” (Neu-
tral) position. CAUTION
l
If
the pull-ring will not return from the
pulled-up position, we recommend you to
have the vehicle inspected.
Changing gears while the vehicle is
moving E00610600194
Always take care to change the gear with the vehi-
cle
speed matched to the engine speed. Proper shift-
ing will improve fuel economy and prolong engine
life.
Avoid shifting down at high speed, as this may
cause excessive engine speed (the tachometer nee-
dle into the red zone) and damage the engine. Starting and driving
4-21 4
Page 176 of 368

Automatic transmission
INVECS-III Sports Mode 6CVT
(Intelligent & Innovative Vehicle Electronic Control System III)* E00602100031
The
INVECS-III uses optimization and adaptation
functions to optimally match the gear ratio to driv-
ing and road conditions.
The CVT is capable of changing the gear ratio auto-
matically and steplessly to suit driving conditions
in all phases of vehicle operation. It therefore real-
izes smooth, shock-free operation and excellent
fuel efficiency. CAUTION
l
Automatic
downshifts may not take place
while the CVT fluid is still cool immedi-
ately after you start driving. To cause a
downshift, depress the brake pedal, man-
ually shift down when necessary.
Always strive to drive safely in accord-
ance with road conditions.
Selector lever operation E00602200221
The CVT selects an optimum gear ratio automati-
cally,
depending on the speed of the vehicle and
the position of the accelerator pedal. The selector lever (A) has 2 gates; the main gate
(B) and the manual gate (C).
While depressing the brake pedal,
move
the selector lever through the gate. Move the selector lever through the gate. WARNING
l Always
depress the brake pedal when
shifting the selector lever into the other
position from the “P” (PARK) or “N”
(NEUTRAL) position.
Never put your foot on the accelerator ped-
al while shifting the selector lever from
the “P” (PARK) or “N” (NEUTRAL) po-
sition.
NOTE l To
avoid erroneous operation, move the se-
lector lever firmly into each position and brief-
ly hold it there. Always check the position
shown by the selector lever position display
after moving the selector lever.
l If the brake pedal is not depressed and held,
the shift-lock device activates to prevent the
selector lever from being moved from the
“P” (PARK) position.
When the selector lever cannot be shifted from
the “P” (PARK) position E00629000178
When the selector lever cannot be shifted from the
“P”
(PARK) position to another position while the
brake pedal is pressed and held down with the igni-
tion switch or the operation mode in ON, the bat-
tery may be flat or the shift-lock mechanism may
be malfunctioning. Immediately have your vehicle
checked by a MITSUBISHI MOTORS Authorized
Service Point.
If you need to move the vehicle, shift the selector
lever as follows. 1. Make sure the parking brake is applied.
2. Stop the engine if it is running. Starting and driving
4-24
4
Page 177 of 368

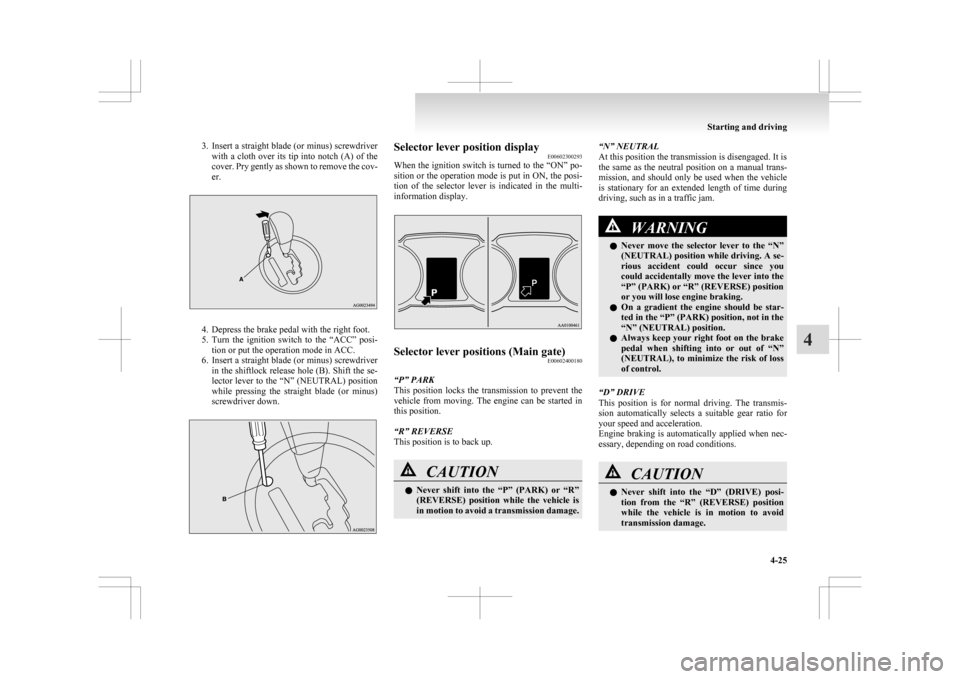
3. Insert a straight blade (or minus) screwdriver
with a cloth over its tip into notch (A) of the
cover. Pry gently as shown to remove the cov-
er. 4. Depress the brake pedal with the right foot.
5. Turn
the ignition switch to the “ACC” posi-
tion or put the operation mode in ACC.
6. Insert a straight blade (or minus) screwdriver in the shiftlock release hole (B). Shift the se-
lector lever to the “N” (NEUTRAL) position
while pressing the straight blade (or minus)
screwdriver down. Selector lever position display
E00602300293
When
the ignition switch is turned to the “ON” po-
sition or the operation mode is put in ON, the posi-
tion of the selector lever is indicated in the multi-
information display. Selector lever positions (Main gate)
E00602400180
“P” PARK
This
position locks the transmission to prevent the
vehicle from moving. The engine can be started in
this position.
“R” REVERSE
This position is to back up. CAUTION
l
Never
shift into the “P” (PARK) or “R”
(REVERSE) position while the vehicle is
in motion to avoid a transmission damage. “N” NEUTRAL
At this position the transmission is disengaged. It is
the
same as the neutral position on a manual trans-
mission, and should only be used when the vehicle
is stationary for an extended length of time during
driving, such as in a traffic jam. WARNING
l Never
move the selector lever to the “N”
(NEUTRAL) position while driving. A se-
rious accident could occur since you
could accidentally move the lever into the
“P” (PARK) or “R” (REVERSE) position
or you will lose engine braking.
l On a gradient the engine should be star-
ted in the “P” (PARK) position, not in the
“N” (NEUTRAL) position.
l Always keep your right foot on the brake
pedal when shifting into or out of “N”
(NEUTRAL), to minimize the risk of loss
of control.
“D” DRIVE
This
position is for normal driving. The transmis-
sion automatically selects a suitable gear ratio for
your speed and acceleration.
Engine braking is automatically applied when nec-
essary, depending on road conditions. CAUTION
l
Never
shift into the “D” (DRIVE) posi-
tion from the “R” (REVERSE) position
while the vehicle is in motion to avoid
transmission damage. Starting and driving
4-25 4
Page 178 of 368

Sports mode
E00602500194
Whether
the vehicle is stationary or in motion,
sports mode is selected by gently pushing the selec-
tor lever from the “D” (DRIVE) position into the
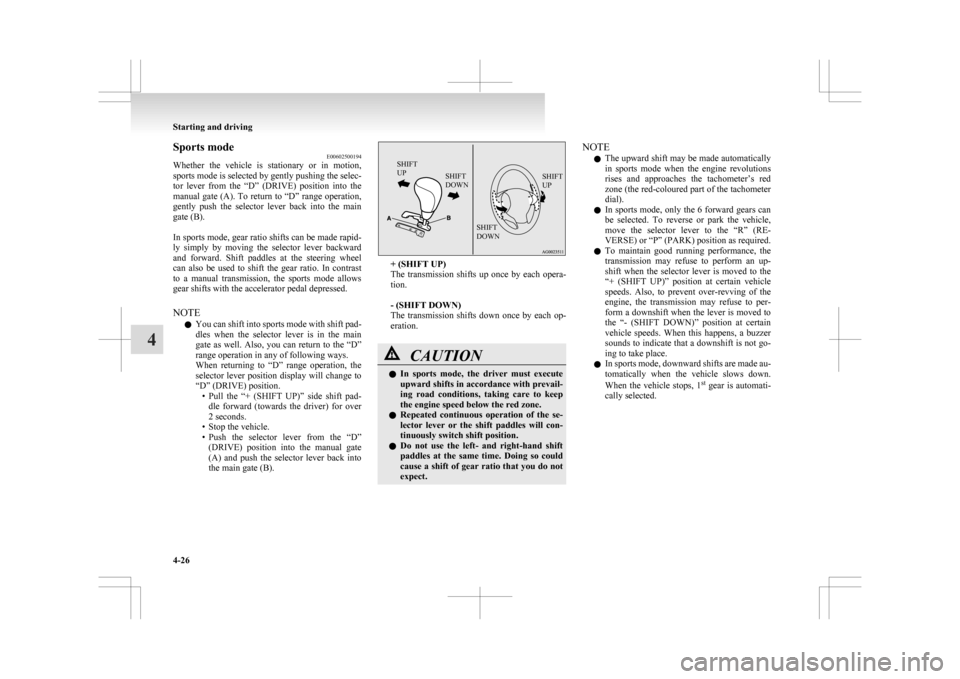
manual gate (A). To return to “D” range operation,
gently push the selector lever back into the main
gate (B).
In sports mode, gear ratio shifts can be made rapid-
ly simply by moving the selector lever backward
and forward. Shift paddles at the steering wheel
can also be used to shift the gear ratio. In contrast
to a manual transmission, the sports mode allows
gear shifts with the accelerator pedal depressed.
NOTE
l You can shift into sports mode with shift pad-
dles when the selector lever is in the main
gate as well. Also, you can return to the “D”
range operation in any of following ways.
When returning to “D” range operation, the
selector lever position display will change to
“D” (DRIVE) position.
• Pull the “+ (SHIFT UP)” side shift pad-dle forward (towards the driver) for over
2 seconds.
• Stop the vehicle.
• Push the selector lever from the “D” (DRIVE) position into the manual gate
(A) and push the selector lever back into
the main gate (B).
SHIFT
UP SHIFT
DOWN SHIFT
UP
SHIFT
DOWN + (SHIFT UP)
The
transmission shifts up once by each opera-
tion.
- (SHIFT DOWN)
The transmission shifts down once by each op-
eration. CAUTION
l
In
sports mode, the driver must execute
upward shifts in accordance with prevail-
ing road conditions, taking care to keep
the engine speed below the red zone.
l Repeated continuous operation of the se-
lector lever or the shift paddles will con-
tinuously switch shift position.
l Do not use the left- and right-hand shift
paddles at the same time. Doing so could
cause a shift of gear ratio that you do not
expect. NOTE
l The
upward shift may be made automatically
in sports mode when the engine revolutions
rises and approaches the tachometer’s red
zone (the red-coloured part of the tachometer
dial).
l In sports mode, only the 6 forward gears can
be selected. To reverse or park the vehicle,
move the selector lever to the “R” (RE-
VERSE) or “P” (PARK) position as required.
l To maintain good running performance, the
transmission may refuse to perform an up-
shift when the selector lever is moved to the
“+ (SHIFT UP)” position at certain vehicle
speeds. Also, to prevent over-revving of the
engine, the transmission may refuse to per-
form a downshift when the lever is moved to
the “- (SHIFT DOWN)” position at certain
vehicle speeds. When this happens, a buzzer
sounds to indicate that a downshift is not go-
ing to take place.
l In sports mode, downward shifts are made au-
tomatically when the vehicle slows down.
When the vehicle stops, 1 st
gear is automati-
cally selected. Starting and driving
4-26
4
Page 356 of 368
![MITSUBISHI ASX 2009 1.G Owners Manual No. Item Quantity Lubricants
4 Engine oil Petrol-powered vehicles 1600 models
6.0 litres
[includes 0.65 litre in the reserve tank]
DIA QUEEN SUPER LONG LIFE COOLANT PRE-MIUM or equivalent* 1800 models MITSUBISHI ASX 2009 1.G Owners Manual No. Item Quantity Lubricants
4 Engine oil Petrol-powered vehicles 1600 models
6.0 litres
[includes 0.65 litre in the reserve tank]
DIA QUEEN SUPER LONG LIFE COOLANT PRE-MIUM or equivalent* 1800 models](/manual-img/19/7566/w960_7566-355.png)
No. Item Quantity Lubricants
4 Engine oil Petrol-powered vehicles 1600 models
6.0 litres
[includes 0.65 litre in the reserve tank]
DIA QUEEN SUPER LONG LIFE COOLANT PRE-MIUM or equivalent* 1800 models,
2000 models
7.5 litres
[includes 0.65 litre in the reserve tank] Diesel-powered vehicles
7.5 litres
[includes 0.62 litre in the reserve tank] 5 CVT fluid
7.1 litresDIA QUEEN CVTF-J16 Manual transmission
oil 5 M/T 1600 models
2.0 litres
DIA QUEEN NEW MULTI GEAR OIL API classifica-tion GL-3, SAE 75W-80 2000 models
2.5 litres 6 M/T
2.2 litres7 Transfer oil
0.49 litre Hypoid gear oil API classification GL-5 SAE 808 Rear differential oil
0.5 litreHypoid gear oil API classification GL-5 SAE 809 Refrigerant (air conditioning)
480 - 520 gHFC-134a*: similar high quality ethylene glycol based non-silicate, non-amine, non-nitrate and non-borate coolant with long life hybrid organic acid technologySpecifications
9-16
9
Page 358 of 368

Used engine oils safety instructions and disposal
information 05
Exterior and interior lamp operation
8-17
F Fluid capacities and lubricants 9-14
Fluid
Automatic transmission fluid
9-14
Brake fluid 8-07,9-14
Clutch fluid 8-07
CVT fluid 9-14
Engine coolant 8-06,9-14
Power steering fluid 9-14
Twin Clutch SST fluid 9-14
Washer fluid 8-07,9-14
For cold and snowy weather 8-17
Front fog lamps Bulb capacity 8-24
Replacement 8-29
Switch 3-50
Front room lamp Bulb capacity 8-24
Front seat 2-03
Front turn-signal lamps Bulb capacity 8-24
Replacement 8-28
Fuel consumption 9-13
Fuel Filling the fuel tank 03
Fuel selection 02
Modification/alterations to the electrical or fuel
systems 05
Tank capacity 03
Fuses 8-18
Fusible links 8-18 GGeneral maintenance 8-17
General vehicle data
9-04
Genuine parts 05
Glove box lamp Bulb capacity 8-24
H Hazard warning flasher switch 3-50
Hazard warning indication lamps
3-40
Head restraints 2-07
Headlamp levelling switch 3-48
Headlamp washer switch 3-56
Headlamps Bulb capacity 8-23
Headlamp flasher 3-47
Replacement 8-25,8-26
Switch 3-44
Heated mirror 4-10
Heated seats 2-06
Heater 5-03
High-mounted stop lamp Bulb capacity 8-24
Replacement 8-33
Hill start assist 4-35
Hinges and latches lubrication 8-17
Horn switch 3-57
I If the vehicle breaks down 6-02
Ignition switch 4-11
Indication lamps
3-40
Information screen display 3-42
Inside rear-view mirror 4-08
Inside tailgate release 1-27 Inspection and maintenance following rough road
operation 4-33
Instruments 3-02
Interior lamps 5-62
Map lamps 5-63
J Jack 6-06
Storage 6-06
Jump starting (Emergency starting)
6-02
K Key slot 1-17
Keyless entry system 1-04,1-18
Keyless operation system 1-07
Keys 1-02
L Labeling 9-02
Lamp monitor buzzer
3-46
Leakage (Fuel, engine coolant, oil and exhaust
gas) 8-17
Licence plate lamps Bulb capacity 8-24
Replacement 8-33
Link System 5-41
Lubricants 9-14
Luggage hooks 5-70
Luggage room lamp 5-63 Bulb capacity 8-24
M Making a luggage compartment 2-08
Manual transmission 4-21
Map lamps 5-62,5-63Alphabetical index
2
Page 359 of 368

Bulb capacity 8-24
Mirror Inside rear-view mirror 4-08
Outside rear-view mirrors 4-09
Modification/alterations
to the electrical or fuel sys-
tems 05
Multi-information display 3-03
OOil
Engine oil 8-04
Manual transmission oil 9-14
Rear differential oil
9-14
Transfer oil 9-14
Operation mode 1-12
Operation under adverse driving conditions 6-22
Outside rear-view mirrors 4-09
Overheating 6-04
PParking 4-07
Parking brake 4-06
Parking brake break-in 8-15
Position lamps Bulb capacity
8-24
Replacement 8-27
Power steering Fluid 9-14
Precautions to observe when using wipers and wash-
ers 3-56
Pregnant women restraint 2-14
Puncture Tyre changing 6-12
Tyre repair kit 6-07 RRear combination lamps
Bulb capacity
8-24
Replacement 8-31
Rear differential oil 9-14
Rear fog lamp Bulb capacity 8-24
Replacement 8-31
Switch 3-51
Rear room lamp Bulb capacity 8-24
Rear shelf panel 5-69
Rear turn-signal lamps Bulb capacity 8-24
Replacement 8-31
Rear window demister switch 3-57
Rear-view camera 4-50
Rear-view mirror Inside 4-08
Outside 4-09
Refill capacities 9-14
Replacement of lamp bulbs 8-23
Reversing lamps Bulb capacity 8-24
Replacement 8-31
Reversing sensor system 4-47
Roof carrier precaution 4-53
Room lamp (front) 5-62
Room lamp (rear) 5-63
Running-in recommendations 4-04
S Safe driving techniques 4-03
Seat belt 2-10
Adjustable seat belt anchor
2-12
Child restraint 2-15 Force limiter 2-15
Inspection 2-24
Pregnant women restraint
2-14
Pretensioner 2-14
Seat Adjustment 2-03
Front seat 2-03
Head restraints 2-07
Heated seats 2-06
Making a luggage compartment 2-08
Rear seat 2-06
Security alarm system 1-28
Service precaution 8-02
Side turn-signal lamp Bulb capacity 8-24
Side turn-signal lamps Replacement 8-29
Snow tyres 8-14
Spare wheel 6-13
Spark plug 9-11
Specifications 9-02
Starting 4-13
Starting and stopping the engine 1-15
Steering Power steering fluid 9-14
Steering wheel height and reach adjust-
ment 4-08
Steering wheel lock 1-14,4-12
Stop and tail lamps Replacement 8-31
Stop lamps Bulb capacity 8-23
Storage spaces 5-65
Sun visors 5-59
Sunshade 1-36
Sunshade illumination 5-64
Supplemental restraint system 2-24 Servicing 2-34 Alphabetical index
3