2009 MITSUBISHI ASX warning light
[x] Cancel search: warning lightPage 4 of 368
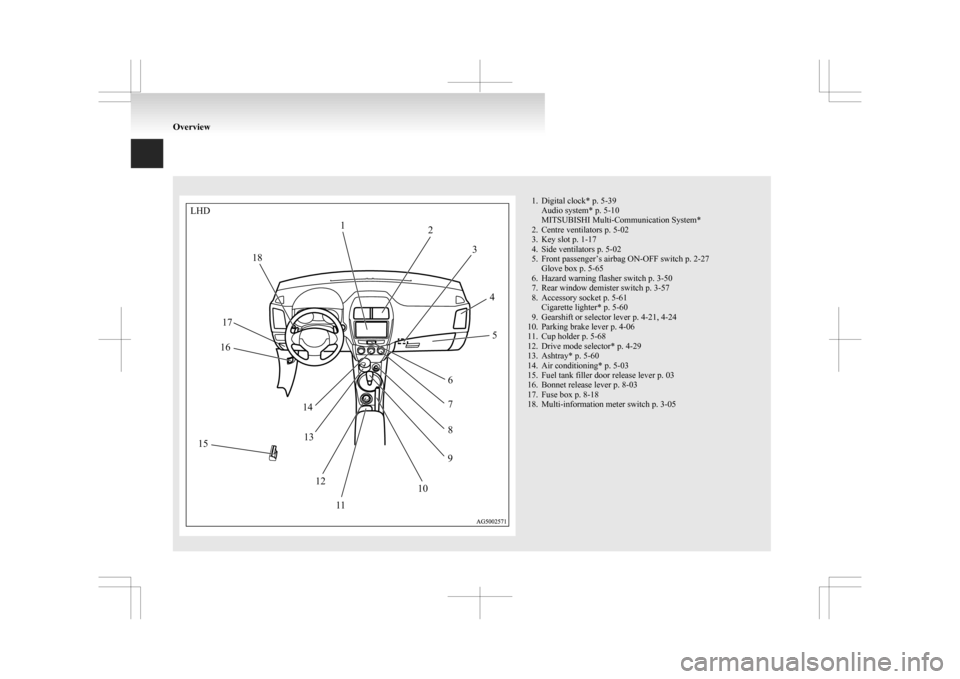
1. Digital clock* p. 5-39
Audio system* p. 5-10
MITSUBISHI Multi-Communication System*
2.
Centre ventilators p. 5-02
3. Key slot p. 1-17
4. Side ventilators p. 5-02
5. Front passenger’s airbag ON-OFF switch p. 2-27 Glove box p. 5-65
6. Hazard warning flasher switch p. 3-50
7. Rear window demister switch p. 3-57
8. Accessory socket p. 5-61 Cigarette lighter* p. 5-60
9. Gearshift or selector lever p. 4-21, 4-24
10. Parking brake lever p. 4-06
11. Cup holder p. 5-68
12. Drive mode selector* p. 4-29
13. Ashtray* p. 5-60
14. Air conditioning* p. 5-03
15. Fuel tank filler door release lever p. 03
16. Bonnet release lever p. 8-03
17. Fuse box p. 8-18
18. Multi-information meter switch p. 3-05 OverviewLHD
12
3
45
6 7
8
9
10
1
1
12
13
14
15 16
17 18
Page 24 of 368
Keys
E00300102269
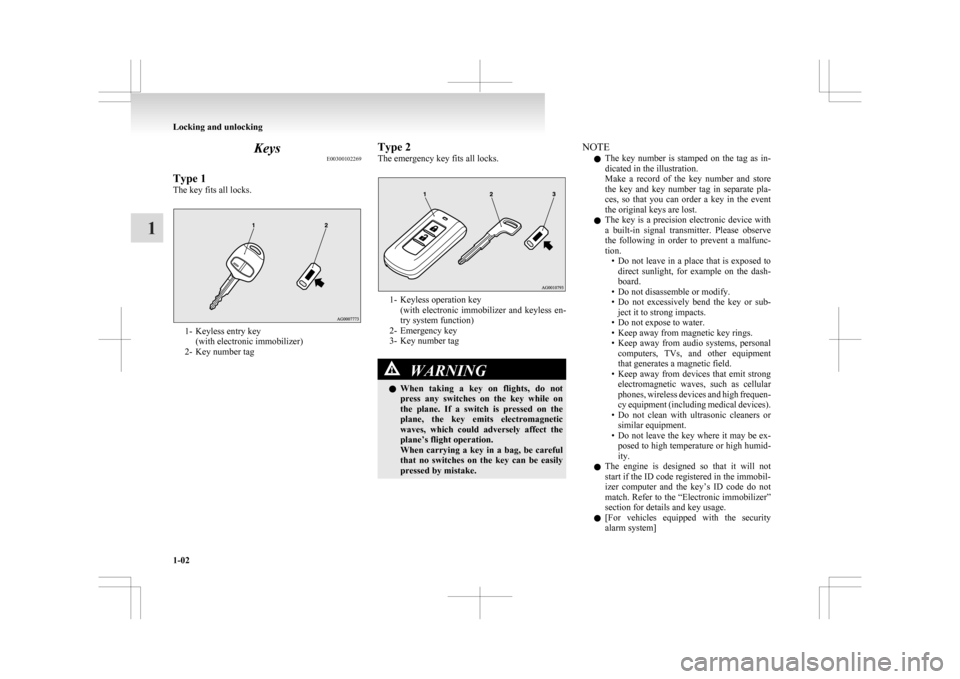
Type 1
The key fits all locks. 1- Keyless entry key
(with electronic immobilizer)
2-
Key number tag Type 2
The emergency key fits all locks. 1- Keyless operation key
(with
electronic immobilizer and keyless en-
try system function)
2- Emergency key
3- Key number tag WARNING
l When
taking a key on flights, do not
press any switches on the key while on
the plane. If a switch is pressed on the
plane, the key emits electromagnetic
waves, which could adversely affect the
plane’s flight operation.
When carrying a key in a bag, be careful
that no switches on the key can be easily
pressed by mistake. NOTE
l The
key number is stamped on the tag as in-
dicated in the illustration.
Make a record of the key number and store
the key and key number tag in separate pla-
ces, so that you can order a key in the event
the original keys are lost.
l The key is a precision electronic device with
a built-in signal transmitter. Please observe
the following in order to prevent a malfunc-
tion.
• Do not leave in a place that is exposed todirect sunlight, for example on the dash-
board.
• Do not disassemble or modify.
• Do not excessively bend the key or sub- ject it to strong impacts.
• Do not expose to water.
• Keep away from magnetic key rings.
• Keep away from audio systems, personal computers, TVs, and other equipment
that generates a magnetic field.
• Keep away from devices that emit strong electromagnetic waves, such as cellular
phones, wireless devices and high frequen-
cy equipment (including medical devices).
• Do not clean with ultrasonic cleaners or similar equipment.
• Do not leave the key where it may be ex- posed to high temperature or high humid-
ity.
l The engine is designed so that it will not
start if the ID code registered in the immobil-
izer computer and the key’s ID code do not
match. Refer to the “Electronic immobilizer”
section for details and key usage.
l [For vehicles equipped with the security
alarm system] Locking and unlocking
1-02
1
Page 37 of 368
NOTE
l When
the following operation is performed
with the operation mode in OFF, the steering
wheel is locked. • Open or close one of the doors (exceptthe tailgate).
• Lock all doors and the tailgate with the keyless entry system or the keyless opera-
tion function.
l When the steering wheel does not unlock,
the warning will be displayed on the informa-
tion screen in the multi-information display.
Press the engine switch again while moving
the steering wheel slightly. Starting and stopping the engine
E00306900395
Tips for starting l The
operation mode can be in any mode to
start the engine. l
The
starter motor will be turning for up to ap-
proximately 15 seconds if the engine switch
is released at once. Pressing the engine
switch again while the starter motor is still
turning will stop the starter motor. The start-
er motor will be turning for up to approxi-
mately 30 seconds while the engine switch is
pressed.
If the engine does not start, wait for a while
and then attempt to start the engine again. Try-
ing repeatedly with the starter motor still run-
ning will damage the starter mechanism.
l [Diesel-powered vehicles]
While the vehicle is stationary with the
clutch pedal fully depressed, the engine revo-
lutions do not rise to over 3,000 rpm in order
to protect the engine even if the accelerator
pedal is depressed. WARNING
l Never
run the engine in a closed or poor-
ly ventilated area any longer than is nee-
ded to move your vehicle in or out of the
area. Carbon monoxide gases are odour-
less and can be fatal. CAUTION
l
Never
attempt to start the engine by push-
ing or pulling the vehicle.
l Do not run the engine at high rpm or
drive the vehicle at high speed until the en-
gine has had a chance to warm up. Starting the engine (petrol-powered vehicles)
E00307000478
The starting procedure is as follows:
1.
Fasten the seat belt.
2. Make sure the parking brake is applied.
3. Depress and hold the brake pedal.
4. Fully depress the clutch pedal (M/T).
NOTE l On vehicles with the Auto Stop & Go
(AS&G) system, the starter will not operate
unless the clutch pedal is fully depressed
(Clutch interlock).
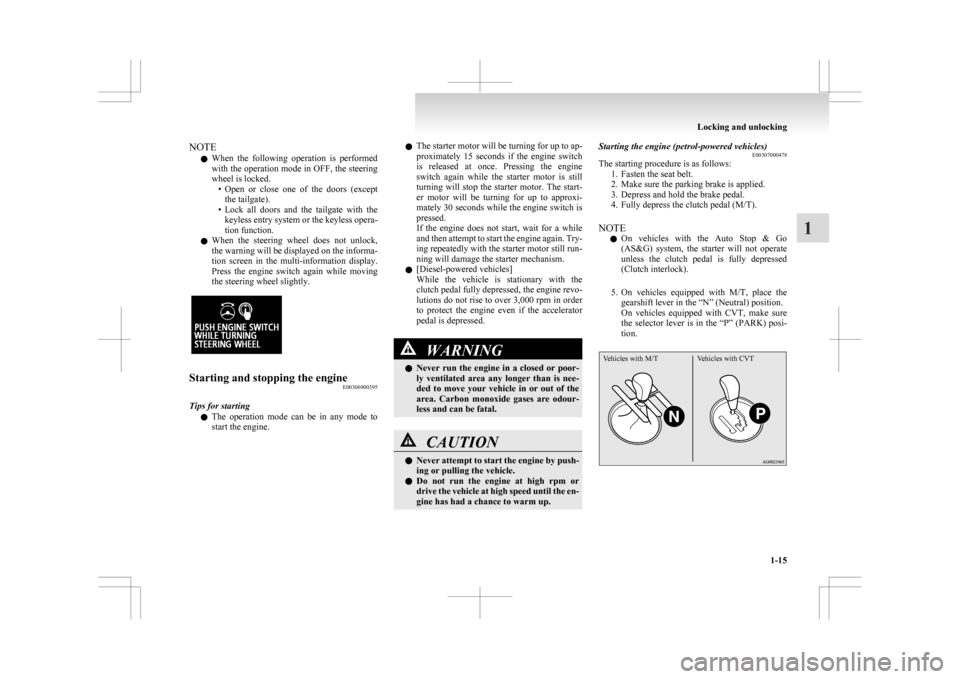
5. On vehicles equipped with M/T, place the gearshift lever in the “N” (Neutral) position.
On vehicles equipped with CVT, make sure
the selector lever is in the “P” (PARK) posi-
tion.
Vehicles with M/T Vehicles with CVT Locking and unlocking
1-15 1
Page 56 of 368
Electric window control
E00302200521
The electric windows can only be operated with the
ignition
switch in the “ON” position or the opera-
tion mode in ON. WARNING
l Before
operating the electric window con-
trol, make sure that nothing can get trap-
ped (head, hand, finger, etc.).
l Never leave the vehicle without removing
the key.
l Never leave a child (or other person who
might not be capable of safe operation of
the electric window control) in the vehicle
alone.
l The child may tamper with the switch at
the risk of its hands or head being trap-
ped in the window.
Electric window control switch E00302301558
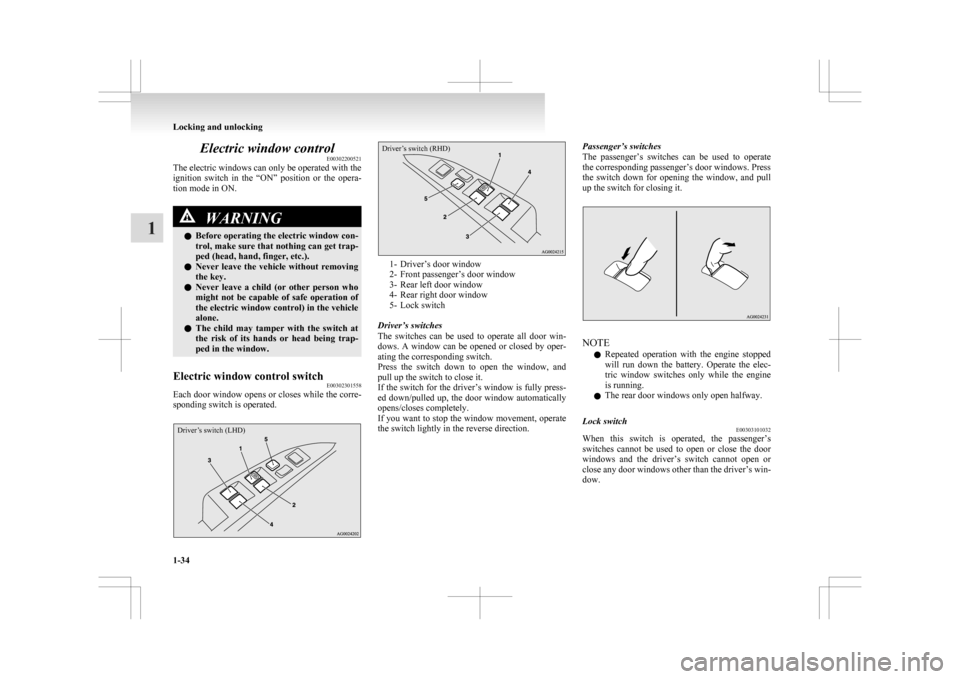
Each door window opens or closes while the corre-
sponding switch is operated.
Driver’s switch (LHD)
Driver’s switch (RHD) 1- Driver’s door window
2-
Front passenger’s door window
3- Rear left door window
4- Rear right door window
5- Lock switch
Driver’s switches
The switches can be used to operate all door win-
dows. A window can be opened or closed by oper-
ating the corresponding switch.
Press the switch down to open the window, and
pull up the switch to close it.
If the switch for the driver’s window is fully press-
ed down/pulled up, the door window automatically
opens/closes completely.
If you want to stop the window movement, operate
the switch lightly in the reverse direction. Passenger’s switches
The
passenger’s switches can be used to operate
the corresponding passenger’s door windows. Press
the switch down for opening the window, and pull
up the switch for closing it. NOTE
l Repeated
operation with the engine stopped
will run down the battery. Operate the elec-
tric window switches only while the engine
is running.
l The rear door windows only open halfway.
Lock switch E00303101032
When this switch is operated, the passenger’s
switches
cannot be used to open or close the door
windows and the driver’s switch cannot open or
close any door windows other than the driver’s win-
dow. Locking and unlocking
1-34
1
Page 64 of 368

Heated seats*
E00401100960
The
heated seats can be operated with the ignition
switch or the operation mode in ON. The indica-
tion lamp (A) will illuminate while the heater is on. 1 (HI) - Heater high (for quick heating).
2 - Heater off.
3 (LO) - Heater low (to keep the seat warm).
CAUTION
l
Switch off seat heaters when not in use.
l Operate
in the high position for quick heat-
ing. Once the seat is warm, set the heater
to low to keep it warm. Slight variations
in seat temperature may be felt while us-
ing the heated seats. This is caused by the
operation of the heater’s internal thermo-
stat and does not indicate a malfunction.
l If the following types of persons use the
heated seats, they might become too hot CAUTION
or receive minor burns (red skin, heat blis-
ters, etc.):
•
Children, elderly or ill people
• People with sensitive skin
• Excessively tired people
• People under the influence of alcohol or sleep inducing medication (cold
medicine, etc.)
l Do not place heavy objects on the seat or
stick pins, needles, or other pointed ob-
jects into it.
l Do not use a blanket, cushion, or other ma-
terial with high heat insulation properties
on the seat while using the heater; this
might cause the heater element to overheat
l Do not use benzine, kerosene, petrol, alco-
hol or other organic solvents when clean-
ing the seats. Doing so could damage not
only the seat cover, but also the heater el-
ement.
l If water or any other liquid is spilled on
the seat, allow it to dry thoroughly before
attempting to use the heater.
l Turn the heater off immediately if it ap-
pears to be malfunctioning during use. Rear seat
E00401300294 WARNING
l When
a person sits in the rear seat, pull
up the head restraint to a height at which
it locks in position. Be sure to make this
adjustment before starting to drive. Seri-
ous injuries could otherwise be suffered
as the result of an impact. Refer to “Head
restraints” on page 2-07.
Armrest* E00401700650
To use the armrest, fold it down.
To
return to the original position, push it backward
level with the seat. NOTE
l Do
not climb or sit on the armrest. Doing so
could damage the armrest. Seat and seat belts
2-06
2
Page 69 of 368
WARNING
l The seat belts must not be twisted when
worn.
3. Pull
the belt slightly to adjust slackness as de- sired.
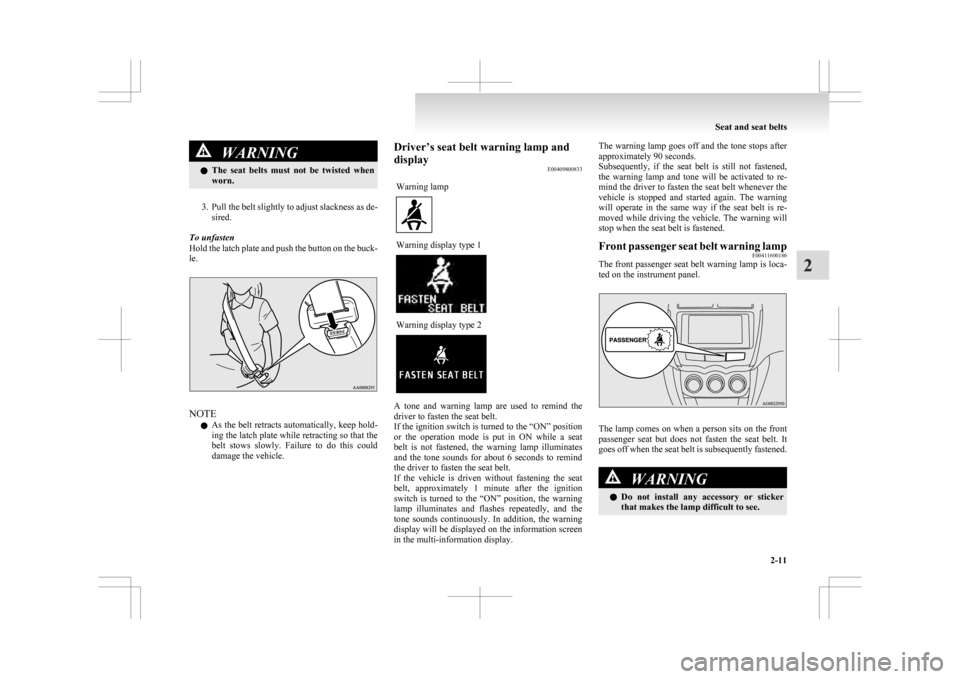
To unfasten
Hold the latch plate and push the button on the buck-
le. NOTE
l As
the belt retracts automatically, keep hold-
ing the latch plate while retracting so that the
belt stows slowly. Failure to do this could
damage the vehicle. Driver’s seat belt warning lamp and
display
E00409800833
Warning lamp Warning display type 1
Warning display type 2
A tone and warning lamp are used to remind the
driver to fasten the seat belt.
If
the ignition switch is turned to the “ON” position
or the operation mode is put in ON while a seat
belt is not fastened, the warning lamp illuminates
and the tone sounds for about 6 seconds to remind
the driver to fasten the seat belt.
If the vehicle is driven without fastening the seat
belt, approximately 1 minute after the ignition
switch is turned to the “ON” position, the warning
lamp illuminates and flashes repeatedly, and the
tone sounds continuously. In addition, the warning
display will be displayed on the information screen
in the multi-information display. The warning lamp goes off and the tone stops after
approximately 90 seconds.
Subsequently,
if the seat belt is still not fastened,
the warning lamp and tone will be activated to re-
mind the driver to fasten the seat belt whenever the
vehicle is stopped and started again. The warning
will operate in the same way if the seat belt is re-
moved while driving the vehicle. The warning will
stop when the seat belt is fastened.
Front passenger seat belt warning lamp E00411600186
The front passenger seat belt warning lamp is loca-
ted on the instrument panel. The lamp comes on when a person sits on the front
passenger
seat but does not fasten the seat belt. It
goes off when the seat belt is subsequently fastened. WARNING
l Do
not install any accessory or sticker
that makes the lamp difficult to see. Seat and seat belts
2-11 2
Page 99 of 368
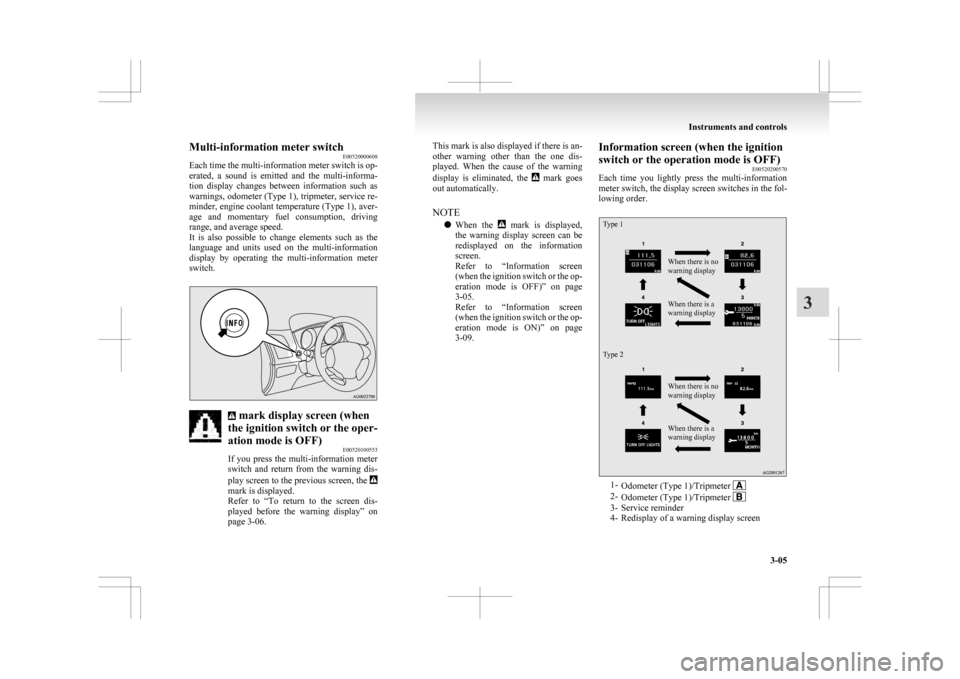
Multi-information meter switch
E00520000608
Each
time the multi-information meter switch is op-
erated, a sound is emitted and the multi-informa-
tion display changes between information such as
warnings, odometer (Type 1), tripmeter, service re-
minder, engine coolant temperature (Type 1), aver-
age and momentary fuel consumption, driving
range, and average speed.
It is also possible to change elements such as the
language and units used on the multi-information
display by operating the multi-information meter
switch. mark display screen (when
the ignition switch or the oper-
ation mode is OFF) E00520100553
If
you press the multi-information meter
switch and return from the warning dis-
play screen to the previous screen, the mark is displayed.
Refer
to “To return to the screen dis-
played before the warning display” on
page 3-06. This mark is also displayed if there is an-
other
warning other than the one dis-
played. When the cause of the warning
display is eliminated, the mark goes
out automatically.
NOTE
l When
the mark is displayed,
the
warning display screen can be
redisplayed on the information
screen.
Refer to “Information screen
(when the ignition switch or the op-
eration mode is OFF)” on page
3-05.
Refer to “Information screen
(when the ignition switch or the op-
eration mode is ON)” on page
3-09. Information screen (when the ignition
switch or the operation mode is OFF)
E00520200570
Each
time you lightly press the multi-information
meter switch, the display screen switches in the fol-
lowing order.
Type 1
Type 2 When there is no
warning display
When there is a
warning display
When there is no
warning display
When there is a
warning display
1-
Odometer (Type 1)/Tripmeter 2-
Odometer (Type 1)/Tripmeter 3- Service reminder
4-
Redisplay of a warning display screen Instruments and controls
3-05 3
Page 100 of 368

Odometer/Tripmeter
E00521201516
Each
time you lightly press the multi-information
meter switch, the display screen switches.
Odometer/Tripmeter →
Odometer/Tripmeter
→ Service reminder → Redisplay of a warning
display screen → Odometer/Tripmeter Odometer
The odometer indicates the distance travelled.
Tripmeter
The
tripmeter indicates the distance travelled be-
tween two points.
Example usage of tripmeter and tripmeter
It is possible to measure two currently travel-
led
distances, from home using tripmeter and from a particular point on the way using
tripmeter
.
To reset the tripmeter
To
return the display to 0, hold down the multi-in-
formation meter switch for about 2 seconds or
more. Only the currently displayed value will be re-
set.
Example If tripmeter is displayed, only tripmeter
will be reset.
Type 1
Type 2
NOTE
l If
there is no warning display, the switching
sequence is: Odometer/Tripmeter → Od-
ometer/Tripmeter →
Service reminder
→ Odometer/Tripmeter .l
Both
tripmeters and can count up to
9999.9 km (9999.9 miles).
When
a tripmeter goes past 9999.9 km
(9999.9 miles), it returns to 0.0 km
(0.0 miles).
l When disconnecting the battery terminal, the
memories of tripmeter display and dis-
play are erased, and their displays return
to 0.0 km (0.0 miles).
Type 1
Type 2 Service reminder
E00521301126
This displays the distance and number of
months
until the next periodic inspection.
Refer to “Service reminder” on page
3-15.
Interrupt display screen (when the ig-
nition switch or the operation mode is
OFF) E00520500616
When there is information to be announced, such
as
lamp reminders, the buzzer sounds and the multi-
information display switches to the warning dis-
play screen. Refer to the appropriate page and take
the necessary measures.
When the cause of the warning display is elimina-
ted, the warning display goes out automatically. Instruments and controls
3-06
3