2009 MERCEDES-BENZ GL SUV lights
[x] Cancel search: lightsPage 245 of 309
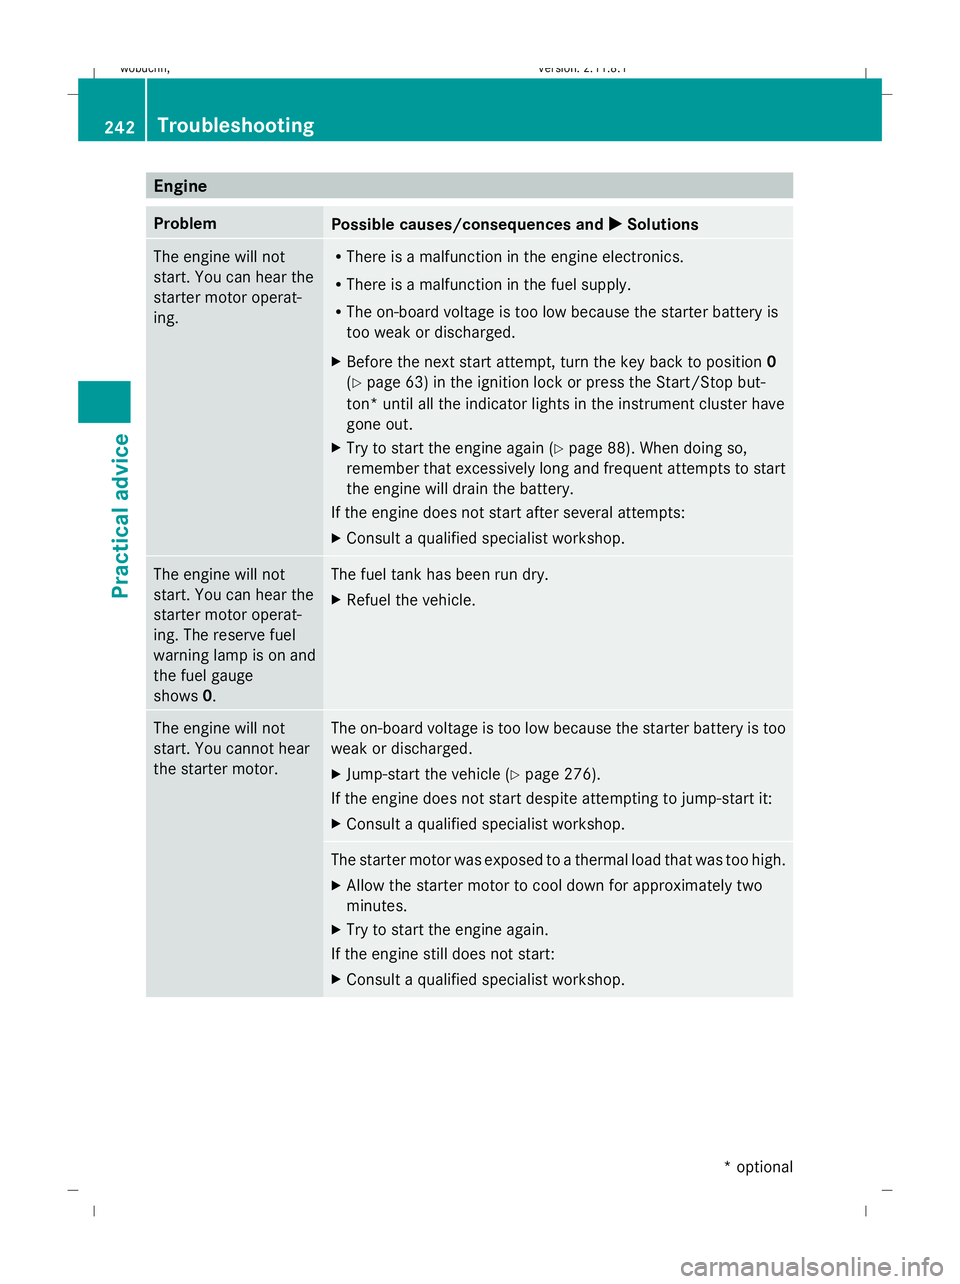
Engine
Problem
Possible causes/consequences and
X
X Solutions The engine will not
start. You can hear the
starter motor operat-
ing. R
There is a malfunction in the engine electronics.
R There is a malfunction in the fuel supply.
R The on-board voltage is too low because the starter battery is
too weak or discharged.
X Before the next start attempt, turn the key back to position 0
(Y page 63) in the ignition lock or press the Start/Stop but-
ton* until all the indicator lights in the instrument cluster have
gone out.
X Try to start the engine again (Y page 88). When doing so,
remember that excessively long and frequent attempts to start
the engine will drain the battery.
If the engine does not start after several attempts:
X Consult a qualified specialist workshop. The engine will not
start. You can hear the
starter motor operat-
ing. The reserve fuel
warning lamp is on and
the fuel gauge
shows
0. The fuel tank has been run dry.
X
Refuel the vehicle. The engine will not
start. You cannot hear
the starter motor. The on-board voltage is too low because the starter battery is too
weak or discharged.
X
Jump-start the vehicle (Y page 276).
If the engine does not start despite attempting to jump-start it:
X Consult a qualified specialist workshop. The starter motor was exposed to a thermal load that was too high.
X
Allow the starter motor to cool down for approximately two
minutes.
X Try to start the engine again.
If the engine still does not start:
X Consult a qualified specialist workshop. 242
TroubleshootingPractical advice
* optional
X164_AKB; 2; 3, en-GB
wobuchh,
Version: 2.11.8.1 2009-03-31T14:14:58+02:00 - Seite 242
Dateiname: 6515431202_buchblock.pdf; erzeugt am 01. Apr 2009 00:18:02; WK
Page 247 of 309
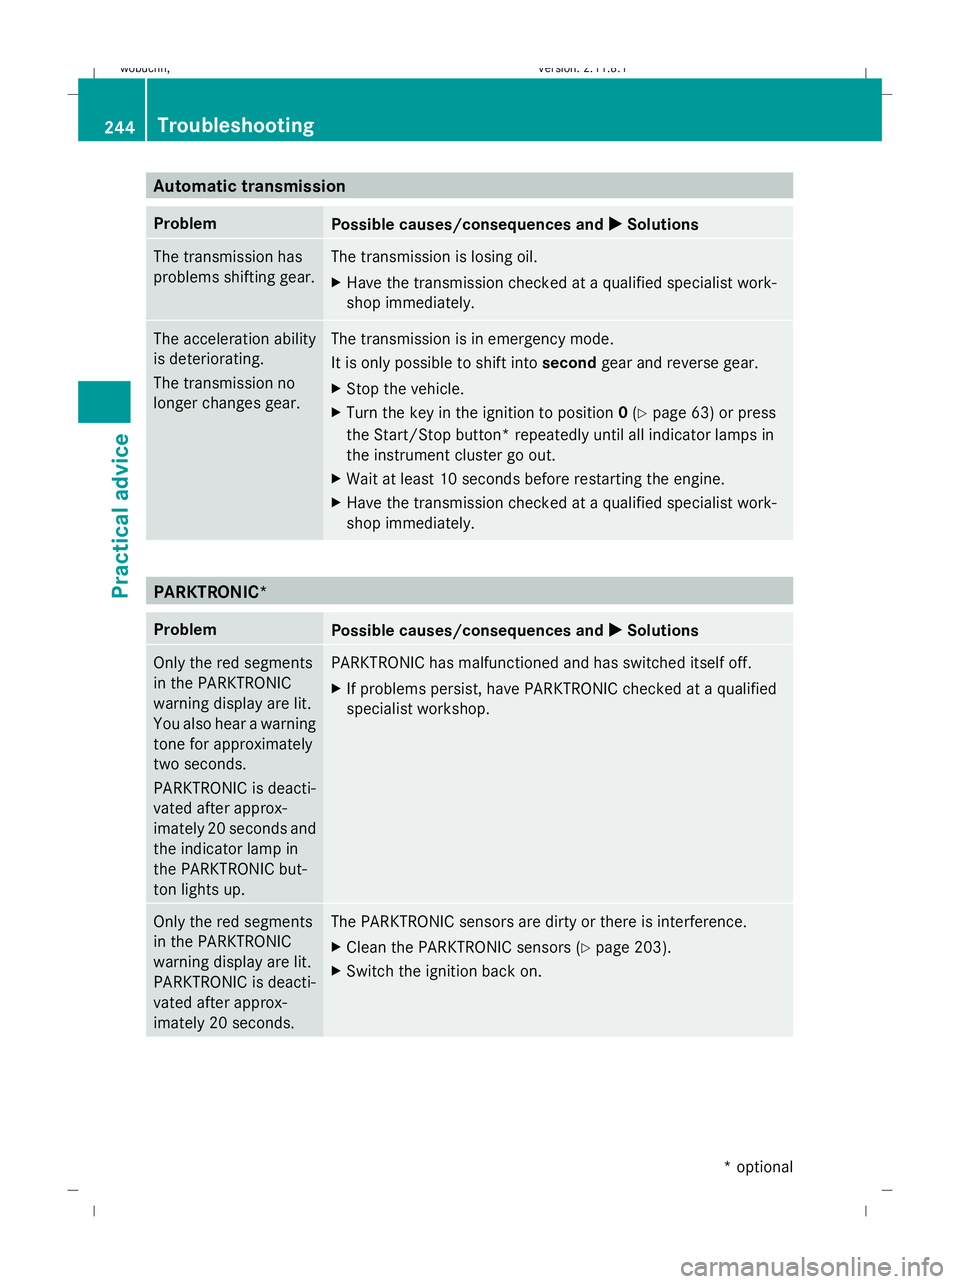
Automatic transmission
Problem
Possible causes/consequences and
X XSolutions The transmission has
problems shifting gear. The transmission is losing oil.
X
Have the transmission checked at a qualified specialist work-
shop immediately. The acceleration ability
is deteriorating.
The transmission no
longer changes gear. The transmission is in emergency mode.
It is only possible to shift into
secondgear and reverse gear.
X Stop the vehicle.
X Turn the key in the ignition to position 0(Y page 63) or press
the Start/Stop button* repeatedly until all indicator lamps in
the instrument cluster go out.
X Wait at least 10 seconds before restarting the engine.
X Have the transmission checked at a qualified specialist work-
shop immediately. PARKTRONIC*
Problem
Possible causes/consequences and
X XSolutions Only the red segments
in the PARKTRONIC
warning display are lit.
You also hear a warning
tone for approximately
two seconds.
PARKTRONIC is deacti-
vated after approx-
imately 20 seconds and
the indicator lamp in
the PARKTRONIC but-
ton lights up. PARKTRONIC has malfunctioned and has switched itself off.
X
If problems persist, have PARKTRONIC checked at a qualified
specialist workshop. Only the red segments
in the PARKTRONIC
warning display are lit.
PARKTRONIC is deacti-
vated after approx-
imately 20 seconds. The PARKTRONIC sensors are dirty or there is interference.
X
Clean the PARKTRONIC sensors (Y page 203).
X Switch the ignition back on. 244
TroubleshootingPractical advice
* optional
X164_AKB; 2; 3, en-GB
wobuchh,
Version: 2.11.8.1 2009-03-31T14:14:58+02:00 - Seite 244
Dateiname: 6515431202_buchblock.pdf; erzeugt am 01. Apr 2009 00:18:02; WK
Page 256 of 309
X
Press resetting tool :downwards until
you hear the head restraint deployment
mechanism engage.
X Pull out resetting tool :.
X Firmly press back the head restraint cush-
ion until it engages =.
X Repeat this procedure for the second head
restraint. Replacing batteries (key and remote
control) Notes
It is advisable to have the batteries replaced
at a qualified specialist workshop, e.g. at a
Mercedes-Benz Service Centre. G
Risk of poisoning
Batteries contain toxic and caustic substan-
ces. For this reason, keep batteries away from
children.
If a battery is swallowed, consult a doctor
immediately. H
Environmental note
Do not dispose of batteries with the house-
hold rubbish. They contain highly toxic sub-
stances.
Take discharged batteries to a qualified spe-
cialist workshop, e.g. a Mercedes-Benz
Service Centre, or to a special collection point
for old batteries. Key
Checking the batteries X
Press the &or% button.
The batteries are in working order if the
battery charge indicator lamp lights up
briefly. Changing batteries (key with KEYLESS
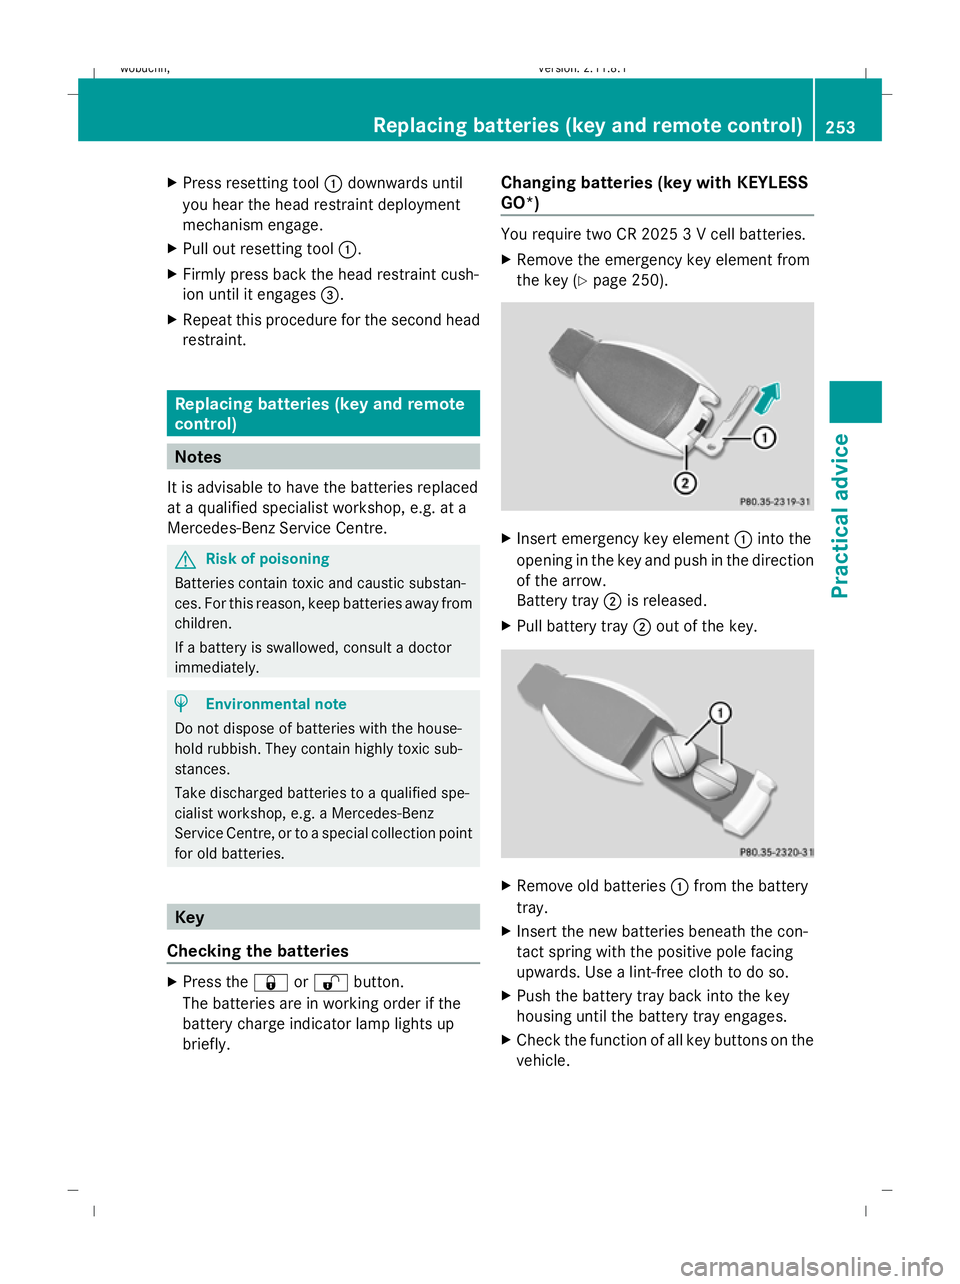
GO*) You require two CR 2025 3 V cell batteries.
X
Remove the emergency key element from
the key (Y page 250). X
Insert emergency key element :into the
opening in the key and push in the direction
of the arrow.
Battery tray ;is released.
X Pull battery tray ;out of the key. X
Remove old batteries :from the battery
tray.
X Insert the new batteries beneath the con-
tact spring with the positive pole facing
upwards. Use a lint-free cloth to do so.
X Push the battery tray back into the key
housing until the battery tray engages.
X Check the function of all key buttons on the
vehicle. Replacing batteries (key and remote control)
253Practical advice
X164_AKB; 2; 3, en-GB
wobuchh,Version: 2.11.8.1 2009-03-31T14:14:58+02:00 - Seite 253 Z
Dateiname: 6515431202_buchblock.pdf; erzeugt am 01. Apr 2009 00:18:04; WK
Page 258 of 309
here. If the new bulb still does not light up,
consult a qualified specialist workshop.
Do not touch the glass tube of new bulbs with
your bare hands. Even minor contamination
can burn into the glass surface and reduce
the service life of the bulbs. Always use a lint-
free cloth or only touch the base of the bulb
when fitting. G
Risk of injury
Bulbs and lights can become very hot. For this
reason, allow them to cool down before
changing the bulb. Otherwise you could burn
yourself when you touch them.
Keep bulbs out of the reach of children. Oth-
erwise, they could damage them, for example,
and injure themselves.
Never use a bulb which has been dropped.
Such a bulb may explode and injure you.
Halogen bulbs are pressurised and could
explode when you change them, especially if they are very hot. You should therefore wear
eye protection and gloves when you are
changing them.
G
Risk of injury
Xenon bulbs are under high voltage. You could
get an electric shock and be seriously or even
fatally injured if you touch the electric con-
tacts on xenon bulbs. Therefore, do not
remove the cover on xenon bulbs.
Do not change xenon bulbs yourself, but have
them replaced at a qualified specialist work-
shop which has the necessary specialist
knowledge and tools to carry out the work
required.
Mercedes-Benz recommends that you use a
Mercedes-Benz Service Centre for this pur-
pose. In particular, work relevant to safety or
on safety-related systems must be carried out
at a qualified specialist workshop. Changing bulbs
255Practical advice
X164_AKB; 2; 3, en-GB
wobuchh, Version: 2.11.8.1 2009-03-31T14:14:58+02:00 - Seite 255 Z
Dateiname: 6515431202_buchblock.pdf; erzeugt am 01. Apr 2009 00:18:05; WK
Page 261 of 309

Changing the front bulbs
Dipped-beam headlamps (halogen
headlamps) X
Switch off the lights.
X Open the bonnet.
X Turn housing cover :anti-clockwise and
remove it.
X Turn bulb holder ;anti-clockwise and
remove it.
X Remove the bulb from bulb holder ;.
X Insert the new bulb into bulb holder ;.
X Insert bulb holder ;and turn it clockwise.
X Align housing cover :and turn it clock-
wise.
Main-beam headlamps X
Switch off the lights.
X Open the bonnet.
X Turn housing cover :anti-clockwise and
remove it. X
Turn bulb holder ;anti-clockwise and
remove it.
X Remove the bulb from bulb holder ;.
X Insert the new bulb into bulb holder ;.
X Insert bulb holder ;and turn it clockwise.
X Align housing cover :and turn it clock-
wise.
Side lamp/parking lamp X
Switch off the lights.
X Open the bonnet.
X Turn bulb holder :anti-clockwise and
remove it.
X Remove the bulb from bulb holder :.
X Insert the new bulb into bulb holder :.
X Insert bulb holder :and turn it clockwise.
Turn signal lamp X
Switch off the lights.
X Open the bonnet. 258
Changing bulbsPractical advice
X164_AKB; 2; 3, en-GB
wobuchh,
Version: 2.11.8.1 2009-03-31T14:14:58+02:00 - Seite 258
Dateiname: 6515431202_buchblock.pdf; erzeugt am 01. Apr 2009 00:18:06; WK
Page 263 of 309

Tail lamps with LEDs
:
Rear foglamp
; Reversing lamp
X Switch off the lights.
X Open the luggage compartment.
X Open the side trim panel (Y page 259).
X Turn the corresponding bulb holder anti-
clockwise and remove it.
X Remove the bulb from the bulb holder.
X Insert the new bulb into the bulb holder.
X Insert the bulb holder and turn it clockwise.
X Close the side trim panel (Y page 259).
Tail lamp (exterior spare wheel
bracket*) On vehicles with an exterior spare wheel
bracket*, the following lamps are located in
the bumper:
R turn signal lamp
R tail lamp/parking lamp/brake lamp
R licence plate lamp X
Switch off the lights.
X Insert a plastic card into the gap between
the bumper and lamp cluster :.
X Push the plastic card in the direction of the
arrow.
Lamp cluster :pops out.
X Remove lamp cluster :. ;
Turn signal lamp
= Tail lamp/parking lamp/brake lamp
X Turn the corresponding bulb holder anti-
clockwise and remove it.
X Press the lamp slightly into the holder, turn
it anti-clockwise and pull it out.
X Insert the new bulb into the bulb holder and
turn it clockwise.
X Insert the corresponding bulb holder and
turn it clockwise.
X Insert lamp unit :and press in firmly.
Lamp unit :snaps into place.
Licence plate lamp 260
Changing bulbsPractical advice
* optional
X164_AKB; 2; 3, en-GB
wobuchh
,V ersion: 2.11.8.1
2009-03-31T14:14:58+02:00 - Seite 260
Dateiname: 6515431202_buchblock.pdf; erzeugt am 01. Apr 2009 00:18:08; WK
Page 264 of 309
X
Switch off the lights.
X Open the tailgate.
X Remove screws :.
X Remove licence plate lamp.
X Replace the bulb.
X Insert licence plate lamp.
X Replace and tighten screws :.Replacing the wiper blades
Windscreen wiper blades
G
Risk of accident
The windscreen will no longer be wiped prop-
erly if the wiper blades are worn. This could
prevent you from observing the traffic condi-
tions, thereby causing an accident. Replace
the wiper blades twice a year, ideally in spring
and autumn. G
Risk of accident
The wiper arms could start moving and cause
an injury if you leave the windscreen wipers
switched on.
Remove the key from the ignition lock before
replacing the wiper blades.
! To avoid damaging the windscreen wiper
blades, make sure that you touch only the
wiper arm of the windscreen wiper.
Removing X
Remove the key from the ignition lock.
X Fold the wiper arm away from the wind-
screen. X
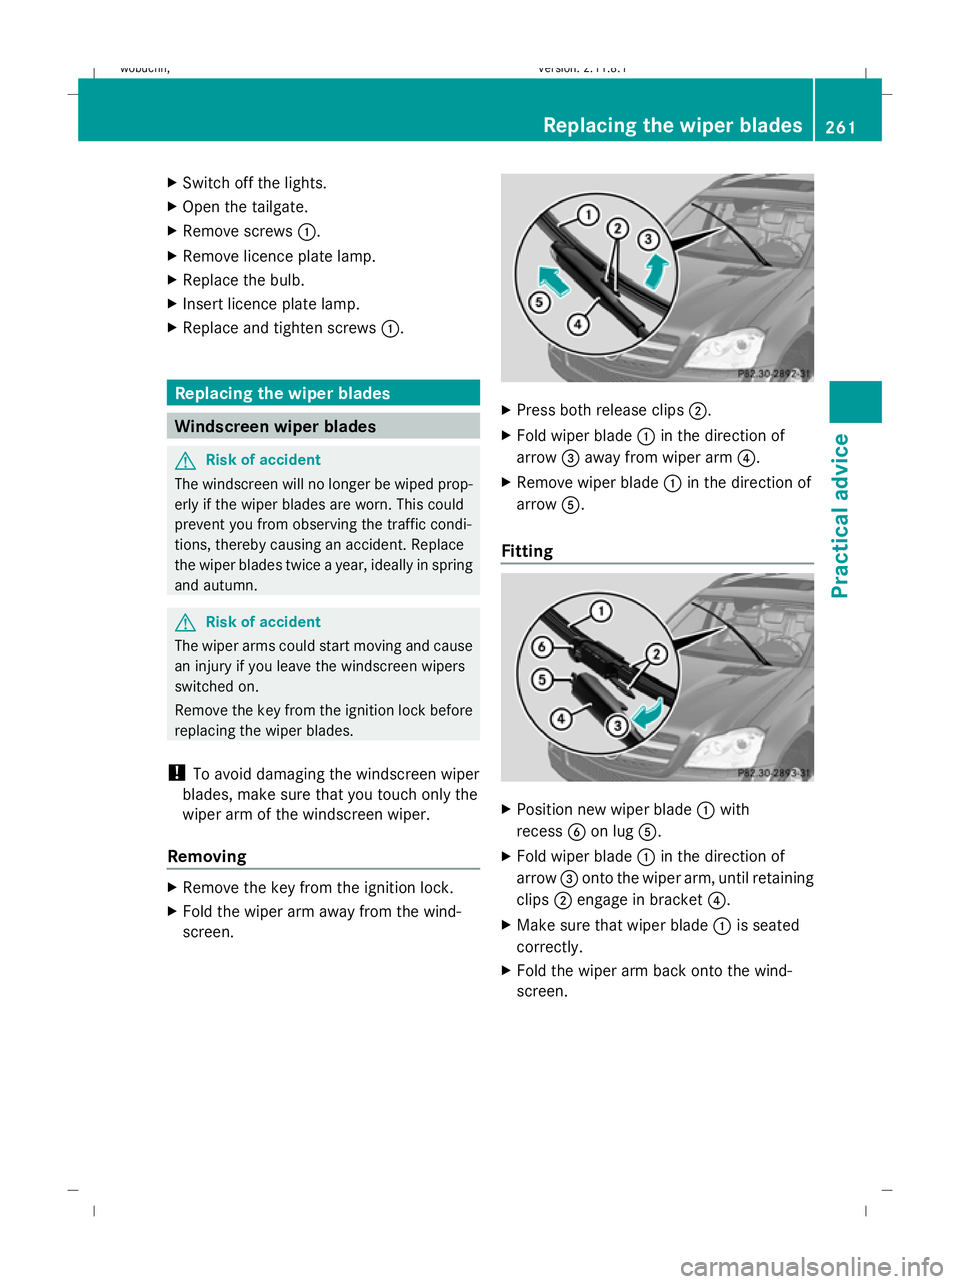
Press both release clips ;.
X Fold wiper blade :in the direction of
arrow =away from wiper arm ?.
X Remove wiper blade :in the direction of
arrow A.
Fitting X
Position new wiper blade :with
recess Bon lug A.
X Fold wiper blade :in the direction of
arrow =onto the wiper arm, until retaining
clips ;engage in bracket ?.
X Make sure that wiper blade :is seated
correctly.
X Fold the wiper arm back onto the wind-
screen. Replacing the wiper blades
261Practical advice
X164_AKB; 2; 3, en-GB
wobuchh, Version: 2.11.8.1 2009-03-31T14:14:58+02:00 - Seite 261 Z
Dateiname: 6515431202_buchblock.pdf; erzeugt am 01. Apr 2009 00:18:08; WK