2009 MERCEDES-BENZ GL SUV lights
[x] Cancel search: lightsPage 193 of 309
X
Wheels and tyres: check the tyre tread
depth and tyre pressure.
X Check for damage and remove foreign
objects, e.g. small stones, from the
wheels/tyres.
X Replace any missing valve caps.
X Replace dented or damaged wheels.
Checklist after driving off-road Driving over rough terrain places greater
demands on your vehicle than driving on nor-
mal roads. After driving off-road, check the
vehicle. This allows you to detect damage
promptly and reduce the risk of an accident
to yourself and other road users.
X Deactivate the LOW RANGE off-road gear
(Y page 114).
X Deactivate DSR (Y page 113).
X Set the differential lock setting to AUTO on
the selector wheel (Y page 116).
X Lower the vehicle level again to a level suit-
able to the road conditions, e.g. to the high-
way/high-speed level.
X Clean the headlamps and rear lights and
check for damage.
X Clean the front and rear licence plates.
X Clean the wheels/tyres with a water jet and
remove any foreign objects.
X Clean the wheels, wheel arches and the
vehicle underside with a water jet; check
for foreign objects and damage.
X Check whether twigs or other parts of
plants have become trapped. These
increase the risk of fire and can damage
fuel pipes, brake hoses or the rubber bel-
lows of the axle joints and propeller shafts.
X After the trip, examine without fail the
entire undercarriage, wheels, tyres, brakes,
bodywork structure, steering, chassis and
exhaust system for damage.
X After driving for extended periods across
sand, mud, gravel, water or in similarly dirty
conditions, have the brake discs, wheels, brake pads/l
inings and axle joints checked
and cleaned.
X If you detect strong vibrations after off-road
travel, check for foreign objects in the
wheels and drive train and remove them if
necessary. Foreign objects can disturb the
balance and cause vibrations. Travelling uphill
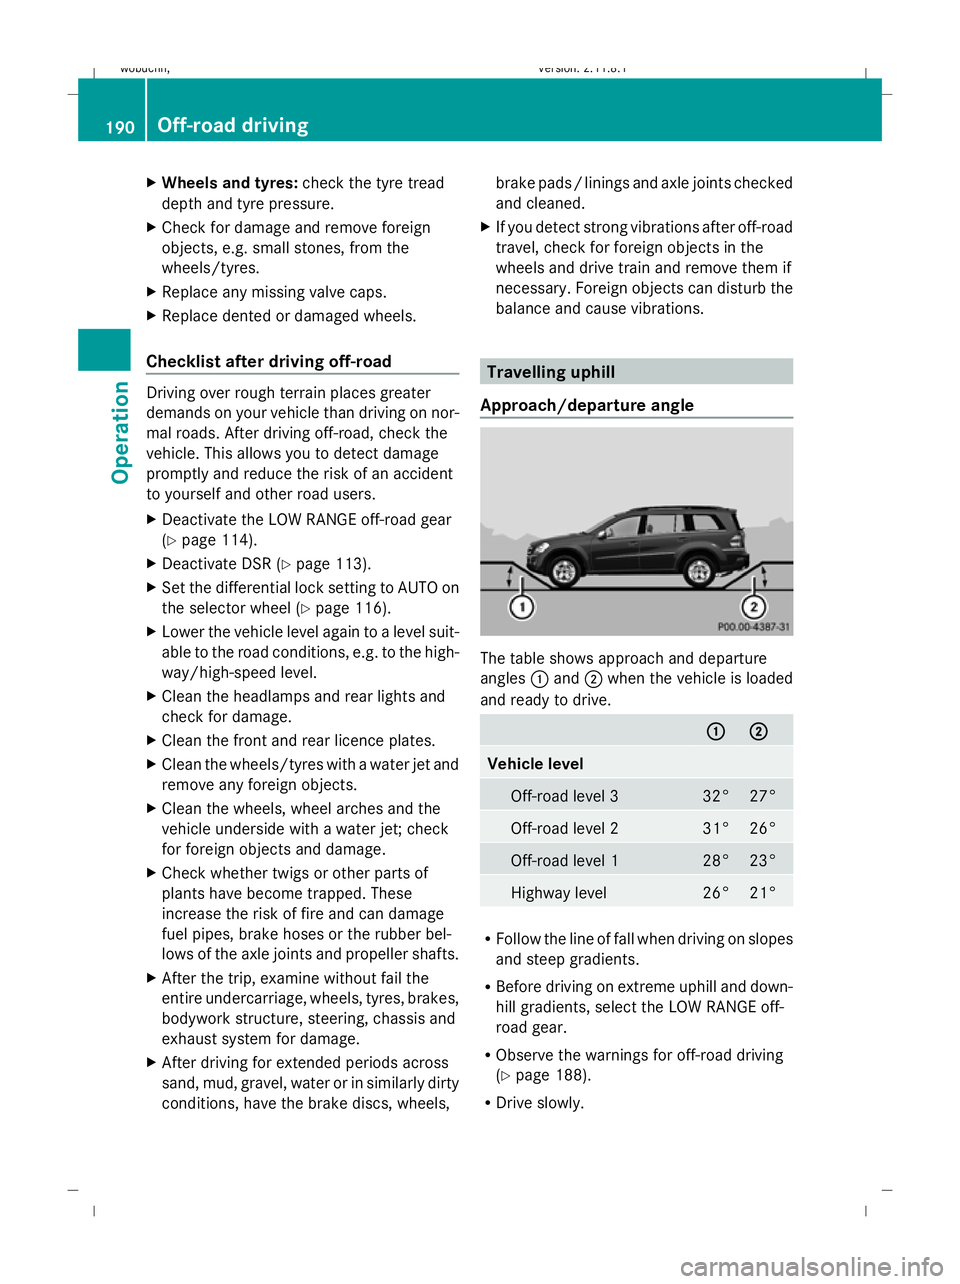
Approach/departure angle The table shows approach and departure
angles
:and ;when the vehicle is loaded
and ready to drive. :
: ;
; Vehicle level
Off-road level 3 32° 27°
Off-road level 2 31° 26°
Off-road level 1 28° 23°
Highway level 26° 21°
R
Follow the line of fall when driving on slopes
and steep gradients.
R Before driving on extreme uphill and down-
hill gradients, select the LOW RANGE off-
road gear.
R Observe the warnings for off-road driving
(Y page 188).
R Drive slowly. 190
Off-road drivingOperation
X164_AKB; 2; 3, en-GB
wobuchh,
Version: 2.11.8.1 2009-03-31T14:14:58+02:00 - Seite 190
Dateiname: 6515431202_buchblock.pdf; erzeugt am 01. Apr 2009 00:17:49; WK
Page 205 of 309
High-pressure cleaners
G
Risk of accident
Do not use high-pressure cleaners with circu-
lar-jet nozzles (dirt grinders) to clean your
vehicle, in particular the tyres. You could oth-
erwise damage the tyres and cause an acci-
dent.
! Observe the instructions issued by the
equipment manufacturer concerning the
distance to be maintained between the
nozzle of the high-pressure cleaner and the
vehicle (at least 30 cm).
Move the high-pressure cleaner nozzle
around when cleaning your vehicle.
Do not aim directly at any of the following:
R tyres
R door joint
R electrical components
R battery
R connectors
R lights
R seals
R trim elements
R ventilation slots
Damaged seals or electrical components
can lead to failures or leaks.
Cleaning the paintwork Scratches, corrosive deposits, areas affected
by corrosion and damage caused by inade-
quate care cannot always be completely
repaired. In such cases, visit a qualified spe-
cialist workshop immediately, e.g. a
Mercedes-Benz Service Centre.
X Remove the following types of dirt immedi-
ately, whilst avoiding rubbing too hard.
Soak:
R insect remains with insect remover
R bird droppings with water and rinse off the treated surface after-
wards.
Remove:
R
tree resin, oils, fuels and greases by rub-
bing gently with a cloth soaked in petro-
leum ether or lighter fluid.
R tar stain with tar remover
R wax with silicone remover
! Do not affix:
R stickers
R films
R magnetic plates or similar items
to painted surfaces. Otherwise, you could
damage the paintwork.
Cleaning the wheels !
Do not use acidic wheel cleaners to
remove brake dust. This could damage
wheel bolts and brake components.
Cleaning the windows X
Clean the inside and outside of the win-
dows with a damp cloth and a cleaning
product approved and recommended by
Mercedes-Benz.
! Clean the water drainage channels of the
windscreen and the rear window at regular
intervals. Under certain circumstances,
deposits such as leaves, petals and pollen
may prevent water from draining away
leading to corrosion damage.
Cleaning the wiper blades G
Risk of injury
Before cleaning the windscreen or wiper
blades, turn the key to position 0in the igni-
tion lock or press the Start/Stop button* until
all indicator lamps have gone out in the instru-
ment cluster. The windscreen wipers could
otherwise move and cause injury. 202
CareOperation
* optional
X164_AKB; 2; 3, en-GB
wobuchh,
Version: 2.11.8.1 2009-03-31T14:14:58+02:00 - Seite 202
Dateiname: 6515431202_buchblock.pdf; erzeugt am 01. Apr 2009 00:17:53; WK
Page 218 of 309
Display messages
Possible causes/consequences and
X
X Solutions ESP unavaila‐
ble See
Owner's
Manual
G
Risk of accident
ESP ®
and therefore also PRE-SAFE ®
are temporarily unavail-
able. The self diagnosis function might not be complete, for
example. BAS has also been deactivated.
X Carefully drive a short, gently winding stretch of road at a
speed above 20 km/h.
If the display message disappears, ESP ®
is available again. G
Risk of accident
ESP ®
and therefore also BAS and PRE-SAFE ®
are unavailable
due to undervoltage.
The brake system continues to function normally, but without
the functions listed above.
X Drive on carefully.
X Visit a qualified specialist workshop immediately. If the display message is shown during the journey and the
d
warning lamp is flashing, then 4ETS (Electronic Traction
System) is deactivated. Otherwise, the brakes on the drive
wheels could overheat.
X Let the brakes cool down until the display message disap-
pears and the dwarning lamp goes out.
4ETS is activated again. ESP inopera‐
tive See
Owner's
Manual
G
Risk of accident
ESP ®
and therefore also Brake Assist and PRE-SAFE ®
are
unavailable due to a malfunction. The dwarning lamp also
lights up in the instrument cluster.
The brake system continues to function normally, but without
the functions listed above.
X Drive on carefully.
X Visit a qualified specialist workshop immediately. Select
position P only when
vehicle
is at a
standstill The vehicle is moving.
X
Pull over and stop the vehicle safely, paying attention to
road and traffic conditions.
X Move the selector lever to P.Vehicle not in
position P The driver's door is open and the automatic transmission is
in position R,Nor D.
X Move the selector lever to P.
X Engage the parking brake. Display
messages
215Practical advice
X164_AKB; 2; 3, en-GB
wobuchh,V ersion: 2.11.8.1
2009-03-31T14:14:58+02:00 - Seite 215 Z
Dateiname: 6515431202_buchblock.pdf; erzeugt am 01. Apr 2009 00:17:59; WK
Page 228 of 309

Display messages
Possible causes/consequences and
X
X Solutions D Power
steering
malfunc‐
tion See
Owner's
Manual
G
Risk of accident
There is no power assistance for the steering. You will need
to use more force to steer.
X Check whether you are able to apply the extra force
required.
X If you are able to steer safely: carefully drive on to a
qualified specialist workshop.
X If you are unable to steer safely: do not drive on. Contact
the nearest qualified specialist workshop. b Left-hand
Cornering
light
or
Right-
hand Cor‐
nering
light
The left-hand or right-hand cornering lamp* is faulty.
X
Change the bulb ( Ypage 254). b Left-hand
dipped
beam
or
Right-
hand
dipped
beam The left-hand or right-hand dipped-beam headlamp is faulty.
X
Halogen headlamp: replace the bulb (Ypage 254).
X Bi-xenon headlamp*: visit a qualified specialist workshop. b AUTO
lights
inopera‐
tive The light sensor is faulty.
X
Visit a qualified specialist workshop. b Trailer
Left-hand
turn sig‐
nal
or
Trailer
Right-
hand turn
signal The left-hand or right-hand trailer turn signal lamp is faulty.
X
Change the bulb. b Trailer
brake lamp The trailer brake lamp is faulty.
X
Change the bulb. Display
messages
225Practical advice
* optional
X164_AKB; 2; 3, en-GB
wobuchh
,V ersion: 2.11.8.1
2009-03-31T14:14:58+02:00 - Seite 225 Z
Dateiname: 6515431202_buchblock.pdf; erzeugt am 01. Apr 2009 00:18:00; WK
Page 230 of 309
Display messages
Possible causes/consequences and
X
X Solutions b Main
beam, left
or
Main
beam,
right The left-hand or right-hand main beam headlamp is faulty.
X
Halogen headlamp: replace the bulb (Ypage 254).
X Bi-xenon headlamp*: visit a qualified specialist workshop. b Licence
plate
lamp, left
or
Licence
plate
lamp,
right The left-hand or right-hand licence plate lamp is faulty.
X
Change the bulb ( Ypage 254). b Switch
off lights The lights are still switched on when you leave the vehicle.
X
Turn the light switch to $orÃ.
or
X If the rear foglamp is switched on: press the light switch in
to the stop. b Front fog‐
lamp, left
or
Front fog‐
lamp,
right The front left-hand or right-hand foglamp is faulty.
X
Visit a qualified specialist workshop. b Rear left-
hand fog‐
lamp
or
Rear
right-
hand fog‐
lamp The left-hand or right-hand rear foglamp is faulty.
X
Change the bulb ( Ypage 259). b Parking
lamp,
front left
or
Parking
lamp,
front
right The front left-hand or right-hand parking lamp is faulty.
X
Change the bulb ( Ypage 254). Display
messages
227Practical advice
* optional
X164_AKB; 2; 3, en-GB
wobuchh
,V ersion: 2.11.8.1
2009-03-31T14:14:58+02:00 - Seite 227 Z
Dateiname: 6515431202_buchblock.pdf; erzeugt am 01. Apr 2009 00:18:00; WK
Page 240 of 309
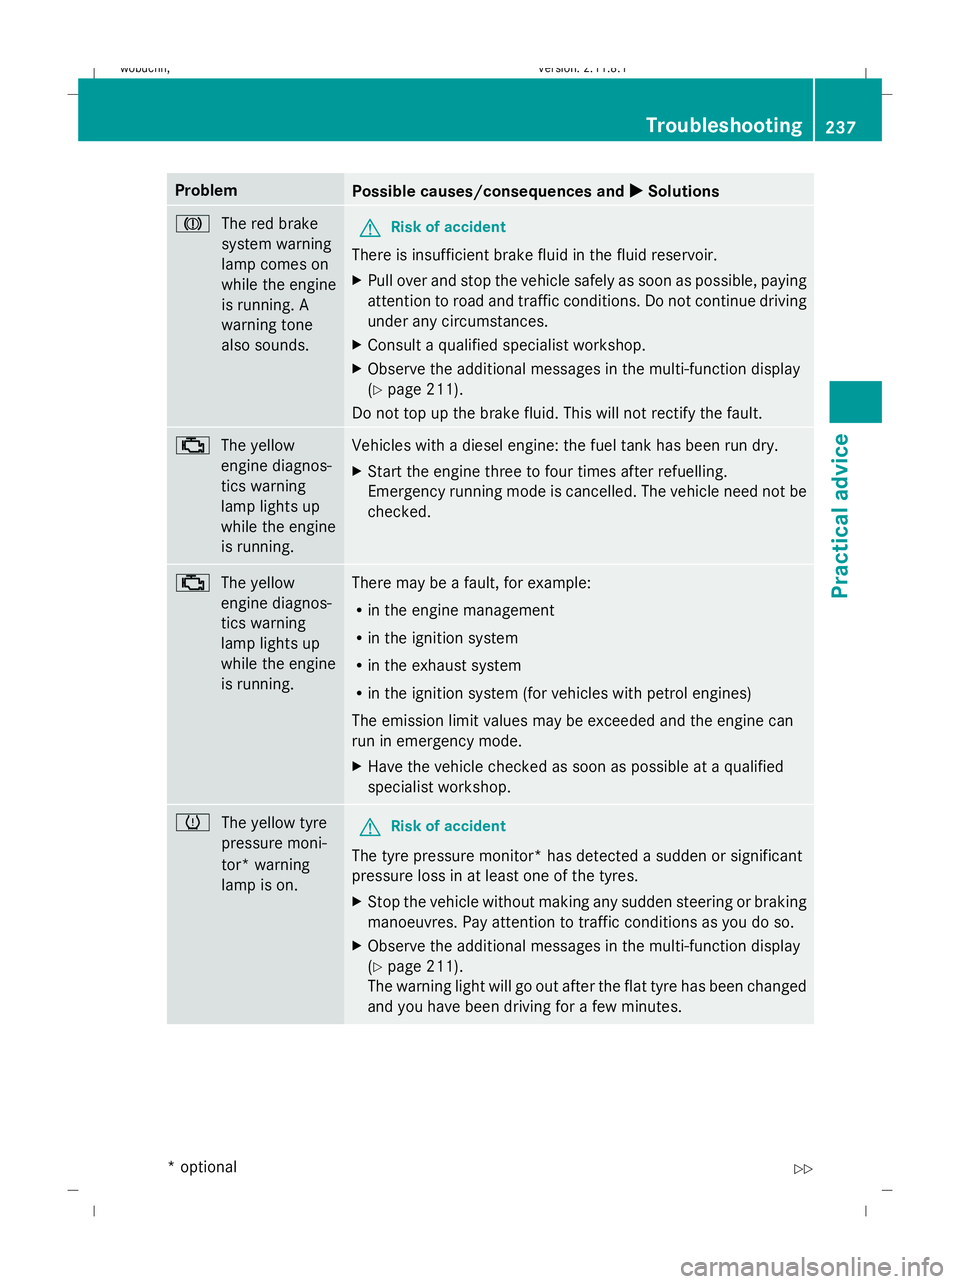
Problem
Possible causes/consequences and
X
X Solutions J
The red brake
system warning
lamp comes on
while the engine
is running. A
warning tone
also sounds. G
Risk of accident
There is insufficient brake fluid in the fluid reservoir.
X Pull over and stop the vehicle safely as soon as possible, paying
attention to road and traffic conditions. Do not continue driving
under any circumstances.
X Consult a qualified specialist workshop.
X Observe the additional messages in the multi-function display
(Y page 211).
Do not top up the brake fluid. This will not rectify the fault. ;
The yellow
engine diagnos-
tics warning
lamp lights up
while the engine
is running. Vehicles with a diesel engine: the fuel tank has been run dry.
X
Start the engine three to four times after refuelling.
Emergency running mode is cancelled. The vehicle need not be
checked. ;
The yellow
engine diagnos-
tics warning
lamp lights up
while the engine
is running. There may be a fault, for example:
R
in the engine management
R in the ignition system
R in the exhaust system
R in the ignition system (for vehicles with petrol engines)
The emission limit values may be exceeded and the engine can
run in emergency mode.
X Have the vehicle checked as soon as possible at a qualified
specialist workshop. h
The yellow tyre
pressure moni-
tor* warning
lamp is on. G
Risk of accident
The tyre pressure monitor* has detected a sudden or significant
pressure loss in at least one of the tyres.
X Stop the vehicle without making any sudden steering or braking
manoeuvres. Pay attention to traffic conditions as you do so.
X Observe the additional messages in the multi-function display
(Y page 211).
The warning light will go out after the flat tyre has been changed
and you have been driving for a few minutes. Troubleshooting
237Practical advice
* optional
X164_AKB; 2; 3, en-GB
wobuchh,
Version: 2.11.8.1 2009-03-31T14:14:58+02:00 - Seite 237 Z
Dateiname: 6515431202_buchblock.pdf; erzeugt am 01. Apr 2009 00:18:01; WK
Page 241 of 309
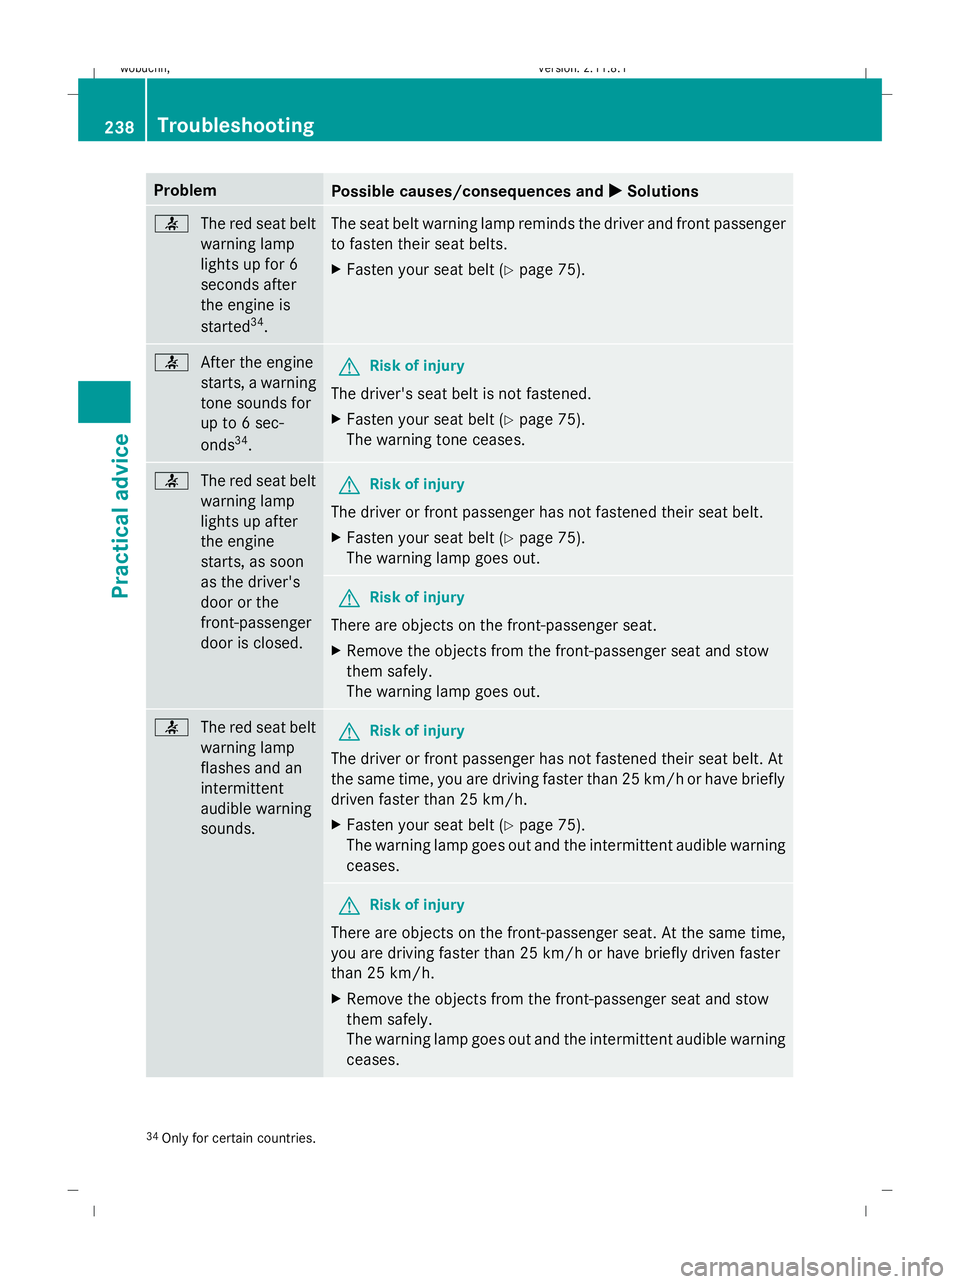
Problem
Possible causes/consequences and
X XSolutions 7
The red seat belt
warning lamp
lights up for 6
seconds after
the engine is
started 34
. The seat belt warning lamp reminds the driver and front passenger
to fasten their seat belts.
X
Fasten your seat belt (Y page 75).7
After the engine
starts, a warning
tone sounds for
up to 6 sec-
onds34
. G
Risk of injury
The driver's seat belt is not fastened.
X Fasten your seat belt (Y page 75).
The warning tone ceases. 7
The red seat belt
warning lamp
lights up after
the engine
starts, as soon
as the driver's
door or the
front-passenger
door is closed. G
Risk of injury
The driver or front passenger has not fastened their seat belt.
X Fasten your seat belt (Y page 75).
The warning lamp goes out. G
Risk of injury
There are objects on the front-passenger seat.
X Remove the objects from the front-passenger seat and stow
them safely.
The warning lamp goes out. 7
The red seat belt
warning lamp
flashes and an
intermittent
audible warning
sounds. G
Risk of injury
The driver or front passenger has not fastened their seat belt. At
the same time, you are driving faster than 25 km/ho r have briefly
driven faster than 25 km/h.
X Fasten your seat belt (Y page 75).
The warning lamp goes out and the intermittent audible warning
ceases. G
Risk of injury
There are objects on the front-passenger seat. At the same time,
you are driving faster than 25 km/h or have briefly driven faster
than 25 km/h.
X Remove the objects from the front-passenger seat and stow
them safely.
The warning lamp goes out and the intermittent audible warning
ceases. 34
Only for certain countries. 238
TroubleshootingPractical advice
X164_AKB; 2; 3, en-GB
wobuchh,
Version: 2.11.8.1 2009-03-31T14:14:58+02:00 - Seite 238
Dateiname: 6515431202_buchblock.pdf; erzeugt am 01. Apr 2009 00:18:01; WK
Page 242 of 309
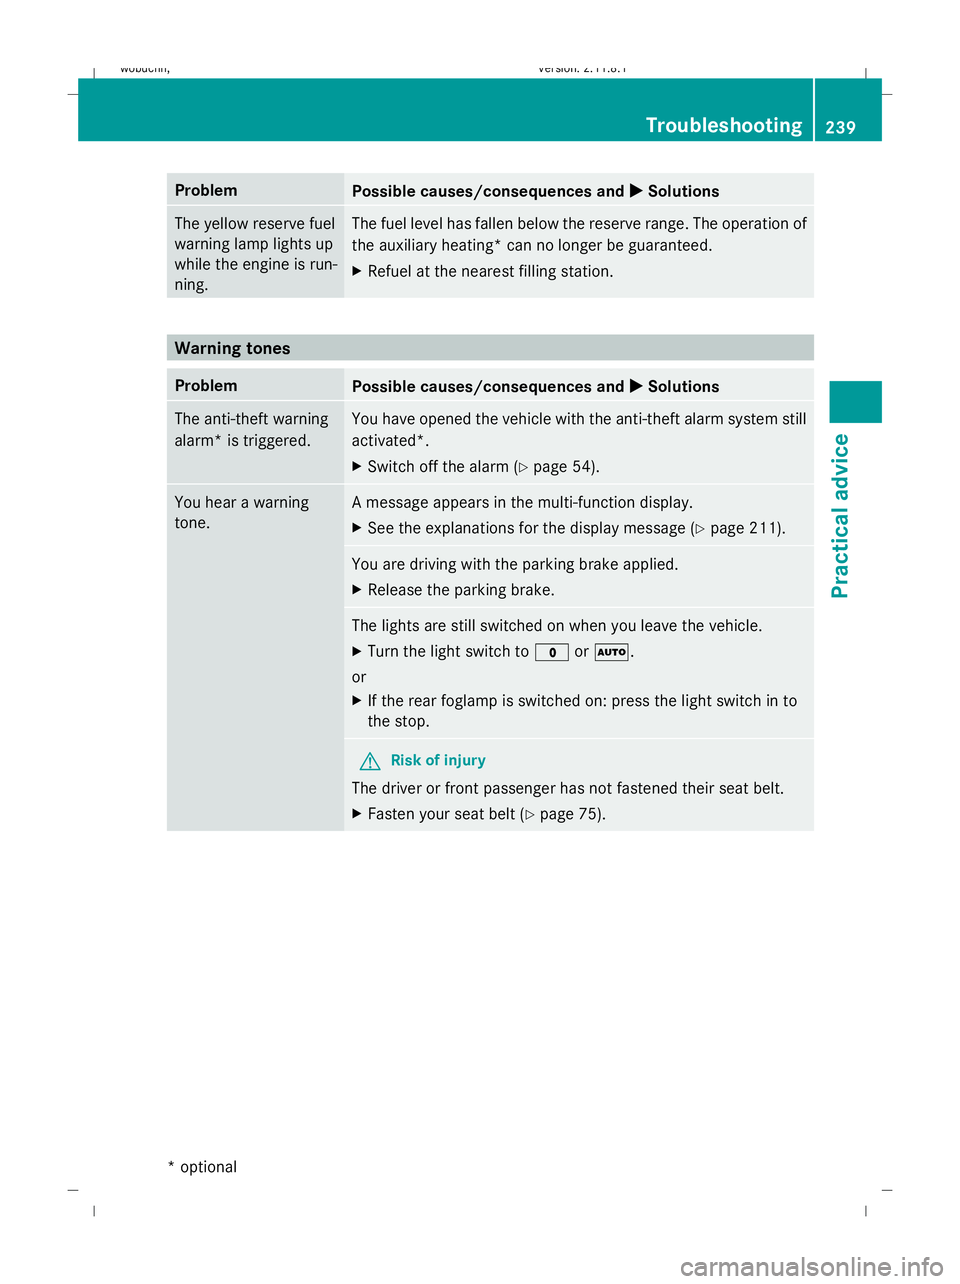
Problem
Possible causes/consequences and
X
X Solutions The yellow reserve fuel
warning lamp lights up
while the engine is run-
ning. The fuel level has fallen below the reserve range. The operation of
the auxiliary heating* can no longer be guaranteed.
X
Refuel at the nearest filling station. Warning tones
Problem
Possible causes/consequences and
X
X Solutions The anti-theft warning
alarm* is triggered. You have opened the vehicle with the anti-theft alarm system still
activated*.
X
Switch off the alarm (Y page 54). You hear a warning
tone. A message appears in the multi-function display.
X
See the explanations for the display message (Y page 211). You are driving with the parking brake applied.
X
Release the parking brake. The lights are still switched on when you leave the vehicle.
X
Turn the light switch to $orÃ.
or
X If the rear foglamp is switched on: press the light switch in to
the stop. G
Risk of injury
The driver or front passenger has not fastened their seat belt.
X Fasten your seat belt (Y page 75). Troubleshooting
239Practical advice
* optional
X164_AKB; 2; 3, en-GB
wobuchh,
Version: 2.11.8.1 2009-03-31T14:14:58+02:00 - Seite 239 Z
Dateiname: 6515431202_buchblock.pdf; erzeugt am 01. Apr 2009 00:18:02; WK