2009 MERCEDES-BENZ GL SUV lights
[x] Cancel search: lightsPage 92 of 309
Automatic transmission
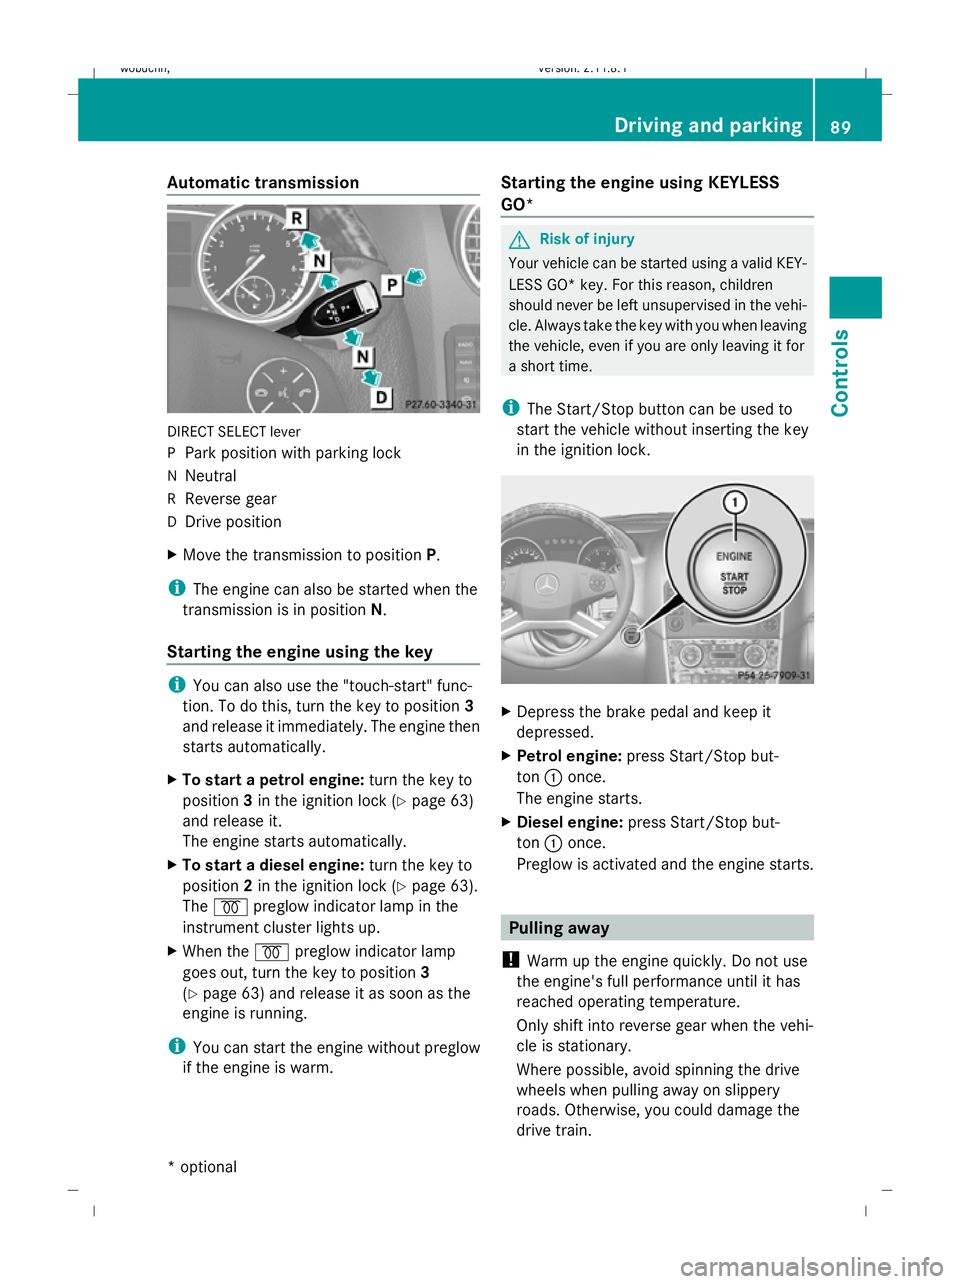
DIRECT SELECT lever
P
Park position with parking lock
N Neutral
R Reverse gear
D Drive position
X Move the transmission to position P.
i The engine can also be started when the
transmission is in position N.
Starting the engine using the key i
You can also use the "touch-start" func-
tion. To do this, turn the key to position 3
and release it immediately. The engine then
starts automatically.
X To start a petrol engine: turn the key to
position 3in the ignition lock (Y page 63)
and release it.
The engine starts automatically.
X To start a diesel engine: turn the key to
position 2in the ignition lock (Y page 63).
The % preglow indicator lamp in the
instrument cluster lights up.
X When the %preglow indicator lamp
goes out, turn the key to position 3
(Y page 63) and release it as soon as the
engine is running.
i You can start the engine without preglow
if the engine is warm. Starting the engine using KEYLESS
GO* G
Risk of injury
Your vehicle can be started using a valid KEY-
LESS GO* key. For this reason, children
should never be left unsupervised in the vehi-
cle. Always take the key with you when leaving
the vehicle, even if you are only leaving it for
a short time.
i The Start/Stop button can be used to
start the vehicle without inserting the key
in the ignition lock. X
Depress the brake pedal and keep it
depressed.
X Petrol engine: press Start/Stop but-
ton :once.
The engine starts.
X Diesel engine: press Start/Stop but-
ton :once.
Preglow is activated and the engine starts. Pulling away
! Warm up the engine quickly. Do not use
the engine's full performance until it has
reached operating temperature.
Only shift into reverse gear when the vehi-
cle is stationary.
Where possible, avoid spinning the drive
wheels when pulling away on slippery
roads. Otherwise, you could damage the
drive train. Driving and parking
89Controls
* optional
X164_AKB; 2; 3, en-GB
wobuchh,
Version: 2.11.8.1 2009-03-31T14:14:58+02:00 - Seite 89 Z
Dateiname: 6515431202_buchblock.pdf; erzeugt am 01. Apr 2009 00:17:11; WK
Page 94 of 309
Parking brake
X
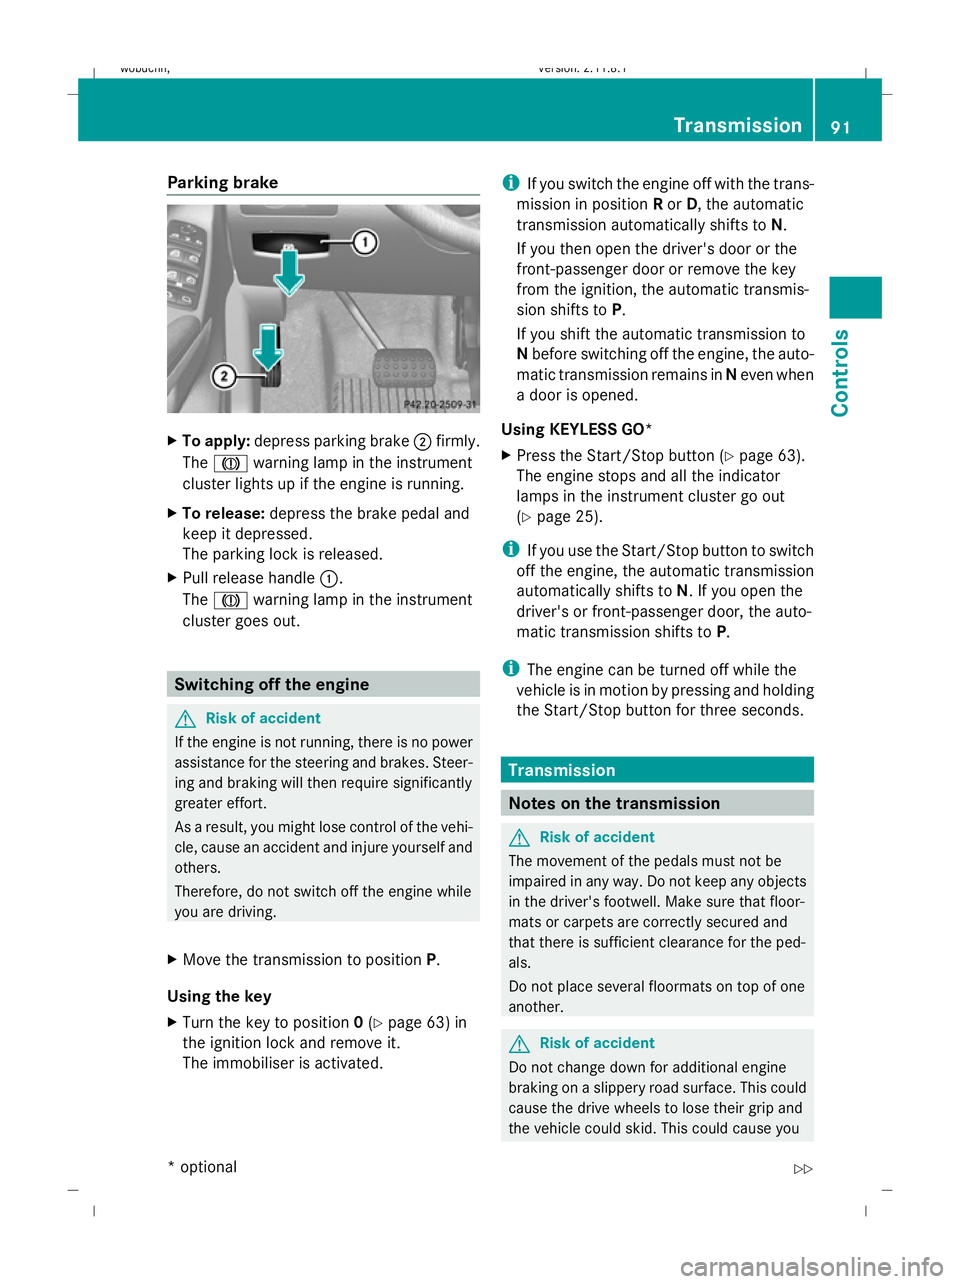
To apply: depress parking brake ;firmly.
The J warning lamp in the instrument
cluster lights up if the engine is running.
X To release: depress the brake pedal and
keep it depressed.
The parking lock is released.
X Pull release handle :.
The J warning lamp in the instrument
cluster goes out. Switching off the engine
G
Risk of accident
If the engine is not running, there is no power
assistance for the steering and brakes. Steer-
ing and braking will then require significantly
greater effort.
As a result, you might lose control of the vehi-
cle, cause an accident and injure yourself and
others.
Therefore, do not switch off the engine while
you are driving.
X Move the transmission to position P.
Using the key
X Turn the key to position 0(Y page 63) in
the ignition lock and remove it.
The immobiliser is activated. i
If you switch the engine off with the trans-
mission in position Ror D, the automatic
transmission automatically shifts to N.
If you then open the driver's door or the
front-passenger door or remove the key
from the ignition, the automatic transmis-
sion shifts to P.
If you shift the automatic transmission to
N before switching off the engine, the auto-
matic transmission remains in Neven when
a door is opened.
Using KEYLESS GO*
X Press the Start/Stop button (Y page 63).
The engine stops and all the indicator
lamps in the instrument cluster go out
(Y page 25).
i If you use the Start/Stop button to switch
off the engine, the automatic transmission
automatically shifts to N. If you open the
driver's or front-passenger door, the auto-
matic transmission shifts to P.
i The engine can be turned off while the
vehicle is in motion by pressing and holding
the Start/Stop button for three seconds. Transmission
Notes on the transmission
G
Risk of accident
The movement of the pedals must not be
impaired in any way. Do not keep any objects
in the driver's footwell. Make sure that floor-
mats or carpets are correctly secured and
that there is sufficient clearance for the ped-
als.
Do not place several floormats on top of one
another. G
Risk of accident
Do not change down for additional engine
braking on a slippery road surface. This could
cause the drive wheels to lose their grip and
the vehicle could skid. This could cause you Transmission
91Controls
* optional
X164_AKB; 2; 3, en-GB
wobuchh,
Version: 2.11.8.1 2009-03-31T14:14:58+02:00 - Seite 91 Z
Dateiname: 6515431202_buchblock.pdf; erzeugt am 01. Apr 2009 00:17:11; WK
Page 101 of 309
&
*
Press briefly:
scrolls back
and forth within a menu
In the Audio/TV*/DVD*
menu: selects a stored sta-
tion, an audio track or a video
scene
In the Telephone menu,
switches to the phone book
and selects a name or a tele-
phone number &
* Press and hold:
in the
Audio/TV*/DVD* menu,
selects the next/previous sta-
tion or selects an audio track
using rapid scrolling
In the Telephone menu,
starts rapid scrolling through
the phone book Multi-function display
To activate the multi-function display:
R switch on the ignition.
R switch on the lights. R
open a front door.
R press the .reset button in the instrument
panel.
Values, settings and display messages are
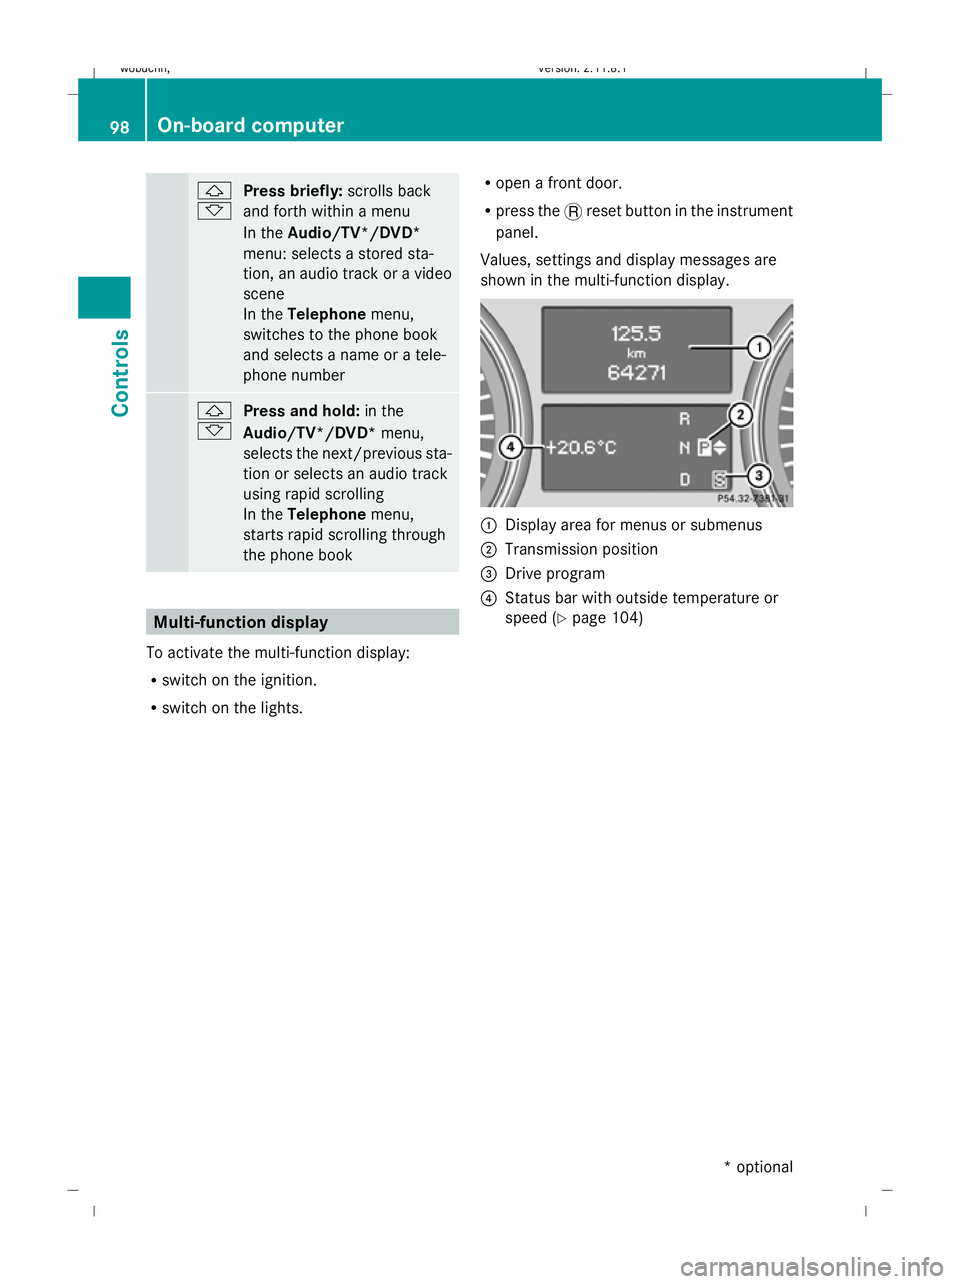
shown in the multi-function display. :
Display area for menus or submenus
; Transmission position
= Drive program
? Status bar with outside temperature or
speed (Y page 104) 98
On-board computerControls
* optional
X164_AKB; 2; 3, en-GB
wobuchh,
Version: 2.11.8.1 2009-03-31T14:14:58+02:00 - Seite 98
Dateiname: 6515431202_buchblock.pdf; erzeugt am 01. Apr 2009 00:17:14; WK
Page 108 of 309
Setting the time
X
Press &to select Time set Hours (or
time set Minutes).
X Press the WorX button to set a
value.
Setting the date
X Press the &button to select Date Set
day (orDate Set month orDate set
year).
X Press the WorX button to set the
date.
X Press the &,VorU button to
select a different display.
Lighting submenu Setting the daytime driving lights
If you set the daytime driving lights and the
light switch is set to
$orÃ, the day-
time driving lights are switched on automati-
cally when the engine is running. When it is
dark, the side lamps and dipped-beam head-
lights are switched on automatically.
In countries in which daytime driving lights
are a legal requirement, Onis the factory set-
ting.
X Press VorU on the steering wheel
to select the Settings... menu.
X Press the &button to select submenus.
X Press the WorX button to select the
Lighting submenu.
X Press &to select Daytime driving
lamps.
X Press WorX to set daytime driving
lights to onoroff.
X Press the &,VorU button to
select a different display. Switching the surround lighting on/off
If the surround lighting is switched on, the
following lights will be switched on automat-
ically in the dark after you have unlocked the
vehicle using the key:
R
the side lamps
R the licence plate lighting
R the front foglamps
The surround lighting switches off automati-
cally after 40 seconds or when the driver's
door is opened.
X Press VorU on the steering wheel
to select the Settings... menu.
X Press the &button to select submenus.
X Press the WorX button to select the
Lighting submenu.
X Press the &button to select the Sur‐
round lighting function.
X Press the WorX button to switch
the Surround lighting function on or
off.
X Press the &,VorU button to
select a different display.
Activating or deactivating the exterior
lighting delayed switch-off
When you activate the Headlamp delayed
shut off function, the exterior lighting
remains on for another 15 seconds after clos-
ing the doors when it is dark. If the engine is
switched off and then none of the doors are
opened, or if an open door is not closed, the
exterior lighting goes out after 60 seconds.
If you have activated the delayed switch-off
function and switched off the engine, the fol-
lowing remain lit:
R the side lamps
R the licence plate lighting
R the front foglamps
X Press VorU on the steering wheel
to select the Settings... menu.
X Press the &button to select submenus. On-board computer
105Controls
X164_AKB; 2; 3, en-GB
wobuchh, Version: 2.11.8.1 2009-03-31T14:14:58+02:00 - Seite 105 Z
Dateiname: 6515431202_buchblock.pdf; erzeugt am 01. Apr 2009 00:17:17; WK
Page 111 of 309
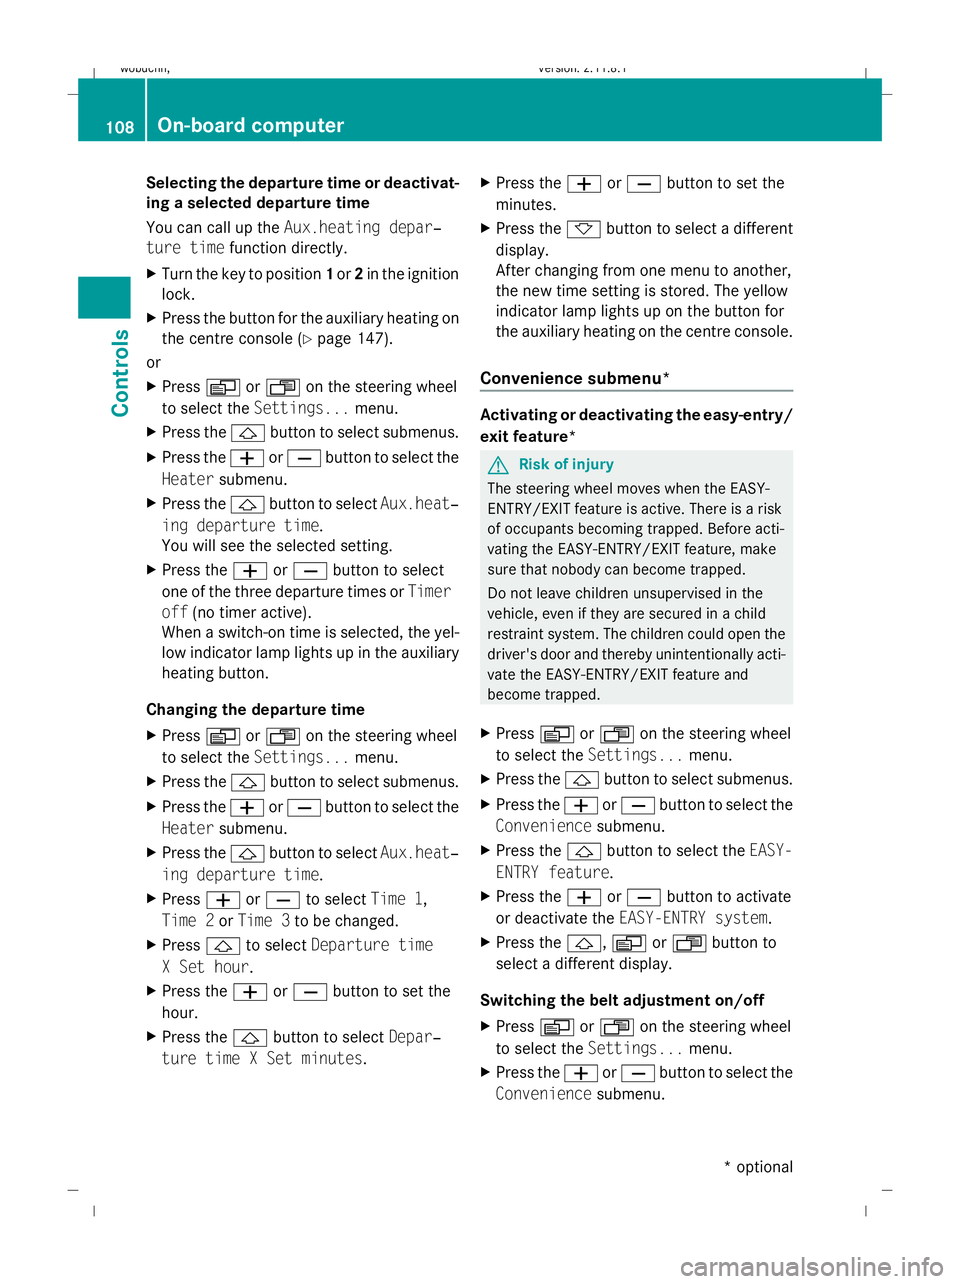
Selecting the departure time or deactivat-
ing a selected departure time
You can call up the Aux.heating depar‐
ture time function directly.
X Turn the key to position 1or 2in the ignition
lock.
X Press the button for the auxiliary heating on
the centre console (Y page 147).
or
X Press VorU on the steering wheel
to select the Settings... menu.
X Press the &button to select submenus.
X Press the WorX button to select the
Heater submenu.
X Press the &button to select Aux.heat‐
ing departure time.
You will see the selected setting.
X Press the WorX button to select
one of the three departure times or Timer
off (no timer active).
When a switch-on time is selected, the yel-
low indicator lamp lights up in the auxiliary
heating button.
Changing the departure time
X Press VorU on the steering wheel
to select the Settings... menu.
X Press the &button to select submenus.
X Press the WorX button to select the
Heater submenu.
X Press the &button to select Aux.heat‐
ing departure time.
X Press WorX to select Time 1,
Time 2 orTime 3 to be changed.
X Press &to select Departure time
X Set hour.
X Press the WorX button to set the
hour.
X Press the &button to select Depar‐
ture time X Set minutes. X
Press the WorX button to set the
minutes.
X Press the *button to select a different
display.
After changing from one menu to another,
the new time setting is stored. The yellow
indicator lamp lights up on the button for
the auxiliary heating on the centre console.
Convenience submenu* Activating or deactivating the easy-entry/
exit feature*
G
Risk of injury
The steering wheel moves when the EASY-
ENTRY/EXIT feature is active. There is a risk
of occupants becoming trapped. Before acti-
vating the EASY-ENTRY/EXIT feature, make
sure that nobody can become trapped.
Do not leave children unsupervised in the
vehicle, even if they are secured in a child
restraint system. The children could open the
driver's door and thereby unintentionally acti-
vate the EASY-ENTRY/EXIT feature and
become trapped.
X Press VorU on the steering wheel
to select the Settings... menu.
X Press the &button to select submenus.
X Press the WorX button to select the
Convenience submenu.
X Press the &button to select the EASY-
ENTRY feature.
X Press the WorX button to activate
or deactivate the EASY-ENTRY system.
X Press the &,VorU button to
select a different display.
Switching the belt adjustment on/off
X Press VorU on the steering wheel
to select the Settings... menu.
X Press the WorX button to select the
Convenience submenu. 108
On-board computerControls
* optional
X164_AKB; 2; 3, en-GB
wobuchh,
Version: 2.11.8.1 2009-03-31T14:14:58+02:00 - Seite 108
Dateiname: 6515431202_buchblock.pdf; erzeugt am 01. Apr 2009 00:17:17; WK
Page 116 of 309
0
or 1in the ignition. Failure to do this can
cause damage to the drive train or the
brake system.
! A function or performance test should
only be carried out on a twin-axle dyna-
mometer. If you wish to operate the vehicle
on such a dynamometer, please consult a
Mercedes-Benz Service Centre in advance.
You could otherwise damage the drive train
or the brake system. DSR (Downhill Speed Regulation)
You will find information about driving off-
road in the "Operation" section
(Y page 188).
DSR is an aid to assist you when driving down-
hill. It keeps the speed of travel at the speed
set on the on-board computer (Y page 109).
The steeper the downhill gradient, the greater
the DSR braking effect on the vehicle. When
driving on flat stretches of road or on an uphill
gradient, the DSR braking effect is minimal or
non-existent. G
Risk of accident
DSR is only an aid designed to assist you when
driving downhill. You are responsible for keep-
ing control of the vehicle and for assessing
whether the downhill gradient can be man-
aged.
When activating DSR the vehicle may brake
suddenly due to DSR intervening. This is
dependent on the downhill gradient and the
difference between the current speed and the
speed set. DSR may not always be able to
keep to the set speed, depending on road sur-
face and tyre conditions. You could lose con-
trol of the vehicle and cause an accident.
Select a set speed suitable for the prevailing
conditions and when necessary, apply the
brakes manually.
DSR controls the vehicle’s speed when
DIRECT SELECT lever positions D,Rand Nare
selected. You can drive at a higher or a lower speed than that set on the on-board computer
at any time by braking or accelerating. G
Risk of accident
If you depress the accelerator pedal with DSR
activated, then the set speed can be excee-
ded. Drive downhill with special care and
always keep in mind that DSR brakes the vehi-
cle as soon as you remove your foot from the
accelerator pedal. The vehicle may be heavily
braked by DSR depending on the gradient and
the difference between the vehicle's road
speed and the set speed. You could lose con-
trol of the vehicle and cause an accident.
The speed is set to 6 km/h at the factory.
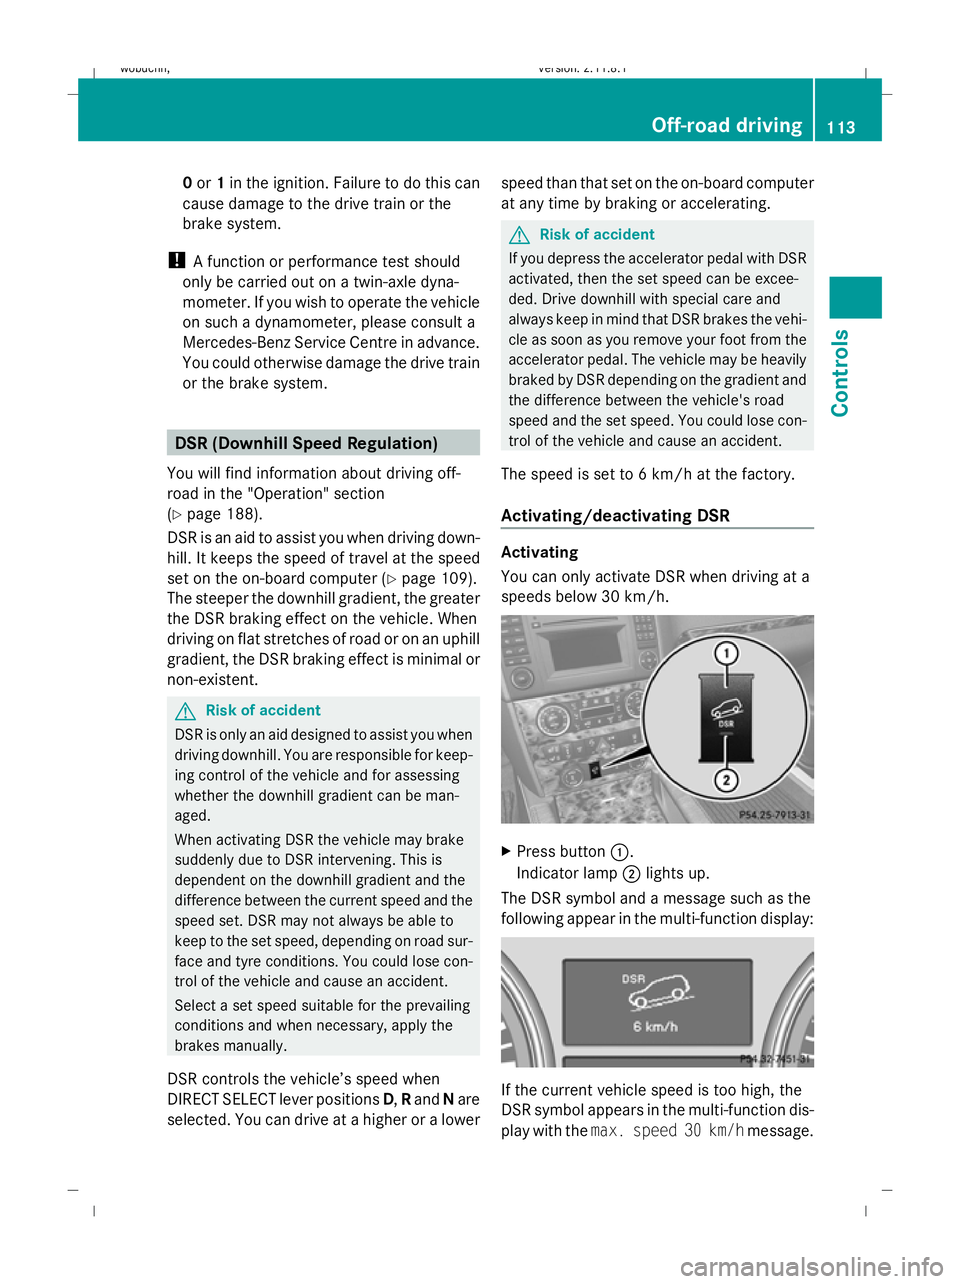
Activating/deactivating DSR Activating
You can only activate DSR when driving at a
speeds below 30 km/h.
X
Press button :.
Indicator lamp ;lights up.
The DSR symbol and a message such as the
following appear in the multi-function display: If the current vehicle speed is too high, the
DSR symbol appears in the multi-function dis-
play with the
max. speed 30 km/h message. Off-road driving
113Controls
X164_AKB; 2; 3, en-GB
wobuchh, Version: 2.11.8.1 2009-03-31T14:14:58+02:00 - Seite 113 Z
Dateiname: 6515431202_buchblock.pdf; erzeugt am 01. Apr 2009 00:17:18; WK
Page 118 of 309
do not switch the automatic transmission to
another gear.
If you do not wait for the gear change process
to complete, it may not be correctly imple-
mented. The transfer case may then be in
neutral and the connection between the
engine and the drive axles may be disen-
gaged. The vehicle could then move freely,
even if a gear is engaged, and could inadver-
tently start moving, particularly if it is on a
slope.
Observe the messages in the multi-function
display.
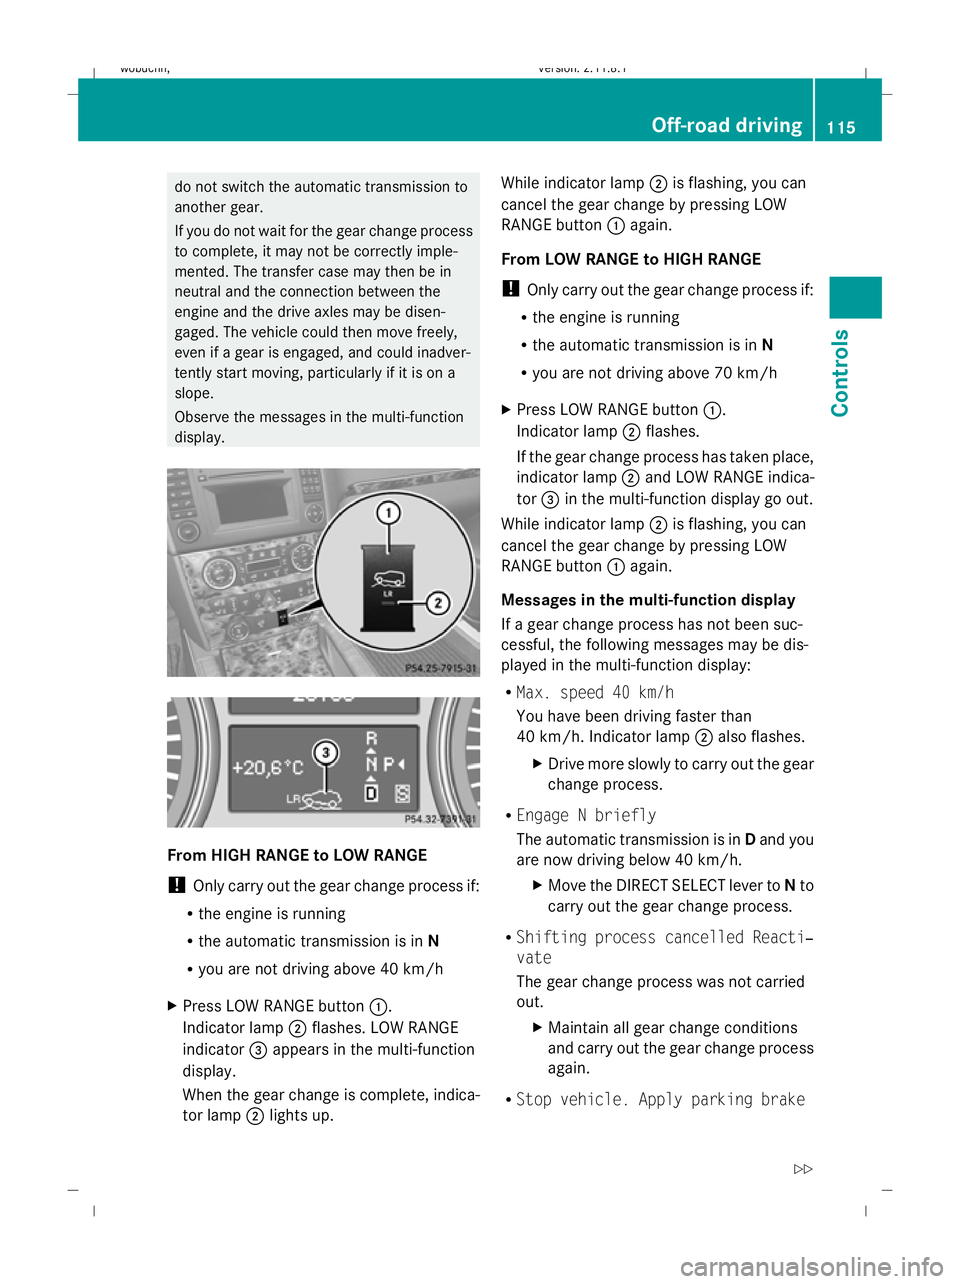
From HIGH RANGE to LOW RANGE
! Only carry out the gear change process if:
R the engine is running
R the automatic transmission is in N
R you are not driving above 40 km/h
X Press LOW RANGE button :.
Indicator lamp ;flashes. LOW RANGE
indicator =appears in the multi-function
display.
When the gear change is complete, indica-
tor lamp ;lights up. While indicator lamp
;is flashing, you can
cancel the gear change by pressing LOW
RANGE button :again.
From LOW RANGE to HIGH RANGE
! Only carry out the gear change process if:
R the engine is running
R the automatic transmission is in N
R you are not driving above 70 km/h
X Press LOW RANGE button :.
Indicator lamp ;flashes.
If the gear change process has taken place,
indicator lamp ;and LOW RANGE indica-
tor =in the multi-function display go out.
While indicator lamp ;is flashing, you can
cancel the gear change by pressing LOW
RANGE button :again.
Messages in the multi-function display
If a gear change process has not been suc-
cessful, the following messages may be dis-
played in the multi-function display:
R Max. speed 40 km/h
You have been driving faster than
40 km/h. Indicator lamp ;also flashes.
X Drive more slowly to carry out the gear
change process.
R Engage N briefly
The automatic transmission is in Dand you
are now driving below 40 km/h.
XMove the DIRECT SELECT lever to Nto
carry out the gear change process.
R Shifting process cancelled Reacti‐
vate
The gear change process was not carried
out.
XMaintain all gear change conditions
and carry out the gear change process
again.
R Stop vehicle. Apply parking brake Off-road driving
115Controls
X164_AKB; 2; 3, en-GB
wobuchh, Version: 2.11.8.1 2009-03-31T14:14:58+02:00 - Seite 115 Z
Dateiname: 6515431202_buchblock.pdf; erzeugt am 01. Apr 2009 00:17:19; WK
Page 119 of 309

An acoustic warning will also sound. The
gear change process has not been comple-
ted. LOW RANGE is in the neutral position.
There is no connection between the engine
and the drive wheels.
! Do not drive any further, otherwise you
could damage the vehicle's drive train.
XStop the vehicle. Take into account the
road and traffic conditions when doing
this.
X Depress the parking brake.
X Carry out the gear change process
again.
If the gear change process has been
carried out, the Stop vehicle. Apply
parking brake message disappears. Differential locks
Differential locks improve the vehicle’s trac-
tion.
Your vehicle is equipped with the following:
R A differential lock for the transfer box: this
controls the balance between the front and
rear axles.
R A differential lock for the rear axle: this
controls the balance between the wheels
and the rear axle.
4ETS (Y page 53) controls the compensation
between the wheels and the front axle.
Engaging the differential locks Automatic mode
Use automatic mode
;for all driving situa-
tions, including driving off-road or when ford-
ing.
In automatic mode, the differential locks are
engaged and disengaged according to driving
requirements. This guarantees sufficient trac-
tion for most driving situations with unrestric-
ted vehicle steerability.
X Start the engine.
The differential locks are in automatic
mode. The indicator lamp in selector
wheel :lights up above symbol for auto-
matic mode ;.
Engaging manually G
Risk of accident
When driving on a firm road surface, only drive
in automatic mode, never with manually
engaged differential locks. If differential locks
have been engaged manually, the vehicle's
steerability is greatly impaired and the risk of
an accident thereby increased.
Do not manually engage or disengage the dif-
ferential locks while cornering. The vehicle
motion could otherwise be jerky. You could
lose control of the vehicle as a result and
cause an accident.
Only engage the differential locks manually if
traction in automatic mode is insufficient.
At speeds of up to 30 km/h, you can engage
the differential locks by hand.
X Start the engine.
X Turn selector wheel :to desired position
= or?.
The indicator lamp in selector wheel :
lights up at the corresponding symbol. 116
Off-road drivingControls
X164_AKB; 2; 3, en-GB
wobuchh
,V ersion: 2.11.8.1
2009-03-31T14:14:58+02:00 - Seite 116
Dateiname: 6515431202_buchblock.pdf; erzeugt am 01. Apr 2009 00:17:20; WK