2009 MERCEDES-BENZ GL SUV four wheel drive
[x] Cancel search: four wheel drivePage 7 of 309

1, 2, 3 ...
4ETS (Electronic Traction Support) ...53
4MATIC (permanent four-wheel
drive) .................................................. 112A
ABS (Anti-lock Braking System) .........50
Display message .................... 212, 213
Warning lamp ................................. 235
Accident
Notes ............................................. 240
Acoustic warning tone
see Warning tone ........................... 239
Active Service System PLUS
see ASSYST PLUS service interval
displa y........................................... 199
Adaptive brake lamps .........................51
Adaptive Damping System See ADS ....................................... 129
AdBlue ®
Display message ............................ 213
Service indicator ............................ 200
AdBlue ®
service indicator ................200
Additional functions (on-board
computer) .......................................... 109
ADS (Adaptive Damping System) ..... 129
Airbags Activation ......................................... 35
Control unit ...................................... 35
Driver's ............................................ 38
Front ................................................ 38
Front passenger ............................... 38
PASSENGER AIRBAG OFF warning
lamp ............................................. 234
Sidebag ............................................ 39
System ............................................. 37
Windowba g...................................... 39
Air conditioning
Activating/deactivating .................140
Activating/deactivating air-recir-
culation mode ................................ 146
Auxiliary heating/ventilation .......... 147
Controlling automatically ...............141
Convenience opening/closing
(air-recirculation mode )................. 147
Demisting the windscreen .............145 Malfunction indicator lamp
............234
Rear-compartment air condition-
ing ................................................. 139
Rear window heating .....................146
Setting the air distribution .............144
Setting the airflow .........................145
Setting the air vents ......................143
Setting the temperature ................142
Setting the temperature (rear
compartment) ................................ 142
Switching the residual heat func-
tion on/off ..................................... 147
Thermatic 2-zone automatic cli-
mate control .................................. 138
Thermotronic luxury multi-zone
automatic climate control ..............139
Air-conditioning system
see Air conditioning
Air filter
Display message ............................ 228
Air pressure
see Tyre pressure
Ambient lighting
Setting (on-board computer) .......... 106
Anti-glare film .................................... 169
Anti-lock braking system See ABS ........................................... 50
Anti-theft alarm system
See EDW .......................................... 54
Anti-theft systems ............................... 54
Ashtray ............................................... 162
ASSYST PLUS see ASSYST PLUS service interval
displa y........................................... 199
ASSYST PLUS service interval dis-
play ..................................................... 199
Calling up the date (on-board
computer) ...................................... 200
Display message ............................ 199
ATA (anti-theft alarm system) ............54
Switching off the alarm ....................54
AUTO lights
Display message ............................ 225
Automatic car wash ..........................2014
Index X164_AKB; 2; 3, en-GB
wobuchh,
Version: 2.11.8.1 2009-03-31T14:14:58+02:00 - Seite 4Dateiname: 6515431202_buchblock.pdf; erzeugt am 01. Apr 2009 00:16:29; WK
Page 15 of 309

Oil level
Checking (dipstick) ........................177
Checking (on-board computer) ......176
On-board computer .............................97
Additional functions menu .............109
Audio menu ................................... 100
Convenience submenu ..................108
Display messages ..........................211
DVD menu ..................................... 102
Factory settings ............................. 103
Heating submenu ........................... 107
Instrument cluster submenu ..........103
Lighting submenu .......................... 105
Navi menu ..................................... 102
Off-road menu ............................... 102
Overview .......................................... 99
Settings menu ............................... 103
Standard display menu ....................99
Telephone menu ............................ 111
Time/date submenu ......................104
Trip computer menu ......................110
TV menu ........................................ 101
Vehicle submenu ........................... 106
On-board computer language ..........104
Operating system see On-board computer ...................97
Outside temperature display ............97
On-board computer .......................100
Override feature
Rear side windows ...........................49 P
Paint code .......................................... 286
Paintwork Cleaning ......................................... 202
Panel
Removing (third row of seats) ..........68
Parking ................................................. 90
Parking aid Exterior mirror on the front-
passenger side ................................. 74
PARKTRONIC ................................. 133
Reversing camera ..........................135
Parking brake ...................................... 91
Display message ............................ 221
Parking lamps
Display message ............................ 227Parking position
Exterior mirror on the front-
passenger side ................................. 74
PARKTRONIC ...................................... 133
Activating/deactivating .................135
Malfunction ................................... .244
Range of the sensors .....................134
Trailer towing ................................. 135
Warning displa y............................. 134
PASSENGER AIRBAG OFF warning
lamp ............................................. 43, 234
Permanent four-wheel drive see 4MATIC ................................... 112
Permanent Speedtronic ....................128
Petrol Minimum grade ............................ .173
see Fuel
Plastic trim
Cleaning ......................................... 205
Power supply (trailer) .......................199
Power window switch see Side windows
Pre-emptive occupant safety system
see PRE-SAFE ®
PRE-SAFE ®
system .............................. 40
Display message ............................ 217
Program selector button
Automatic transmission ...................95
Pulling away ......................................... 89 R
Radio Changing a station (on-board
computer) ...................................... 100
see separate operating instructions
Radio-controlled equipment
Installation ..................................... 168
Rain closing feature
Sliding/tilting sunroof ...................151
Range (on-board computer) .............111
Rear bench seat Folding forward/back ....................155
Rear compartment
Activating/deactivating the air
conditioning ........................... 140, 141
Setting the air vents ......................144
Setting the temperature ................142 12
Index X164_AKB; 2; 3, en-GB
wobuchh,
Version: 2.11.8.1 2009-03-31T14:14:58+02:00 - Seite 12Dateiname: 6515431202_buchblock.pdf; erzeugt am 01. Apr 2009 00:16:30; WK
Page 115 of 309

If you are not in the
Telephonemenu, you can
still accept a call.
Rejecting or ending a call X
Press the ~button.
If you are not in the Telephonemenu, you can
still accept a call.
Dialling a number from the phone book You can use the mobile phone to enter new
telephone numbers into the phone book (see
separate operating instructions). If your
mobile phone is operational, you can select
and dial a number from the phone book at any
time.
X Press the VorU button to select the
Telephone menu.
X Press the &or* button to call up
the phone book.
X Press the &or* button to select the
name you are searching for. To scroll rap-
idly, press and hold the &or* but-
ton for longer than 1 second.
X Press the 6button to start dialling.
or
X If you do not want to make a call, press the
~ button.
Redialling The on-board computer saves the last names
or numbers dialled in the redial memory.
X Press the VorU button to select the
Telephone menu.
X Press the 6button to switch to the
redial memory.
X Press the &or* button to select the
desired name or number.
X Press the 6button to start dialling. Off-road driving
Overview of off-road driving systems
The systems which are relevant for off-road
driving are explained on the following pages:
R 4MATIC (permanent four-wheel drive), for
optimum traction
R DSR (Downhill Speed Regulation), which
assists you when driving downhill
R LOW RANGE off-road gear for better trac-
tion off-road
R Differential locks for increased traction off-
road
You will find further information about driving
off-road in the "Operation" section
(Y page 188). 4MATIC (permanent four-wheel drive)
4MATIC ensures that all four wheels are per-
manently driven. Together with ESP ®
and
4ETS, it improves the traction of your vehicle
whenever a drive wheel spins due to insuffi-
cient grip. G
Risk of accident
4MATIC cannot reduce the risk of an accident
if you drive too fast.
If a drive wheel spins due to insufficient grip:
R only depress the accelerator pedal as far as
necessary when pulling away.
R accelerate less when driving.
R adapt your driving style to suit road and
traffic conditions.
i In wintry driving conditions, the maximum
effect of 4MATIC can only be achieved if
you use winter tyres (M+S tyres), with snow
chains if necessary.
! When testing the parking brake, operate
the vehicle only briefly (for a maximum of
ten seconds) on a brake test dynamometer.
When doing this, turn the key to position 112
Off-road drivingControls
X164_AKB; 2; 3, en-GB
wobuchh,
Version: 2.11.8.1 2009-03-31T14:14:58+02:00 - Seite 112
Dateiname: 6515431202_buchblock.pdf; erzeugt am 01. Apr 2009 00:17:18; WK
Page 125 of 309

X
Briefly pull the cruise control lever towards
you ?or press it up :or down Ato the
pressure point.
Distronic is activated.
X Keep the cruise control lever pressed
up : or down Auntil the desired speed
is set.
X Remove your foot from the accelerator
pedal.
Your vehicle adapts its speed to that of the
vehicle in front, but only up to the stored
speed.
i You can use the cruise control lever to set
the stored speed and the thumbwheel on
the cruise control lever to set the specified
minimum distance (Y page 123).
i If you do not fully release the accelerator
pedal, the DISTRONIC Override message
appears in the multi-function display. The
distance to a slower-moving vehicle in front
will then not be governed. You will be driv-
ing at the speed you determine by the posi-
tion of the accelerator pedal.
Driving
If there is no vehicle in front, Distronic oper-
ates in the same way as cruise control.
If a slower-moving vehicle is detected in front,
Distronic causes your vehicle to brake and
maintain the preset distance to the vehicle in
front.
If Distronic detects a faster-moving vehicle in
front, it increases the driving speed, but only
as far as the stored speed. G
Risk of accident
If you depress the brake pedal, Distronic is
deactivated. Distronic will then no longer
brake your vehicle. The driver is fully respon-
sible for the vehicle's distance from other
vehicles, its speed and for braking in good
time. Stopping G
Risk of accident
The Distronic braking effect is cancelled and
the vehicle can start moving if:
R Distronic is deactivated using the cruise
control lever.
R you accelerate.
R the system or the power supply is disrup-
ted, e.g. due to battery failure.
R the electrical system in the engine com-
partment or the fuses have been tampered
with.
R the battery is disconnected. G
Risk of accident
Distronic must never be operated or deacti-
vated by a passenger or from outside the vehi-
cle.
If you wish to leave the vehicle or park it,
deactivate Distronic and secure the vehicle
against rolling away.
If Distronic detects that the vehicle in front is
stopping, it brakes your vehicle until it is sta-
tionary.
i Depending on the specified minimum dis-
tance, your vehicle will come to a standstill
about four metres behind the vehicle in
front. The specified minimum distance is
set using the thumbwheel on the cruise-
control lever.
Distronic is deactivated automatically when
stopping:
R on flat stretches of road or on downhill gra-
dients when the vehicle is stationary.
R while the vehicle is still moving on uphill
gradients, to prevent the vehicle from unex-
pectedly rolling back when Distronic is
deactivated.
If Distronic is deactivated, you will hear a
warning tone.
X Secure the vehicle against rolling away. 122
Driving systemsControls
X164_AKB; 2; 3, en-GB
wobuchh,
Version: 2.11.8.1 2009-03-31T14:14:58+02:00 - Seite 122
Dateiname: 6515431202_buchblock.pdf; erzeugt am 01. Apr 2009 00:17:21; WK
Page 136 of 309

If one or more indicator lamps
=are on:
X Turn the selector wheel anti-clockwise ;
until all indicator lamps =that are lit start
to flash.
The vehicle is lowered to highway level. As
soon as the next lowest level is reached,
the indicator lamp stops flashing and goes
out.
While the adjustment is taking place, a mes-
sage appears in the multi-function display,
e.g.: If you press the
WorX button on the
multi-function steering wheel, the messages
will disappear.
Once highway level has been reached, all indi-
cator lamps =go out. You will see a message
in the multi-function display, for example: If you have not previously selected the off-
road menu (Y
page 102) in the on-board com-
puter, the message disappears after about
five seconds.
The vehicle automatically selects highway
level if you are driving at a speed above
115 km/h or if you drive at between
100 km/h and 115 km/h for around 20 sec-
onds. Depending on the ADS basic setting
(Y page 129), the vehicle is lowered to high-
speed level at high speeds. PARKTRONIC*
G
Risk of accident
PARKTRONIC is only an aid and may not
detect all obstacles. It is not a substitute for
attentive driving.
You are always responsible for safety and
must continue to pay attention to your imme-
diate surroundings when parking and
manoeuvring. You could otherwise endanger
yourself and others. G
Risk of injury
Make sure that no persons or animals are in
the manoeuvring range. Otherwise, they
could be injured.
PARKTRONIC is an electronic parking aid
using ultrasound. It indicates visually and
audibly the distance between your vehicle
and an object.
PARKTRONIC is activated automatically when
you:
R switch on the ignition
R release the parking brake
R shift the automatic transmission to D,Ror
N
PARKTRONIC is deactivated at speeds above
18 km/h. It is reactivated at lower speeds.
PARKTRONIC monitors the area around your
vehicle using six sensors in the front bumper
and four sensors in the rear bumper. :
Example: sensors in the front bumper,
left-hand side Driving systems
133Controls
* optional
X164_AKB; 2; 3, en-GB
wobuchh,
Version: 2.11.8.1 2009-03-31T14:14:58+02:00 - Seite 133 Z
Dateiname: 6515431202_buchblock.pdf; erzeugt am 01. Apr 2009 00:17:26; WK
Page 186 of 309

G
Risk of accident
The tyre pressure loss warning system can
only give reliable warnings if you have set the
correct tyre pressure.
If an incorrect tyre pressure is set, these
incorrect values will be monitored.
A tyre with insufficient pressure results in
vehicle instability when driving, thus increas-
ing the risk of an accident.
X Make sure that the key is in position
2 (Y page 63) in the ignition lock.
In the multi-function display you will see the
standard display (Y page 98).
X Press *or& to select the Tyre
pressure function.
The
Run Flat Indicator active
Menu: R-Button message is displayed.
X Press the reset button (Y page 25) on the
instrument cluster.
The multi-function display shows the mes-
sage:
Restart Run Flat Indicator?
Yes Cancel
If you wish to confirm the restart:
X Press the Wbutton.
The multi-function display shows the mes-
sage:
Run Flat Indicator restarted
After a teach-in period, the tyre pressure
loss warning system will monitor the set
tyre pressures of all four tyres.
If you wish to cancel the restart:
X Press the Xbutton.
or
X Wait until the Restart Run Flat Indi‐
cator? Yes Cancel message disappears.
The tyre pressure values stored at the last
restart will continue to be monitored. Tyre pressure monitor*
If a tyre pressure monitor system is fitted, the
vehicle's wheels have sensors fitted that
monitor the tyre pressures in all four tyres.
The tyre pressure monitor warns you when
the pressure drops in one or more of the
tyres. The tyre pressure monitor only func-
tions if the correct wheel electronics units are
fitted to all wheels. G
Risk of accident
The tyre pressure monitor does not warn you
of an incorrectly set tyre pressure. The table
on the inside of the fuel filler flap will help you
decide whether the tyre pressures should be
corrected.
The tyre pressure monitor is not able to warn
you of a sudden loss of pressure, e.g. if the
tyre is penetrated by a foreign object. In the
event of a sudden loss of pressure, bring the
vehicle to a halt by braking carefully. Do not
make any sudden steering movements when
doing so.
i The operation of the tyre pressure moni-
tor can be affected by interference from
radio transmitting equipment (e.g. radio
headphones, two-way radios) that may be
being operated in or near the vehicle.
Checking tyre pressure electronically X
Make sure that the key is in posi-
tion 2(Y page 63) in the ignition lock.
X Press the &or* button to select the
Tyre pressure function.
The current tyre pressure for each wheel will
be displayed in the multi-function display.
If the vehicle has been parked for longer than
20 minutes or if you have not driven faster
than 25 km/h since starting the vehicle, the
following message appears:
i The tyre pressure values indicated by the
on-board computer may differ from those
measured at a filling station with a pressure
gauge. The tyre pressures shown by the on- Tyres and wheels
183Operation
* optional
X164_AKB; 2; 3, en-GB
wobuchh,
Version: 2.11.8.1 2009-03-31T14:14:58+02:00 - Seite 183 Z
Dateiname: 6515431202_buchblock.pdf; erzeugt am 01. Apr 2009 00:17:48; WK
Page 270 of 309

Do not drive any further. Consult a qualified
specialist workshop which has the necessary
specialist knowledge and tools to carry out
the work required. Mercedes-Benz recom-
mends that you use a Mercedes-Benz Service
Centre for this purpose. In particular, work
relevant to safety or on safety-related sys-
tems must be carried out at a qualified spe-
cialist workshop.
When a tyre pressure of at least 1.8 bar
is reached:
X Press on/off switch =on the electric air
pump to 0.
The electric air pump is switched off.
X Remove the TIREFIT kit from the wheel.
! After use, excess TIREFIT may run out of
the filler hose. This may cause stains.
Therefore, place the filler hose in the plastic
which contained the TIREFIT kit.
X Stow away the TIREFIT kit, the electric air
pump and the warning triangle.
X Pull away immediately .
X Stop after driving for approximately ten
minutes and check the tyre pressure with
the electric air pump. G
Risk of accident
If the tyre pressure is now lower than 1.3 bar,
the tyre is too badly damaged. Do not drive
any further. Consult a qualified specialist
workshop which has the necessary specialist
knowledge and tools to carry out the work
required. Mercedes-Benz recommends that
you use a Mercedes-Benz Service Centre for
this purpose. In particular, work relevant to
safety or on safety-related systems must be
carried out at a qualified specialist workshop. E
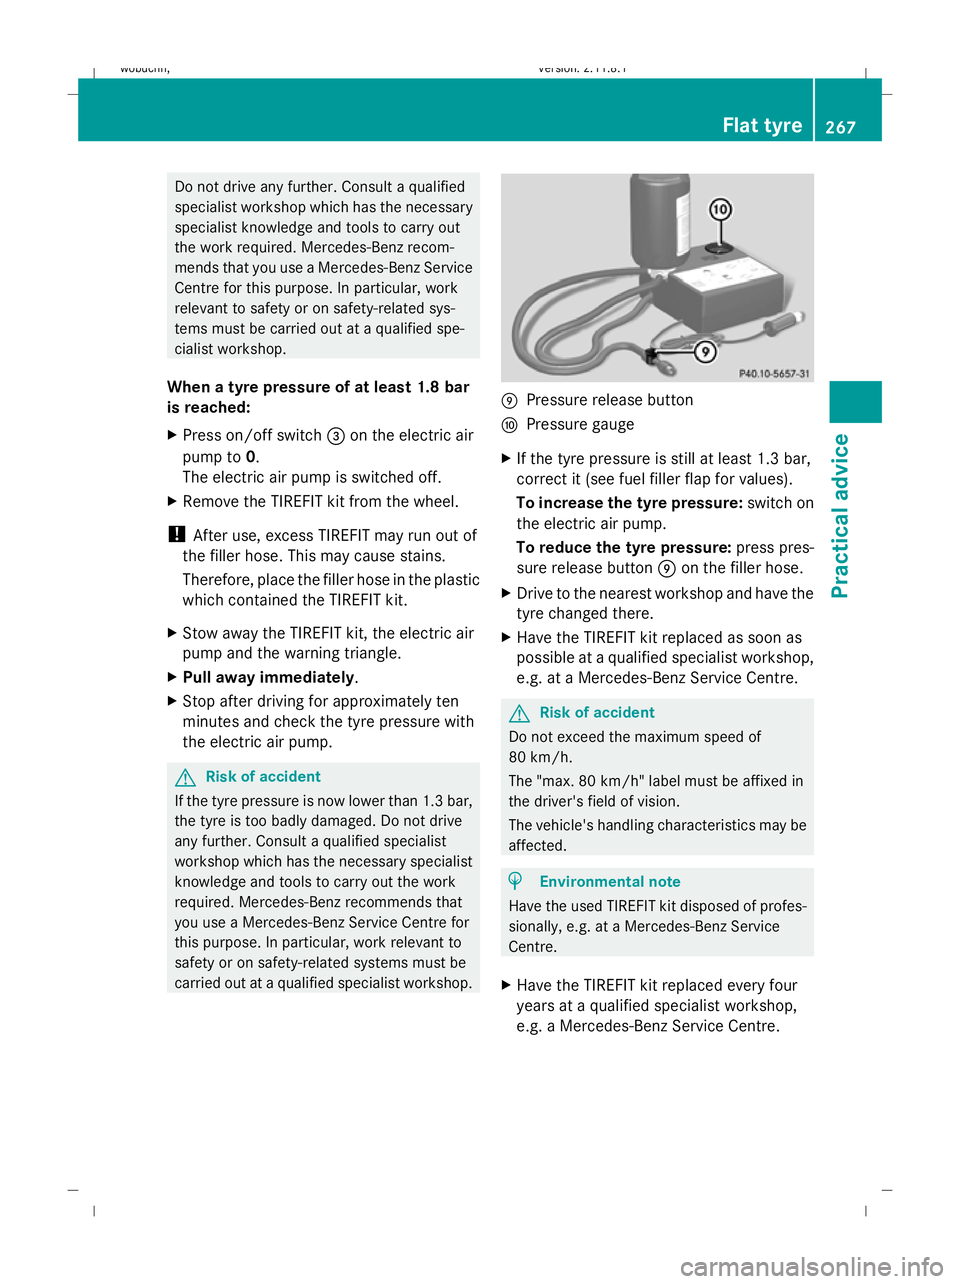
Pressure release button
F Pressure gauge
X If the tyre pressure is still at least 1.3 bar,
correct it (see fuel filler flap for values).
To increase the tyre pressure: switch on
the electric air pump.
To reduce the tyre pressure: press pres-
sure release button Eon the filler hose.
X Drive to the nearest workshop and have the
tyre changed there.
X Have the TIREFIT kit replaced as soon as
possible at a qualified specialist workshop,
e.g. at a Mercedes-Benz Service Centre. G
Risk of accident
Do not exceed the maximum speed of
80 km/h.
The "max. 80 km/h" label must be affixed in
the driver's field of vision.
The vehicle's handling characteristics may be
affected. H
Environmental note
Have the used TIREFIT kit disposed of profes-
sionally, e.g. at a Mercedes-Benz Service
Centre.
X Have the TIREFIT kit replaced every four
years at a qualified specialist workshop,
e.g. a Mercedes-Benz Service Centre. Flat tyre
267Practical advice
X164_AKB; 2; 3, en-GB
wobuchh,V ersion: 2.11.8.1
2009-03-31T14:14:58+02:00 - Seite 267 Z
Dateiname: 6515431202_buchblock.pdf; erzeugt am 01. Apr 2009 00:18:11; WK