2009 MERCEDES-BENZ GL SUV oil pressure
[x] Cancel search: oil pressurePage 102 of 309

Menus and submenus
Function
:
Standard display
menu
(Y page 99)
R tyre pressure loss warning
(Y page 182) or tyre pressure mon-
itor* (Y page 183)
R ASSYST PLUS service interval dis-
play
R checking engine oil level*
(Y page 176) ;
Audio/TV*/DVD*
menu
(Y page 100) =
Navigation*
menu (Ypage 102) ?
Off-road*
menu (Ypage 102)
R off-road level (Y page 129)
R compass display (Y page 166)
R differential locks (status indicator)
(Y page 116) A
Distronic*
menu (Ypage 119) Function
B
Message memory
menu19
(Y page 211) C
Settings
menu (Ypage 103) D
Additional functions
menu
(Y page 109) E
Trip computer
menu (Ypage 110) F
Telephone
menu (Ypage 111) The number of menus shown depends on the
optional equipment in the vehicle.
Depending on the audio system fitted, the
Audio, Navigation* and Telephonemenus
are slightly different. The examples given in
this Owner's Manual apply to vehicles equip-
ped with COMAND APS*. Standard display menu
Use the buttons on the multi-function steer-
ing wheel.
19 The menu is only visible when there is a display message. On-board computer
99Controls
* optional
X164_AKB; 2; 3, en-GB
wobuchh,
Version: 2.11.8.1 2009-03-31T14:14:58+02:00 - Seite 99 Z
Dateiname: 6515431202_buchblock.pdf; erzeugt am 01. Apr 2009 00:17:15; WK
Page 103 of 309

X
Press the VorU button to select the
standard display. Standard display
:
Trip meter
; Total distance
You can select the following functions in the
Standard display menu using the&or
* button:
R tyre pressure loss warning (Y page 182) or
tyre pressure monitor* (Y page 183)
R coolant temperature (Y page 100)
R digital speedometer or outside tempera-
ture (Y page 104)
R ASSYST PLUS service interval display
R engine oil level* (Y page 176)
X To reset the trip meter: press and hold
the .reset button in the instrument clus-
ter until the trip meter is reset.
Displaying the coolant temperature X
Press the VorU button to select the
standard display.
X Press the &or* button to select the
coolant temperature. Under normal driving conditions, with the cor-
rect anti-corrosion and antifreeze additive concentration, the reading may rise to
120 †.
Displaying the digital speedometer or
outside temperature If you have selected the digital speedometer
as the status line (Y
page 104), select the
outside temperature display here 20
.
X Press the VorU button to select the
standard display.
X Press the &or* button to select
digital speedometer or the outside temper-
ature. Digital speedometer
Outside temperature
Audio/TV*/DVD* menu
Use the functions in the Audio/TV/DVD
menu to operate the audio equipment or
COMAND APS*.
Selecting a radio station You can only store new stations using the
audio system or COMAND APS* (see the sep-
arate operating instructions).
20 Vehicles for the United Kingdom: the outside temperature is always displayed. 100
On-board computerControls
* optional
X164_AKB; 2; 3, en-GB
wobuchh,
Version: 2.11.8.1 2009-03-31T14:14:58+02:00 - Seite 100
Dateiname: 6515431202_buchblock.pdf; erzeugt am 01. Apr 2009 00:17:15; WK
Page 176 of 309

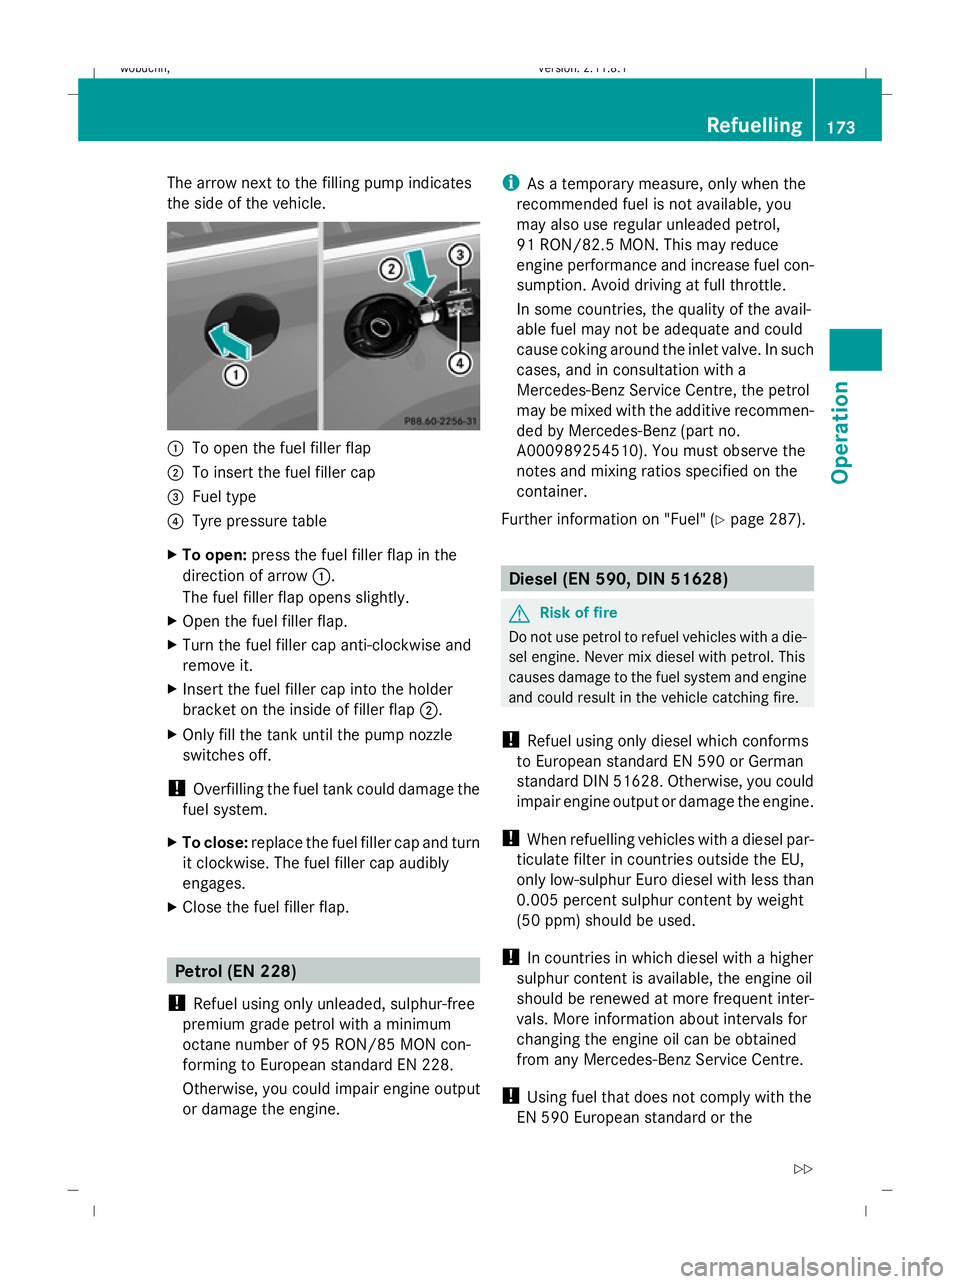
The arrow next to the filling pump indicates
the side of the vehicle.
:
To open the fuel filler flap
; To insert the fuel filler cap
= Fuel type
? Tyre pressure table
X To open: press the fuel filler flap in the
direction of arrow :.
The fuel filler flap opens slightly.
X Open the fuel filler flap.
X Turn the fuel filler cap anti-clockwise and
remove it.
X Insert the fuel filler cap into the holder
bracket on the inside of filler flap ;.
X Only fill the tank until the pump nozzle
switches off.
! Overfilling the fuel tank could damage the
fuel system.
X To close: replace the fuel filler cap and turn
it clockwise. The fuel filler cap audibly
engages.
X Close the fuel filler flap. Petrol (EN 228)
! Refuel using only unleaded, sulphur-free
premium grade petrol with a minimum
octane number of 95 RON/85 MON con-
forming to European standard EN 228.
Otherwise, you could impair engine output
or damage the engine. i
As a temporary measure, only when the
recommended fuel is not available, you
may also use regular unleaded petrol,
91 RON/82.5 MON. This may reduce
engine performance and increase fuel con-
sumption. Avoid driving at full throttle.
In some countries, the quality of the avail-
able fuel may not be adequate and could
cause coking around the inlet valve. In such
cases, and in consultation with a
Mercedes-Benz Service Centre, the petrol
may be mixed with the additive recommen-
ded by Mercedes-Benz (part no.
A000989254510). You must observe the
notes and mixing ratios specified on the
container.
Further information on "Fuel" (Y page 287). Diesel (EN 590, DIN 51628)
G
Risk of fire
Do not use petrol to refuel vehicles with a die-
sel engine. Never mix diesel with petrol. This
causes damage to the fuel system and engine
and could result in the vehicle catching fire.
! Refuel using only diesel which conforms
to European standard EN 590 or German
standard DIN 51628. Otherwise, you could
impair engine output or damage the engine.
! When refuelling vehicles with a diesel par-
ticulate filter in countries outside the EU,
only low-sulphur Euro diesel with less than
0.005 percent sulphur content by weight
(50 ppm) should be used.
! In countries in which diesel with a higher
sulphur content is available, the engine oil
should be renewed at more frequent inter-
vals. More information about intervals for
changing the engine oil can be obtained
from any Mercedes-Benz Service Centre.
! Using fuel that does not comply with the
EN 590 European standard or the Refuelling
173Operation
X164_AKB; 2; 3, en-GB
wobuchh, Version: 2.11.8.1 2009-03-31T14:14:58+02:00 - Seite 173 Z
Dateiname: 6515431202_buchblock.pdf; erzeugt am 01. Apr 2009 00:17:45; WK
Page 205 of 309

High-pressure cleaners
G
Risk of accident
Do not use high-pressure cleaners with circu-
lar-jet nozzles (dirt grinders) to clean your
vehicle, in particular the tyres. You could oth-
erwise damage the tyres and cause an acci-
dent.
! Observe the instructions issued by the
equipment manufacturer concerning the
distance to be maintained between the
nozzle of the high-pressure cleaner and the
vehicle (at least 30 cm).
Move the high-pressure cleaner nozzle
around when cleaning your vehicle.
Do not aim directly at any of the following:
R tyres
R door joint
R electrical components
R battery
R connectors
R lights
R seals
R trim elements
R ventilation slots
Damaged seals or electrical components
can lead to failures or leaks.
Cleaning the paintwork Scratches, corrosive deposits, areas affected
by corrosion and damage caused by inade-
quate care cannot always be completely
repaired. In such cases, visit a qualified spe-
cialist workshop immediately, e.g. a
Mercedes-Benz Service Centre.
X Remove the following types of dirt immedi-
ately, whilst avoiding rubbing too hard.
Soak:
R insect remains with insect remover
R bird droppings with water and rinse off the treated surface after-
wards.
Remove:
R
tree resin, oils, fuels and greases by rub-
bing gently with a cloth soaked in petro-
leum ether or lighter fluid.
R tar stain with tar remover
R wax with silicone remover
! Do not affix:
R stickers
R films
R magnetic plates or similar items
to painted surfaces. Otherwise, you could
damage the paintwork.
Cleaning the wheels !
Do not use acidic wheel cleaners to
remove brake dust. This could damage
wheel bolts and brake components.
Cleaning the windows X
Clean the inside and outside of the win-
dows with a damp cloth and a cleaning
product approved and recommended by
Mercedes-Benz.
! Clean the water drainage channels of the
windscreen and the rear window at regular
intervals. Under certain circumstances,
deposits such as leaves, petals and pollen
may prevent water from draining away
leading to corrosion damage.
Cleaning the wiper blades G
Risk of injury
Before cleaning the windscreen or wiper
blades, turn the key to position 0in the igni-
tion lock or press the Start/Stop button* until
all indicator lamps have gone out in the instru-
ment cluster. The windscreen wipers could
otherwise move and cause injury. 202
CareOperation
* optional
X164_AKB; 2; 3, en-GB
wobuchh,
Version: 2.11.8.1 2009-03-31T14:14:58+02:00 - Seite 202
Dateiname: 6515431202_buchblock.pdf; erzeugt am 01. Apr 2009 00:17:53; WK
Page 207 of 309

!
Do not clean the ball coupling with a high-
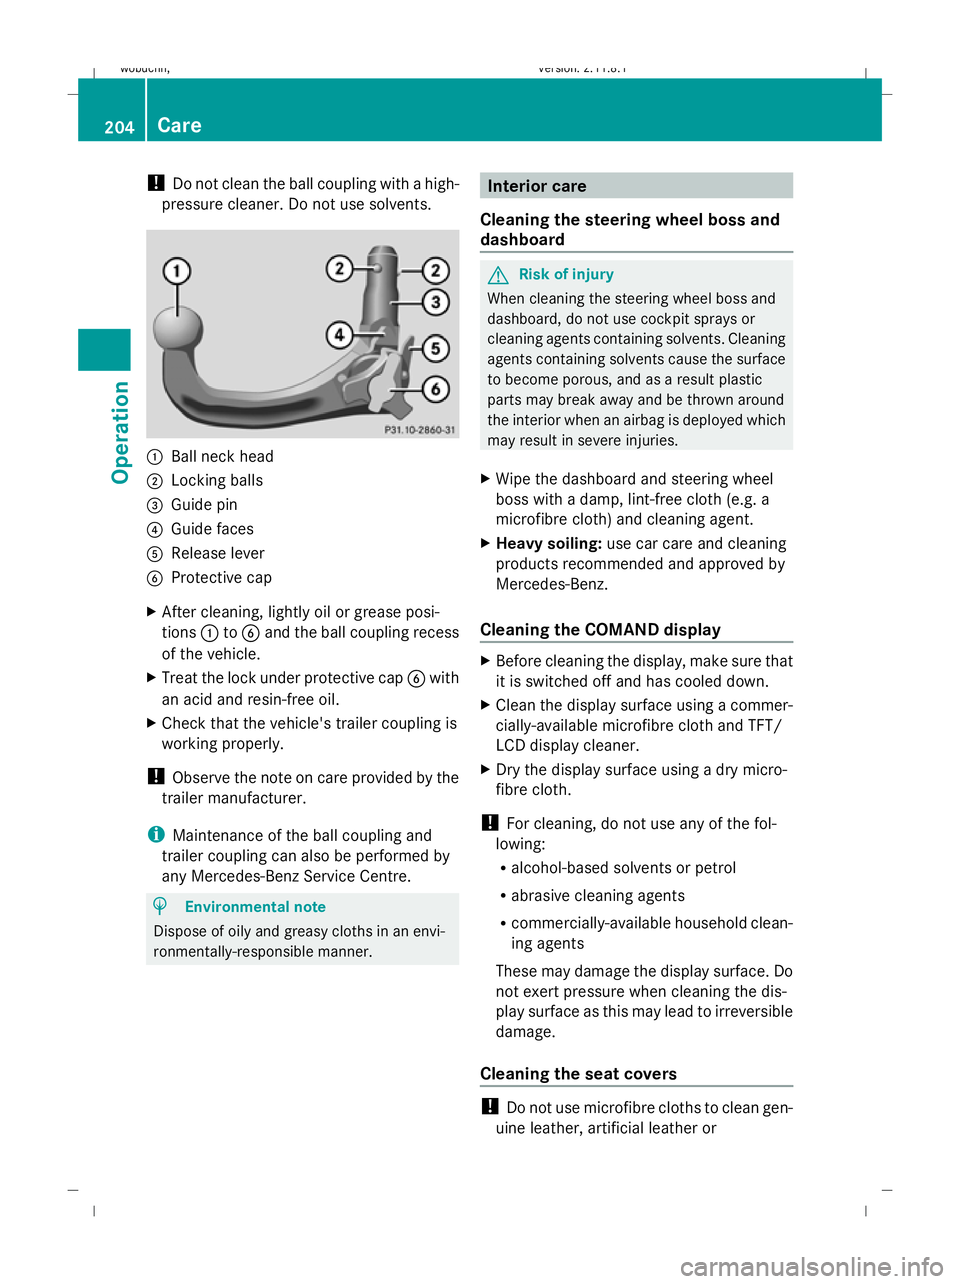
pressure cleaner. Do not use solvents. :
Ball neck head
; Locking balls
= Guide pin
? Guide faces
A Release lever
B Protective cap
X After cleaning, lightly oil or grease posi-
tions :toB and the ball coupling recess
of the vehicle.
X Treat the lock under protective cap Bwith
an acid and resin-free oil.
X Check that the vehicle's trailer coupling is
working properly.
! Observe the note on care provided by the
trailer manufacturer.
i Maintenance of the ball coupling and
trailer coupling can also be performed by
any Mercedes-Benz Service Centre. H
Environmental note
Dispose of oily and greasy cloths in an envi-
ronmentally-responsible manner. Interior care
Cleaning the steering wheel boss and
dashboard G
Risk of injury
When cleaning the steering wheel boss and
dashboard, do not use cockpit sprays or
cleaning agents containing solvents. Cleaning
agents containing solvents cause the surface
to become porous, and as a result plastic
parts may break away and be thrown around
the interior when an airbag is deployed which
may result in severe injuries.
X Wipe the dashboard and steering wheel
boss with a damp, lint-free cloth (e.g. a
microfibre cloth) and cleaning agent.
X Heavy soiling: use car care and cleaning
products recommended and approved by
Mercedes-Benz.
Cleaning the COMAND display X
Before cleaning the display, make sure that
it is switched off and has cooled down.
X Clean the display surface using a commer-
cially-available microfibre cloth and TFT/
LCD display cleaner.
X Dry the display surface using a dry micro-
fibre cloth.
! For cleaning, do not use any of the fol-
lowing:
R alcohol-based solvents or petrol
R abrasive cleaning agents
R commercially-available household clean-
ing agents
These may damage the display surface. Do
not exert pressure when cleaning the dis-
play surface as this may lead to irreversible
damage.
Cleaning the seat covers !
Do not use microfibre cloths to clean gen-
uine leather, artificial leather or 204
CareOperation
X164_AKB; 2; 3, en-GB
wobuchh,
Version: 2.11.8.1 2009-03-31T14:14:58+02:00 - Seite 204
Dateiname: 6515431202_buchblock.pdf; erzeugt am 01. Apr 2009 00:17:54; WK
Page 232 of 309

Display messages
Possible causes/consequences and
X
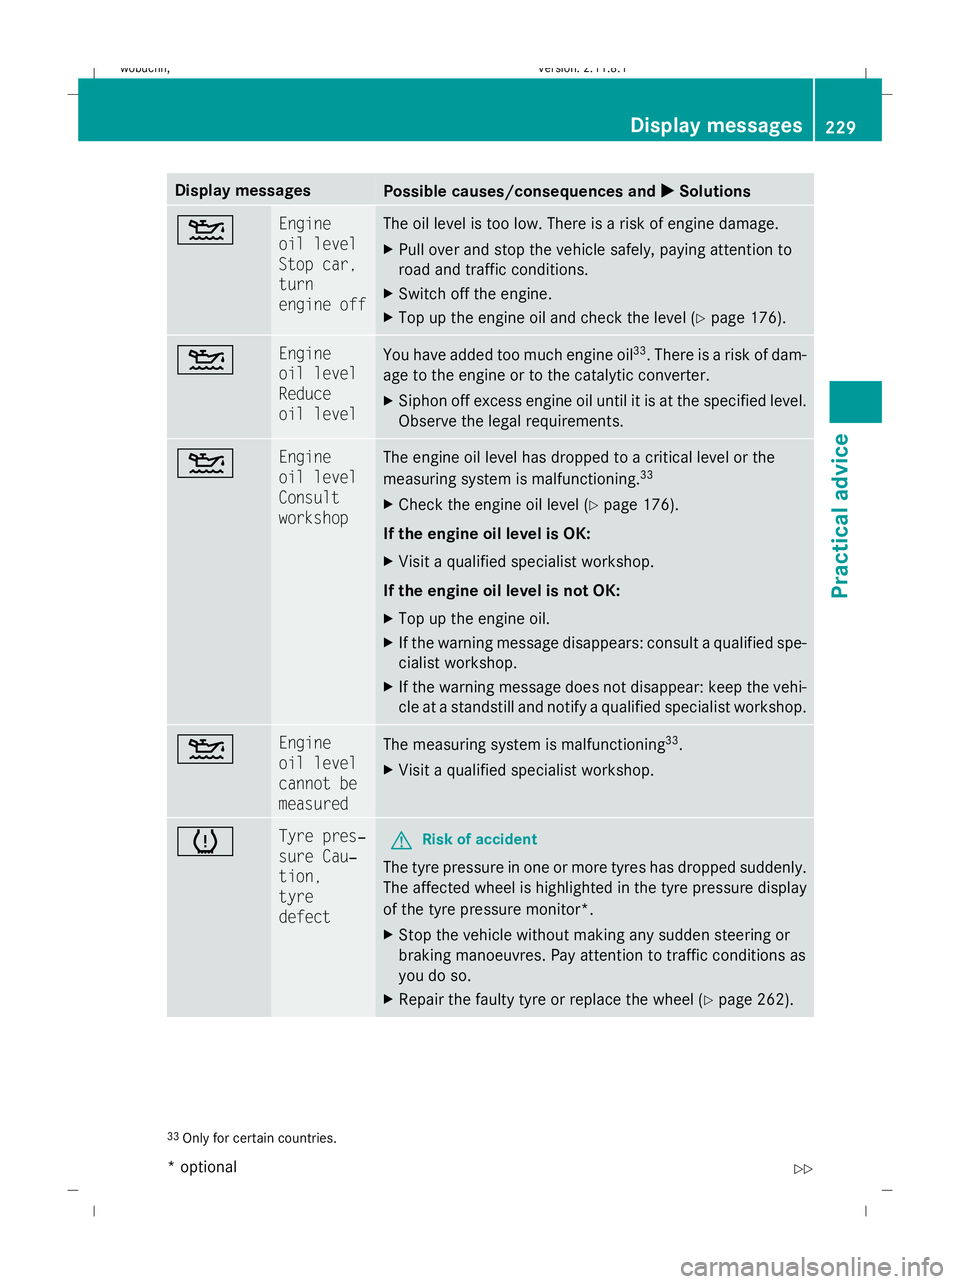
X Solutions 4 Engine
oil level
Stop car,
turn
engine off The oil level is too low. There is a risk of engine damage.
X
Pull over and stop the vehicle safely, paying attention to
road and traffic conditions.
X Switch off the engine.
X Top up the engine oil and check the level (Y page 176).4 Engine
oil level
Reduce
oil level
You have added too much engine oil
33
. There is a risk of dam-
age to the engine or to the catalytic converter.
X Siphon off excess engine oil until it is at the specified level.
Observe the legal requirements. 4 Engine
oil level
Consult
workshop The engine oil level has dropped to a critical level or the
measuring system is malfunctioning.
33
X Check the engine oil level ( Ypage 176).
If the engine oil level is OK:
X Visit a qualified specialist workshop.
If the engine oil level is not OK:
X Top up the engine oil.
X If the warning message disappears: consult a qualified spe-
cialist workshop.
X If the warning message does not disappear: keep the vehi-
cle at a standstill and notify a qualified specialist workshop. 4 Engine
oil level
cannot be
measured
The measuring system is malfunctioning
33
.
X Visit a qualified specialist workshop. h Tyre pres‐
sure Cau‐
tion,
tyre
defect
G
Risk of accident
The tyre pressure in one or more tyres has dropped suddenly.
The affected wheel is highlighted in the tyre pressure display
of the tyre pressure monitor*.
X Stop the vehicle without making any sudden steering or
braking manoeuvres. Pay attention to traffic conditions as
you do so.
X Repair the faulty tyre or replace the wheel ( Ypage 262). 33
Only for certain countries. Display
messages
229Practical advice
* optional
X164_AKB; 2; 3, en-GB
wobuchh
,V ersion: 2.11.8.1
2009-03-31T14:14:58+02:00 - Seite 229 Z
Dateiname: 6515431202_buchblock.pdf; erzeugt am 01. Apr 2009 00:18:00; WK