2009 MERCEDES-BENZ GL SUV bulb
[x] Cancel search: bulbPage 8 of 309

Automatic transmission
DIRECT SELECT lever .......................92
Display mes-
sage .............................. 213, 216, 217
Driving tips ...................................... 94
Emergency running mode ..............244
Gear indicator .................................. 93
Kickdown ......................................... 94
Malfunction ................................... .244
Program selector button ..................95
Shift ranges ..................................... 94
Trailer towing ................................... 94
Transmission positions ....................93
Auxiliary heating ............................... 147
Display message .................... 231, 232
Notes ............................................. 147
Remote control .............................. 148
Setting (on-board computer) .......... 107
Auxiliary ventilation ..........................147 B
Backrest angle Adjusting (2nd row of seats) ............67
Ball coupling
Fitting ............................................ 194
Folding in ....................................... 198
Folding out ..................................... 193
Removing ....................................... 198
BAS (Brake Assist) ............................... 50
Battery Changing (auxiliary heating
remote control) .............................. 254
Charging ........................................ 275
Checking (key) ............................... 253
Check lamp (key )........................... 253
Disconnecting ................................ 273
Display message ............................ 220
Jump-starting ................................. 276
Maintenance (vehicle) .................... 272
Reconnecting ................................. 276
Removing/fitting ........................... 274
Vehicle battery .............................. 272
Belt force limiters
Activation ......................................... 35
Belt height adjustment .......................77
Belt reel (Easy-Pack fix kit) ..............160Belt tensioners
Activation ......................................... 35
Belt warning ......................................... 77
BlueTEC
AdBlue ®
......................................... 288
Bonnet
Bonnet catch ................................. 175
Display message ............................ 219
Opening/closing ........................... 174
Bonnet release lever
Release leve r................................. 175
Boot
Automatic opening ........................... 62
Boot lid
Opening/closing .............................. 60
Brake Assist
See BAS ........................................... 50
Brake fluid .......................................... 291
Display message ............................ 221
Brake lamps
Adaptive .......................................... .51
Display message ............................ 226
Brakes
Parking brake ................................... 91
Warning lamp ........................ 235, 236
Brake system
Display message ............................ 220
Bulbs .................................................. 254
Brake lamp .................................... 260
Dipped-beam headlamps ...............258
Display message ............................ 225
Licence plate lamp ......................... 260
Main-beam headlamps ................... 258
Overview ........................................ 256
Parking lamp .......................... 258, 260
Rear foglamp ................................. 260
Replacing .............................. .258, 259
Reversing lamp .............................. 260
Side lamp ....................................... 258
Tail lamp ........................................ 260
Turn signal lamp ....................258, 260
see Lamp Index
5 X164_AKB; 2; 3, en-GB
wobuchh,
Version: 2.11.8.1
2009-03-31T14:14:58+02:00 - Seite 5Dateiname: 6515431202_buchblock.pdf; erzeugt am 01. Apr 2009 00:16:29; WK
Page 202 of 309

G
Risk of accident
Do not carry the ball coupling in the vehicle
interior if it is not secured.
Otherwise, you and others could be injured by
the ball coupling being thrown around if you:
R brake sharply
R change direction suddenly
R are involved in an accident
Information on cleaning and care of the trailer
coupling can be found at (Y page 203).Trailer power supply
When it leaves the factory, your vehicle's
trailer socket outlet is equipped with a per-
manent power supply and a power supply that
is switched on via the ignition lock.
The permanent power supply is supplied via
trailer socket pin 9.
The power supply that is switched on via the
ignition lock is supplied via trailer socket
pin 10.
! You can connect consumers with a power
rating of up to 240 W to the permanent
power supply and up to 180 W to the power
supply that is switched on via the ignition
lock.
You must not charge a trailer battery using
the power supply.
The trailer's turn signal lamps are only guar-
anteed to function when bulbs are used.
You can obtain further information about
installing the trailer electrics from a qualified
specialist workshop, e.g. a Mercedes-Benz
Service Centre.
X To switch the connected power supply
on or off: turn the key in the ignition lock
to position 2or 0, respectively. Trailer with 7-pin connector
If your trailer has a 7-pin connector, you can
connect it to the 13-pin socket on the ball
coupling using an adapter or, if necessary, an
adapter cable. Both of these can be obtained
at a qualified specialist workshop, e.g. at a
Mercedes-Benz Service Centre.
Fitting the adapter X
Open the socket cover.
X Insert connector with lug :into
groove ;on the socket and turn the con-
nector clockwise to the stop.
X Make the cover engage.
X If you are using an adapter cable, secure
the cable to the trailer with cable ties.
! Make sure that there is sufficient cable
play so that the cable cannot become
detached when cornering. Service
ASSYST PLUS service interval display
The ASSYST PLUS service interval display
informs you of the next service due date.
The service due date is shown in the multi-
function display, for example:
Service A in .. days
Service A in .. km
Service A due now
The letter indicates how much time the work-
shop will require to carry out the service work. Service
199Operation
X164_AKB; 2; 3, en-GB
wobuchh, Version: 2.11.8.1 2009-03-31T14:14:58+02:00 - Seite 199 Z
Dateiname: 6515431202_buchblock.pdf; erzeugt am 01. Apr 2009 00:17:52; WK
Page 210 of 309

Where will I find...?
...........................208
Display messages ............................. 211
Troubleshooting ................................ 233
Locking/unlocking in an emer-
gency ................................................. 250
Resetting triggered NECK-PRO
head restraints .................................. 252
Replacing batteries (key and
remote control) ................................. 253
Changing bulbs ................................. 254
Replacing the wiper blades ..............261
Flat tyre ............................................. 262
Battery ............................................... 272
Jump-starting .................................... 276
Towing and tow-starting ..................277
Fuses .................................................. 280 207Practical advice
X164_AKB; 2; 3, en-GB
wobuchh,
Version: 2.11.8.1 2009-03-31T14:14:58+02:00 - Seite 207
Dateiname: 6515431202_buchblock.pdf; erzeugt am 01. Apr 2009 00:17:55; WK
Page 228 of 309

Display messages
Possible causes/consequences and
X
X Solutions D Power
steering
malfunc‐
tion See
Owner's
Manual
G
Risk of accident
There is no power assistance for the steering. You will need
to use more force to steer.
X Check whether you are able to apply the extra force
required.
X If you are able to steer safely: carefully drive on to a
qualified specialist workshop.
X If you are unable to steer safely: do not drive on. Contact
the nearest qualified specialist workshop. b Left-hand
Cornering
light
or
Right-
hand Cor‐
nering
light
The left-hand or right-hand cornering lamp* is faulty.
X
Change the bulb ( Ypage 254). b Left-hand
dipped
beam
or
Right-
hand
dipped
beam The left-hand or right-hand dipped-beam headlamp is faulty.
X
Halogen headlamp: replace the bulb (Ypage 254).
X Bi-xenon headlamp*: visit a qualified specialist workshop. b AUTO
lights
inopera‐
tive The light sensor is faulty.
X
Visit a qualified specialist workshop. b Trailer
Left-hand
turn sig‐
nal
or
Trailer
Right-
hand turn
signal The left-hand or right-hand trailer turn signal lamp is faulty.
X
Change the bulb. b Trailer
brake lamp The trailer brake lamp is faulty.
X
Change the bulb. Display
messages
225Practical advice
* optional
X164_AKB; 2; 3, en-GB
wobuchh
,V ersion: 2.11.8.1
2009-03-31T14:14:58+02:00 - Seite 225 Z
Dateiname: 6515431202_buchblock.pdf; erzeugt am 01. Apr 2009 00:18:00; WK
Page 229 of 309

Display messages
Possible causes/consequences and
X
X Solutions b Trailer
Left-hand
tail lamp
or
Trailer
Right-
hand tail
lamp The left-hand or right-hand trailer tail lamp is faulty.
X
Change the bulb. b Turn sig‐
nal, rear
left
or
Turn sig‐
nal, rear
right The rear left-hand or right-hand turn signal is faulty.
X
Change the bulb ( Ypage 254). b Turn sig‐
nal in
mirror,
left
or
Turn sig‐
nal in
mirror,
right The turn signal in the left-hand or right-hand exterior mirror
is faulty. The display message will only appear if all LEDs have
failed.
X
Visit a qualified specialist workshop. b Turn sig‐
nal,
front left
or
Turn sig‐
nal,
front
right The front left-hand or right-hand turn signal is faulty.
X
Change the bulb ( Ypage 254). b Left-hand
brake lamp
or
Right-
hand
brake lamp The left-hand or right-hand brake lamp is faulty.
X
Change the bulb ( Ypage 254). b 3rd brake
lamp The third brake lamp is faulty. The display message will only
appear if all LEDs have failed.
X
Visit a qualified specialist workshop. 226
Display
messagesPractical advice
X164_AKB; 2; 3, en-GB
wobuchh,V ersion: 2.11.8.1
2009-03-31T14:14:58+02:00 - Seite 226
Dateiname: 6515431202_buchblock.pdf; erzeugt am 01. Apr 2009 00:18:00; WK
Page 230 of 309

Display messages
Possible causes/consequences and
X
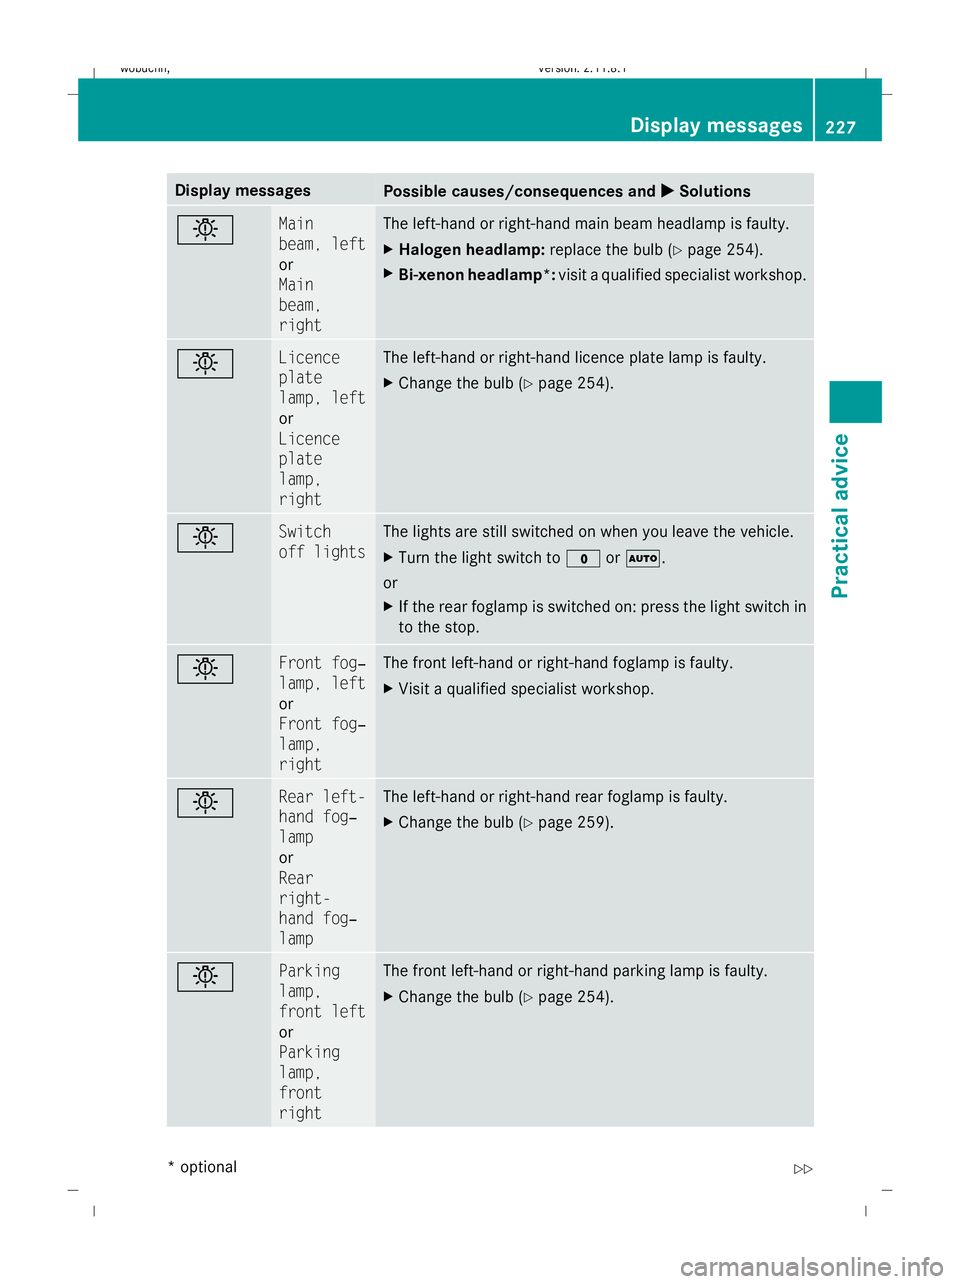
X Solutions b Main
beam, left
or
Main
beam,
right The left-hand or right-hand main beam headlamp is faulty.
X
Halogen headlamp: replace the bulb (Ypage 254).
X Bi-xenon headlamp*: visit a qualified specialist workshop. b Licence
plate
lamp, left
or
Licence
plate
lamp,
right The left-hand or right-hand licence plate lamp is faulty.
X
Change the bulb ( Ypage 254). b Switch
off lights The lights are still switched on when you leave the vehicle.
X
Turn the light switch to $orÃ.
or
X If the rear foglamp is switched on: press the light switch in
to the stop. b Front fog‐
lamp, left
or
Front fog‐
lamp,
right The front left-hand or right-hand foglamp is faulty.
X
Visit a qualified specialist workshop. b Rear left-
hand fog‐
lamp
or
Rear
right-
hand fog‐
lamp The left-hand or right-hand rear foglamp is faulty.
X
Change the bulb ( Ypage 259). b Parking
lamp,
front left
or
Parking
lamp,
front
right The front left-hand or right-hand parking lamp is faulty.
X
Change the bulb ( Ypage 254). Display
messages
227Practical advice
* optional
X164_AKB; 2; 3, en-GB
wobuchh
,V ersion: 2.11.8.1
2009-03-31T14:14:58+02:00 - Seite 227 Z
Dateiname: 6515431202_buchblock.pdf; erzeugt am 01. Apr 2009 00:18:00; WK
Page 231 of 309

Display messages
Possible causes/consequences and
X
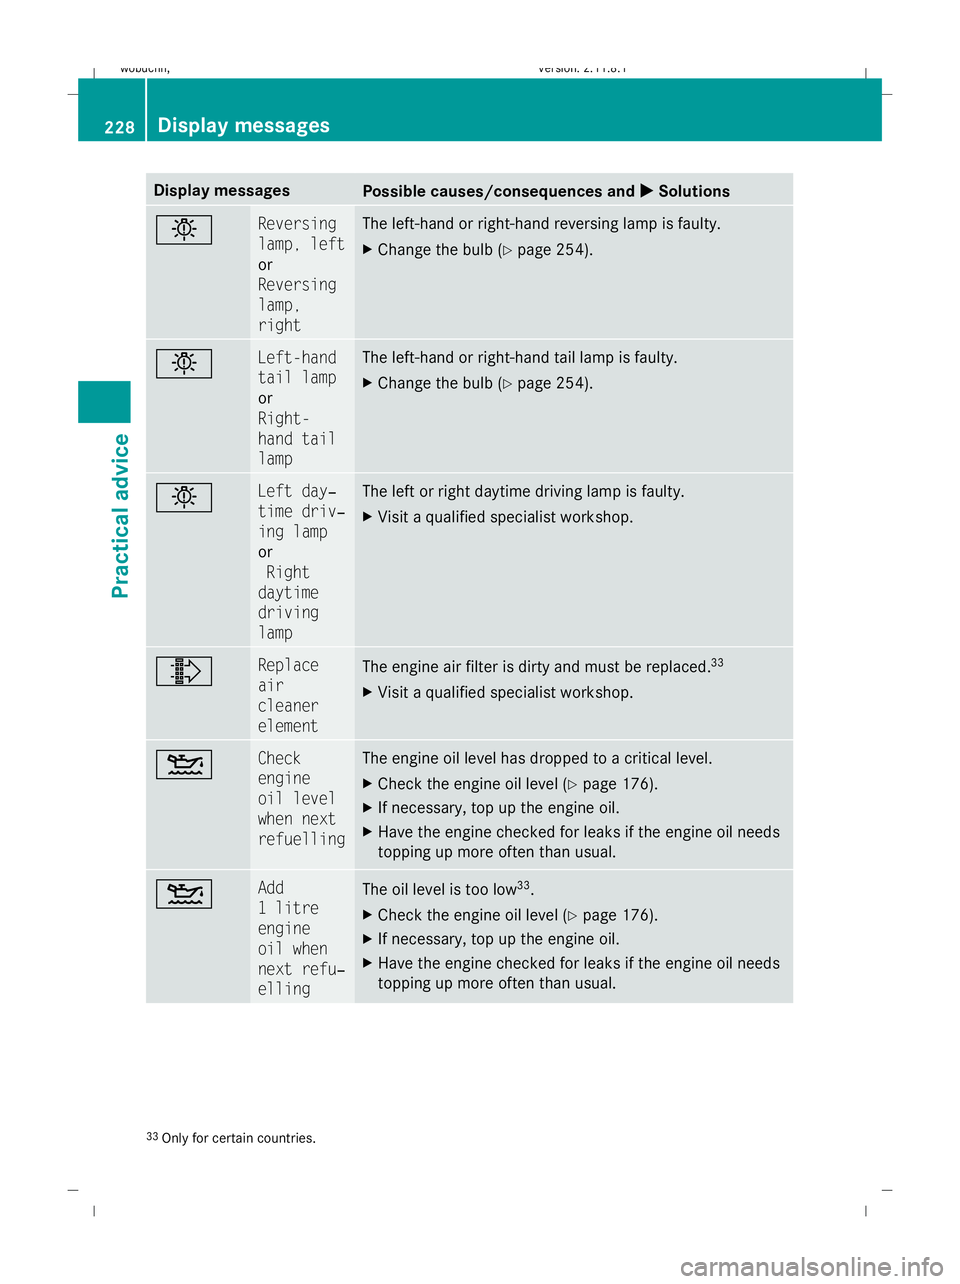
X Solutions b Reversing
lamp, left
or
Reversing
lamp,
right The left-hand or right-hand reversing lamp is faulty.
X
Change the bulb ( Ypage 254). b Left-hand
tail lamp
or
Right-
hand tail
lamp The left-hand or right-hand tail lamp is faulty.
X
Change the bulb ( Ypage 254). b Left day‐
time driv‐
ing lamp
or
Right
daytime
driving
lamp The left or right daytime driving lamp is faulty.
X
Visit a qualified specialist workshop. ¸ Replace
air
cleaner
element
The engine air filter is dirty and must be replaced.
33
X Visit a qualified specialist workshop. 4 Check
engine
oil level
when next
refuelling The engine oil level has dropped to a critical level.
X
Check the engine oil level ( Ypage 176).
X If necessary, top up the engine oil.
X Have the engine checked for leaks if the engine oil needs
topping up more often than usual. 4 Add
1 litre
engine
oil when
next refu‐
elling
The oil level is too low
33
.
X Check the engine oil level ( Ypage 176).
X If necessary, top up the engine oil.
X Have the engine checked for leaks if the engine oil needs
topping up more often than usual. 33
Only for certain countries. 228
Display
messagesPractical advice
X164_AKB; 2; 3, en-GB
wobuchh,V ersion: 2.11.8.1
2009-03-31T14:14:58+02:00 - Seite 228
Dateiname: 6515431202_buchblock.pdf; erzeugt am 01. Apr 2009 00:18:00; WK
Page 257 of 309

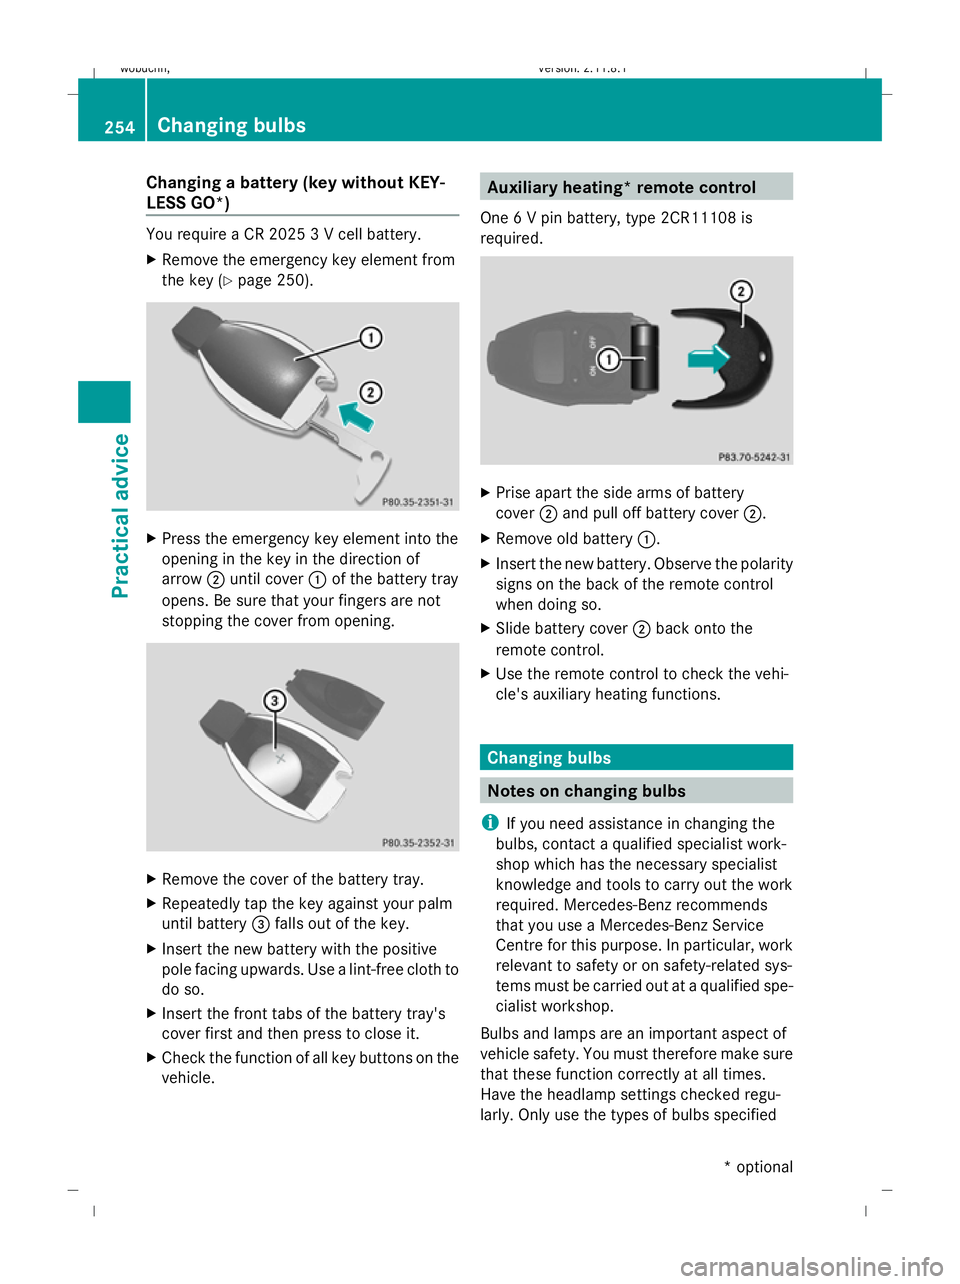
Changing a battery (key without KEY-
LESS GO*) You require a CR 2025 3 V cell battery.
X Remove the emergency key element from
the key (Y page 250). X
Press the emergency key element into the
opening in the key in the direction of
arrow ;until cover :of the battery tray
opens. Be sure that your fingers are not
stopping the cover from opening. X
Remove the cover of the battery tray.
X Repeatedly tap the key against your palm
until battery =falls out of the key.
X Insert the new battery with the positive
pole facing upwards. Use a lint-free cloth to
do so.
X Insert the front tabs of the battery tray's
cover first and then press to close it.
X Check the function of all key buttons on the
vehicle. Auxiliary heating* remote control
One 6 V pin battery, type 2CR11108 is
required. X
Prise apart the side arms of battery
cover ;and pull off battery cover ;.
X Remove old battery :.
X Insert the new battery. Observe the polarity
signs on the back of the remote control
when doing so.
X Slide battery cover ;back onto the
remote control.
X Use the remote control to check the vehi-
cle's auxiliary heating functions. Changing bulbs
Notes on changing bulbs
i If you need assistance in changing the
bulbs, contact a qualified specialist work-
shop which has the necessary specialist
knowledge and tools to carry out the work
required. Mercedes-Benz recommends
that you use a Mercedes-Benz Service
Centre for this purpose. In particular, work
relevant to safety or on safety-related sys-
tems must be carried out at a qualified spe-
cialist workshop.
Bulbs and lamps are an important aspect of
vehicle safety. You must therefore make sure
that these function correctly at all times.
Have the headlamp settings checked regu-
larly. Only use the types of bulbs specified 254
Changing bulbsPractical advice
* optional
X164_AKB; 2; 3, en-GB
wobuchh,
Version: 2.11.8.1 2009-03-31T14:14:58+02:00 - Seite 254
Dateiname: 6515431202_buchblock.pdf; erzeugt am 01. Apr 2009 00:18:05; WK