2009 MERCEDES-BENZ GL SUV steering wheel
[x] Cancel search: steering wheelPage 111 of 309
Selecting the departure time or deactivat-
ing a selected departure time
You can call up the Aux.heating depar‐
ture time function directly.
X Turn the key to position 1or 2in the ignition
lock.
X Press the button for the auxiliary heating on
the centre console (Y page 147).
or
X Press VorU on the steering wheel
to select the Settings... menu.
X Press the &button to select submenus.
X Press the WorX button to select the
Heater submenu.
X Press the &button to select Aux.heat‐
ing departure time.
You will see the selected setting.
X Press the WorX button to select
one of the three departure times or Timer
off (no timer active).
When a switch-on time is selected, the yel-
low indicator lamp lights up in the auxiliary
heating button.
Changing the departure time
X Press VorU on the steering wheel
to select the Settings... menu.
X Press the &button to select submenus.
X Press the WorX button to select the
Heater submenu.
X Press the &button to select Aux.heat‐
ing departure time.
X Press WorX to select Time 1,
Time 2 orTime 3 to be changed.
X Press &to select Departure time
X Set hour.
X Press the WorX button to set the
hour.
X Press the &button to select Depar‐
ture time X Set minutes. X
Press the WorX button to set the
minutes.
X Press the *button to select a different
display.
After changing from one menu to another,
the new time setting is stored. The yellow
indicator lamp lights up on the button for
the auxiliary heating on the centre console.
Convenience submenu* Activating or deactivating the easy-entry/
exit feature*
G
Risk of injury
The steering wheel moves when the EASY-
ENTRY/EXIT feature is active. There is a risk
of occupants becoming trapped. Before acti-
vating the EASY-ENTRY/EXIT feature, make
sure that nobody can become trapped.
Do not leave children unsupervised in the
vehicle, even if they are secured in a child
restraint system. The children could open the
driver's door and thereby unintentionally acti-
vate the EASY-ENTRY/EXIT feature and
become trapped.
X Press VorU on the steering wheel
to select the Settings... menu.
X Press the &button to select submenus.
X Press the WorX button to select the
Convenience submenu.
X Press the &button to select the EASY-
ENTRY feature.
X Press the WorX button to activate
or deactivate the EASY-ENTRY system.
X Press the &,VorU button to
select a different display.
Switching the belt adjustment on/off
X Press VorU on the steering wheel
to select the Settings... menu.
X Press the WorX button to select the
Convenience submenu. 108
On-board computerControls
* optional
X164_AKB; 2; 3, en-GB
wobuchh,
Version: 2.11.8.1 2009-03-31T14:14:58+02:00 - Seite 108
Dateiname: 6515431202_buchblock.pdf; erzeugt am 01. Apr 2009 00:17:17; WK
Page 112 of 309
X
Press the &button to select Belt
adjustment.
X Press the WorX button to activate
or deactivate Belt adjustment.
Switching the fold in mirrors when lock-
ing* function on/off
When you activate the Fold in mirrors
when locking function, the exterior mirrors
are folded in when the vehicle is locked. When
you switch on the ignition, the exterior mir-
rors fold out again.
If the function is activated and you fold in the
exterior mirrors using the button on the door
(Y page 73), the exterior mirrors do not fold
out automatically. The exterior mirrors can
then only be folded out using the button on
the door.
X Press VorU on the steering wheel
to select the Settings... menu.
X Press the &button to select submenus.
X Press the WorX button to select the
Convenience submenu.
X Press the &button to select Fold in
mirrors when locking.
X Press the WorX button to activate
or deactivate the Fold in mirrors when
locking feature.
X Press the &,VorU button to
select a different display. Additional functions menu
In the Additional functions menu, you can:
R activate/deactivate the distance warning
function*
R set DSR (Y page 109)
R prime/deactivate tow-away protec-
tion* (Y page 109)
R prime/deactivate the interior motion sen-
sor* (Y page 110) Activating/deactivating the distance
warning function* This function is only available with Dis-
tronic* (Y
page 119).
X Press VorU on the steering wheel
to select the Additional functions menu.
X If the Distance warning function is not
displayed, press the &or* button
to select the Distance warning system.
X Press the WorX button to activate
or deactivate the Distance warning sys-
tem.
When the distance warning function is acti-
vated, the Äsymbol is shown in the
lower multi-function display.
X Press &, VorU to select a dif-
ferent display.
Setting DSR The
DSR Speed function allows you to set the
threshold speed (vehicle speed for driving
downhill) of the DSR (Y page 113) to a value
between 4 km/h and 18 km/h. The adjust-
ment is carried out in increments of 2 km/h.
X Press VorU on the steering wheel
to select the Additional functions menu.
X If the DSR Speed function is not displayed,
press the &or* button to select the
DSR.
X Press the WorX button to set the
desired threshold speed.
X Press &, VorU to select a dif-
ferent display.
Priming/deactivating tow-away protec-
tion* If you deactivate
Tow-away protection, it
will not be primed when you next lock the
vehicle. On-board computer
109Controls
* optional
X164_AKB; 2; 3, en-GB
wobuchh,
Version: 2.11.8.1 2009-03-31T14:14:58+02:00 - Seite 109 Z
Dateiname: 6515431202_buchblock.pdf; erzeugt am 01. Apr 2009 00:17:17; WK
Page 113 of 309
X
Press VorU on the steering wheel
to select the Additional functions menu.
X IfTow-away protection is not displayed,
press the &or* button to select
Tow-away protection.
X Press the WorX button to prime or
deactivate Tow-away protection.
X Press &, VorU to select a dif-
ferent display.
Priming/deactivating the interior
motion sensor* If you deactivate the
Interior motion sen‐
sor, it will not be primed when you next lock
the vehicle.
X Press VorU on the steering wheel
to select the Additional functions menu.
X If the Interior motion sensor function
is not displayed, press the &or*
button to select the Interior motion
sensor.
X Press the WorX button to prime or
deactivate the Interior motion sensor .
X Press &, VorU to select a dif-
ferent display. Trip computer menu
You can use the Trip computermenu to call
up or reset statistical data for your vehicle.
You can select kmormiles as the unit of
measurement for distance (Y page 103).
Trip computer "From start" or "From
reset" The values in the
From startsubmenu are
calculated from the start of a journey whilst
the values in the From resetsubmenu are
calculated from the last time the submenu
was reset. X
Press VorU on the steering wheel
to select the trip computer menu.
X Press &or* to select From start
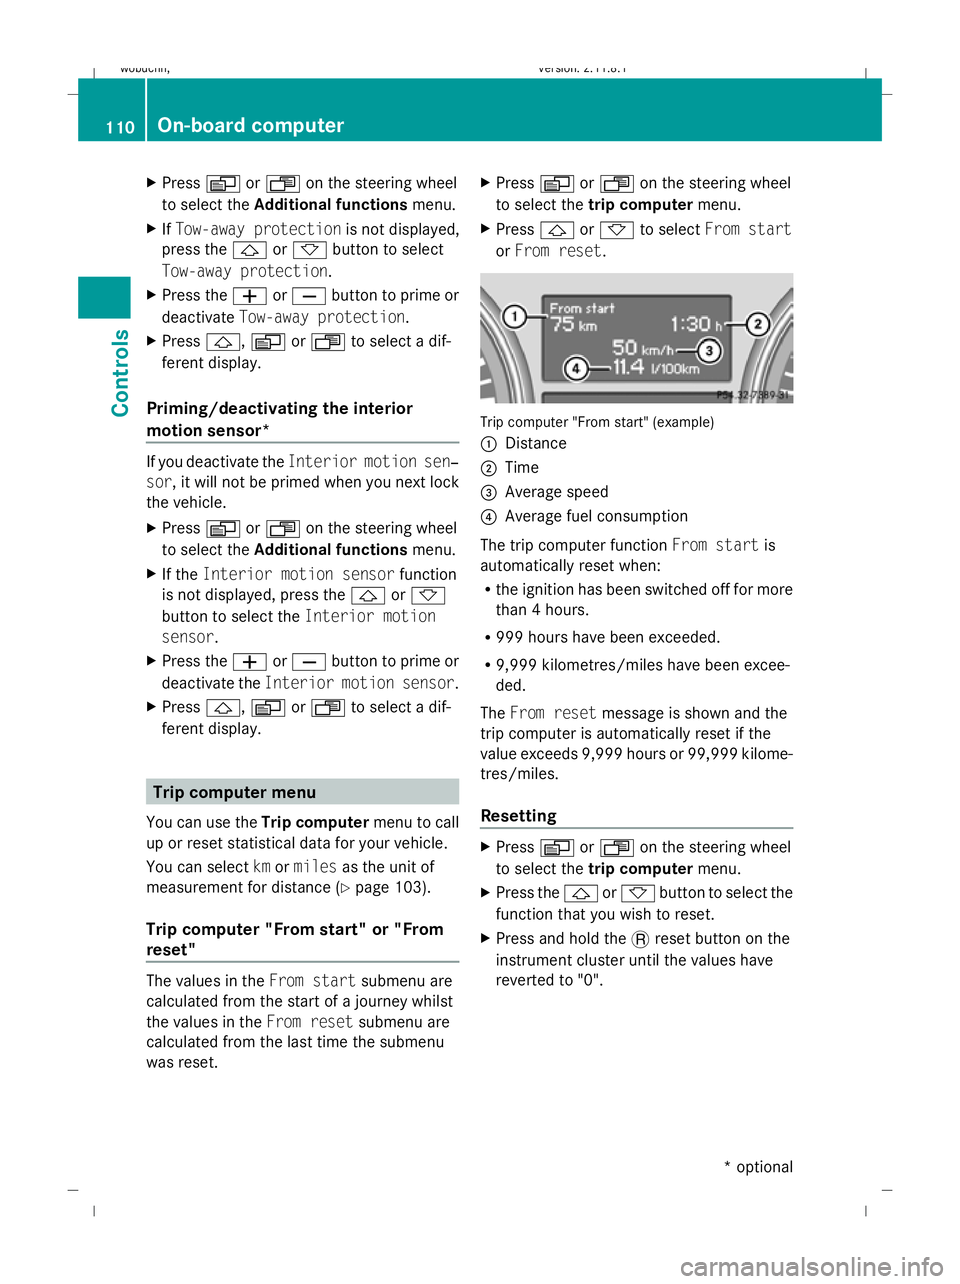
or From reset. Trip computer "From start" (example)
:
Distance
; Time
= Average speed
? Average fuel consumption
The trip computer function From startis
automatically reset when:
R the ignition has been switched off for more
than 4 hours.
R 999 hours have been exceeded.
R 9,999 kilometres/miles have been excee-
ded.
The From reset message is shown and the
trip computer is automatically reset if the
value exceeds 9,999 hours or 99,999 kilome-
tres/miles.
Resetting X
Press VorU on the steering wheel
to select the trip computer menu.
X Press the &or* button to select the
function that you wish to reset.
X Press and hold the .reset button on the
instrument cluster until the values have
reverted to "0". 110
On-board computerControls
* optional
X164_AKB; 2; 3, en-GB
wobuchh,
Version: 2.11.8.1 2009-03-31T14:14:58+02:00 - Seite 110
Dateiname: 6515431202_buchblock.pdf; erzeugt am 01. Apr 2009 00:17:17; WK
Page 114 of 309
Calling up the range
X
Press VorU on the steering wheel
to select the trip computer menu.
X Press &or* to select Range:
The multi-function display shows the esti-
mated range of the vehicle, based on the
current driving style and the fuel level. If
there is only a small amount of fuel remain-
ing in the fuel tank, a vehicle refuelling
C appears instead of the range.
Displaying current fuel consumption X
Press VorU to select the Trip com-
puter menu.
X Press &or* to select Consump‐
tion.
The current fuel consumption is displayed. Telephone menu
Functions and displays depend on the
optional equipment installed in your vehicle.
You can place your mobile phone in the
mobile phone bracket* (Y page 164), or set
up a Bluetooth connection to the audio sys-
tem or to COMAND APS* (see separate oper-
ating instructions). G
Risk of accident
Observe the legal requirements of the country
in which you are currently driving regarding
the use of mobile phones in the vehicle.
If it is permitted to use mobile phones while
the vehicle is in motion, you should only use
them when the road and traffic conditions
allow. Otherwise, you may be distracted from the traffic conditions, cause an accident and
injure yourself and others.
Use the buttons on the multi-function steer-
ing wheel.
X Switch on the mobile phone and audio
equipment or COMAND APS*; see the sep-
arate operating instructions.
X Press the VorU button to select the
Telephone menu.
Mobile phone on PIN code not yet entered
Once you have inserted the mobile phone into
the mobile phone bracket*, the multi-func-
tion display shows the Please enter PIN
message.
X Enter the PIN using the mobile phone, Lin-
guatronic*, the audio system or COMAND
APS*.
The mobile phone will search for a network.
Mobile phone operational
You will see Readyor the name of the mobile
phone network provider in the multi-function
display. If the mobile phone operational read-
iness symbol goes out, your vehicle is outside
of the transmission and reception range. In
this case you will see No Servicein the
multi-function display.
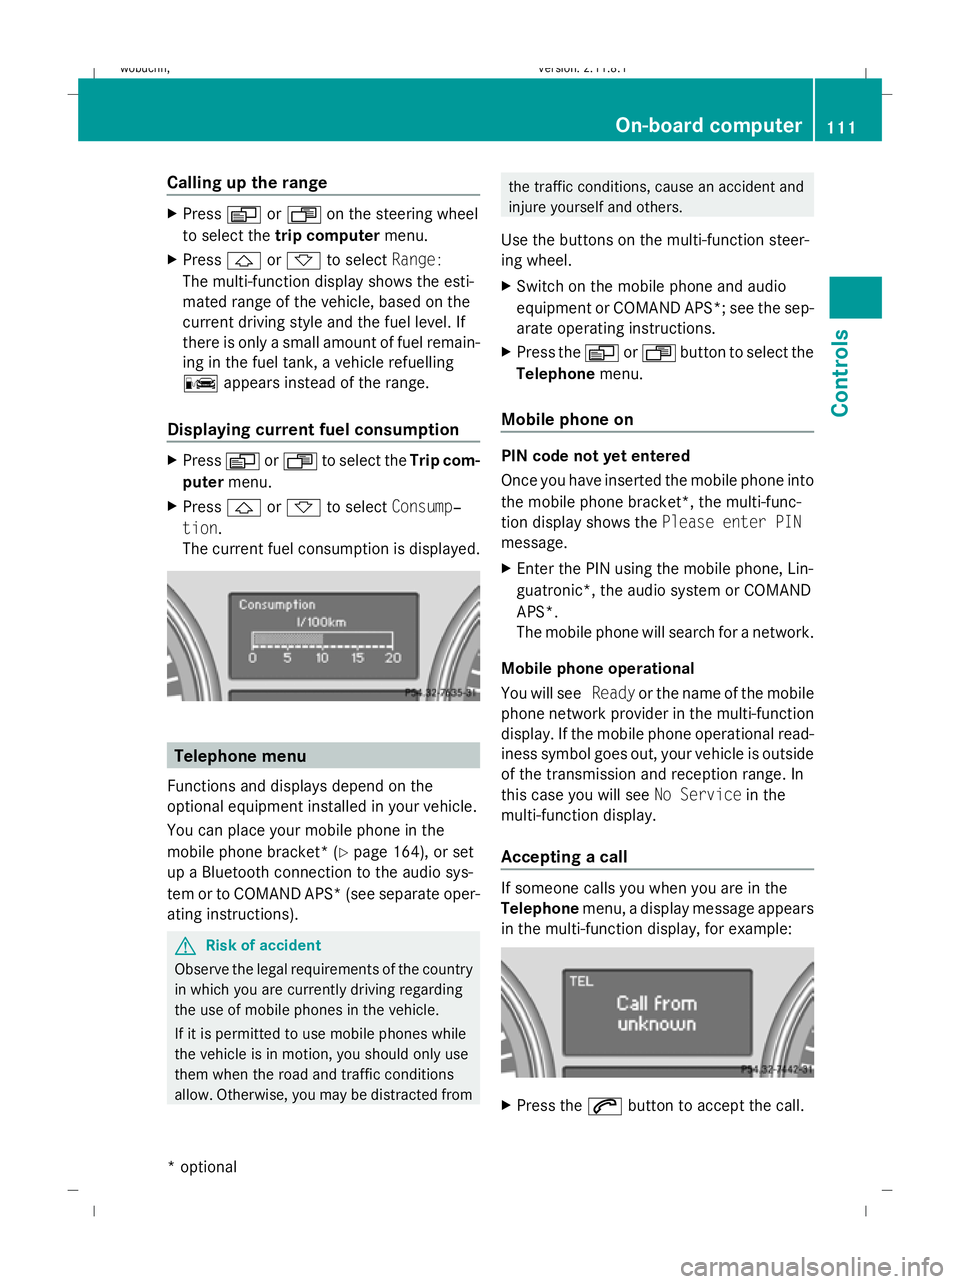
Accepting a call If someone calls you when you are in the
Telephone
menu, a display message appears
in the multi-function display, for example: X
Press the 6button to accept the call. On-board computer
111Controls
* optional
X164_AKB; 2; 3, en-GB
wobuchh,
Version: 2.11.8.1 2009-03-31T14:14:58+02:00 - Seite 111 Z
Dateiname: 6515431202_buchblock.pdf; erzeugt am 01. Apr 2009 00:17:18; WK
Page 134 of 309
X
Start the engine.
X Turn selector wheel :clockwise.
The vehicle is raised.
or
X Turn selector wheel ;anti-clockwise.
The vehicle is lowered.
Indicator lamps =for the desired off-road
level flash:
R Off-road level 1: the lower indicator lamp
flashes
R Off-road level 2: the lower and centre indi-
cator lamps flash
R Off-road level 3: all three indicator lamps
flash
The vehicle is being adjusted to the off-road
level selected. As soon as an off-road level is
reached, the corresponding indicator lamp
stops flashing and lights up constantly.
While the adjustment is taking place, a mes-
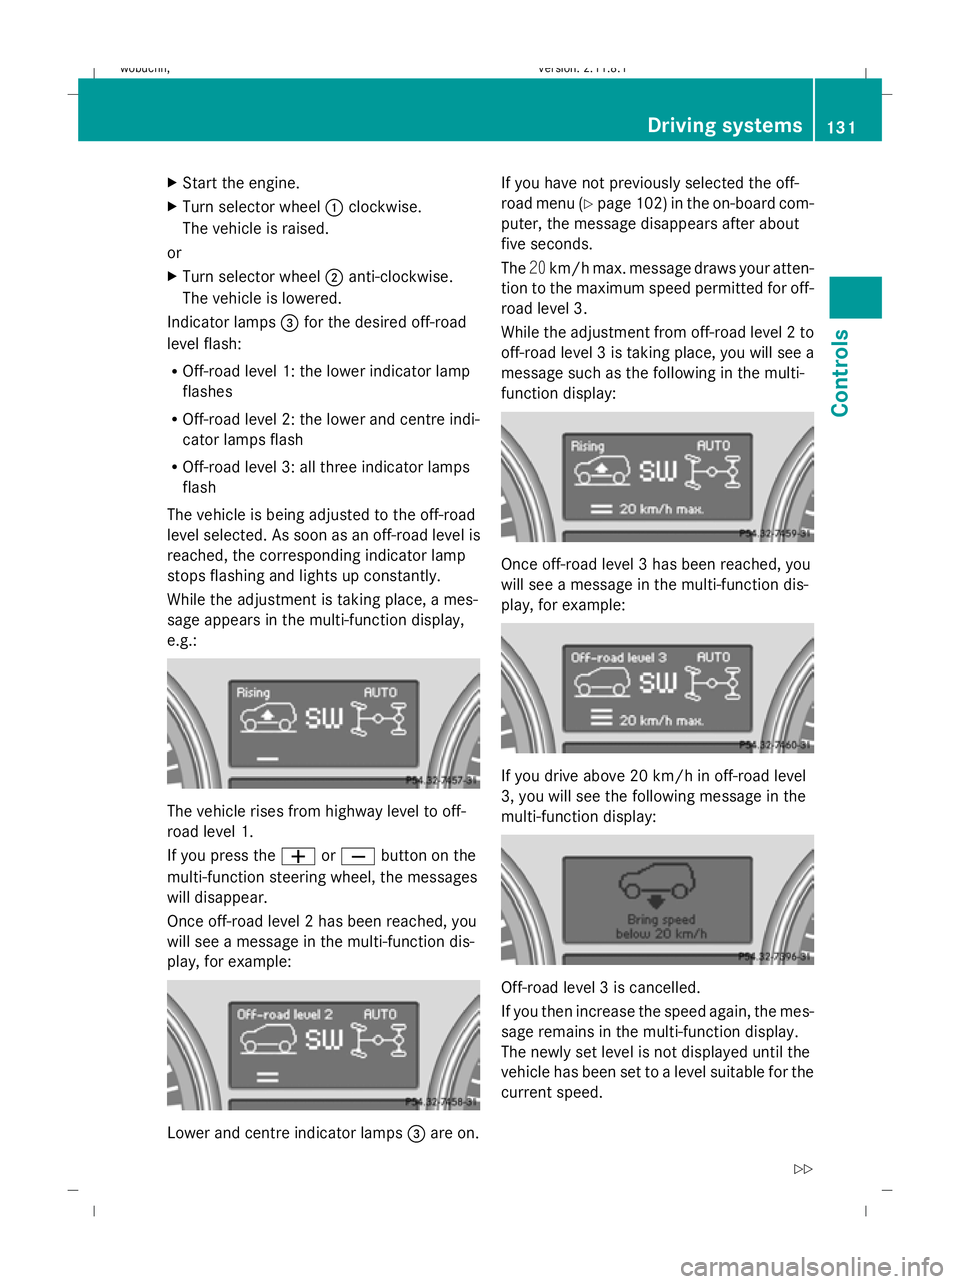
sage appears in the multi-function display,
e.g.: The vehicle rises from highway level to off-
road level 1.
If you press the
WorX button on the
multi-function steering wheel, the messages
will disappear.
Once off-road level 2 has been reached, you
will see a message in the multi-function dis-
play, for example: Lower and centre indicator lamps
=are on. If you have not previously selected the off-
road menu (Y
page 102) in the on-board com-
puter, the message disappears after about
five seconds.
The 20km/h max. message draws your atten-
tion to the maximum speed permitted for off-
road level 3.
While the adjustment from off-road level 2 to
off-road level 3 is taking place, you will see a
message such as the following in the multi-
function display: Once off-road level 3 has been reached, you
will see a message in the multi-function dis-
play, for example:
If you drive above 20 km/h in off-road level
3, you will see the following message in the
multi-function display:
Off-road level 3 is cancelled.
If you then increase the speed again, the mes-
sage remains in the multi-function display.
The newly set level is not displayed until the
vehicle has been set to a level suitable for the
current speed. Driving systems
131Controls
X164_AKB; 2; 3, en-GB
wobuchh, Version: 2.11.8.1 2009-03-31T14:14:58+02:00 - Seite 131 Z
Dateiname: 6515431202_buchblock.pdf; erzeugt am 01. Apr 2009 00:17:25; WK
Page 136 of 309

If one or more indicator lamps
=are on:
X Turn the selector wheel anti-clockwise ;
until all indicator lamps =that are lit start
to flash.
The vehicle is lowered to highway level. As
soon as the next lowest level is reached,
the indicator lamp stops flashing and goes
out.
While the adjustment is taking place, a mes-
sage appears in the multi-function display,
e.g.: If you press the
WorX button on the
multi-function steering wheel, the messages
will disappear.
Once highway level has been reached, all indi-
cator lamps =go out. You will see a message
in the multi-function display, for example: If you have not previously selected the off-
road menu (Y
page 102) in the on-board com-
puter, the message disappears after about
five seconds.
The vehicle automatically selects highway
level if you are driving at a speed above
115 km/h or if you drive at between
100 km/h and 115 km/h for around 20 sec-
onds. Depending on the ADS basic setting
(Y page 129), the vehicle is lowered to high-
speed level at high speeds. PARKTRONIC*
G
Risk of accident
PARKTRONIC is only an aid and may not
detect all obstacles. It is not a substitute for
attentive driving.
You are always responsible for safety and
must continue to pay attention to your imme-
diate surroundings when parking and
manoeuvring. You could otherwise endanger
yourself and others. G
Risk of injury
Make sure that no persons or animals are in
the manoeuvring range. Otherwise, they
could be injured.
PARKTRONIC is an electronic parking aid
using ultrasound. It indicates visually and
audibly the distance between your vehicle
and an object.
PARKTRONIC is activated automatically when
you:
R switch on the ignition
R release the parking brake
R shift the automatic transmission to D,Ror
N
PARKTRONIC is deactivated at speeds above
18 km/h. It is reactivated at lower speeds.
PARKTRONIC monitors the area around your
vehicle using six sensors in the front bumper
and four sensors in the rear bumper. :
Example: sensors in the front bumper,
left-hand side Driving systems
133Controls
* optional
X164_AKB; 2; 3, en-GB
wobuchh,
Version: 2.11.8.1 2009-03-31T14:14:58+02:00 - Seite 133 Z
Dateiname: 6515431202_buchblock.pdf; erzeugt am 01. Apr 2009 00:17:26; WK
Page 168 of 309
cases, these are country-specific. You can
obtain these mobile phone brackets from a
qualified specialist workshop, e.g. a
Mercedes-Benz Service Centre.
The functions and services available when
you use the phone depend on your mobile
phone model and service provider.
Inserting the mobile phone
X Open the telephone compartment
(Y page 153).
X Place the mobile phone bracket into the
pre-installed fitting; see the separate
mobile phone bracket fitting instructions.
X Insert the mobile phone into the mobile
phone bracket; see the separate mobile
phone bracket fitting instructions.
If the mobile phone is inserted in the mobile
phone bracket, you can speak to the person
you are calling using the hands-free system.
You can operate the telephone using the
6 and~ buttons on the multi-function
steering wheel. You can operate other mobile
phone functions via the on-board computer
(Y page 111).
When you take the key out of the ignition lock,
the mobile phone stays on but you can no
longer use the hands-free system.
If you are making a call and you would like to
take the key out of the ignition lock, first
remove the mobile phone from the bracket.
Otherwise, the call will be ended. Garage door opener*
The remote control integrated in the rear-view
mirror allows you to operate up to three dif-
ferent door and gate systems.
i The garage door opener is only available
for certain countries. Observe the legal
requirements in all countries concerned.
The HomeLink ®
garage door opener is
compatible with most European garage and
gate opener drives. More information on HomeLink
®
and/or compatible products is
available from:
R any Mercedes-Benz Service Centre
R the HomeLink ®
hotline
(0) 08000 466 354 65 (free of charge) or
+49 (0) 6838 907-277 (charges apply)
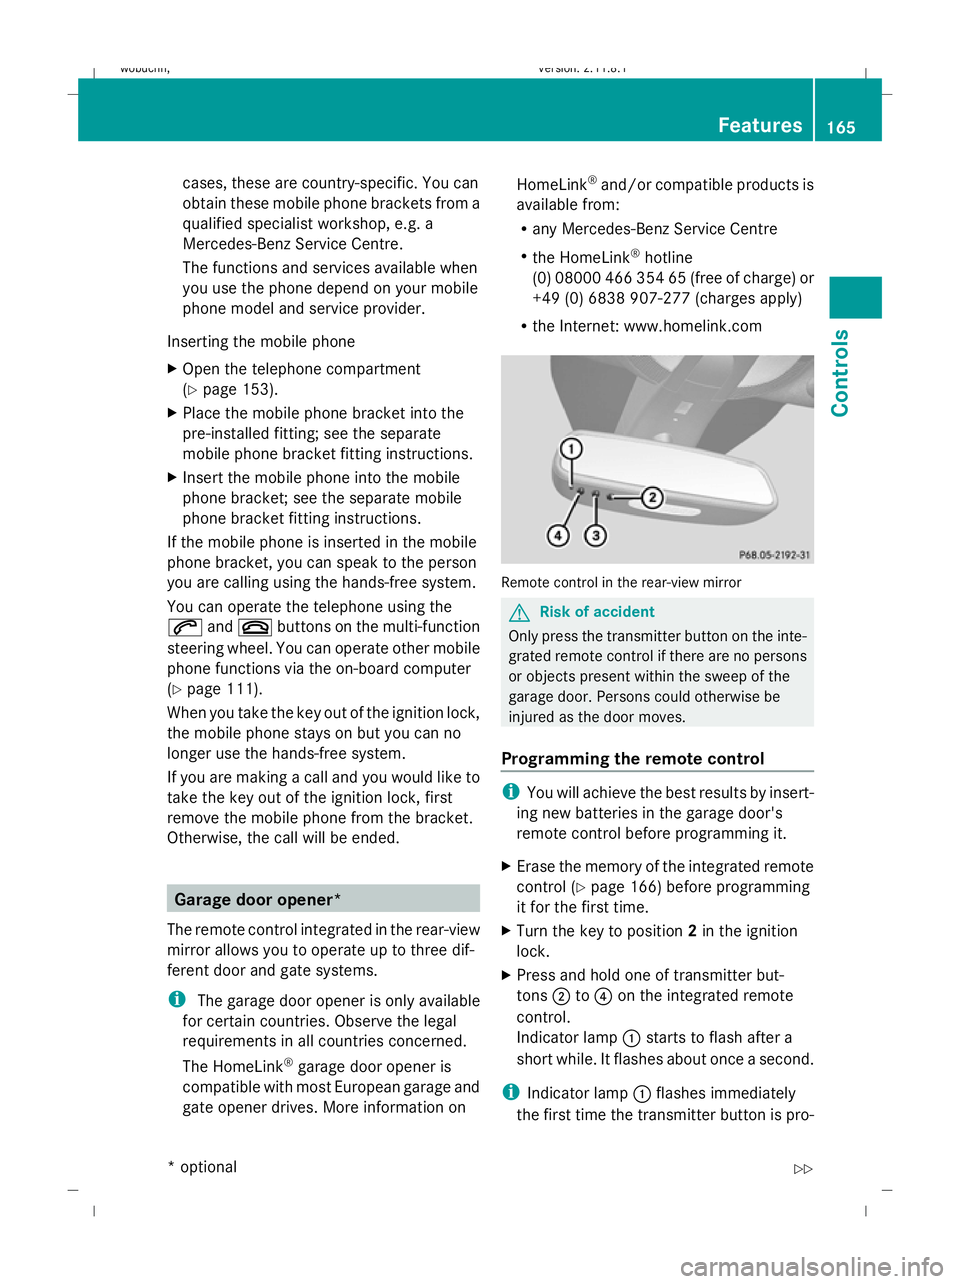
R the Internet: www.homelink.com Remote control in the rear-view mirror
G
Risk of accident
Only press the transmitter button on the inte-
grated remote control if there are no persons
or objects present within the sweep of the
garage door. Persons could otherwise be
injured as the door moves.
Programming the remote control i
You will achieve the best results by insert-
ing new batteries in the garage door's
remote control before programming it.
X Erase the memory of the integrated remote
control ( Ypage 166) before programming
it for the first time.
X Turn the key to position 2in the ignition
lock.
X Press and hold one of transmitter but-
tons ;to? on the integrated remote
control.
Indicator lamp :starts to flash after a
short while. It flashes about once a second.
i Indicator lamp :flashes immediately
the first time the transmitter button is pro- Features
165Controls
* optional
X164_AKB; 2; 3, en-GB
wobuchh,
Version: 2.11.8.1 2009-03-31T14:14:58+02:00 - Seite 165 Z
Dateiname: 6515431202_buchblock.pdf; erzeugt am 01. Apr 2009 00:17:43; WK
Page 170 of 309
To obtain an accurate display of your com-
pass bearing, the correct geographical zone
must be set. If necessary, the compass must
also be calibrated (Y page 167).
If the compass is not calibrated or is malfunc-
tioning due to external interference, you will
see the Compass – – – message in the dis-
play.
i Large buildings, bridges, power lines or
large transmitting masts as well as metallic objects in or on the vehicle may interfere
with the compass display.
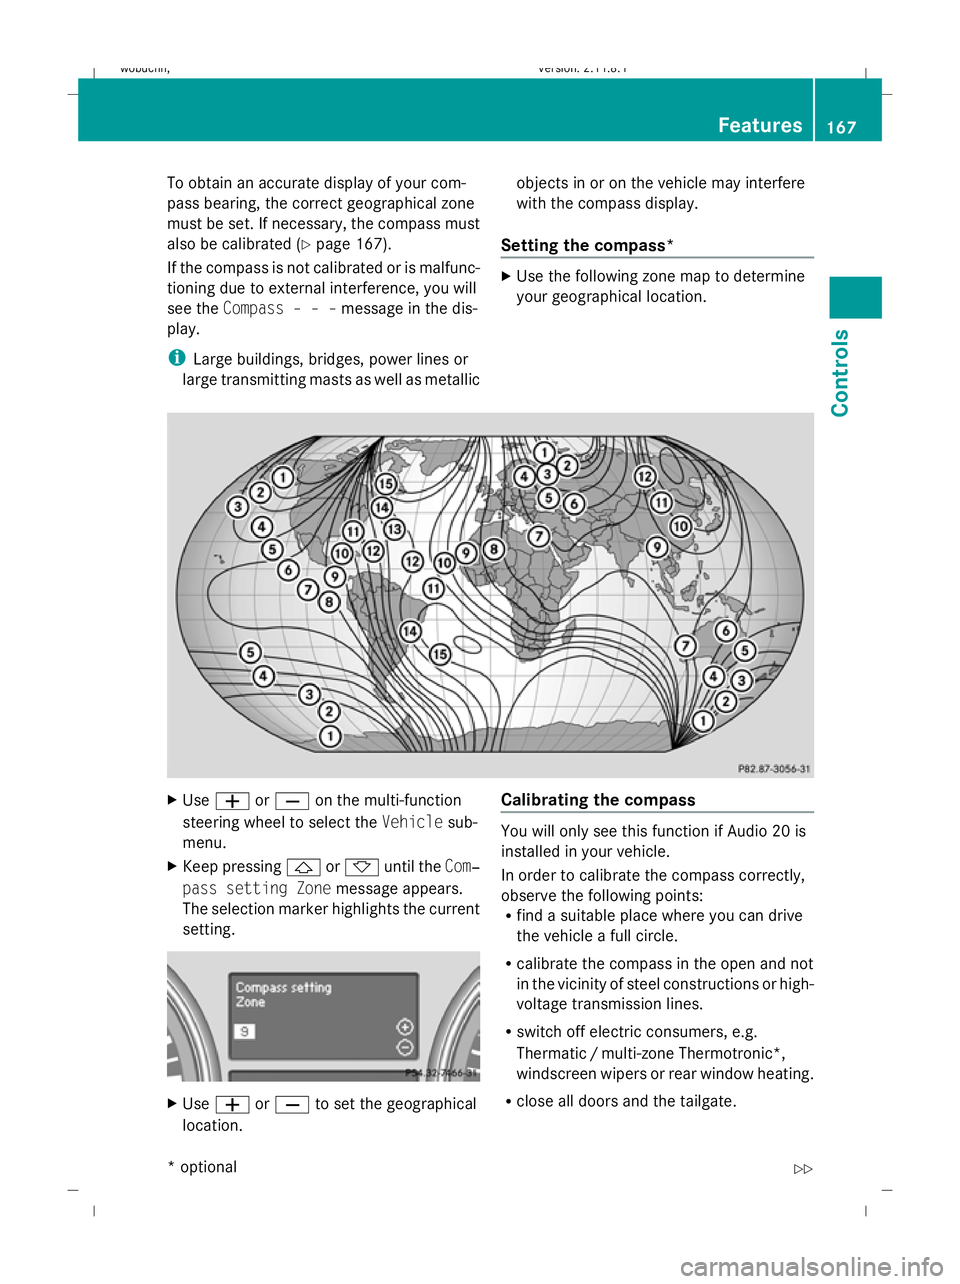
Setting the compass* X
Use the following zone map to determine
your geographical location. X
Use W orX on the multi-function
steering wheel to select the Vehiclesub-
menu.
X Keep pressing &or* until the Com‐
pass setting Zone message appears.
The selection marker highlights the current
setting. X
Use W orX to set the geographical
location. Calibrating the compass You will only see this function if Audio 20 is
installed in your vehicle.
In order to calibrate the compass correctly,
observe the following points:
R
find a suitable place where you can drive
the vehicle a full circle.
R calibrate the compass in the open and not
in the vicinity of steel constructions or high-
voltage transmission lines.
R switch off electric consumers, e.g.
Thermatic /multi-zone Thermotronic*,
windscreen wipers or rear window heating.
R close all doors and the tailgate. Features
167Controls
* optional
X164_AKB; 2; 3, en-GB
wobuchh,
Version: 2.11.8.1 2009-03-31T14:14:58+02:00 - Seite 167 Z
Dateiname: 6515431202_buchblock.pdf; erzeugt am 01. Apr 2009 00:17:43; WK