2009 MERCEDES-BENZ GL SUV steering wheel
[x] Cancel search: steering wheelPage 214 of 309
A
Velcro fastener
B Jack
C Wheel bolts
D Folding wheel chock
E Fuse allocation chart
F Stowage well
G Warning triangle
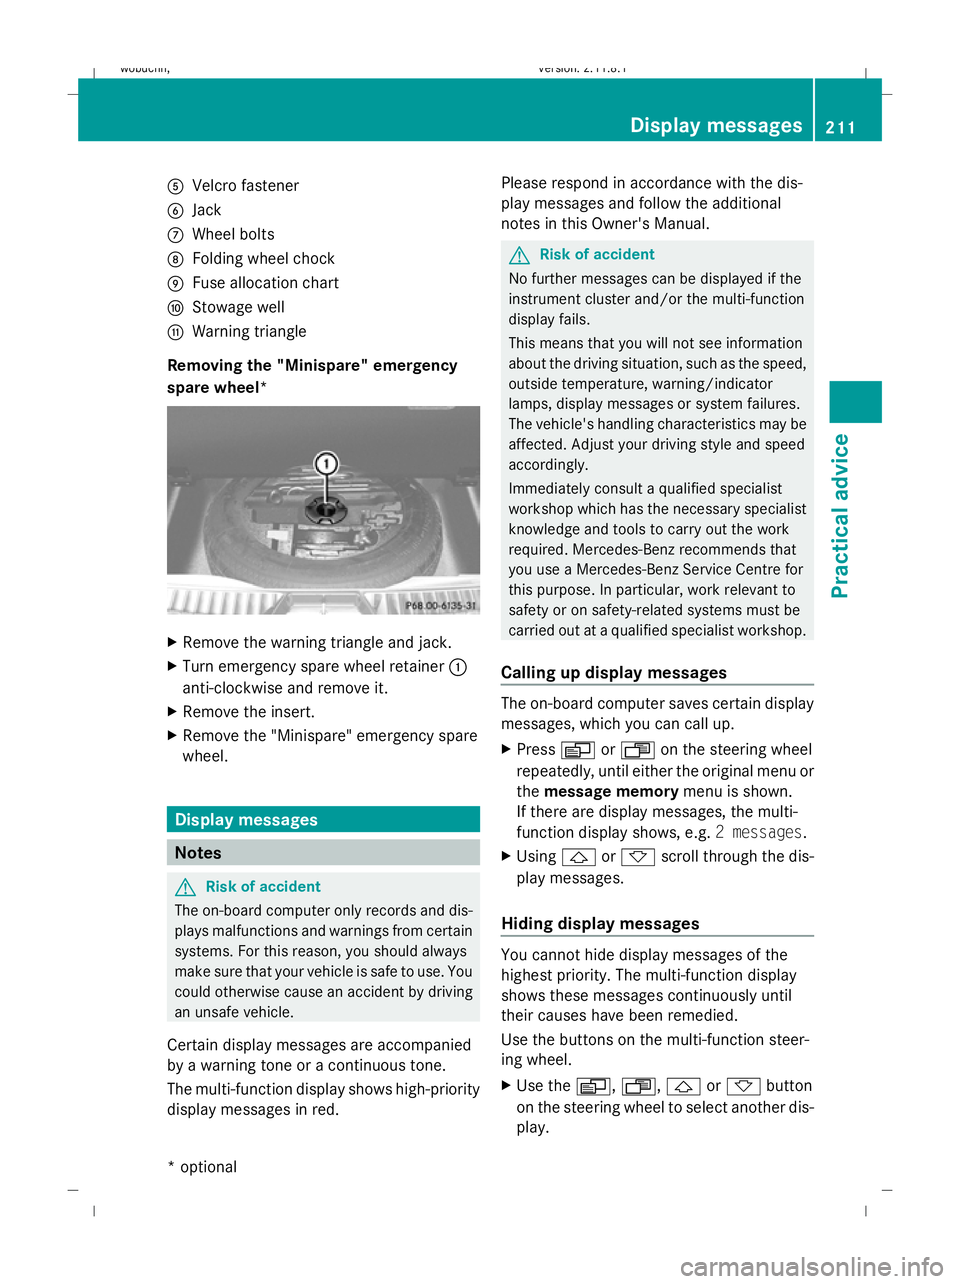
Removing the "Minispare" emergency
spare wheel* X
Remove the warning triangle and jack.
X Turn emergency spare wheel retainer :
anti-clockwise and remove it.
X Remove the insert.
X Remove the "Minispare" emergency spare
wheel. Display messages
Notes
G
Risk of accident
The on-board computer only records and dis-
plays malfunctions and warnings from certain
systems. For this reason, you should always
make sure that your vehicle is safe to use. You
could otherwise cause an accident by driving
an unsafe vehicle.
Certain display messages are accompanied
by a warning tone or a continuous tone.
The multi-function display shows high-priority
display messages in red. Please respond in accordance with the dis-
play messages and follow the additional
notes in this Owner's Manual. G
Risk of accident
No further messages can be displayed if the
instrument cluster and/or the multi-function
display fails.
This means that you will not see information
about the driving situation, such as the speed,
outside temperature, warning/indicator
lamps, display messages or system failures.
The vehicle's handling characteristics may be
affected. Adjust your driving style and speed
accordingly.
Immediately consult a qualified specialist
workshop which has the necessary specialist
knowledge and tools to carry out the work
required. Mercedes-Benz recommends that
you use a Mercedes-Benz Service Centre for
this purpose. In particular, work relevant to
safety or on safety-related systems must be
carried out at a qualified specialist workshop.
Calling up display messages The on-board computer saves certain display
messages, which you can call up.
X
Press VorU on the steering wheel
repeatedly, until either the original menu or
the message memory menu is shown.
If there are display messages, the multi-
function display shows, e.g. 2 messages.
X Using &or* scroll through the dis-
play messages.
Hiding display messages You cannot hide display messages of the
highest priority. The multi-function display
shows these messages continuously until
their causes have been remedied.
Use the buttons on the multi-function steer-
ing wheel.
X
Use the V,U,&or* button
on the steering wheel to select another dis-
play. Display messages
211Practical advice
* optional
X164_AKB; 2; 3, en-GB
wobuchh,
Version: 2.11.8.1 2009-03-31T14:14:58+02:00 - Seite 211 Z
Dateiname: 6515431202_buchblock.pdf; erzeugt am 01. Apr 2009 00:17:58; WK
Page 221 of 309
Display messages
Possible causes/consequences and
X
X Solutions Tyre pres‐
sure moni‐
tor currently
unavaila‐
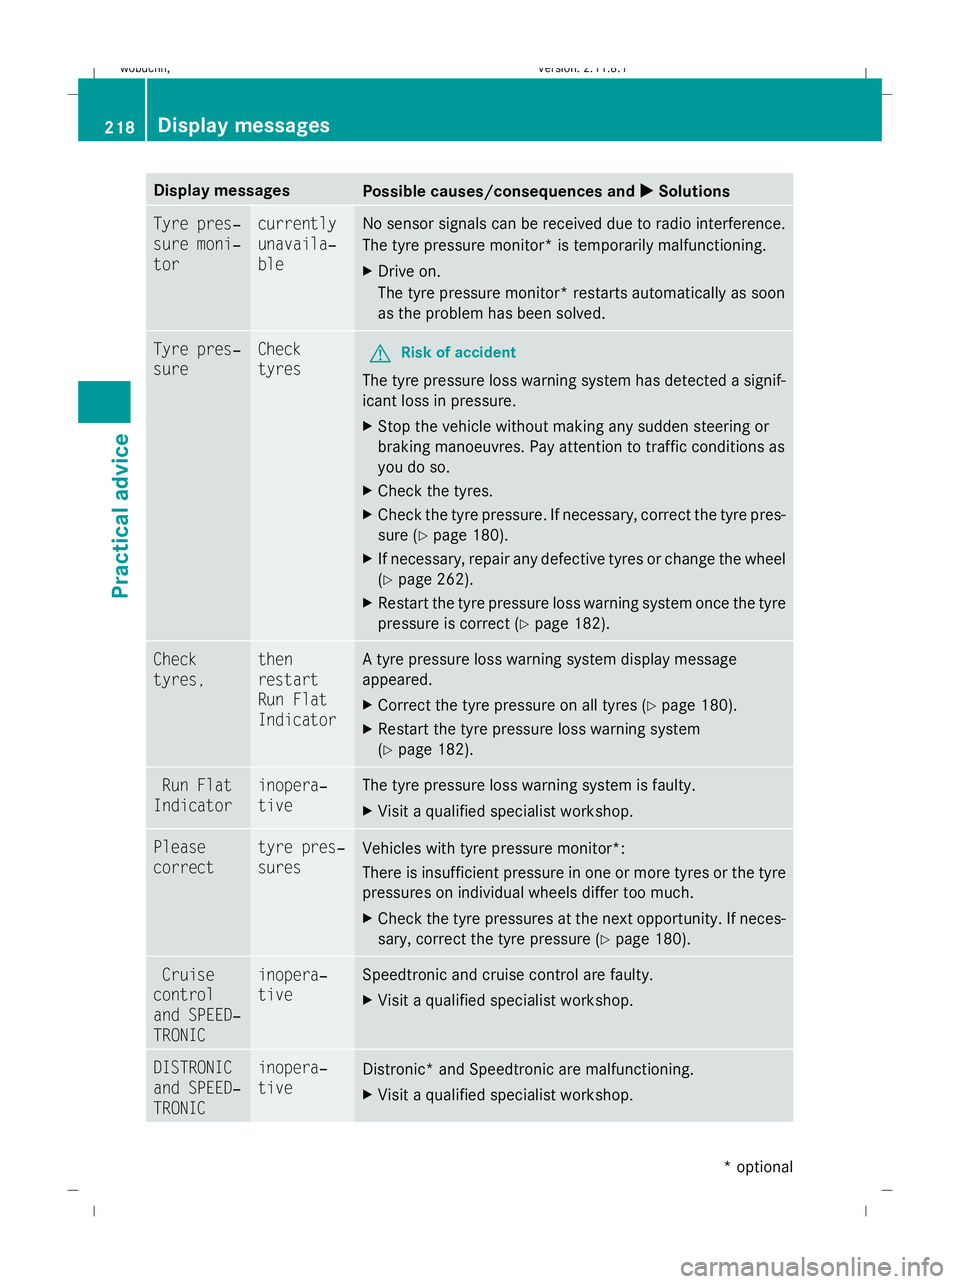
ble No sensor signals can be received due to radio interference.
The tyre pressure monitor* is temporarily malfunctioning.
X
Drive on.
The tyre pressure monitor* restarts automatically as soon
as the problem has been solved. Tyre pres‐
sure Check
tyres
G
Risk of accident
The tyre pressure loss warning system has detected a signif-
icant loss in pressure.
X Stop the vehicle without making any sudden steering or
braking manoeuvres. Pay attention to traffic conditions as
you do so.
X Check the tyres.
X Check the tyre pressure. If necessary, correct the tyre pres-
sure (Y page 180).
X If necessary, repair any defective tyres or change the wheel
(Y page 262).
X Restart the tyre pressure loss warning system once the tyre
pressure is correct (Y page 182).Check
tyres, then
restart
Run Flat
Indicator A tyre pressure loss warning system display message
appeared.
X
Correct the tyre pressure on all tyres ( Ypage 180).
X Restart the tyre pressure loss warning system
(Y page 182). Run Flat
Indicator inopera‐
tive The tyre pressure loss warning system is faulty.
X
Visit a qualified specialist workshop. Please
correct tyre pres‐
sures
Vehicles with tyre pressure monitor*:
There is insufficient pressure in one or more tyres or the tyre
pressures on individual wheels differ too much.
X
Check the tyre pressures at the next opportunity. If neces-
sary, correct the tyre pressure (Y page 180).Cruise
control
and SPEED‐
TRONIC inopera‐
tive Speedtronic and cruise control are faulty.
X
Visit a qualified specialist workshop. DISTRONIC
and SPEED‐
TRONIC inopera‐
tive
Distronic* and Speedtronic are malfunctioning.
X
Visit a qualified specialist workshop. 218
Display
messagesPractical advice
* optional
X164_AKB; 2; 3, en-GB
wobuchh
,V ersion: 2.11.8.1
2009-03-31T14:14:58+02:00 - Seite 218
Dateiname: 6515431202_buchblock.pdf; erzeugt am 01. Apr 2009 00:17:59; WK
Page 232 of 309
Display messages
Possible causes/consequences and
X
X Solutions 4 Engine
oil level
Stop car,
turn
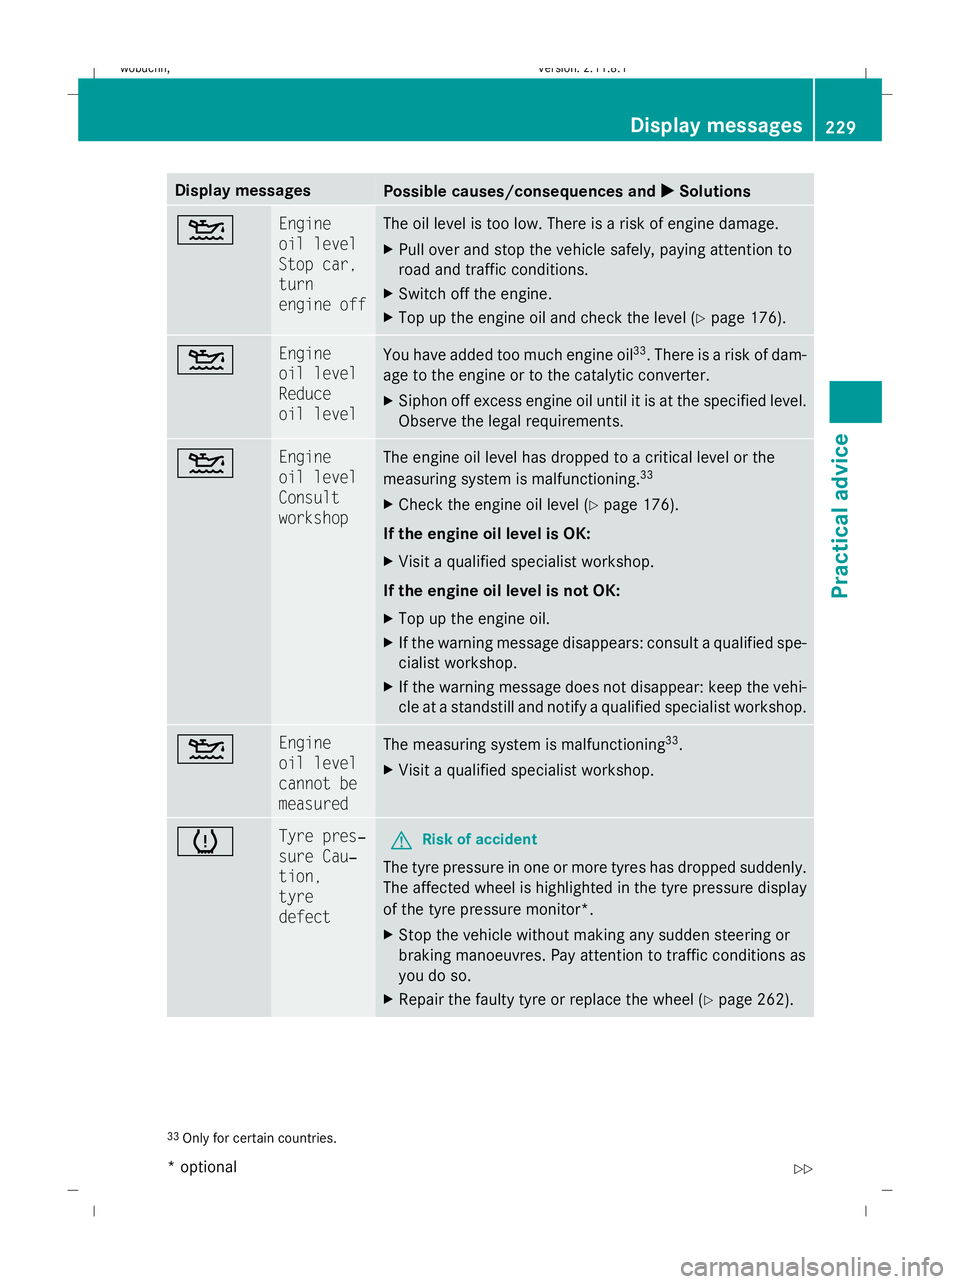
engine off The oil level is too low. There is a risk of engine damage.
X
Pull over and stop the vehicle safely, paying attention to
road and traffic conditions.
X Switch off the engine.
X Top up the engine oil and check the level (Y page 176).4 Engine
oil level
Reduce
oil level
You have added too much engine oil
33
. There is a risk of dam-
age to the engine or to the catalytic converter.
X Siphon off excess engine oil until it is at the specified level.
Observe the legal requirements. 4 Engine
oil level
Consult
workshop The engine oil level has dropped to a critical level or the
measuring system is malfunctioning.
33
X Check the engine oil level ( Ypage 176).
If the engine oil level is OK:
X Visit a qualified specialist workshop.
If the engine oil level is not OK:
X Top up the engine oil.
X If the warning message disappears: consult a qualified spe-
cialist workshop.
X If the warning message does not disappear: keep the vehi-
cle at a standstill and notify a qualified specialist workshop. 4 Engine
oil level
cannot be
measured
The measuring system is malfunctioning
33
.
X Visit a qualified specialist workshop. h Tyre pres‐
sure Cau‐
tion,
tyre
defect
G
Risk of accident
The tyre pressure in one or more tyres has dropped suddenly.
The affected wheel is highlighted in the tyre pressure display
of the tyre pressure monitor*.
X Stop the vehicle without making any sudden steering or
braking manoeuvres. Pay attention to traffic conditions as
you do so.
X Repair the faulty tyre or replace the wheel ( Ypage 262). 33
Only for certain countries. Display
messages
229Practical advice
* optional
X164_AKB; 2; 3, en-GB
wobuchh
,V ersion: 2.11.8.1
2009-03-31T14:14:58+02:00 - Seite 229 Z
Dateiname: 6515431202_buchblock.pdf; erzeugt am 01. Apr 2009 00:18:00; WK
Page 233 of 309
Display messages
Possible causes/consequences and
X
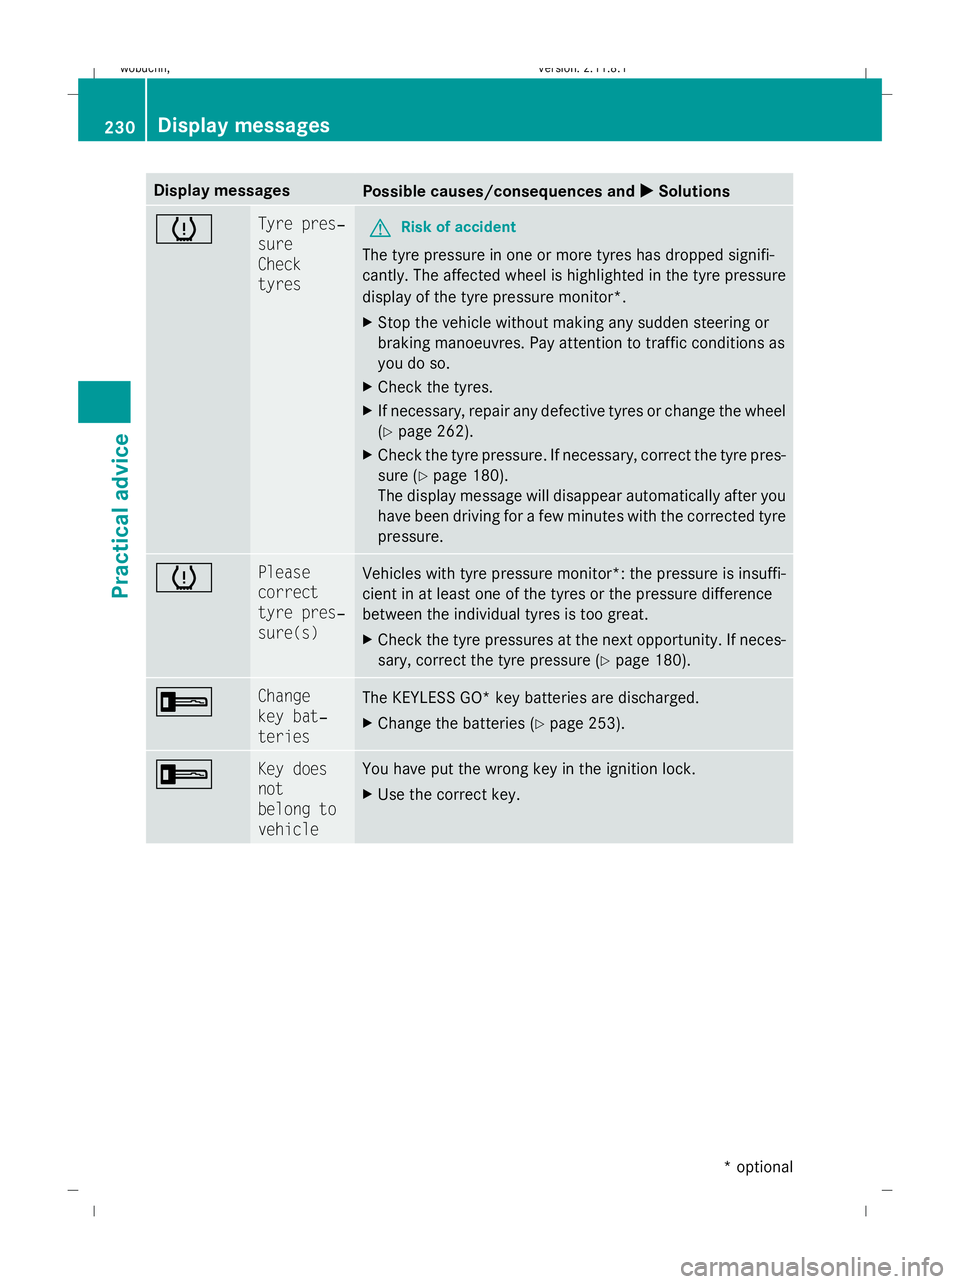
X Solutions h Tyre pres‐
sure
Check
tyres
G
Risk of accident
The tyre pressure in one or more tyres has dropped signifi-
cantly. The affected wheel is highlighted in the tyre pressure
display of the tyre pressure monitor*.
X Stop the vehicle without making any sudden steering or
braking manoeuvres. Pay attention to traffic conditions as
you do so.
X Check the tyres.
X If necessary, repair any defective tyres or change the wheel
(Y page 262).
X Check the tyre pressure. If necessary, correct the tyre pres-
sure (Y page 180).
The display message will disappear automatically after you
have been driving for a few minutes with the corrected tyre
pressure. h Please
correct
tyre pres‐
sure(s)
Vehicles with tyre pressure monitor*: the pressure is insuffi-
cient in at least one of the tyres or the pressure difference
between the individual tyres is too great.
X
Check the tyre pressures at the next opportunity. If neces-
sary, correct the tyre pressure (Y page 180).+ Change
key bat‐
teries
The KEYLESS GO* key batteries are discharged.
X
Change the batteries ( Ypage 253). + Key does
not
belong to
vehicle You have put the wrong key in the ignition lock.
X
Use the correct key. 230
Display
messagesPractical advice
* optional
X164_AKB; 2; 3, en-GB
wobuchh
,V ersion: 2.11.8.1
2009-03-31T14:14:58+02:00 - Seite 230
Dateiname: 6515431202_buchblock.pdf; erzeugt am 01. Apr 2009 00:18:00; WK
Page 236 of 309
Troubleshooting
Points to remember
G
Risk of accident and injury
The operating safety of your vehicle could be compromised if service work is carried out improp-
erly. You could lose control of the vehicle and cause an accident. Safety systems may also not
be able to protect you or others as intended.
Always have maintenance work carried out at a qualified specialist workshop. The workshop must
have the necessary specialist knowledge and tools to carry out the work required. Mercedes-
Benz recommends that you use a Mercedes-Benz Service Centre for this purpose. In particular,
work relevant to safety or on safety-related systems must be carried out at a qualified specialist
workshop. Warning and indicator lamps in switches and buttons
Problem
Possible causes/consequences and
X
X Solutions One or all of the indica-
tor lamps in the seat
ventilation* button are
flashing. The seat ven-
tilation* has switched
off automatically. The on-board voltage is too low, because too many consumers are
switched on.
X Switch off consumers that are not required, e.g. rear window
heating or interior lighting.
Once the battery is sufficiently charged, the seat ventilation*
will switch back on automatically. One or all of the indica-
tor lamps in the seat
heating* button are
flashing. The seat heat-
ing* has switched off
automatically. The on-board voltage is too low, because too many consumers are
switched on.
X Switch off consumers that are not required, e.g. rear window
heating or interior lighting.
Once the battery is sufficiently charged, the seat ventilation*
will switch back on automatically. The steering wheel
heating* indicator lamp
on the lower left lever of
the steering column is
flashing. The on-board voltage is too low, because too many consumers are
switched on. The steering wheel heating* has switched off auto-
matically.
X Switch off consumers that are not required, e.g. rear window
heating or interior lighting.
Once the battery is sufficiently charged, the steering wheel
heating* will switch back on automatically. Troubleshooting
233Practical advice
* optional
X164_AKB; 2; 3, en-GB
wobuchh
,V ersion: 2.11.8.1
2009-03-31T14:14:58+02:00 - Seite 233 Z
Dateiname: 6515431202_buchblock.pdf; erzeugt am 01. Apr 2009 00:18:01; WK
Page 282 of 309
X
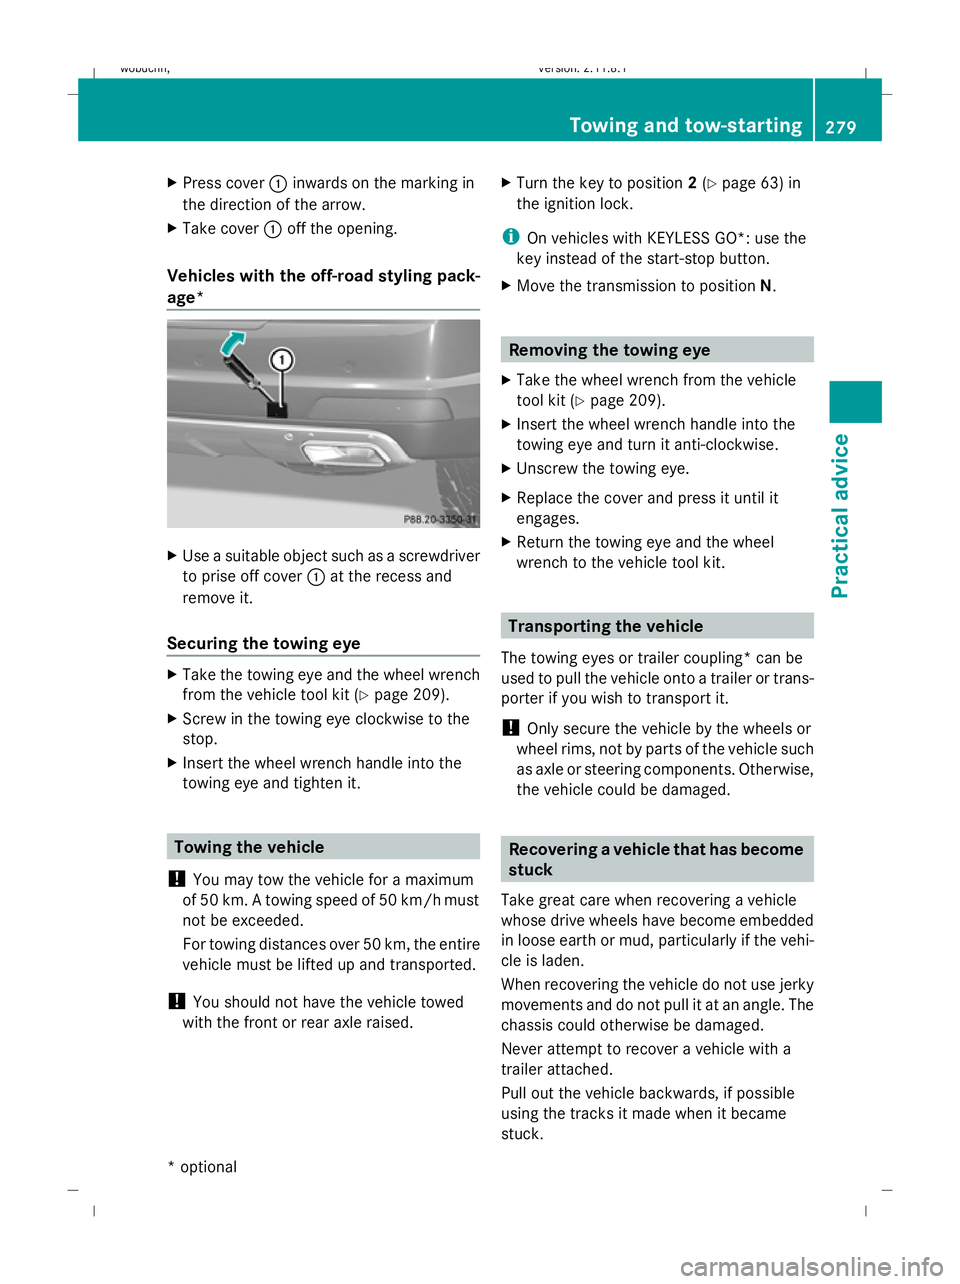
Press cover :inwards on the marking in
the direction of the arrow.
X Take cover :off the opening.
Vehicles with the off-road styling pack-
age* X
Use a suitable object such as a screwdriver
to prise off cover :at the recess and
remove it.
Securing the towing eye X
Take the towing eye and the wheel wrench
from the vehicle tool kit (Y page 209).
X Screw in the towing eye clockwise to the
stop.
X Insert the wheel wrench handle into the
towing eye and tighten it. Towing the vehicle
! You may tow the vehicle for a maximum
of 50 km. A towing speed of 50 km/hm ust
not be exceeded.
For towing distances over 50 km, the entire
vehicle must be lifted up and transported.
! You should not have the vehicle towed
with the front or rear axle raised. X
Turn the key to position 2(Y page 63) in
the ignition lock.
i On vehicles with KEYLESS GO*: use the
key instead of the start-stop button.
X Move the transmission to position N. Removing the towing eye
X Take the wheel wrench from the vehicle
tool kit (Y page 209).
X Insert the wheel wrench handle into the
towing eye and turn it anti-clockwise.
X Unscrew the towing eye.
X Replace the cover and press it until it
engages.
X Return the towing eye and the wheel
wrench to the vehicle tool kit. Transporting the vehicle
The towing eyes or trailer coupling* can be
used to pull the vehicle onto a trailer or trans-
porter if you wish to transport it.
! Only secure the vehicle by the wheels or
wheel rims, not by parts of the vehicle such
as axle or steering components. Otherwise,
the vehicle could be damaged. Recovering a vehicle that has become
stuck
Take great care when recovering a vehicle
whose drive wheels have become embedded
in loose earth or mud, particularly if the vehi-
cle is laden.
When recovering the vehicle do not use jerky
movements and do not pull it at an angle. The
chassis could otherwise be damaged.
Never attempt to recover a vehicle with a
trailer attached.
Pull out the vehicle backwards, if possible
using the tracks it made when it became
stuck. Towing and tow-starting
279Practical advice
* optional
X164_AKB; 2; 3, en-GB
wobuchh,
Version: 2.11.8.1 2009-03-31T14:14:58+02:00 - Seite 279 Z
Dateiname: 6515431202_buchblock.pdf; erzeugt am 01. Apr 2009 00:18:20; WK