2009 MERCEDES-BENZ GL SUV service
[x] Cancel search: servicePage 140 of 309
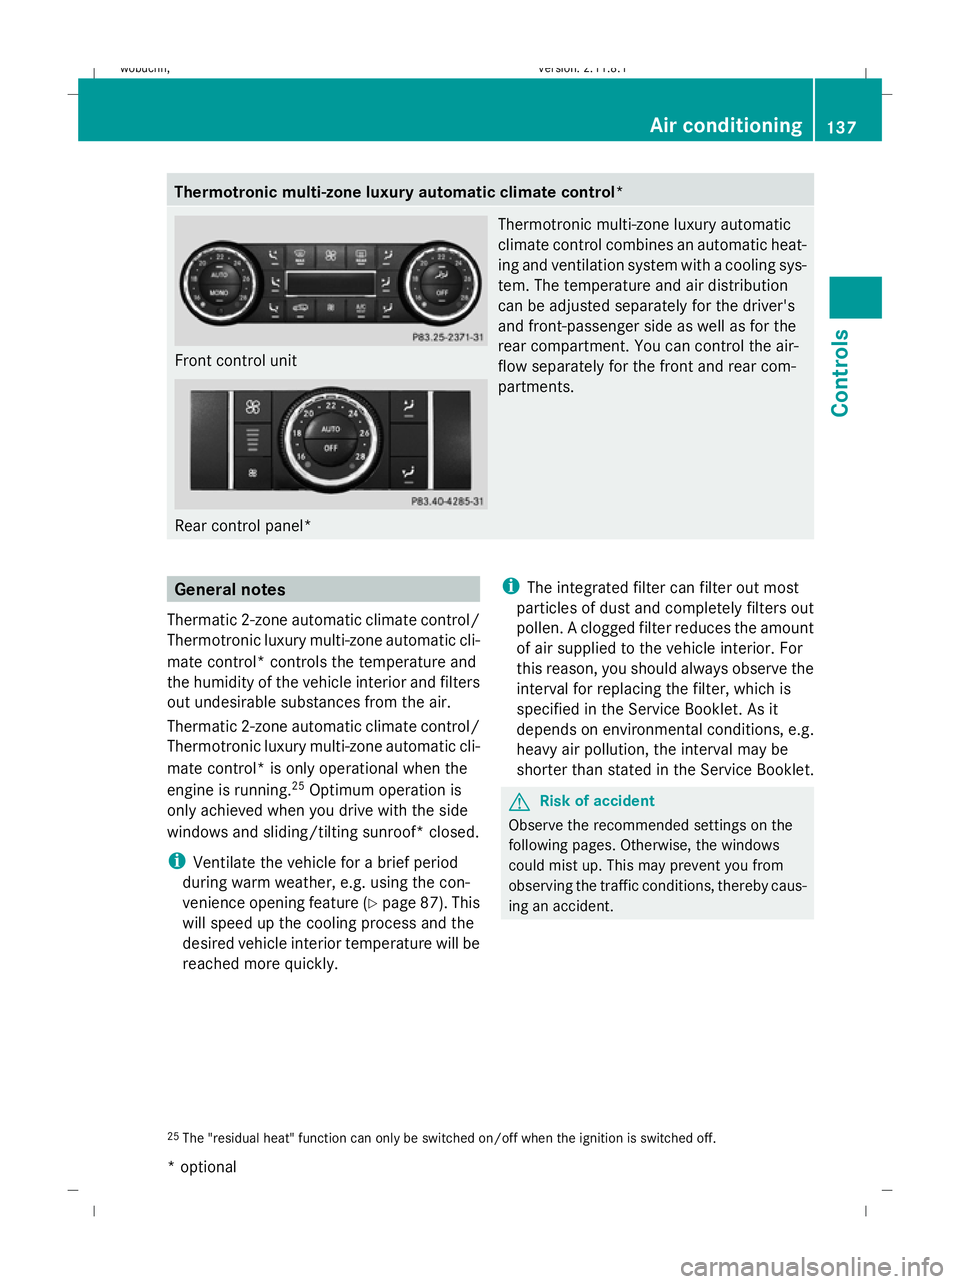
Thermotronic multi-zone luxury automatic climate control*
Front control unit
Rear control panel* Thermotronic multi-zone luxury automatic
climate control combines an automatic heat-
ing and ventilation system with a cooling sys-
tem. The temperature and air distribution
can be adjusted separately for the driver's
and front-passenger side as well as for the
rear compartment. You can control the air-
flow separately for the front and rear com-
partments. General notes
Thermatic 2-zone automatic climate control/
Thermotronic luxury multi-zone automatic cli-
mate control* controls the temperature and
the humidity of the vehicle interior and filters
out undesirable substances from the air.
Thermatic 2-zone automatic climate control/
Thermotronic luxury multi-zone automatic cli-
mate control* is only operational when the
engine is running. 25
Optimum operation is
only achieved when you drive with the side
windows and sliding/tilting sunroof* closed.
i Ventilate the vehicle for a brief period
during warm weather, e.g. using the con-
venience opening feature (Y page 87). This
will speed up the cooling process and the
desired vehicle interior temperature will be
reached more quickly. i
The integrated filter can filter out most
particles of dust and completely filters out
pollen. A clogged filter reduces the amount
of air supplied to the vehicle interior. For
this reason, you should always observe the
interval for replacing the filter, which is
specified in the Service Booklet. As it
depends on environmental conditions, e.g.
heavy air pollution, the interval may be
shorter than stated in the Service Booklet. G
Risk of accident
Observe the recommended settings on the
following pages. Otherwise, the windows
could mist up. This may prevent you from
observing the traffic conditions, thereby caus-
ing an accident.
25 The "residual heat" function can only be switched on/off when the ignition is switched off. Air conditioning
137Controls
* optional
X164_AKB; 2; 3, en-GB
wobuchh
,V ersion: 2.11.8.1
2009-03-31T14:14:58+02:00 - Seite 137 Z
Dateiname: 6515431202_buchblock.pdf; erzeugt am 01. Apr 2009 00:17:28; WK
Page 152 of 309
sult a qualified specialist workshop, e.g. a
Mercedes-Benz Service Centre.
The remote control has a maximum range of
approximately 300 metres. This range is
reduced by:
R sources of radio interference
R solid objects between the remote control
and the vehicle
R the remote control being in an unfavoura-
ble position in relation to the vehicle
R transmitting from an enclosed space
i The optimum range can be achieved if you
hold the remote control vertically, pointing
upwards when you press one of the but-
tons.
i A battery symbol appears in the display
when the batteries in the remote control
are low. Replace the remote control bat-
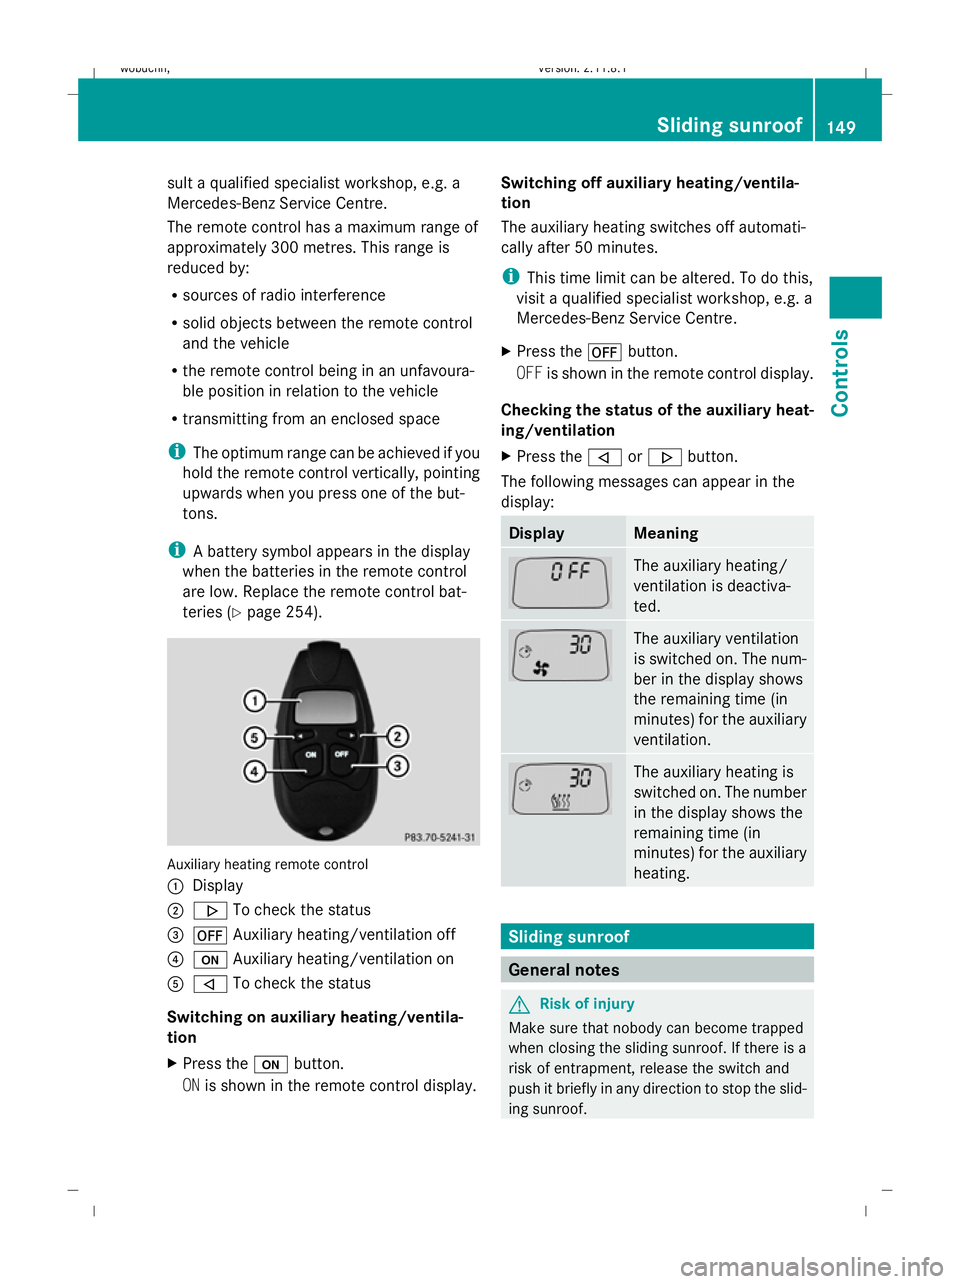
teries (Y page 254). Auxiliary heating remote control
: Display
; . To check the status
= ^ Auxiliary heating/ventilation off
? u Auxiliary heating/ventilation on
A , To check the status
Switching on auxiliary heating/ventila-
tion
X Press the ubutton.
ON is shown in the remote control display. Switching off auxiliary heating/ventila-
tion
The auxiliary heating switches off automati-
cally after 50 minutes.
i
This time limit can be altered. To do this,
visit a qualified specialist workshop, e.g. a
Mercedes-Benz Service Centre.
X Press the ^button.
OFF is shown in the remote control display.
Checking the status of the auxiliary heat-
ing/ventilation
X Press the ,or. button.
The following messages can appear in the
display: Display Meaning
The auxiliary heating/
ventilation is deactiva-
ted.
The auxiliary ventilation
is switched on. The num-
ber in the display shows
the remaining time (in
minutes) for the auxiliary
ventilation.
The auxiliary heating is
switched on. The number
in the display shows the
remaining time (in
minutes) for the auxiliary
heating.
Sliding sunroof
General notes
G
Risk of injury
Make sure that nobody can become trapped
when closing the sliding sunroof. If there is a
risk of entrapment, release the switch and
push it briefly in any direction to stop the slid-
ing sunroof. Sliding sunroof
149Controls
X164_AKB; 2; 3, en-GB
wobuchh, Version: 2.11.8.1 2009-03-31T14:14:58+02:00 - Seite 149 Z
Dateiname: 6515431202_buchblock.pdf; erzeugt am 01. Apr 2009 00:17:32; WK
Page 155 of 309
seat backrests are securely locked into
place.
R always place the load behind unoccupied
seats if possible.
R secure the load with sufficiently strong and
wear-resistant load restraints. Pad sharp
edges for protection.
i Load restraints are available at any quali-
fied specialist workshop, e.g. a Mercedes-
Benz Service Centre. Stowage compartments
G
Risk of injury
The stowage compartments must be closed
when items are stored in them. Luggage nets
are not designed to secure heavy items of
luggage.
You or other vehicle occupants could be
injured by objects being thrown around if you:
R brake sharply
R change direction suddenly
R are involved in an accident
Sharp-edged and fragile objects must not be
placed in the luggage net.
Glove compartment i
Depending on the vehicle's equipment,
there is an AUX-IN connection installed in
the glove compartment, or a Media Inter-
face*, which is a universal interface for
portable audio equipment, e.g. for an iPod
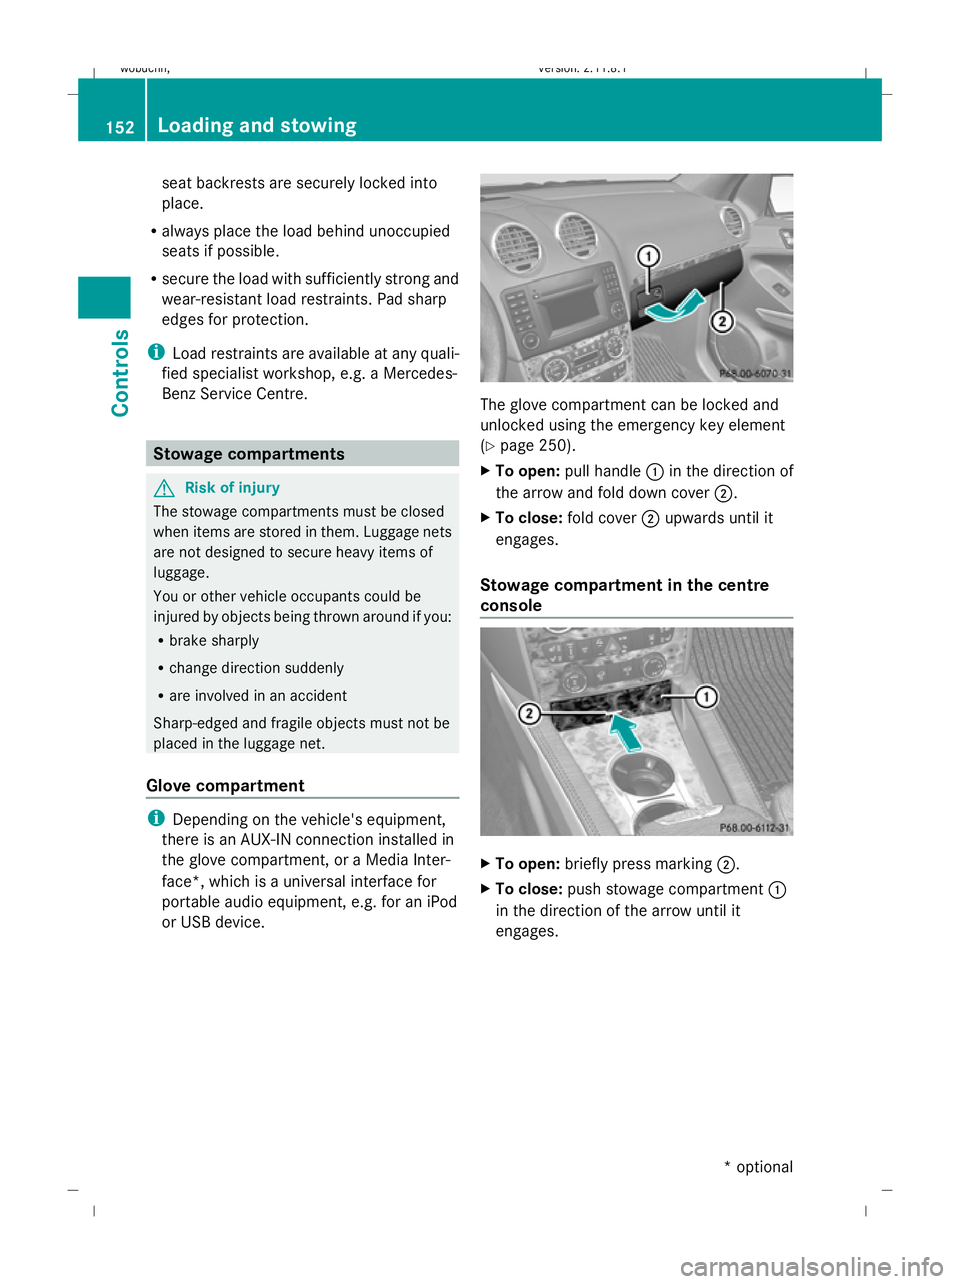
or USB device. The glove compartment can be locked and
unlocked using the emergency key element
(Y
page 250).
X To open: pull handle :in the direction of
the arrow and fold down cover ;.
X To close: fold cover ;upwards until it
engages.
Stowage compartment in the centre
console X
To open: briefly press marking ;.
X To close: push stowage compartment :
in the direction of the arrow until it
engages. 152
Loading and stowingControls
* optional
X164_AKB; 2; 3, en-GB
wobuchh,
Version: 2.11.8.1 2009-03-31T14:14:58+02:00 - Seite 152
Dateiname: 6515431202_buchblock.pdf; erzeugt am 01. Apr 2009 00:17:33; WK
Page 168 of 309
cases, these are country-specific. You can
obtain these mobile phone brackets from a
qualified specialist workshop, e.g. a
Mercedes-Benz Service Centre.
The functions and services available when
you use the phone depend on your mobile
phone model and service provider.
Inserting the mobile phone
X Open the telephone compartment
(Y page 153).
X Place the mobile phone bracket into the
pre-installed fitting; see the separate
mobile phone bracket fitting instructions.
X Insert the mobile phone into the mobile
phone bracket; see the separate mobile
phone bracket fitting instructions.
If the mobile phone is inserted in the mobile
phone bracket, you can speak to the person
you are calling using the hands-free system.
You can operate the telephone using the
6 and~ buttons on the multi-function
steering wheel. You can operate other mobile
phone functions via the on-board computer
(Y page 111).
When you take the key out of the ignition lock,
the mobile phone stays on but you can no
longer use the hands-free system.
If you are making a call and you would like to
take the key out of the ignition lock, first
remove the mobile phone from the bracket.
Otherwise, the call will be ended. Garage door opener*
The remote control integrated in the rear-view
mirror allows you to operate up to three dif-
ferent door and gate systems.
i The garage door opener is only available
for certain countries. Observe the legal
requirements in all countries concerned.
The HomeLink ®
garage door opener is
compatible with most European garage and
gate opener drives. More information on HomeLink
®
and/or compatible products is
available from:
R any Mercedes-Benz Service Centre
R the HomeLink ®
hotline
(0) 08000 466 354 65 (free of charge) or
+49 (0) 6838 907-277 (charges apply)
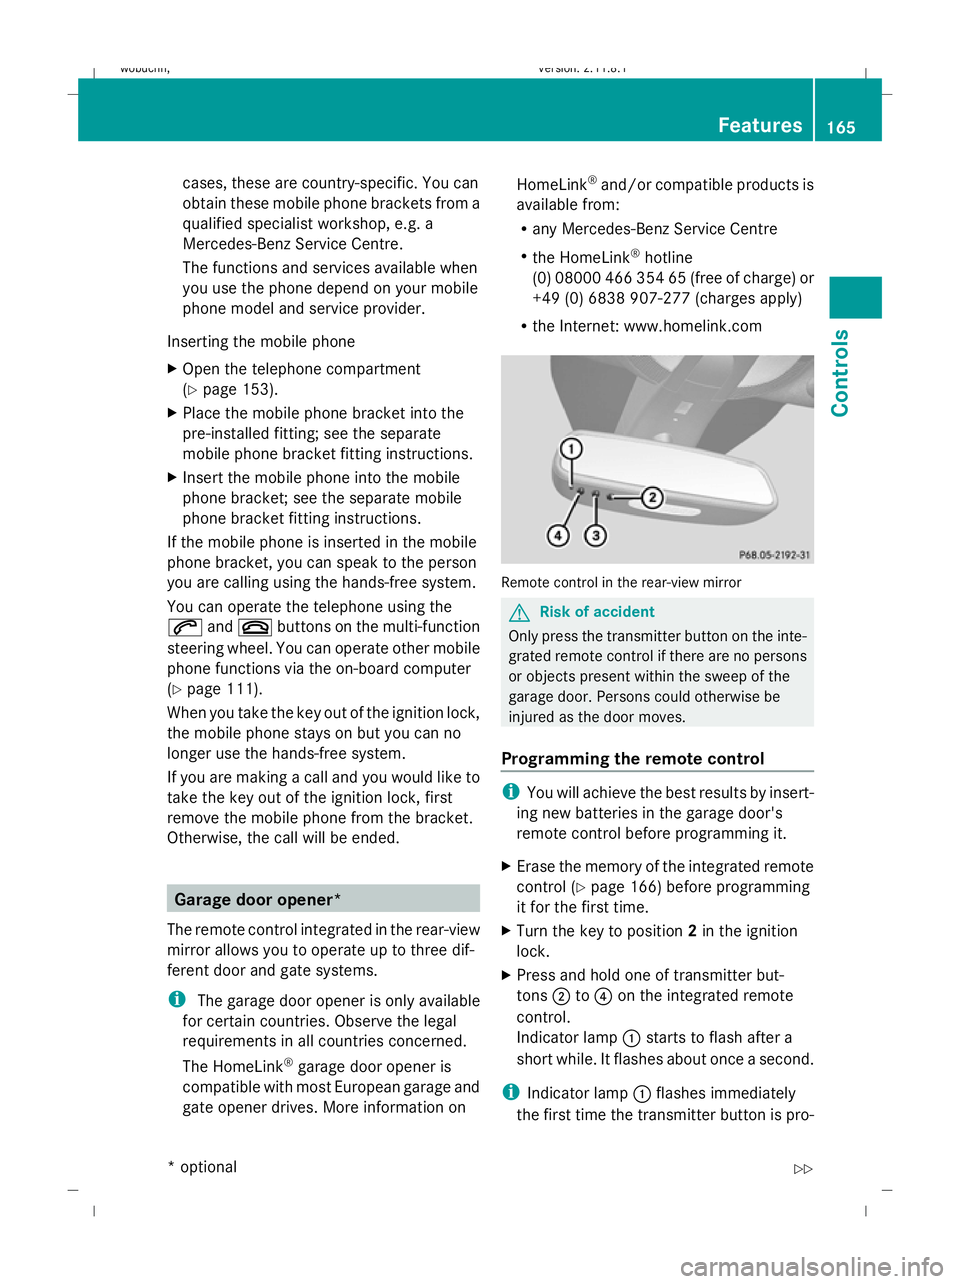
R the Internet: www.homelink.com Remote control in the rear-view mirror
G
Risk of accident
Only press the transmitter button on the inte-
grated remote control if there are no persons
or objects present within the sweep of the
garage door. Persons could otherwise be
injured as the door moves.
Programming the remote control i
You will achieve the best results by insert-
ing new batteries in the garage door's
remote control before programming it.
X Erase the memory of the integrated remote
control ( Ypage 166) before programming
it for the first time.
X Turn the key to position 2in the ignition
lock.
X Press and hold one of transmitter but-
tons ;to? on the integrated remote
control.
Indicator lamp :starts to flash after a
short while. It flashes about once a second.
i Indicator lamp :flashes immediately
the first time the transmitter button is pro- Features
165Controls
* optional
X164_AKB; 2; 3, en-GB
wobuchh,
Version: 2.11.8.1 2009-03-31T14:14:58+02:00 - Seite 165 Z
Dateiname: 6515431202_buchblock.pdf; erzeugt am 01. Apr 2009 00:17:43; WK
Page 172 of 309
outside the vehicle by observing the light
reflected off the windscreen.
Retrofitted anti-glare film
Anti-glare film retrofitted to the insides of the
windows could interfere with radio or mobile
phone reception, especially if it is conductive
or metal-coated film. Information about anti-
glare film can be obtained from any
Mercedes-Benz Service Centre. Features
169Controls
X164_AKB; 2; 3, en-GB
wobuchh, Version: 2.11.8.1 2009-03-31T14:14:58+02:00 - Seite 169 Z
Dateiname: 6515431202_buchblock.pdf; erzeugt am 01. Apr 2009 00:17:44; WK
Page 174 of 309
Running-in notes
............................... 172
Refuelling ........................................... 172
Engine compartment ........................174
Tyres and wheels .............................. 179
Winter driving ................................... 185
Driving tips ........................................ 186
Off-road driving ................................. 188
Driving abroad ................................... 193
Trailer towing* .................................. 193
Service ............................................... 199
Care .................................................... 201 171Operation
X164_AKB; 2; 3, en-GB
wobuchh,
Version: 2.11.8.1 2009-03-31T14:14:58+02:00 - Seite 171
Dateiname: 6515431202_buchblock.pdf; erzeugt am 01. Apr 2009 00:17:45; WK
Page 176 of 309
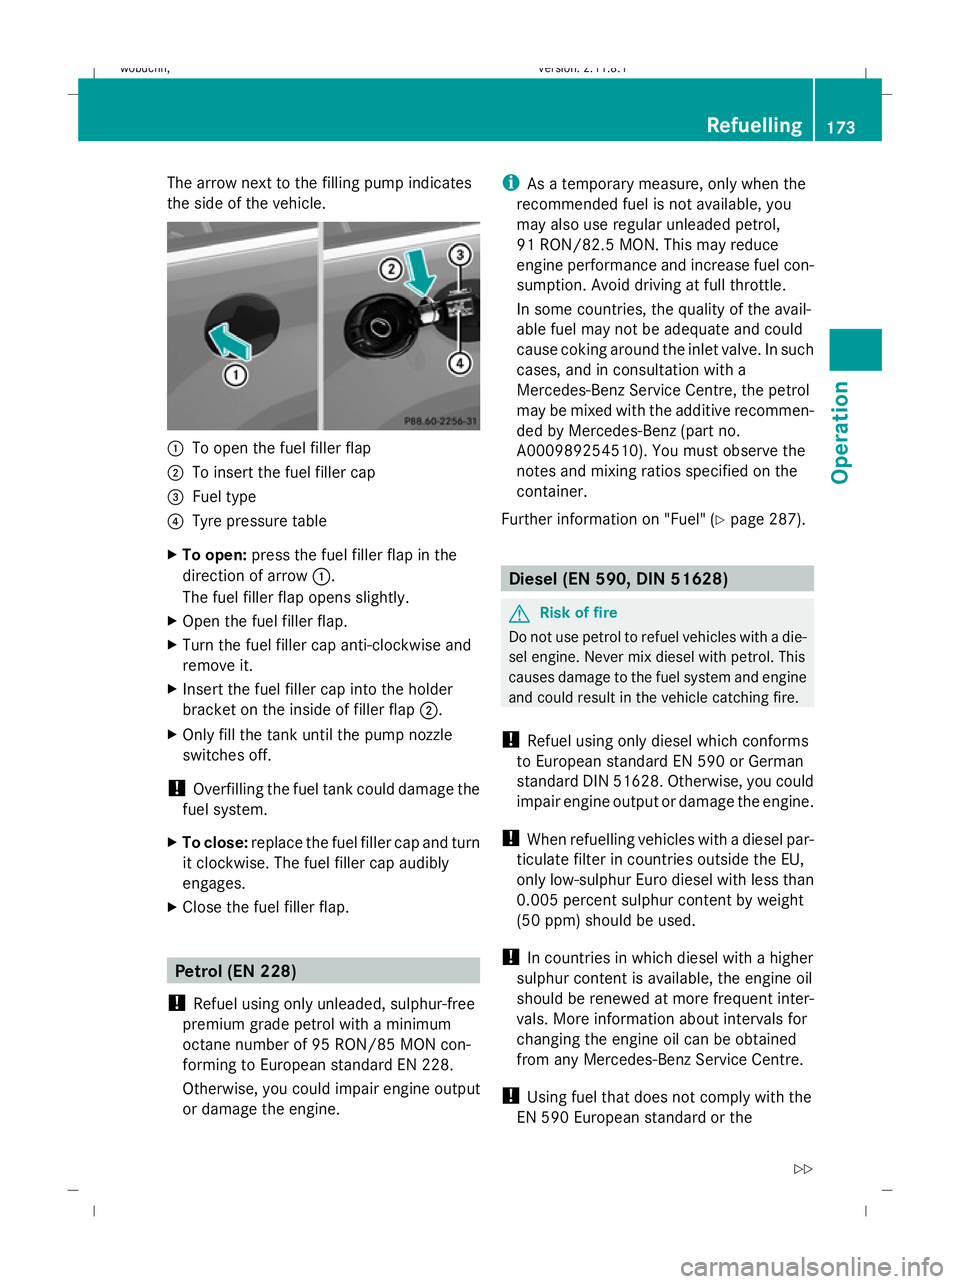
The arrow next to the filling pump indicates
the side of the vehicle.
:
To open the fuel filler flap
; To insert the fuel filler cap
= Fuel type
? Tyre pressure table
X To open: press the fuel filler flap in the
direction of arrow :.
The fuel filler flap opens slightly.
X Open the fuel filler flap.
X Turn the fuel filler cap anti-clockwise and
remove it.
X Insert the fuel filler cap into the holder
bracket on the inside of filler flap ;.
X Only fill the tank until the pump nozzle
switches off.
! Overfilling the fuel tank could damage the
fuel system.
X To close: replace the fuel filler cap and turn
it clockwise. The fuel filler cap audibly
engages.
X Close the fuel filler flap. Petrol (EN 228)
! Refuel using only unleaded, sulphur-free
premium grade petrol with a minimum
octane number of 95 RON/85 MON con-
forming to European standard EN 228.
Otherwise, you could impair engine output
or damage the engine. i
As a temporary measure, only when the
recommended fuel is not available, you
may also use regular unleaded petrol,
91 RON/82.5 MON. This may reduce
engine performance and increase fuel con-
sumption. Avoid driving at full throttle.
In some countries, the quality of the avail-
able fuel may not be adequate and could
cause coking around the inlet valve. In such
cases, and in consultation with a
Mercedes-Benz Service Centre, the petrol
may be mixed with the additive recommen-
ded by Mercedes-Benz (part no.
A000989254510). You must observe the
notes and mixing ratios specified on the
container.
Further information on "Fuel" (Y page 287). Diesel (EN 590, DIN 51628)
G
Risk of fire
Do not use petrol to refuel vehicles with a die-
sel engine. Never mix diesel with petrol. This
causes damage to the fuel system and engine
and could result in the vehicle catching fire.
! Refuel using only diesel which conforms
to European standard EN 590 or German
standard DIN 51628. Otherwise, you could
impair engine output or damage the engine.
! When refuelling vehicles with a diesel par-
ticulate filter in countries outside the EU,
only low-sulphur Euro diesel with less than
0.005 percent sulphur content by weight
(50 ppm) should be used.
! In countries in which diesel with a higher
sulphur content is available, the engine oil
should be renewed at more frequent inter-
vals. More information about intervals for
changing the engine oil can be obtained
from any Mercedes-Benz Service Centre.
! Using fuel that does not comply with the
EN 590 European standard or the Refuelling
173Operation
X164_AKB; 2; 3, en-GB
wobuchh, Version: 2.11.8.1 2009-03-31T14:14:58+02:00 - Seite 173 Z
Dateiname: 6515431202_buchblock.pdf; erzeugt am 01. Apr 2009 00:17:45; WK
Page 177 of 309
DIN 51628 German standard can lead to
increased wear, engine damage and dam-
age to the exhaust system.
Do not use the following:
R marine diesel
R heating oil
R bio-diesel
R vegetable oil
R petrol
R paraffin
R kerosene
Do not add such fuels to diesel fuel and do
not use any special additives (exception:
flow improvers – see "Low outside temper-
atures").
Damage caused by the use of unapproved
fuels or additives is not covered by the
implied warranty.
Further information on "Fuel" (Y page 287).
Low outside temperatures The flow properties of diesel may be inade-
quate at low ambient temperatures.
Diesel fuel with improved cold flow qualities
is available during the winter months. In
Europe, various climate-dependent low-tem-
perature classes are defined in EN 590. Using
diesel fuels which meet the climatic require-
ments set out in EN 590 can help avoid oper-
ating problems. The flow properties of diesel
fuel may be inadequate at unusually low out-
side temperatures or when using fuel which
has not been adjusted to climatic conditions
(e.g. diesel fuels from Mediterranean
regions).
Flow improver
Flow improvers may be added to improve low-
temperature resistance. The effectiveness of
a flow improver is not guaranteed with every
fuel.
Correct dosage and mixing are decisive fac-
tors in ensuring improvement in low-temper- ature resistance. Under certain circumstan-
ces, an excessive dosage may actually
decrease low-temperature resistance, and
should therefore be avoided (follow the man-
ufacturer's dosing instructions).
Mix the additive with the diesel in good time,
before the flow properties of the diesel
become inadequate. Otherwise, malfunctions
can only be rectified by heating the entire fuel
system, e.g. by parking the vehicle in a heated
garage.
Observe the information provided by the man-
ufacturer when using a flow improver. Only
use flow improvers that have been tested and
approved by Mercedes-Benz. You can obtain
further information from any Mercedes-Benz
Service Centre.
Engine compartment
Bonnet
G
Risk of accident
Do not pull the release lever while the vehicle
is in motion. If you do so, the bonnet may open
up and block your view.
Opening G
Risk of injury
There is a risk of injury if the bonnet is open,
even if the engine is not running.
Some engine components can become very
hot.
To avoid the risk of burns, only touch those
components described in the Owner’s Manual
and observe the relevant safety notes. G
Risk of injury
The radiator fan between the radiator and the
engine can start automatically, even if the key
has been removed from the ignition lock. For
this reason, you must not reach into the fan
rotation area. Otherwise, you could be
injured. 174
Engine compartmentOperation
X164_AKB; 2; 3, en-GB
wobuchh
,V ersion: 2.11.8.1
2009-03-31T14:14:58+02:00 - Seite 174
Dateiname: 6515431202_buchblock.pdf; erzeugt am 01. Apr 2009 00:17:45; WK