2009 MERCEDES-BENZ GL SUV belt
[x] Cancel search: beltPage 158 of 309
fold down the respective backrests and
attach the safety net.
G
Risk of poisoning
Always drive with the tailgate closed. Exhaust
fumes could otherwise enter the vehicle inte-
rior.
Folding the rear bench seat forwards G
Risk of accident and injury
Do not fold the backrest onto the folded-down
seat cushions. If the seat cushions are folded
down, luggage can be thrown over the back-
rest into the passenger compartment during,
for instance, heavy braking, sudden changes
of direction or in the event of an accident. You
could cause an accident or cause injury to
yourself and others. !
When the rear bench seat is folded for-
wards, the front seats cannot be moved to
their rearmost position, as otherwise, the
seats and the rear seat bench could be
damaged.
i If the driver's or front-passenger seat has
been adjusted for a tall person, it may be
necessary to move the seats forwards
slightly to fold the backrests forwards.
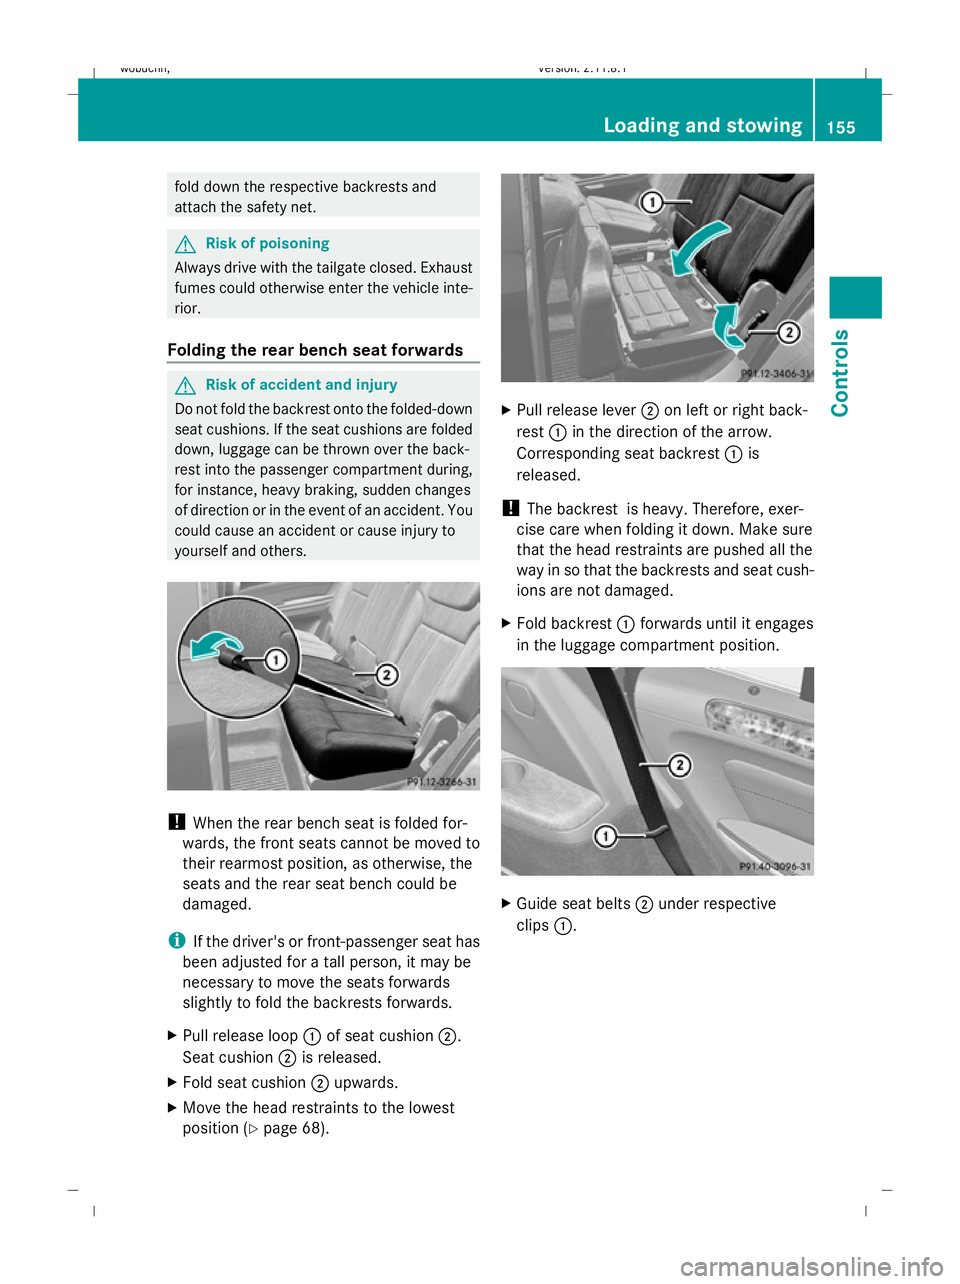
X Pull release loop :of seat cushion ;.
Seat cushion ;is released.
X Fold seat cushion ;upwards.
X Move the head restraints to the lowest
position (Y page 68). X
Pull release lever ;on left or right back-
rest :in the direction of the arrow.
Corresponding seat backrest :is
released.
! The backrest is heavy. Therefore, exer-
cise care when folding it down. Make sure
that the head restraints are pushed all the
way in so that the backrests and seat cush-
ions are not damaged.
X Fold backrest :forwards until it engages
in the luggage compartment position. X
Guide seat belts ;under respective
clips :. Loading and stowing
155Controls
X164_AKB; 2; 3, en-GB
wobuchh, Version: 2.11.8.1 2009-03-31T14:14:58+02:00 - Seite 155 Z
Dateiname: 6515431202_buchblock.pdf; erzeugt am 01. Apr 2009 00:17:36; WK
Page 159 of 309
Folding the rear bench seat back
X
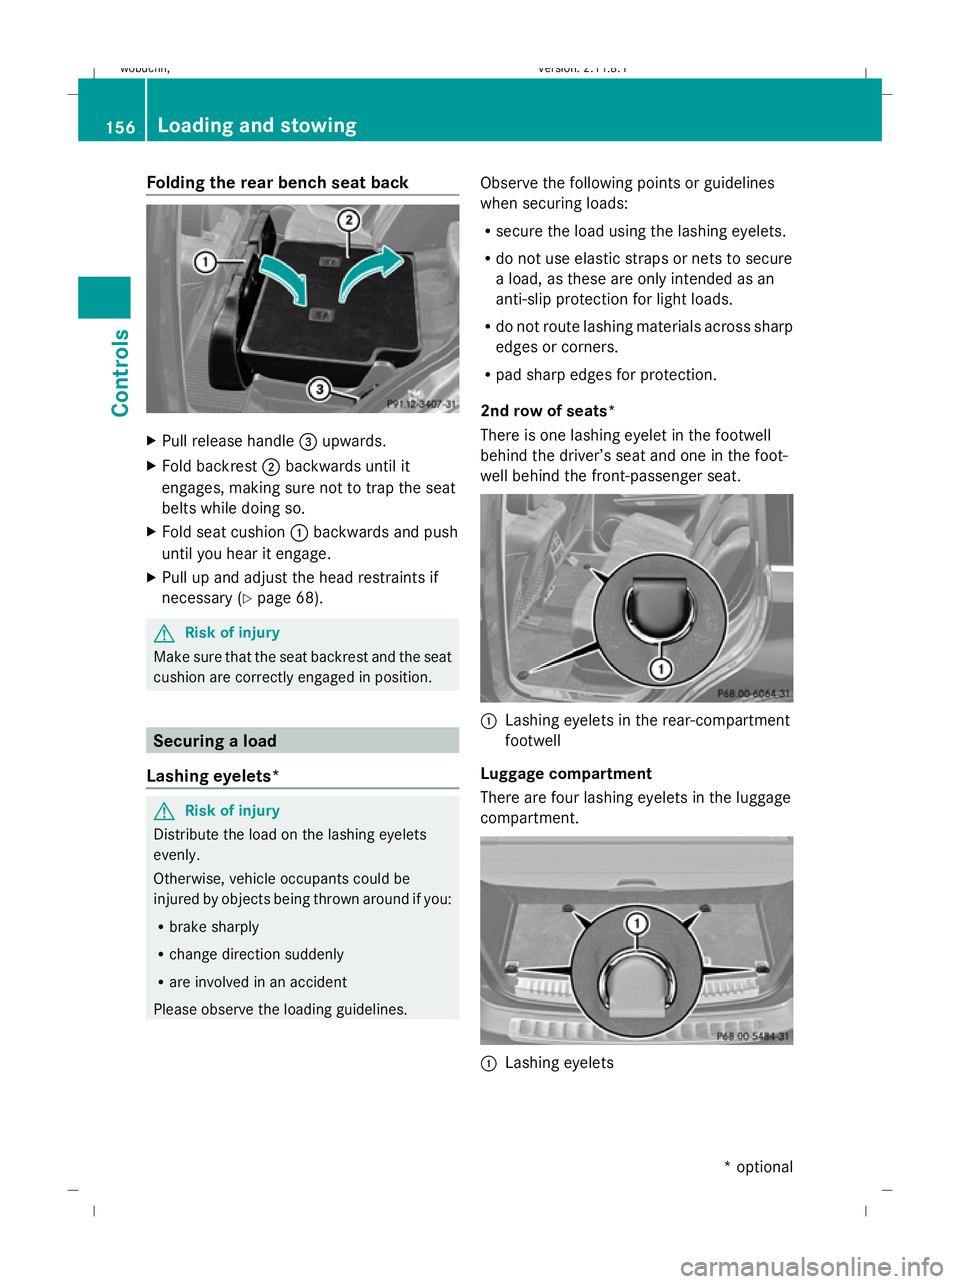
Pull release handle =upwards.
X Fold backrest ;backwards until it
engages, making sure not to trap the seat
belts while doing so.
X Fold seat cushion :backwards and push
until you hear it engage.
X Pull up and adjust the head restraints if
necessary (Y page 68). G
Risk of injury
Make sure that the seat backrest and the seat
cushion are correctly engaged in position. Securing a load
Lashing eyelets* G
Risk of injury
Distribute the load on the lashing eyelets
evenly.
Otherwise, vehicle occupants could be
injured by objects being thrown around if you:
R brake sharply
R change direction suddenly
R are involved in an accident
Please observe the loading guidelines. Observe the following points or guidelines
when securing loads:
R
secure the load using the lashing eyelets.
R do not use elastic straps or nets to secure
a load, as these are only intended as an
anti-slip protection for light loads.
R do not route lashing materials across sharp
edges or corners.
R pad sharp edges for protection.
2nd row of seats*
There is one lashing eyelet in the footwell
behind the driver’s seat and one in the foot-
well behind the front-passenger seat. :
Lashing eyelets in the rear-compartment
footwell
Luggage compartment
There are four lashing eyelets in the luggage
compartment. :
Lashing eyelets 156
Loading and stowingCont
rols
* optional
X164_AKB; 2; 3, en-GB
wobuchh,
Version: 2.11.8.1 2009-03-31T14:14:58+02:00 - Seite 156
Dateiname: 6515431202_buchblock.pdf; erzeugt am 01. Apr 2009 00:17:37; WK
Page 161 of 309
Safety net
G
Risk of injury
You must make sure that the safety net is
correctly secured at the top and bottom.
Do not use a damaged safety net.
The safety net cannot restrain heavy loads.
For this reason, you should always secure the
load.
Otherwise, objects that have not been
secured sufficiently might be thrown around
if you brake suddenly, change direction sud-
denly or are involved in an accident, and could
cause you an injury.
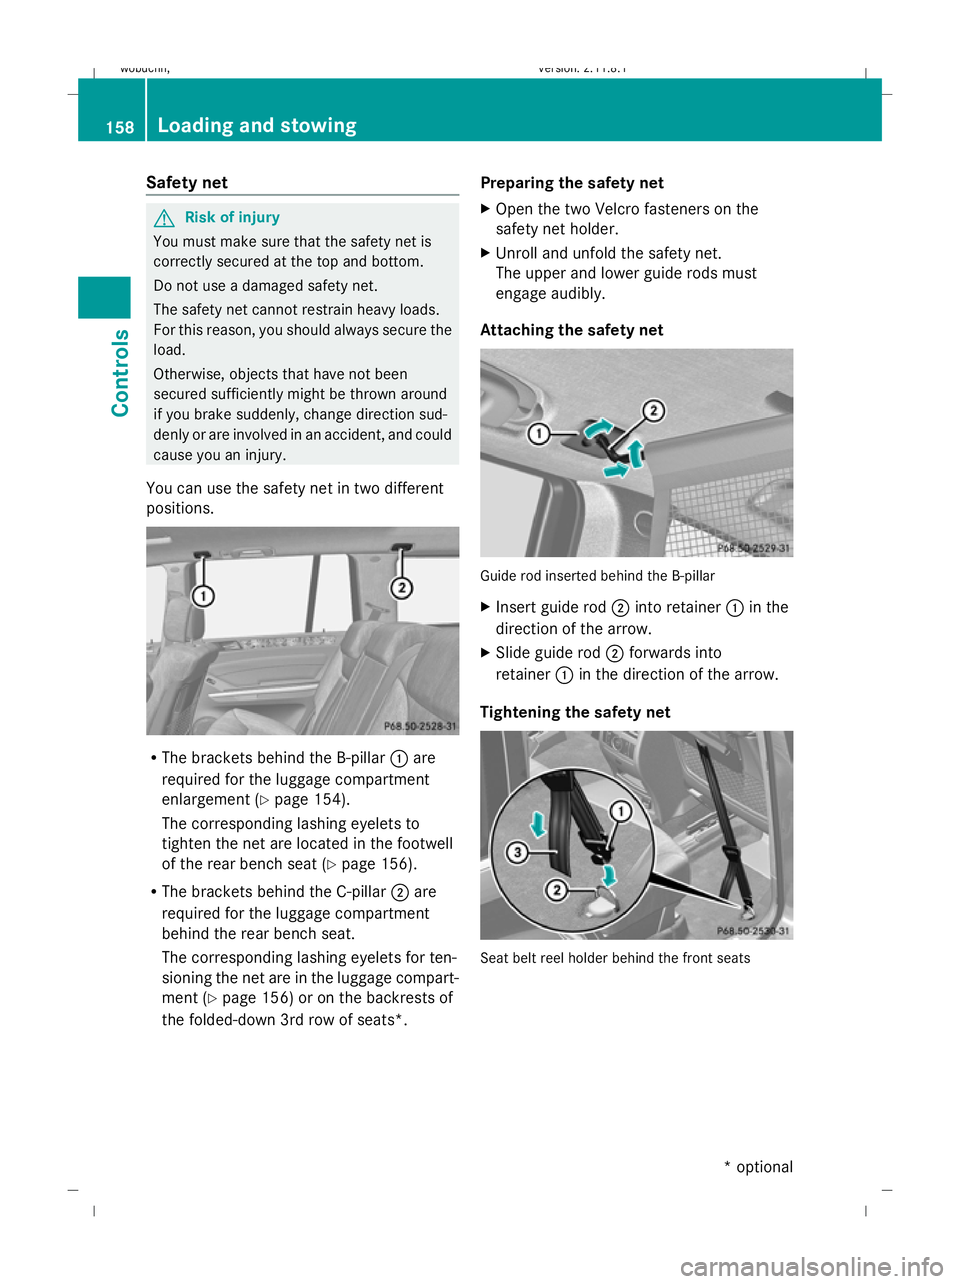
You can use the safety net in two different
positions. R
The brackets behind the B-pillar :are
required for the luggage compartment
enlargement (Y page 154).
The corresponding lashing eyelets to
tighten the net are located in the footwell
of the rear bench seat (Y page 156).
R The brackets behind the C-pillar ;are
required for the luggage compartment
behind the rear bench seat.
The corresponding lashing eyelets for ten-
sioning the net are in the luggage compart-
ment (Y page 156) or on the backrests of
the folded-down 3rd row of seats*. Preparing the safety net
X
Open the two Velcro fasteners on the
safety net holder.
X Unroll and unfold the safety net.
The upper and lower guide rods must
engage audibly.
Attaching the safety net Guide rod inserted behind the B-pillar
X
Insert guide rod ;into retainer :in the
direction of the arrow.
X Slide guide rod ;forwards into
retainer :in the direction of the arrow.
Tightening the safety net Seat belt reel holder behind the front seats158
Loading and stowingControls
* optional
X164_AKB; 2; 3, en-GB
wobuchh,
Version: 2.11.8.1 2009-03-31T14:14:58+02:00 - Seite 158
Dateiname: 6515431202_buchblock.pdf; erzeugt am 01. Apr 2009 00:17:39; WK
Page 162 of 309
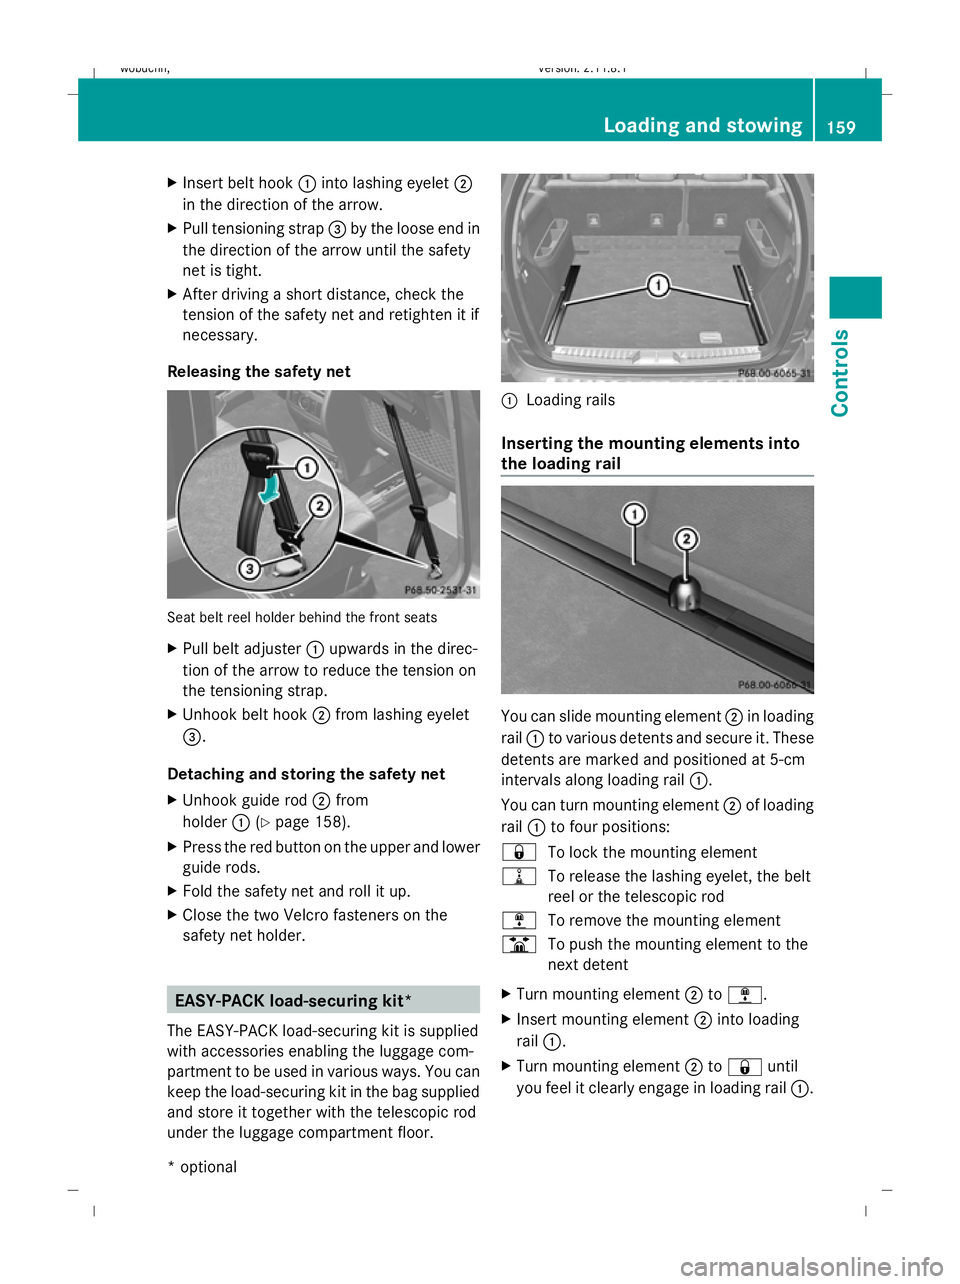
X
Insert belt hook :into lashing eyelet ;
in the direction of the arrow.
X Pull tensioning strap =by the loose end in
the direction of the arrow until the safety
net is tight.
X After driving a short distance, check the
tension of the safety net and retighten it if
necessary.
Releasing the safety net Seat belt reel holder behind the front seats
X
Pull belt adjuster :upwards in the direc-
tion of the arrow to reduce the tension on
the tensioning strap.
X Unhook belt hook ;from lashing eyelet
=.
Detaching and storing the safety net
X Unhook guide rod ;from
holder :(Ypage 158).
X Press the red button on the upper and lower
guide rods.
X Fold the safety net and roll it up.
X Close the two Velcro fasteners on the
safety net holder. EASY-PACK load-securing kit*
The EASY-PACK load-securing kit is supplied
with accessories enabling the luggage com-
partment to be used in various ways. You can
keep the load-securing kit in the bag supplied
and store it together with the telescopic rod
under the luggage compartment floor. :
Loading rails
Inserting the mounting elements into
the loading rail You can slide mounting element
;in loading
rail :to various detents and secure it. These
detents are marked and positioned at 5-cm
intervals along loading rail :.
You can turn mounting element ;of loading
rail :to four positions:
& To lock the mounting element
= To release the lashing eyelet, the belt
reel or the telescopic rod
; To remove the mounting element
B To push the mounting element to the
next detent
X Turn mounting element ;to;.
X Insert mounting element ;into loading
rail :.
X Turn mounting element ;to& until
you feel it clearly engage in loading rail :. Loading and stowing
159Controls
* optional
X164_AKB; 2; 3, en-GB
wobuchh,
Version: 2.11.8.1 2009-03-31T14:14:58+02:00 - Seite 159 Z
Dateiname: 6515431202_buchblock.pdf; erzeugt am 01. Apr 2009 00:17:39; WK
Page 163 of 309
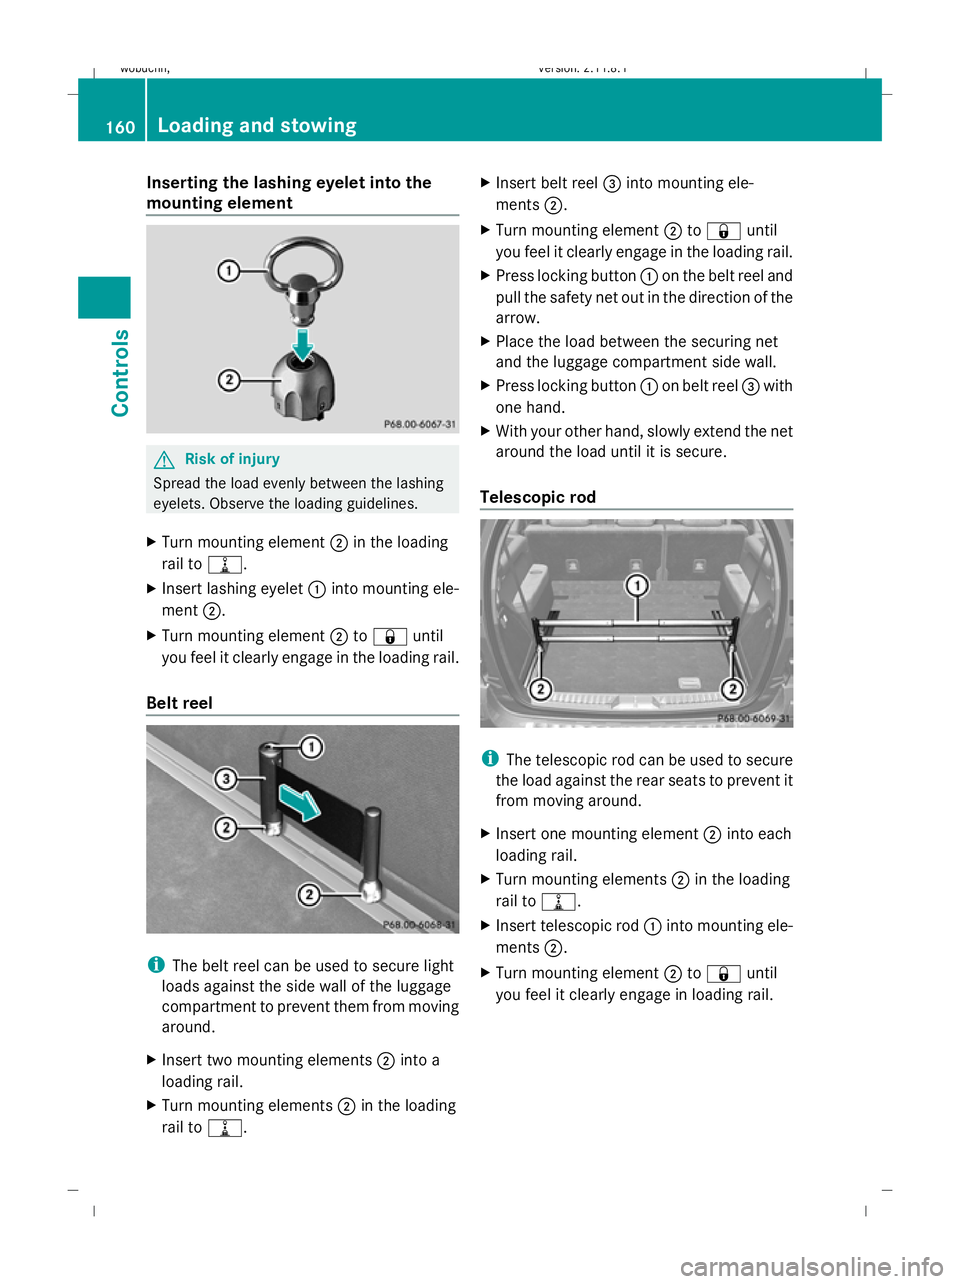
Inserting the lashing eyelet into the
mounting element G
Risk of injury
Spread the load evenly between the lashing
eyelets. Observe the loading guidelines.
X Turn mounting element ;in the loading
rail to =.
X Insert lashing eyelet :into mounting ele-
ment ;.
X Turn mounting element ;to& until
you feel it clearly engage in the loading rail.
Belt reel i
The belt reel can be used to secure light
loads against the side wall of the luggage
compartment to prevent them from moving
around.
X Insert two mounting elements ;into a
loading rail.
X Turn mounting elements ;in the loading
rail to =. X
Insert belt reel =into mounting ele-
ments ;.
X Turn mounting element ;to& until
you feel it clearly engage in the loading rail.
X Press locking button :on the belt reel and
pull the safety net out in the direction of the
arrow.
X Place the load between the securing net
and the luggage compartment side wall.
X Press locking button :on belt reel =with
one hand.
X With your other hand, slowly extend the net
around the load until it is secure.
Telescopic rod i
The telescopic rod can be used to secure
the load against the rear seats to prevent it
from moving around.
X Insert one mounting element ;into each
loading rail.
X Turn mounting elements ;in the loading
rail to =.
X Insert telescopic rod :into mounting ele-
ments ;.
X Turn mounting element ;to& until
you feel it clearly engage in loading rail. 160
Loading and stowingCont
rols
X164_AKB; 2; 3, en-GB
wobuchh, Version: 2.11.8.1 2009-03-31T14:14:58+02:00 - Seite 160
Dateiname: 6515431202_buchblock.pdf; erzeugt am 01. Apr 2009 00:17:40; WK
Page 223 of 309
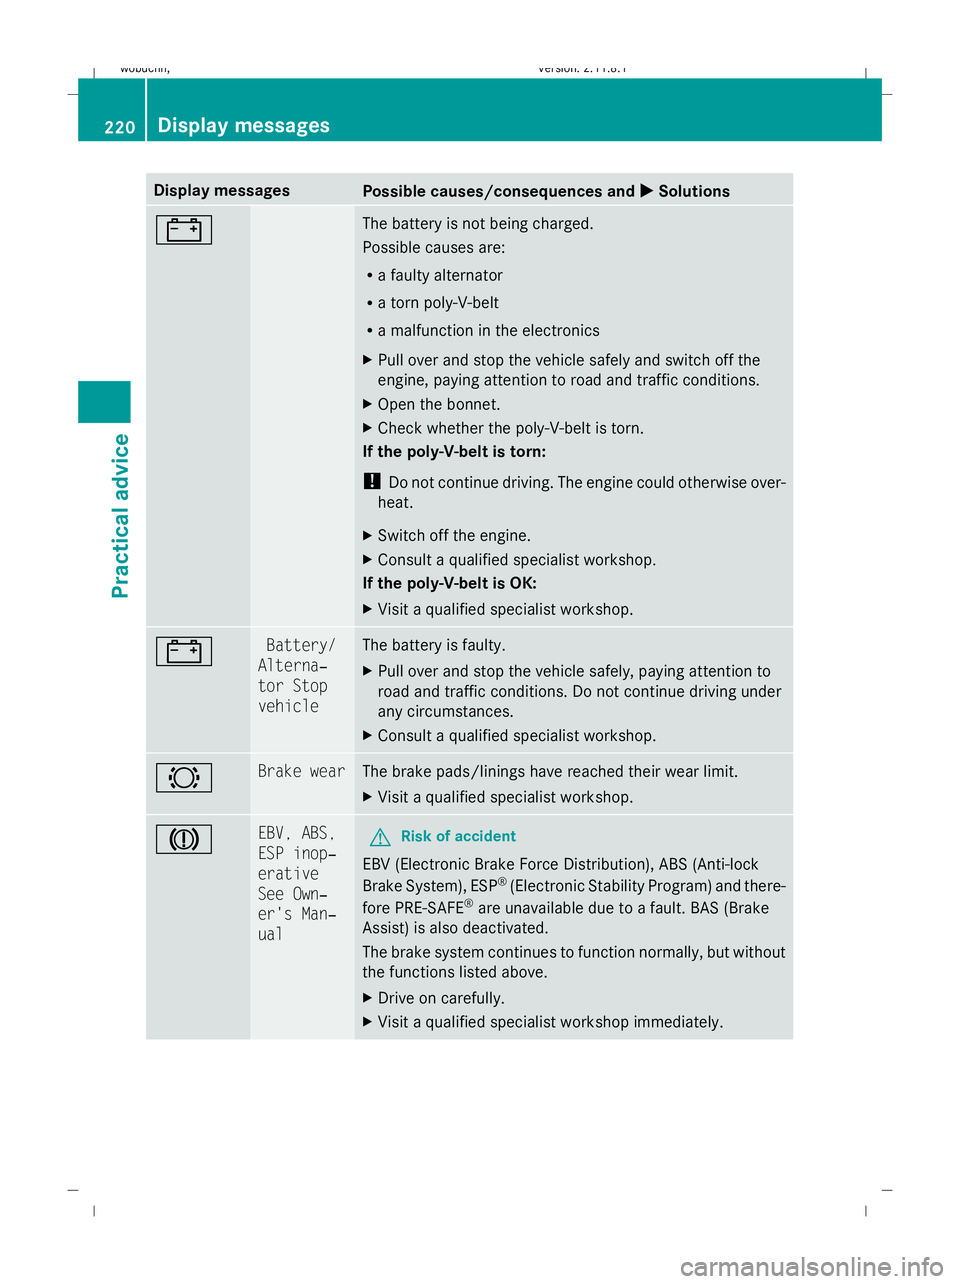
Display messages
Possible causes/consequences and
X
X Solutions # The battery is not being charged.
Possible causes are:
R
a faulty alternator
R a torn poly-V-belt
R a malfunction in the electronics
X Pull over and stop the vehicle safely and switch off the
engine, paying attention to road and traffic conditions.
X Open the bonnet.
X Check whether the poly-V-belt is torn.
If the poly-V-belt is torn:
! Do not continue driving. The engine could otherwise over-
heat.
X Switch off the engine.
X Consult a qualified specialist workshop.
If the poly-V-belt is OK:
X Visit a qualified specialist workshop. # Battery/
Alterna‐
tor Stop
vehicle The battery is faulty.
X
Pull over and stop the vehicle safely, paying attention to
road and traffic conditions. Do not continue driving under
any circumstances.
X Consult a qualified specialist workshop. # Brake wear The brake pads/linings have reached their wear limit.
X
Visit a qualified specialist workshop. J EBV, ABS,
ESP inop‐
erative
See Own‐
er's Man‐
ual
G
Risk of accident
EBV (Electronic Brake Force Distribution), ABS (Anti-lock
Brake System), ESP ®
(Electronic Stability Program) and there-
fore PRE-SAFE ®
are unavailable due to a fault. BAS (Brake
Assist) is also deactivated.
The brake system continues to function normally, but without
the functions listed above.
X Drive on carefully.
X Visit a qualified specialist workshop immediately. 220
Display
messagesPractical advice
X164_AKB; 2; 3, en-GB
wobuchh,V ersion: 2.11.8.1
2009-03-31T14:14:58+02:00 - Seite 220
Dateiname: 6515431202_buchblock.pdf; erzeugt am 01. Apr 2009 00:17:59; WK
Page 227 of 309
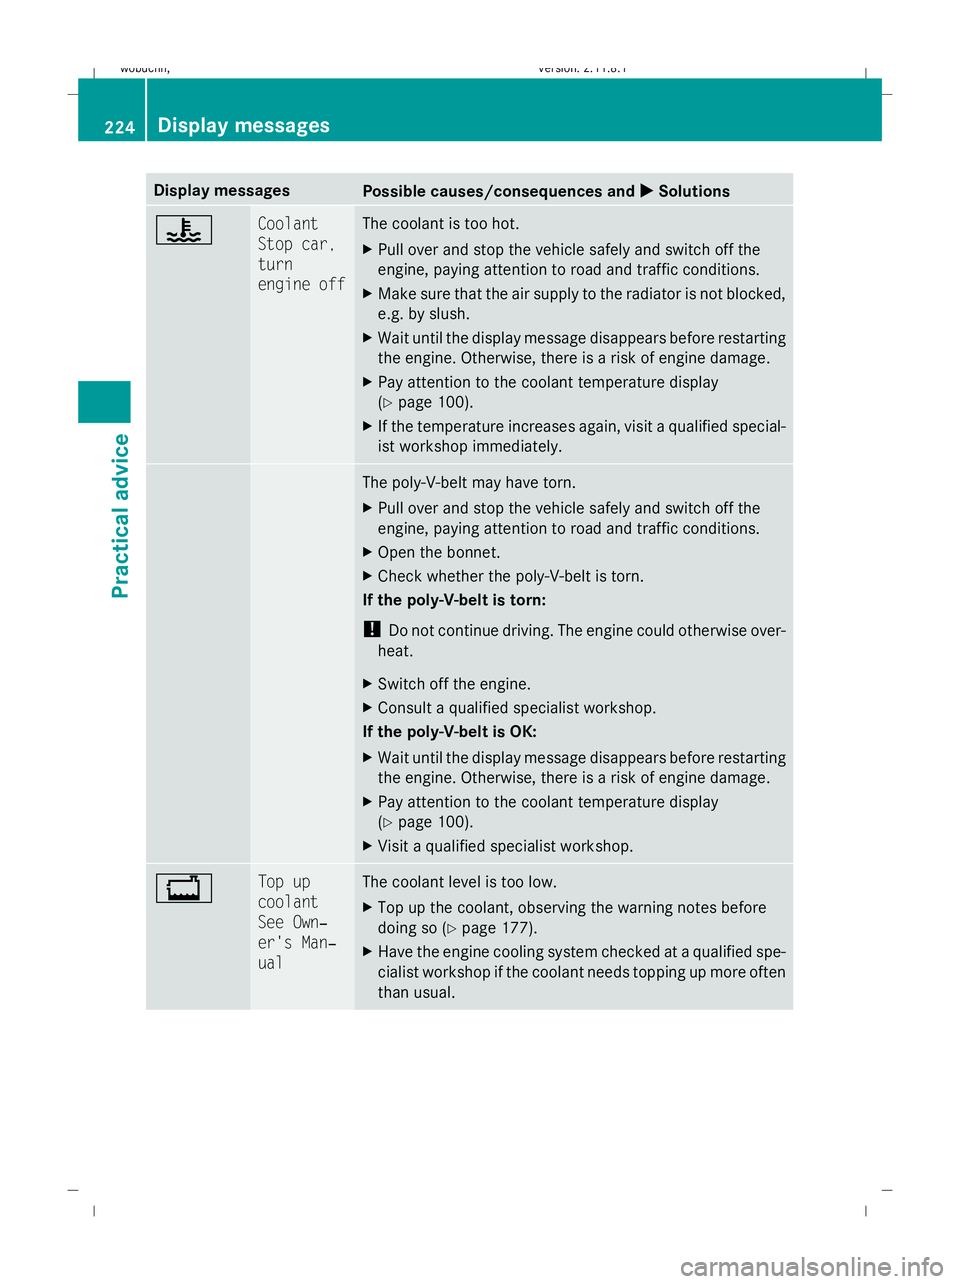
Display messages
Possible causes/consequences and
X
X Solutions ? Coolant
Stop car,
turn
engine off The coolant is too hot.
X
Pull over and stop the vehicle safely and switch off the
engine, paying attention to road and traffic conditions.
X Make sure that the air supply to the radiator is not blocked,
e.g. by slush.
X Wait until the display message disappears before restarting
the engine. Otherwise, there is a risk of engine damage.
X Pay attention to the coolant temperature display
(Y page 100).
X If the temperature increases again, visit a qualified special-
ist workshop immediately. The poly-V-belt may have torn.
X
Pull over and stop the vehicle safely and switch off the
engine, paying attention to road and traffic conditions.
X Open the bonnet.
X Check whether the poly-V-belt is torn.
If the poly-V-belt is torn:
! Do not continue driving. The engine could otherwise over-
heat.
X Switch off the engine.
X Consult a qualified specialist workshop.
If the poly-V-belt is OK:
X Wait until the display message disappears before restarting
the engine. Otherwise, there is a risk of engine damage.
X Pay attention to the coolant temperature display
(Y page 100).
X Visit a qualified specialist workshop. + Top up
coolant
See Own‐
er's Man‐
ual The coolant level is too low.
X
Top up the coolant, observing the warning notes before
doing so (Y page 177).
X Have the engine cooling system checked at a qualified spe-
cialist workshop if the coolant needs topping up more often
than usual. 224
Display
messagesPractical advice
X164_AKB; 2; 3, en-GB
wobuchh,V ersion: 2.11.8.1
2009-03-31T14:14:58+02:00 - Seite 224
Dateiname: 6515431202_buchblock.pdf; erzeugt am 01. Apr 2009 00:18:00; WK
Page 239 of 309
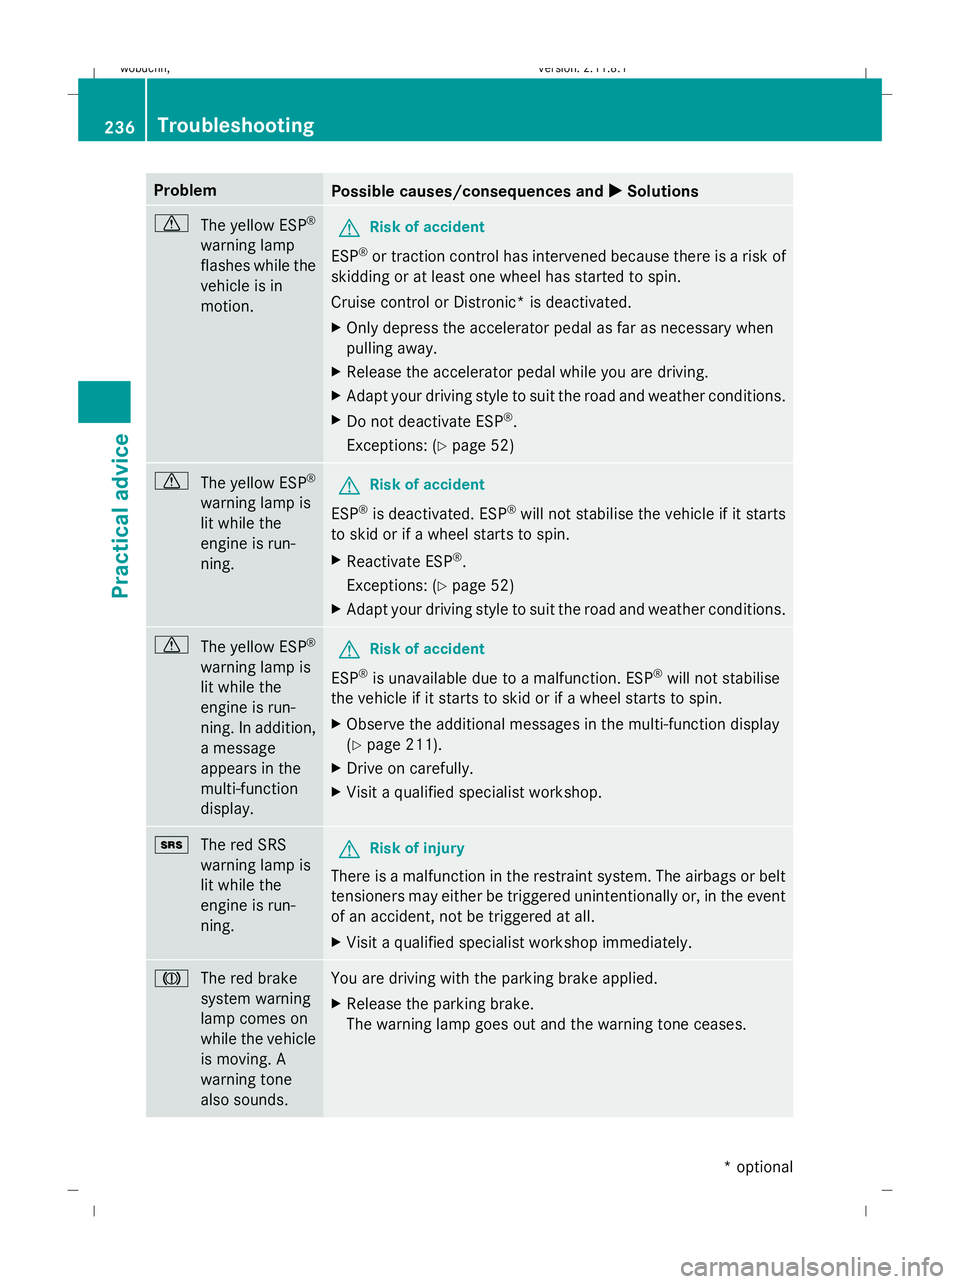
Problem
Possible causes/consequences and
X XSolutions d
The yellow ESP ®
warning lamp
flashes while the
vehicle is in
motion. G
Risk of accident
ESP ®
or traction control has intervened because there is a risk of
skidding or at least one wheel has started to spin.
Cruise control or Distronic* is deactivated.
X Only depress the accelerator pedal as far as necessary when
pulling away.
X Release the accelerator pedal while you are driving.
X Adapt your driving style to suit the road and weather conditions.
X Do not deactivate ESP ®
.
Exceptions: (Y page 52) d
The yellow ESP ®
warning lamp is
lit while the
engine is run-
ning. G
Risk of accident
ESP ®
is deactivated. ESP ®
will not stabilise the vehicle if it starts
to skid or if a wheel starts to spin.
X Reactivate ESP ®
.
Exceptions: (Y page 52)
X Adapt your driving style to suit the road and weather conditions. d
The yellow ESP ®
warning lamp is
lit while the
engine is run-
ning. In addition,
a message
appears in the
multi-function
display. G
Risk of accident
ESP ®
is unavailable due to a malfunction. ESP ®
will not stabilise
the vehicle if it starts to skid or if a wheel starts to spin.
X Observe the additional messages in the multi-function display
(Y page 211).
X Drive on carefully.
X Visit a qualified specialist workshop. +
The red SRS
warning lamp is
lit while the
engine is run-
ning. G
Risk of injury
There is a malfunction in the restraint system. The airbags or belt
tensioners may either be triggered unintentionally or, in the event
of an accident, not be triggered at all.
X Visit a qualified specialist workshop immediately. J
The red brake
system warning
lamp comes on
while the vehicle
is moving. A
warning tone
also sounds. You are driving with the parking brake applied.
X
Release the parking brake.
The warning lamp goes out and the warning tone ceases. 236
TroubleshootingPractical advice
* optional
X164_AKB; 2; 3, en-GB
wobuchh,
Version: 2.11.8.1 2009-03-31T14:14:58+02:00 - Seite 236
Dateiname: 6515431202_buchblock.pdf; erzeugt am 01. Apr 2009 00:18:01; WK