2009 MERCEDES-BENZ GL SUV belt
[x] Cancel search: beltPage 60 of 309
Opening and closing
...........................58
Tailgate ................................................ 60
Key positions ....................................... 63
Seats .................................................... 64
Steering wheel .................................... 70
Mirrors ................................................. 72
Memory functions* .............................74
Seat belts ............................................. 75
Lights ................................................... 78
Windscreen wipers .............................84
Side windows ...................................... 85
Driving and parking ............................88
Transmission ....................................... 91
Instrument cluster ..............................96
On-board computer .............................97
Off-road driving ................................. 112
Driving systems ................................ 117
Air conditioning ................................. 136
Sliding sunroof .................................. 149
Loading and stowing ........................151
Features ............................................. 161 57Controls
X164_AKB; 2; 3, en-GB
wobuchh,
Version: 2.11.8.1 2009-03-31T14:14:58+02:00 - Seite 57
Dateiname: 6515431202_buchblock.pdf; erzeugt am 01. Apr 2009 00:16:51; WK
Page 78 of 309
Setting and storing the parking position
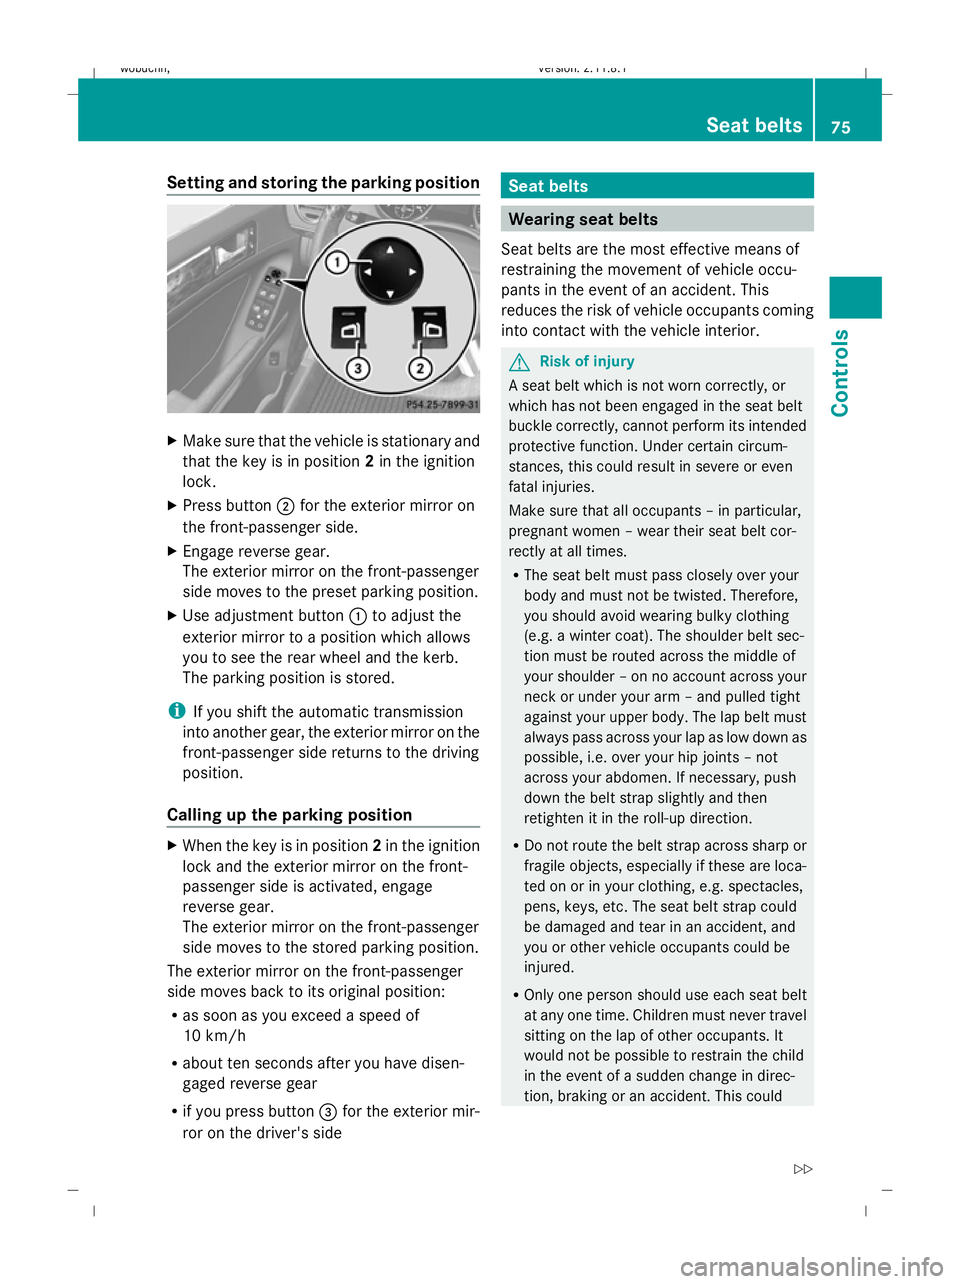
X
Make sure that the vehicle is stationary and
that the key is in position 2in the ignition
lock.
X Press button ;for the exterior mirror on
the front-passenger side.
X Engage reverse gear.
The exterior mirror on the front-passenger
side moves to the preset parking position.
X Use adjustment button :to adjust the
exterior mirror to a position which allows
you to see the rear wheel and the kerb.
The parking position is stored.
i If you shift the automatic transmission
into another gear, the exterior mirror on the
front-passenger side returns to the driving
position.
Calling up the parking position X
When the key is in position 2in the ignition
lock and the exterior mirror on the front-
passenger side is activated, engage
reverse gear.
The exterior mirror on the front-passenger
side moves to the stored parking position.
The exterior mirror on the front-passenger
side moves back to its original position:
R as soon as you exceed a speed of
10 km/h
R about ten seconds after you have disen-
gaged reverse gear
R if you press button =for the exterior mir-
ror on the driver's side Seat belts
Wearing seat belts
Seat belts are the most effective means of
restraining the movement of vehicle occu-
pants in the event of an accident. This
reduces the risk of vehicle occupants coming
into contact with the vehicle interior. G
Risk of injury
A seat belt which is not worn correctly, or
which has not been engaged in the seat belt
buckle correctly, cannot perform its intended
protective function. Under certain circum-
stances, this could result in severe or even
fatal injuries.
Make sure that all occupants – in particular,
pregnant women – wear their seat belt cor-
rectly at all times.
R The seat belt must pass closely over your
body and must not be twisted. Therefore,
you should avoid wearing bulky clothing
(e.g. a winter coat). The shoulder belt sec-
tion must be routed across the middle of
your shoulder – on no account across your
neck or under your arm – and pulled tight
against your upper body. The lap belt must
always pass across your lap as low down as
possible, i.e. over your hip joints – not
across your abdomen. If necessary, push
down the belt strap slightly and then
retighten it in the roll-up direction.
R Do not route the belt strap across sharp or
fragile objects, especially if these are loca-
ted on or in your clothing, e.g. spectacles,
pens, keys, etc. The seat belt strap could
be damaged and tear in an accident, and
you or other vehicle occupants could be
injured.
R Only one person should use each seat belt
at any one time. Children must never travel
sitting on the lap of other occupants. It
would not be possible to restrain the child
in the event of a sudden change in direc-
tion, braking or an accident. This could Seat belts
75Controls
X164_AKB; 2; 3, en-GB
wobuchh, Version: 2.11.8.1 2009-03-31T14:14:58+02:00 - Seite 75 Z
Dateiname: 6515431202_buchblock.pdf; erzeugt am 01. Apr 2009 00:17:04; WK
Page 79 of 309
result in severe or even fatal injuries to the
child and other occupants.
R Persons less than 1.50 m tall cannot wear
the seat belts correctly. For this reason,
secure persons less than 1.50 m tall in spe-
cially designed, suitable restraint systems.
R Children less than 1.50 m tall or under
12 years of age cannot wear the seat belts
properly. Therefore, they always should be
secured in a suitable child restraint system
on a suitable vehicle seat. You can find
more information under "Children in the
vehicle" in the "Safety" section of the Own-
er's Manual. Follow the manufacturer's
installation instructions when fitting the
child restraint system.
R Do not secure any objects with a seat belt
if the seat belt is also being used by one of
the vehicle's occupants. G
Risk of injury
If the backrest is not almost vertical, the seat
belt does not offer the intended level of pro-
tection. Under certain circumstances, this
could cause severe or even fatal injuries.
Before starting a journey, make sure that the
seat is properly adjusted and that the back-
rest is almost vertical. G
Risk of injury
A dirty or damaged seat belt or a seat belt that
has been subjected to a load in an accident
or which has been modified no longer offers
the intended level of protection. Under certain
circumstances, this could cause severe or
even fatal injuries.
For this reason, check regularly that the seat
belts are not damaged or dirty.
Always have damaged seat belts or seat belts
that have been subjected to a load in an acci-
dent replaced at a qualified specialist work-
shop. Consult a qualified specialist workshop
which has the necessary specialist knowledge
and tools to carry out the work required.
Mercedes-Benz recommends that you use a Mercedes-Benz Service Centre for this pur-
pose.
For safety reasons, Mercedes-Benz recom-
mends that you only use seat belts which have
been approved by Mercedes-Benz for your
vehicle. Fastening the belt
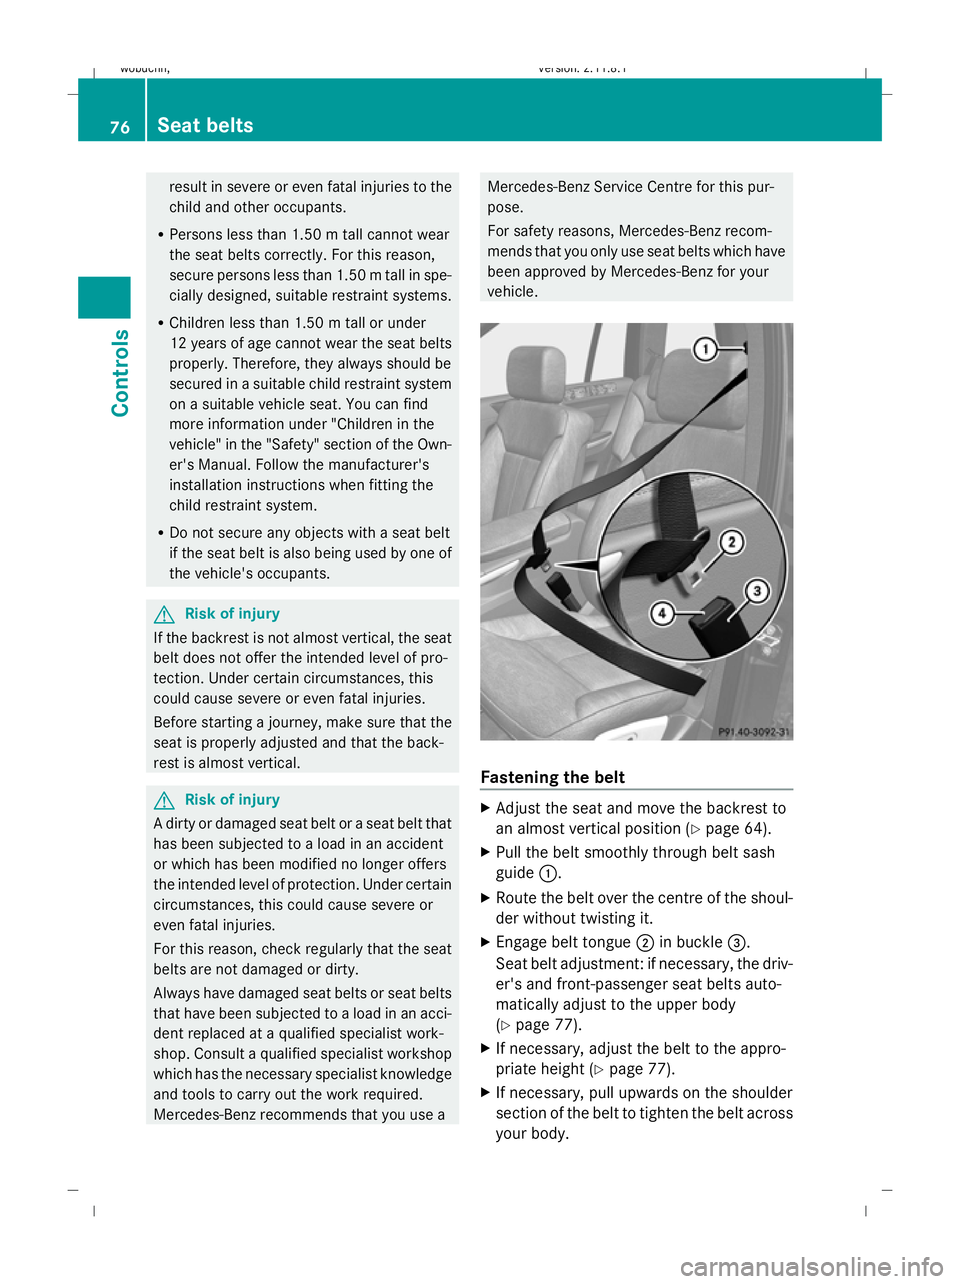
X
Adjust the seat and move the backrest to
an almost vertical position (Y page 64).
X Pull the belt smoothly through belt sash
guide :.
X Route the belt over the centre of the shoul-
der without twisting it.
X Engage belt tongue ;in buckle =.
Seat belt adjustment: if necessary, the driv-
er's and front-passenger seat belts auto-
matically adjust to the upper body
(Y page 77).
X If necessary, adjust the belt to the appro-
priate height (Y page 77).
X If necessary, pull upwards on the shoulder
section of the belt to tighten the belt across
your body. 76
Seat beltsControls
X164_AKB; 2; 3, en-GB
wobuchh,
Version: 2.11.8.1 2009-03-31T14:14:58+02:00 - Seite 76
Dateiname: 6515431202_buchblock.pdf; erzeugt am 01. Apr 2009 00:17:05; WK
Page 80 of 309
Seat-belt adjustment
The belt adjustment function adjusts the driv-
er's and front-passenger seat belt to the
upper body of the occupants. The belt strap
is tightened slightly when:
R
you engage the belt tongue in the buckle
and then turn the key to position 2in the
ignition lock.
R the key is in position 2in the ignition lock
and you then engage the belt tongue in the
buckle.
The seat-belt adjustment will apply a certain
tightening force if any slack is detected
between the occupant and the belt sash. The
belt should not be held during the adjust-
ment. You can switch the belt adjustment on
and off in the on-board computer
(Y page 108).
Unfastening the belt X
Press release button ?and guide belt
tongue ;back towards belt sash
guide :. Belt warning for driver and front
passenger
The 7 seat belt warning lamp in the instru-
ment cluster reminds you that all occupants
should fasten their seat belts. It is either lit
continuously or flashes. Additionally, there
may be a warning tone.
The 7 seat belt warning lamp goes out and
the warning tone ceases as soon as the driver
and front passenger have fastened their seat
belts.
For certain countries only: regardless of
whether the driver or the front passenger
already have their seat belt fastened, the
7 seat belt warning lamp lights up for six
seconds after the engine has been started. It
then goes out if both the driver and the front
passenger have fastened their seat belt. i
Further information about the 7seat
belt warning lamp (Y page 238). Belt height adjustment
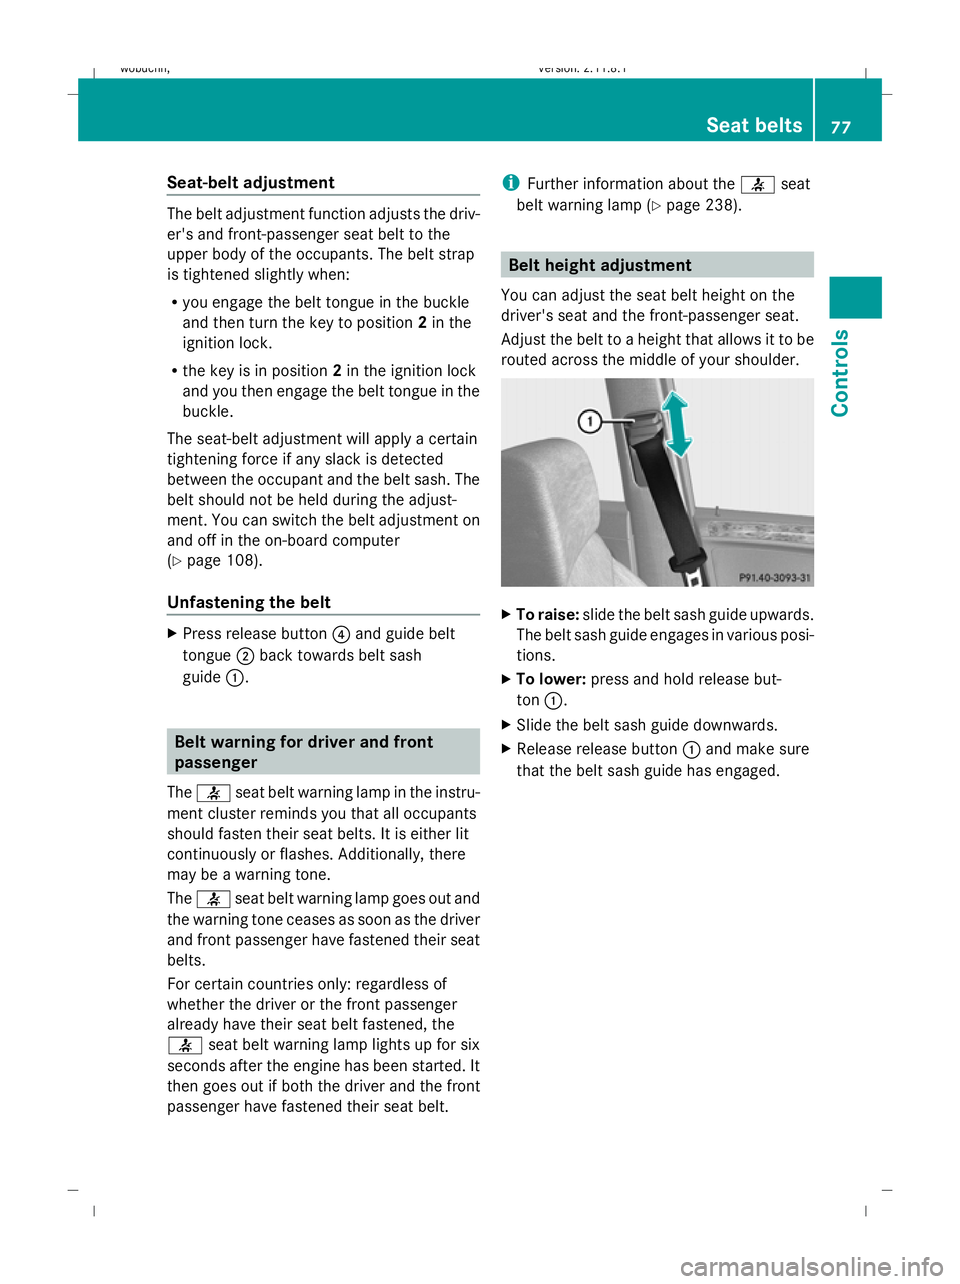
You can adjust the seat belt height on the
driver's seat and the front-passenger seat.
Adjust the belt to a height that allows it to be
routed across the middle of your shoulder. X
To raise: slide the belt sash guide upwards.
The belt sash guide engages in various posi-
tions.
X To lower: press and hold release but-
ton :.
X Slide the belt sash guide downwards.
X Release release button :and make sure
that the belt sash guide has engaged. Seat belts
77Controls
X164_AKB; 2; 3, en-GB
wobuchh, Version: 2.11.8.1 2009-03-31T14:14:58+02:00 - Seite 77 Z
Dateiname: 6515431202_buchblock.pdf; erzeugt am 01. Apr 2009 00:17:05; WK
Page 81 of 309
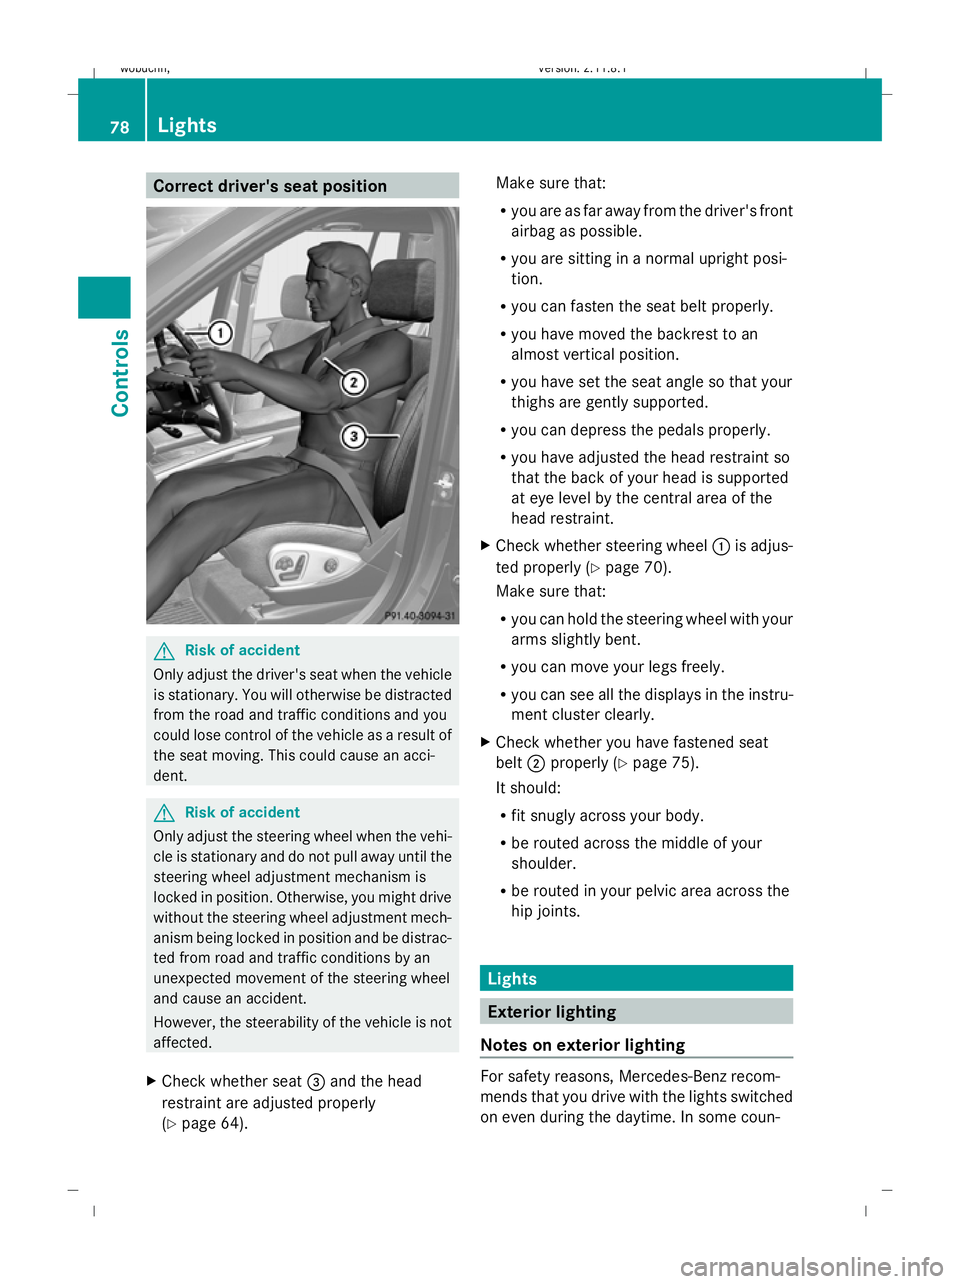
Correct driver's seat position
G
Risk of accident
Only adjust the driver's seat when the vehicle
is stationary. You will otherwise be distracted
from the road and traffic conditions and you
could lose control of the vehicle as a result of
the seat moving. This could cause an acci-
dent. G
Risk of accident
Only adjust the steering wheel when the vehi-
cle is stationary and do not pull away until the
steering wheel adjustment mechanism is
locked in position. Otherwise, you might drive
without the steering wheel adjustment mech-
anism being locked in position and be distrac-
ted from road and traffic conditions by an
unexpected movement of the steering wheel
and cause an accident.
However, the steerability of the vehicle is not
affected.
X Check whether seat =and the head
restraint are adjusted properly
(Y page 64). Make sure that:
R
you are as far away from the driver's front
airbag as possible.
R you are sitting in a normal upright posi-
tion.
R you can fasten the seat belt properly.
R you have moved the backrest to an
almost vertical position.
R you have set the seat angle so that your
thighs are gently supported.
R you can depress the pedals properly.
R you have adjusted the head restraint so
that the back of your head is supported
at eye level by the central area of the
head restraint.
X Check whether steering wheel :is adjus-
ted properly (Y page 70).
Make sure that:
R you can hold the steering wheel with your
arms slightly bent.
R you can move your legs freely.
R you can see all the displays in the instru-
ment cluster clearly.
X Check whether you have fastened seat
belt ;properly (Y page 75).
It should:
R fit snugly across your body.
R be routed across the middle of your
shoulder.
R be routed in your pelvic area across the
hip joints. Lights
Exterior lighting
Notes on exterior lighting For safety reasons, Mercedes-Benz recom-
mends that you drive with the lights switched
on even during the daytime. In some coun-78
LightsControls
X164_AKB; 2; 3, en-GB
wobuchh,
Version: 2.11.8.1 2009-03-31T14:14:58+02:00 - Seite 78
Dateiname: 6515431202_buchblock.pdf; erzeugt am 01. Apr 2009 00:17:06; WK
Page 111 of 309
Selecting the departure time or deactivat-
ing a selected departure time
You can call up the Aux.heating depar‐
ture time function directly.
X Turn the key to position 1or 2in the ignition
lock.
X Press the button for the auxiliary heating on
the centre console (Y page 147).
or
X Press VorU on the steering wheel
to select the Settings... menu.
X Press the &button to select submenus.
X Press the WorX button to select the
Heater submenu.
X Press the &button to select Aux.heat‐
ing departure time.
You will see the selected setting.
X Press the WorX button to select
one of the three departure times or Timer
off (no timer active).
When a switch-on time is selected, the yel-
low indicator lamp lights up in the auxiliary
heating button.
Changing the departure time
X Press VorU on the steering wheel
to select the Settings... menu.
X Press the &button to select submenus.
X Press the WorX button to select the
Heater submenu.
X Press the &button to select Aux.heat‐
ing departure time.
X Press WorX to select Time 1,
Time 2 orTime 3 to be changed.
X Press &to select Departure time
X Set hour.
X Press the WorX button to set the
hour.
X Press the &button to select Depar‐
ture time X Set minutes. X
Press the WorX button to set the
minutes.
X Press the *button to select a different
display.
After changing from one menu to another,
the new time setting is stored. The yellow
indicator lamp lights up on the button for
the auxiliary heating on the centre console.
Convenience submenu* Activating or deactivating the easy-entry/
exit feature*
G
Risk of injury
The steering wheel moves when the EASY-
ENTRY/EXIT feature is active. There is a risk
of occupants becoming trapped. Before acti-
vating the EASY-ENTRY/EXIT feature, make
sure that nobody can become trapped.
Do not leave children unsupervised in the
vehicle, even if they are secured in a child
restraint system. The children could open the
driver's door and thereby unintentionally acti-
vate the EASY-ENTRY/EXIT feature and
become trapped.
X Press VorU on the steering wheel
to select the Settings... menu.
X Press the &button to select submenus.
X Press the WorX button to select the
Convenience submenu.
X Press the &button to select the EASY-
ENTRY feature.
X Press the WorX button to activate
or deactivate the EASY-ENTRY system.
X Press the &,VorU button to
select a different display.
Switching the belt adjustment on/off
X Press VorU on the steering wheel
to select the Settings... menu.
X Press the WorX button to select the
Convenience submenu. 108
On-board computerControls
* optional
X164_AKB; 2; 3, en-GB
wobuchh,
Version: 2.11.8.1 2009-03-31T14:14:58+02:00 - Seite 108
Dateiname: 6515431202_buchblock.pdf; erzeugt am 01. Apr 2009 00:17:17; WK
Page 112 of 309
X
Press the &button to select Belt
adjustment.
X Press the WorX button to activate
or deactivate Belt adjustment.
Switching the fold in mirrors when lock-
ing* function on/off
When you activate the Fold in mirrors
when locking function, the exterior mirrors
are folded in when the vehicle is locked. When
you switch on the ignition, the exterior mir-
rors fold out again.
If the function is activated and you fold in the
exterior mirrors using the button on the door
(Y page 73), the exterior mirrors do not fold
out automatically. The exterior mirrors can
then only be folded out using the button on
the door.
X Press VorU on the steering wheel
to select the Settings... menu.
X Press the &button to select submenus.
X Press the WorX button to select the
Convenience submenu.
X Press the &button to select Fold in
mirrors when locking.
X Press the WorX button to activate
or deactivate the Fold in mirrors when
locking feature.
X Press the &,VorU button to
select a different display. Additional functions menu
In the Additional functions menu, you can:
R activate/deactivate the distance warning
function*
R set DSR (Y page 109)
R prime/deactivate tow-away protec-
tion* (Y page 109)
R prime/deactivate the interior motion sen-
sor* (Y page 110) Activating/deactivating the distance
warning function* This function is only available with Dis-
tronic* (Y
page 119).
X Press VorU on the steering wheel
to select the Additional functions menu.
X If the Distance warning function is not
displayed, press the &or* button
to select the Distance warning system.
X Press the WorX button to activate
or deactivate the Distance warning sys-
tem.
When the distance warning function is acti-
vated, the Äsymbol is shown in the
lower multi-function display.
X Press &, VorU to select a dif-
ferent display.
Setting DSR The
DSR Speed function allows you to set the
threshold speed (vehicle speed for driving
downhill) of the DSR (Y page 113) to a value
between 4 km/h and 18 km/h. The adjust-
ment is carried out in increments of 2 km/h.
X Press VorU on the steering wheel
to select the Additional functions menu.
X If the DSR Speed function is not displayed,
press the &or* button to select the
DSR.
X Press the WorX button to set the
desired threshold speed.
X Press &, VorU to select a dif-
ferent display.
Priming/deactivating tow-away protec-
tion* If you deactivate
Tow-away protection, it
will not be primed when you next lock the
vehicle. On-board computer
109Controls
* optional
X164_AKB; 2; 3, en-GB
wobuchh,
Version: 2.11.8.1 2009-03-31T14:14:58+02:00 - Seite 109 Z
Dateiname: 6515431202_buchblock.pdf; erzeugt am 01. Apr 2009 00:17:17; WK
Page 153 of 309
G
Risk of injury
Children could injure themselves if they oper-
ate the sliding sunroof.
Never leave children unsupervised in the vehi-
cle. Always take the key with you when leaving
the vehicle, even if you are only leaving it for
a short time. G
Risk of injury
The glass in the panorama sunroof could
break in an accident. If you are not wearing a
seat belt, there is a risk that you could be
thrown through the opening in the event of the
vehicle overturning. Therefore, always wear a
seat belt to reduce the risk of injuries.
! Only open the panorama sliding sunroof
if it is free of snow and ice. Otherwise, mal-
functions may occur.
Do not allow anything to protrude from the
sliding sunroof. The seals could otherwise
be damaged.
i When the sliding sunroof is open, apart
from the normal airflow noises resonance
noises may also occur. They are caused by
minor pressure fluctuations in the vehicle
interior. Change the position of the sliding
sunroof or open a side window slightly to
reduce or eliminate these noises.
i Related topics:
R convenience opening from the out-
side (Y page 87) or from the inside
(Y page 147)
R convenience closing from the out-
side (Y page 87) or from the inside
(Y page 147)
R automatic closing of the sliding sunroof
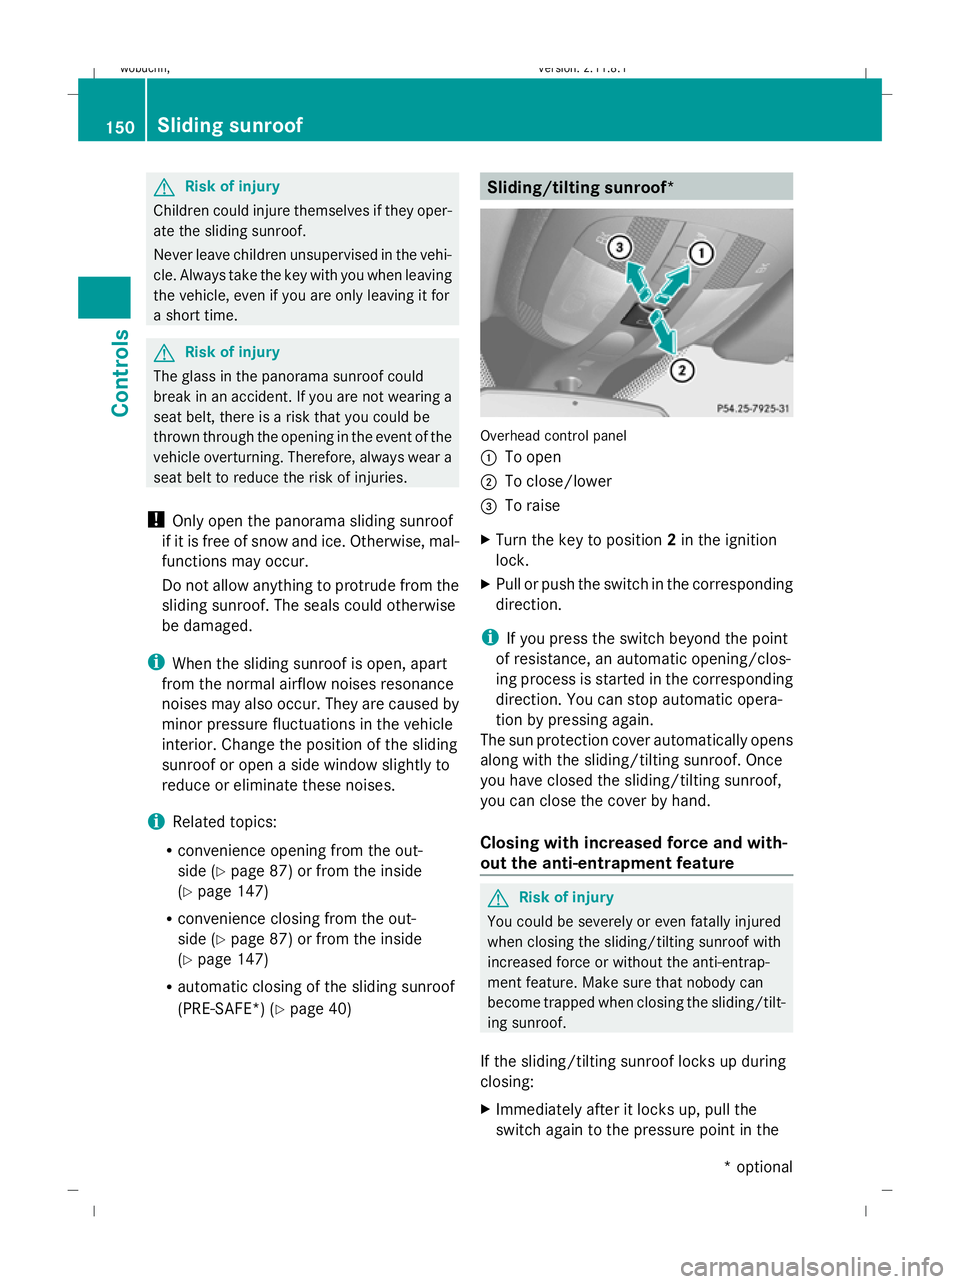
(PRE-SAFE*) (Y page 40) Sliding/tilting sunroof*
Overhead control panel
:
To open
; To close/lower
= To raise
X Turn the key to position 2in the ignition
lock.
X Pull or push the switch in the corresponding
direction.
i If you press the switch beyond the point
of resistance, an automatic opening/clos-
ing process is started in the corresponding
direction. You can stop automatic opera-
tion by pressing again.
The sun protection cover automatically opens
along with the sliding/tilting sunroof. Once
you have closed the sliding/tilting sunroof,
you can close the cover by hand.
Closing with increased force and with-
out the anti-entrapment feature G
Risk of injury
You could be severely or even fatally injured
when closing the sliding/tilting sunroof with
increased force or without the anti-entrap-
ment feature. Make sure that nobody can
become trapped when closing the sliding/tilt-
ing sunroof.
If the sliding/tilting sunroof locks up during
closing:
X Immediately after it locks up, pull the
switch again to the pressure point in the 150
Sliding sunroofControls
* optional
X164_AKB; 2; 3, en-GB
wobuchh,
Version: 2.11.8.1 2009-03-31T14:14:58+02:00 - Seite 150
Dateiname: 6515431202_buchblock.pdf; erzeugt am 01. Apr 2009 00:17:32; WK