2009 MERCEDES-BENZ E-CLASS ESTATE tyre pressure
[x] Cancel search: tyre pressurePage 232 of 373
X
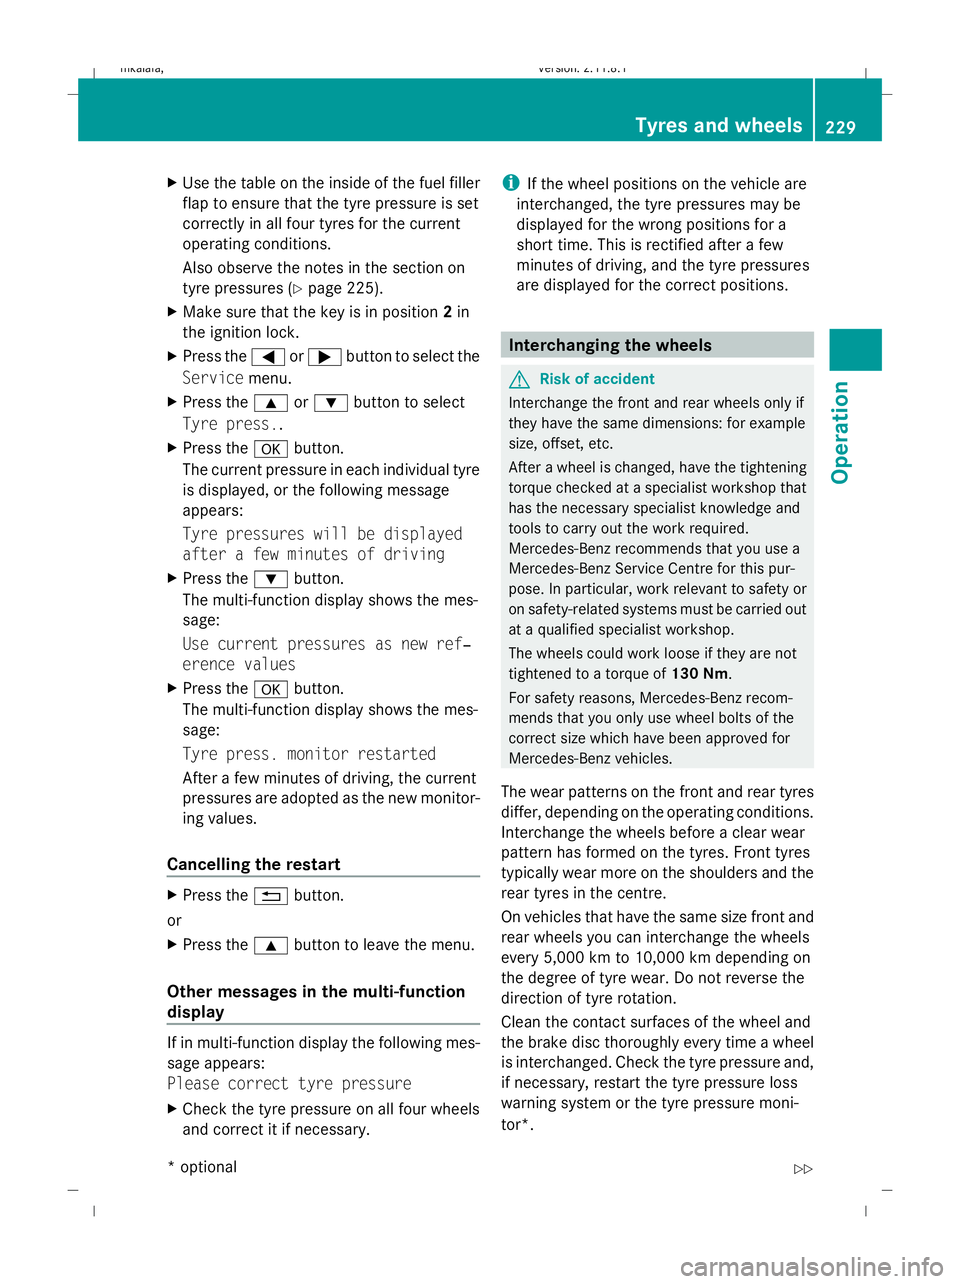
Use the table on the inside of the fuel filler
flap to ensure that the tyre pressure is set
correctly in all four tyres for the current
operating conditions.
Also observe the notes in the section on
tyre pressures (Y page 225).
X Make sure that the key is in position 2in
the ignition lock.
X Press the =or; button to select the
Service menu.
X Press the 9or: button to select
Tyre press..
X Press the abutton.
The current pressure in each individual tyre
is displayed, or the following message
appears:
Tyre pressures will be displayed
after a few minutes of driving
X Press the :button.
The multi-function display shows the mes-
sage:
Use current pressures as new ref‐
erence values
X Press the abutton.
The multi-function display shows the mes-
sage:
Tyre press. monitor restarted
After a few minutes of driving, the current
pressures are adopted as the new monitor-
ing values.
Cancelling the restart X
Press the %button.
or
X Press the 9button to leave the menu.
Other messages in the multi-function
display If in multi-function display the following mes-
sage appears:
Please correct tyre pressure
X
Check the tyre pressure on all four wheels
and correct it if necessary. i
If the wheel positions on the vehicle are
interchanged, the tyre pressures may be
displayed for the wrong positions for a
short time. This is rectified after a few
minutes of driving, and the tyre pressures
are displayed for the correct positions. Interchanging the wheels
G
Risk of accident
Interchange the front and rear wheels only if
they have the same dimensions: for example
size, offset, etc.
After a wheel is changed, have the tightening
torque checked at a specialist workshop that
has the necessary specialist knowledge and
tools to carry out the work required.
Mercedes-Benz recommends that you use a
Mercedes-Benz Service Centre for this pur-
pose. In particular, work relevant to safety or
on safety-related systems must be carried out
at a qualified specialist workshop.
The wheels could work loose if they are not
tightened to a torque of 130 Nm.
For safety reasons, Mercedes-Benz recom-
mends that you only use wheel bolts of the
correct size which have been approved for
Mercedes-Benz vehicles.
The wear patterns on the front and rear tyres
differ, depending on the operating conditions.
Interchange the wheels before a clear wear
pattern has formed on the tyres. Front tyres
typically wear more on the shoulders and the
rear tyres in the centre.
On vehicles that have the same size front and
rear wheels you can interchange the wheels
every 5,000 km to 10,000 km depending on
the degree of tyre wear. Do not reverse the
direction of tyre rotation.
Clean the contact surfaces of the wheel and
the brake disc thoroughly every time a wheel
is interchanged. Check the tyre pressure and,
if necessary, restart the tyre pressure loss
warning system or the tyre pressure moni-
tor*. Tyres and wheels
229Operation
* optional
212_AKB; 2; 4, en-GB
mkalafa,
Version: 2.11.8.1 2009-05-05T14:17:16+02:00 - Seite 229 Z
Dateiname: 6515346702_buchblock.pdf; erzeugt am 07. May 2009 14:16:58; WK
Page 233 of 373
!
On vehicles fitted with a tyre pressure
monitor*, electronic components are loca-
ted in the wheel.
Tyre-fitting tools should not be applied in
the area of the valve, as this could damage
the electronic components.
Always have the wheels interchanged/
changed at a qualified specialist workshop,
e.g. a Mercedes-Benz Service Centre. Winter driving
Points to remember
Have your vehicle winterproofed at a qualified
specialist workshop, e.g. at a Mercedes-Benz
Service Centre, at the onset of winter.
Observe the notes in the "Changing a wheel"
section (Y page 229). Winter tyres
Use winter tyres at temperatures below
+7 ˚C and in wintry road conditions. Only
winter tyres displaying the isnowflake
symbol in addition to the M+S marking pro-
vide optimum grip in wintry road conditions.
Only these tyres will allow the ABS, ESP ®
and
4MATIC* driving systems to function opti-
mally in winter, as these tyres have been
designed specifically for driving in snow.
Use winter tyres of the same make and tread
on all wheels to maintain safe handling char-
acteristics. G
Risk of accident
Winter tyres with a tread depth of less than
4 mm must be replaced immediately. They are
no longer suitable for winter use and can no
longer provide sufficient grip. This could
cause you to lose control of your vehicle and
cause an accident.
Always observe the maximum permissible
speed specified for the winter tyres you have fitted. If you fit winter tyres which have a
lower maximum permissible speed than that
of the vehicle, affix an appropriate warning
sign in the driver's field of vision. This can be
obtained at a qualified specialist workshop,
e.g. from a Mercedes-Benz Service Centre.
Under these circumstances, you should also
restrict the maximum speed of the vehicle
using permanent Speedtronic
39
to the maxi-
mum permissible speed for the winter tyres
(Y page 150).
Once you have fitted the winter tyres:
X Check the tyre pressures (Y page 225).
X Restart the tyre pressure moni-
tor* (Y page 228). G
Risk of accident
If you fit the spare wheel* when driving with
winter tyres, bear in mind that driving stability
will be impaired owing to unstable cornering
characteristics caused by the different tyres.
You should therefore adapt your driving style
and drive carefully.
Have the spare wheel* replaced at the near-
est qualified specialist workshop which has
the necessary specialist knowledge and tools
to carry out the work required. Mercedes-
Benz recommends that you use a Mercedes-
Benz Service Centre for this purpose. In par-
ticular, work relevant to safety or on safety-
related systems must be carried out at a quali-
fied specialist workshop. Snow chains
For safety reasons, Mercedes-Benz recom-
mends that you only use snow chains which
have been specially approved for your vehicle
by Mercedes-Benz, or are of a corresponding
standard of quality.
If you intend to fit snow chains, please bear
the following points in mind:
R you may not attach snow chains to all
wheel-tyre combinations; see the "Tyres
39 Only available for certain countries. 230
Winter drivingOperation
* optional
212_AKB; 2; 4, en-GB
mkalafa,
Version: 2.11.8.1 2009-05-05T14:17:16+02:00 - Seite 230
Dateiname: 6515346702_buchblock.pdf; erzeugt am 07. May 2009 14:16:58; WK
Page 238 of 373
X
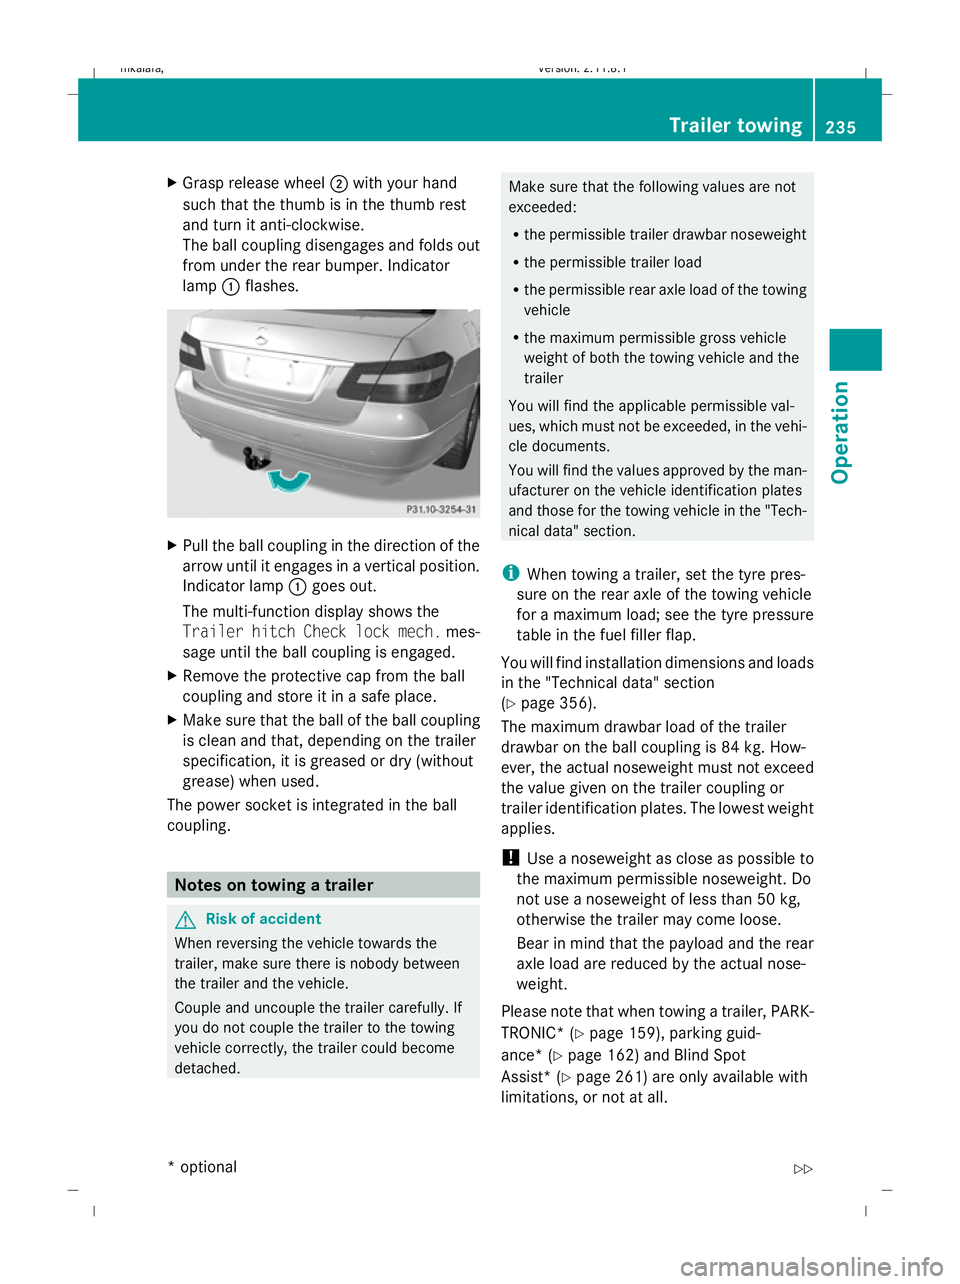
Grasp release wheel ;with your hand
such that the thumb is in the thumb rest
and turn it anti-clockwise.
The ball coupling disengages and folds out
from under the rear bumper. Indicator
lamp :flashes. X
Pull the ball coupling in the direction of the
arrow until it engages in a vertical position.
Indicator lamp :goes out.
The multi-function display shows the
Trailer hitch Check lock mech. mes-
sage until the ball coupling is engaged.
X Remove the protective cap from the ball
coupling and store it in a safe place.
X Make sure that the ball of the ball coupling
is clean and that, depending on the trailer
specification, it is greased or dry (without
grease) when used.
The power socket is integrated in the ball
coupling. Notes on towing a trailer
G
Risk of accident
When reversing the vehicle towards the
trailer, make sure there is nobody between
the trailer and the vehicle.
Couple and uncouple the trailer carefully. If
you do not couple the trailer to the towing
vehicle correctly, the trailer could become
detached. Make sure that the following values are not
exceeded:
R
the permissible trailer drawbar noseweight
R the permissible trailer load
R the permissible rear axle load of the towing
vehicle
R the maximum permissible gross vehicle
weight of both the towing vehicle and the
trailer
You will find the applicable permissible val-
ues, which must not be exceeded, in the vehi-
cle documents.
You will find the values approved by the man-
ufacturer on the vehicle identification plates
and those for the towing vehicle in the "Tech-
nical data" section.
i When towing a trailer, set the tyre pres-
sure on the rear axle of the towing vehicle
for a maximum load; see the tyre pressure
table in the fuel filler flap.
You will find installation dimensions and loads
in the "Technical data" section
(Y page 356).
The maximum drawbar load of the trailer
drawbar on the ball coupling is 84 kg. How-
ever, the actual noseweight must not exceed
the value given on the trailer coupling or
trailer identification plates. The lowest weight
applies.
! Use a noseweight as close as possible to
the maximum permissible noseweight. Do
not use a noseweight of less than 50 kg,
otherwise the trailer may come loose.
Bear in mind that the payload and the rear
axle load are reduced by the actual nose-
weight.
Please note that when towing a trailer, PARK-
TRONIC* ( Ypage 159), parking guid-
ance* (Y page 162) and Blind Spot
Assist* (Y page 261) are only available with
limitations, or not at all. Trailer towing
235Operation
* optional
212_AKB; 2; 4, en-GB
mkalafa
,V ersion: 2.11.8.1
2009-05-05T14:17:16+02:00 - Seite 235 Z
Dateiname: 6515346702_buchblock.pdf; erzeugt am 07. May 2009 14:16:59; WK
Page 244 of 373
If the vehicle is very dirty, pre-wash it before
cleaning it in an automatic car wash.
! Make sure that the automatic car wash is
suitable for the size of the vehicle. Fold in
the exterior mirrors before the vehicle is
washed. There is otherwise a risk of dam-
age to the exterior mirrors.
! When washing your vehicle in a tow-
through car wash, make sure that the auto-
matic transmission* is in position N. The
vehicle could otherwise be damaged.
R Vehicles with DIRECT SELECT lever and
key:
Do not remove the key from the ignition
lock. Do not open the driver's or front-
passenger door when the engine is
switched off, as this automatically shifts
the automatic transmission to park posi-
tion Pand locks the wheels, unless you
have previously shifted the automatic
transmission to N.
R Vehicles with DIRECT SELECT lever and
KEYLESS GO*:
Do not open the driver's or front-
passenger door when the engine is
switched off, as this shifts the automatic
transmission to park position Pand locks
the wheels.
! Make sure that the side windows are
closed completely, that the blower for the
ventilation/heating is switched off and that
the windscreen wiper switch is in position
0. The rain/light sensor could otherwise be
activated and thereby cause unintentional
wiping. This could result in damage to the
vehicle.
After using an automatic car wash, wipe off
wax and drying agents from the windscreen
and the wiper blades. This will prevent smears
and reduce wiping noises caused by residue
on the windscreen. High-pressure cleaners G
Risk of accident
Do not use high-pressure cleaners with circu-
lar-jet nozzles (dirt grinders) to clean your
vehicle, in particular the tyres. You could oth-
erwise damage the tyres and cause an acci-
dent.
! Observe the instructions issued by the
equipment manufacturer concerning the
distance to be maintained between the
nozzle of the high-pressure cleaner and the
vehicle (at least 30 cm).
Move the high-pressure cleaner nozzle
around when cleaning your vehicle.
Do not aim directly at any of the following:
R tyres
R door joint
R electrical components
R battery
R connectors
R lights
R seals
R trim elements
R ventilation slots
Damaged seals or electrical components
can lead to failures or leaks.
Care and treatment of matt paint-
work* Your vehicle has a clear matt finish. For this
reason, you should make sure that you
adhere to the following instructions to avoid
damage to paintwork due to improper treat-
ment.
!
Under no circumstances should you pol-
ish the vehicle. Polishing will make the
paintwork shine.
! When caring for your paintwork, do not
use paint cleaner, grinding or polishing Care
241Operation
* optional
212_AKB; 2; 4, en-GB
mkalafa
,V ersion: 2.11.8.1
2009-05-05T14:17:16+02:00 - Seite 241 Z
Dateiname: 6515346702_buchblock.pdf; erzeugt am 07. May 2009 14:17:01; WK
Page 261 of 373
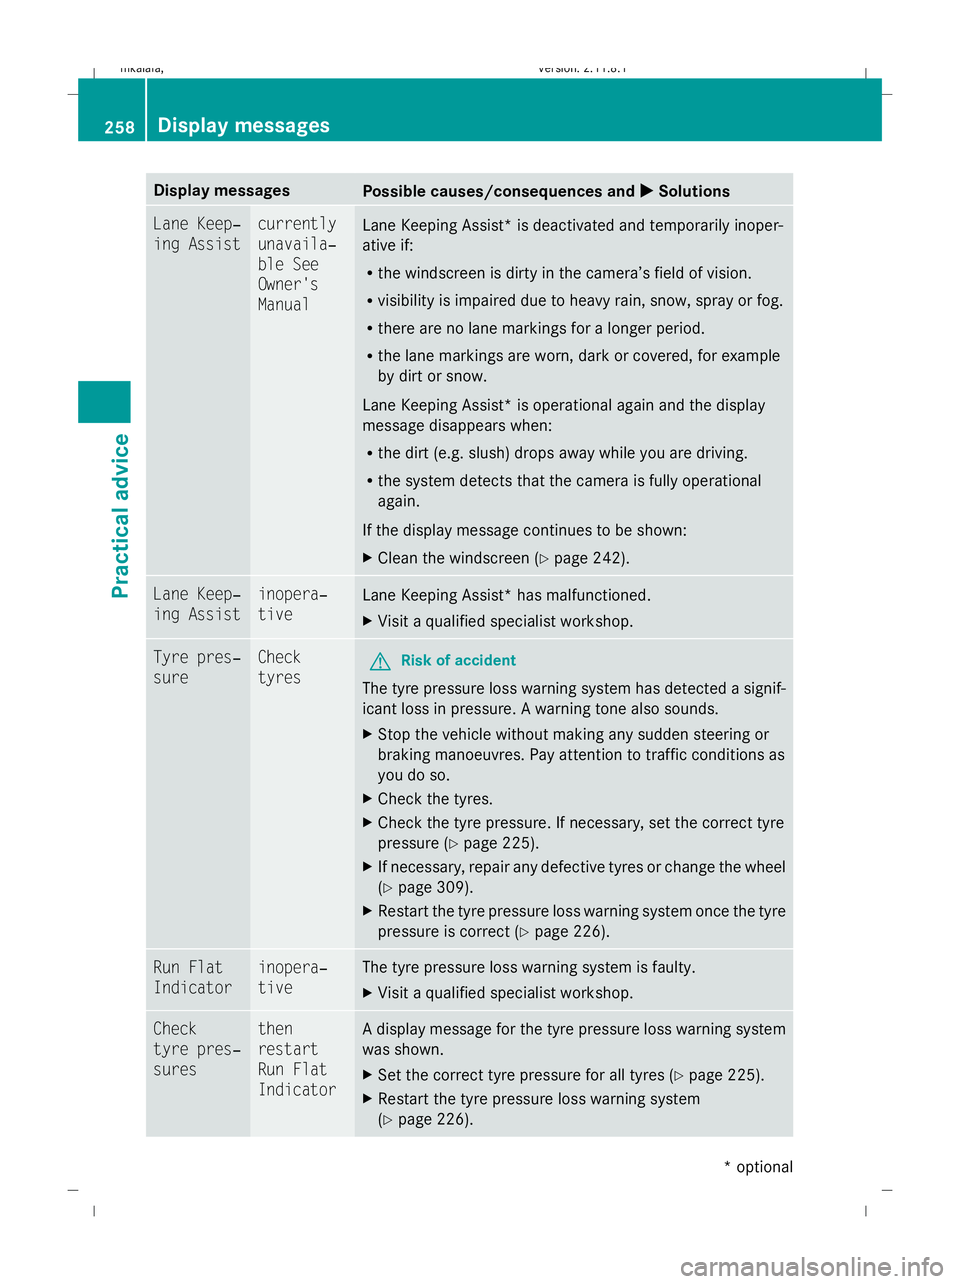
Display messages
Possible causes/consequences and
X
X Solutions Lane Keep‐
ing Assist currently
unavaila‐
ble See
Owner's
Manual
Lane Keeping Assist* is deactivated and temporarily inoper-
ative if:
R
the windscreen is dirty in the camera’s field of vision.
R visibility is impaired due to heavy rain, snow, spray or fog.
R there are no lane markings for a longer period.
R the lane markings are worn, dark or covered, for example
by dirt or snow.
Lane Keeping Assist* is operational again and the display
message disappears when:
R the dirt (e.g. slush) drops away while you are driving.
R the system detects that the camera is fully operational
again.
If the display message continues to be shown:
X Clean the windscreen (Y page 242).Lane Keep‐
ing Assist inopera‐
tive
Lane Keeping Assist* has malfunctioned.
X
Visit a qualified specialist workshop. Tyre pres‐
sure Check
tyres
G
Risk of accident
The tyre pressure loss warning system has detected a signif-
icant loss in pressure. A warning tone also sounds.
X Stop the vehicle without making any sudden steering or
braking manoeuvres. Pay attention to traffic conditions as
you do so.
X Check the tyres.
X Check the tyre pressure. If necessary, set the correct tyre
pressure ( Ypage 225).
X If necessary, repair any defective tyres or change the wheel
(Y page 309).
X Restart the tyre pressure loss warning system once the tyre
pressure is correct (Y page 226).Run Flat
Indicator inopera‐
tive The tyre pressure loss warning system is faulty.
X
Visit a qualified specialist workshop. Check
tyre pres‐
sures then
restart
Run Flat
Indicator A display message for the tyre pressure loss warning system
was shown.
X
Set the correct tyre pressure for all tyres (Y page 225).
X Restart the tyre pressure loss warning system
(Y page 226). 258
Display
messagesPractical advice
* optional
212_AKB; 2; 4, en-GB
mkalafa
,V ersion: 2.11.8.1
2009-05-05T14:17:16+02:00 - Seite 258
Dateiname: 6515346702_buchblock.pdf; erzeugt am 07. May 2009 14:17:08; WK
Page 262 of 373
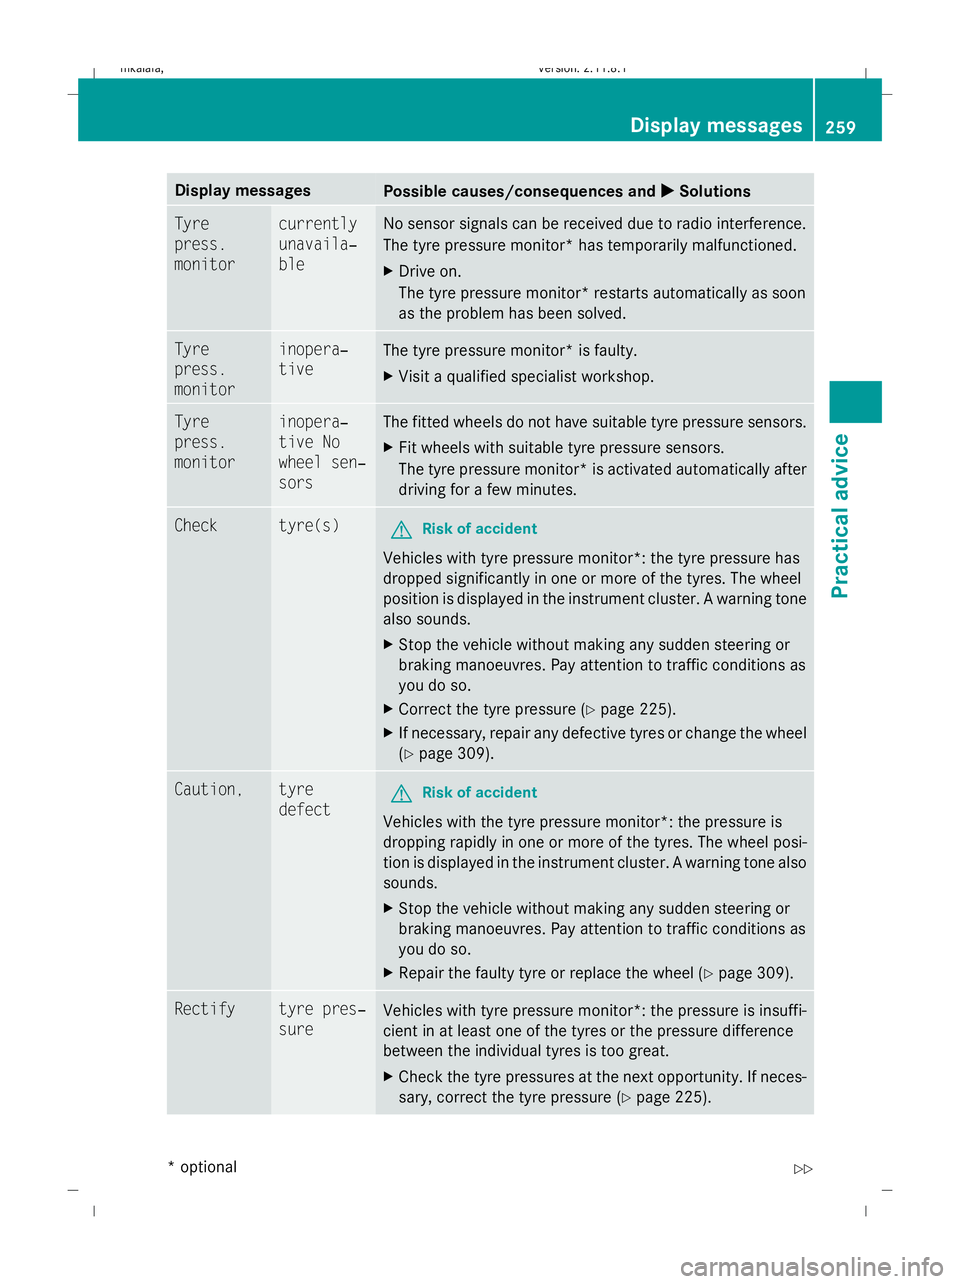
Display messages
Possible causes/consequences and
X
X Solutions Tyre
press.
monitor currently
unavaila‐
ble No sensor signals can be received due to radio interference.
The tyre pressure monitor* has temporarily malfunctioned.
X
Drive on.
The tyre pressure monitor* restarts automatically as soon
as the problem has been solved. Tyre
press.
monitor inopera‐
tive
The tyre pressure monitor* is faulty.
X
Visit a qualified specialist workshop. Tyre
press.
monitor inopera‐
tive No
wheel sen‐
sors The fitted wheels do not have suitable tyre pressure sensors.
X
Fit wheels with suitable tyre pressure sensors.
The tyre pressure monitor* is activated automatically after
driving for a few minutes. Check tyre(s)
G
Risk of accident
Vehicles with tyre pressure monitor*: the tyre pressure has
dropped significantly in one or more of the tyres. The wheel
position is displayed in the instrument cluster. A warning tone
also sounds.
X Stop the vehicle without making any sudden steering or
braking manoeuvres. Pay attention to traffic conditions as
you do so.
X Correct the tyre pressure (Y page 225).
X If necessary, repair any defective tyres or change the wheel
(Y page 309). Caution, tyre
defect
G
Risk of accident
Vehicles with the tyre pressure monitor*: the pressure is
dropping rapidly in one or more of the tyres. The wheel posi-
tion is displayed in the instrument cluster. A warning tone also
sounds.
X Stop the vehicle without making any sudden steering or
braking manoeuvres. Pay attention to traffic conditions as
you do so.
X Repair the faulty tyre or replace the wheel ( Ypage 309). Rectify tyre pres‐
sure
Vehicles with tyre pressure monitor*: the pressure is insuffi-
cient in at least one of the tyres or the pressure difference
between the individual tyres is too great.
X
Check the tyre pressures at the next opportunity. If neces-
sary, correct the tyre pressure (Y page 225). Display
messages
259Practical advice
* optional
212_AKB; 2; 4, en-GB
mkalafa
,V ersion: 2.11.8.1
2009-05-05T14:17:16+02:00 - Seite 259 Z
Dateiname: 6515346702_buchblock.pdf; erzeugt am 07. May 2009 14:17:08; WK
Page 263 of 373
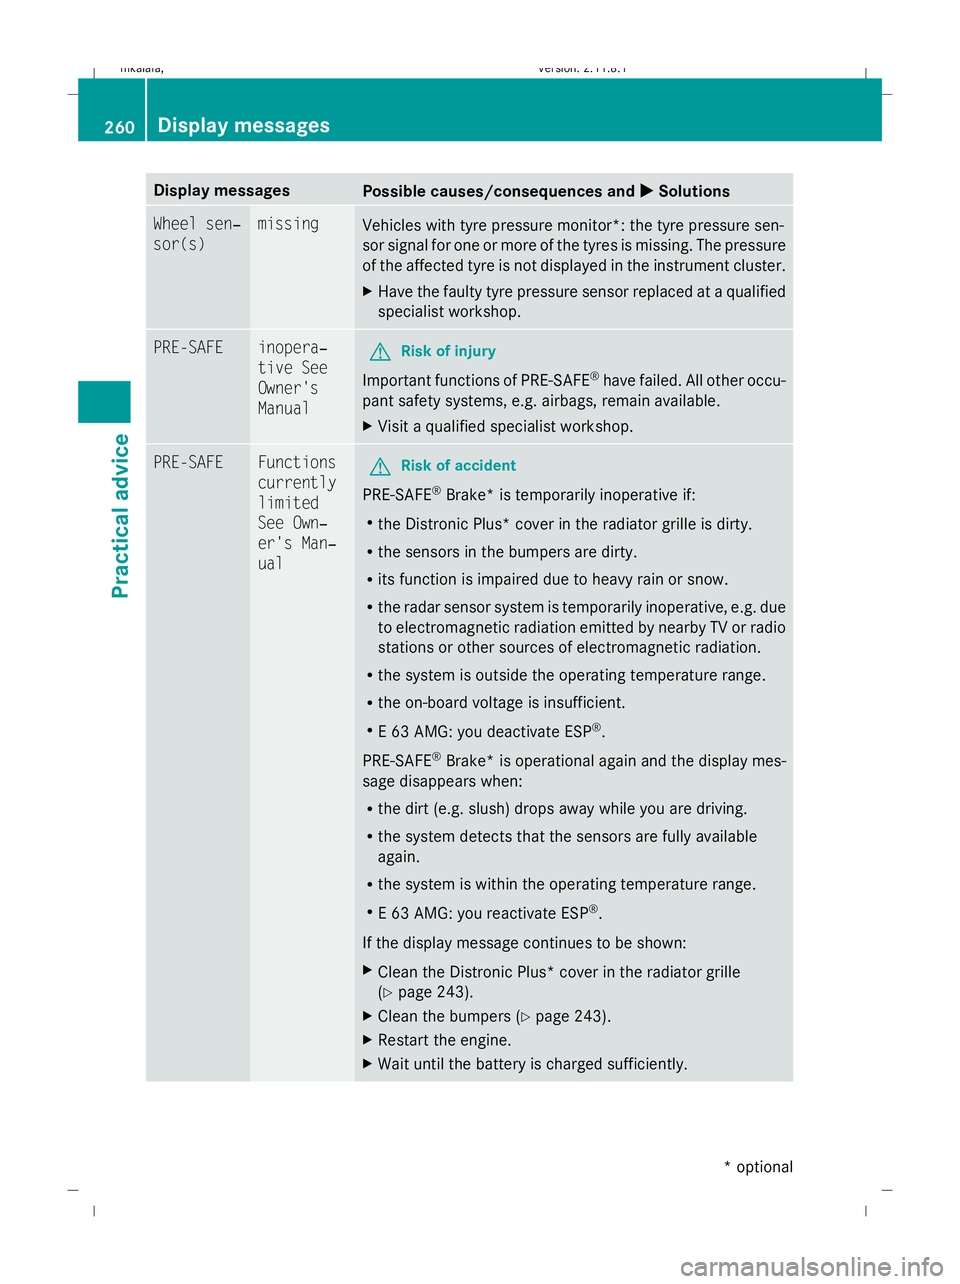
Display messages
Possible causes/consequences and
X
X Solutions Wheel sen‐
sor(s) missing
Vehicles with tyre pressure monitor*: the tyre pressure sen-
sor signal for one or more of the tyres is missing. The pressure
of the affected tyre is not displayed in the instrument cluster.
X
Have the faulty tyre pressure sensor replaced at a qualified
specialist workshop. PRE-SAFE inopera‐
tive See
Owner's
Manual
G
Risk of injury
Important functions of PRE-SAFE ®
have failed. All other occu-
pant safety systems, e.g. airbags, remain available.
X Visit a qualified specialist workshop. PRE-SAFE Functions
currently
limited
See Own‐
er's Man‐
ual
G
Risk of accident
PRE-SAFE ®
Brake* is temporarily inoperative if:
R the Distronic Plus* cover in the radiator grille is dirty.
R the sensors in the bumpers are dirty.
R its function is impaired due to heavy rain or snow.
R the radar sensor system is temporarily inoperative, e.g. due
to electromagnetic radiation emitted by nearby TV or radio
stations or other sources of electromagnetic radiation.
R the system is outside the operating temperature range.
R the on-board voltage is insufficient.
R E 63 AMG: you deactivate ESP ®
.
PRE-SAFE ®
Brake *is operational again and the display mes-
sage disappears when:
R the dirt (e.g. slush) drops away while you are driving.
R the system detects that the sensors are fully available
again.
R the system is within the operating temperature range.
R E 63 AMG: you reactivate ESP ®
.
If the display message continues to be shown:
X Clean the Distronic Plus* cover in the radiator grille
(Y page 243).
X Clean the bumpers (Y page 243).
X Restart the engine.
X Wait until the battery is charged sufficiently. 260
Display messagesPractical advice
* optional
212_AKB; 2; 4, en-GB
mkalafa,
Version: 2.11.8.1 2009-05-05T14:17:16+02:00 - Seite 260
Dateiname: 6515346702_buchblock.pdf; erzeugt am 07. May 2009 14:17:09; WK
Page 279 of 373
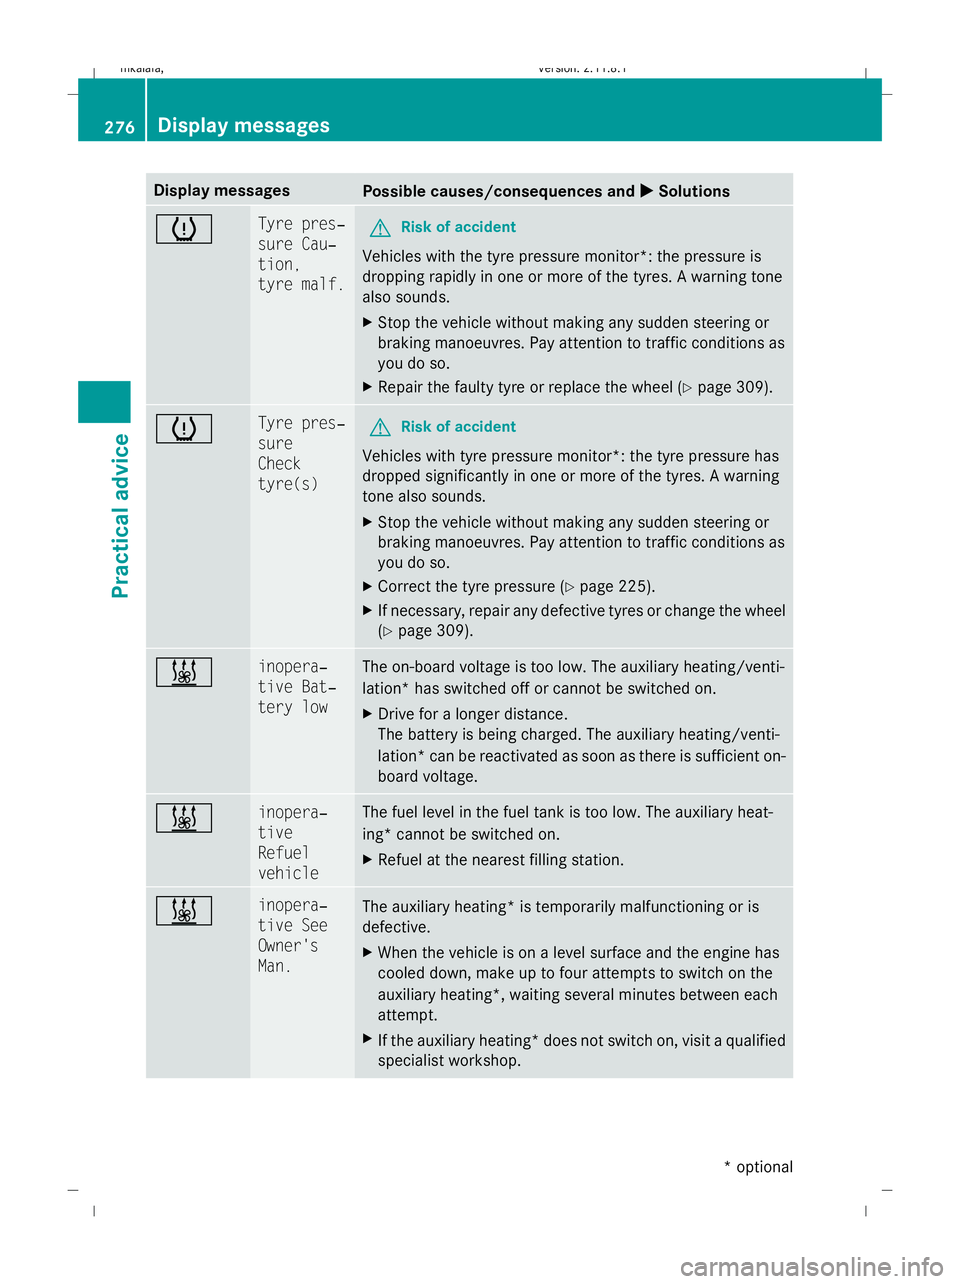
Display messages
Possible causes/consequences and
X
X Solutions h Tyre pres‐
sure Cau‐
tion,
tyre malf.
G
Risk of accident
Vehicles with the tyre pressure monitor*: the pressure is
dropping rapidly in one or more of the tyres. A warning tone
also sounds.
X Stop the vehicle without making any sudden steering or
braking manoeuvres. Pay attention to traffic conditions as
you do so.
X Repair the faulty tyre or replace the wheel ( Ypage 309). h Tyre pres‐
sure
Check
tyre(s)
G
Risk of accident
Vehicles with tyre pressure monitor*: the tyre pressure has
dropped significantly in one or more of the tyres. A warning
tone also sounds.
X Stop the vehicle without making any sudden steering or
braking manoeuvres. Pay attention to traffic conditions as
you do so.
X Correct the tyre pressure (Y page 225).
X If necessary, repair any defective tyres or change the wheel
(Y page 309). & inopera‐
tive Bat‐
tery low The on-board voltage is too low. The auxiliary heating/venti-
lation* has switched off or cannot be switched on.
X
Drive for a longer distance.
The battery is being charged. The auxiliary heating/venti-
lation *can be reactivated as soon as there is sufficient on-
board voltage. & inopera‐
tive
Refuel
vehicle The fuel level in the fuel tank is too low. The auxiliary heat-
ing* cannot be switched on.
X
Refuel at the nearest filling station. & inopera‐
tive See
Owner's
Man.
The auxiliary heating
*is temporarily malfunctioning or is
defective.
X When the vehicle is on a level surface and the engine has
cooled down, make up to four attempts to switch on the
auxiliary heating*, waiting several minutes between each
attempt.
X If the auxiliary heating* does not switch on, visit a qualified
specialist workshop. 276
Display messagesPractical advice
* optional
212_AKB; 2; 4, en-GB
mkalafa,
Version: 2.11.8.1 2009-05-05T14:17:16+02:00 - Seite 276
Dateiname: 6515346702_buchblock.pdf; erzeugt am 07. May 2009 14:17:11; WK