2009 MERCEDES-BENZ E-CLASS ESTATE tyre pressure
[x] Cancel search: tyre pressurePage 289 of 373
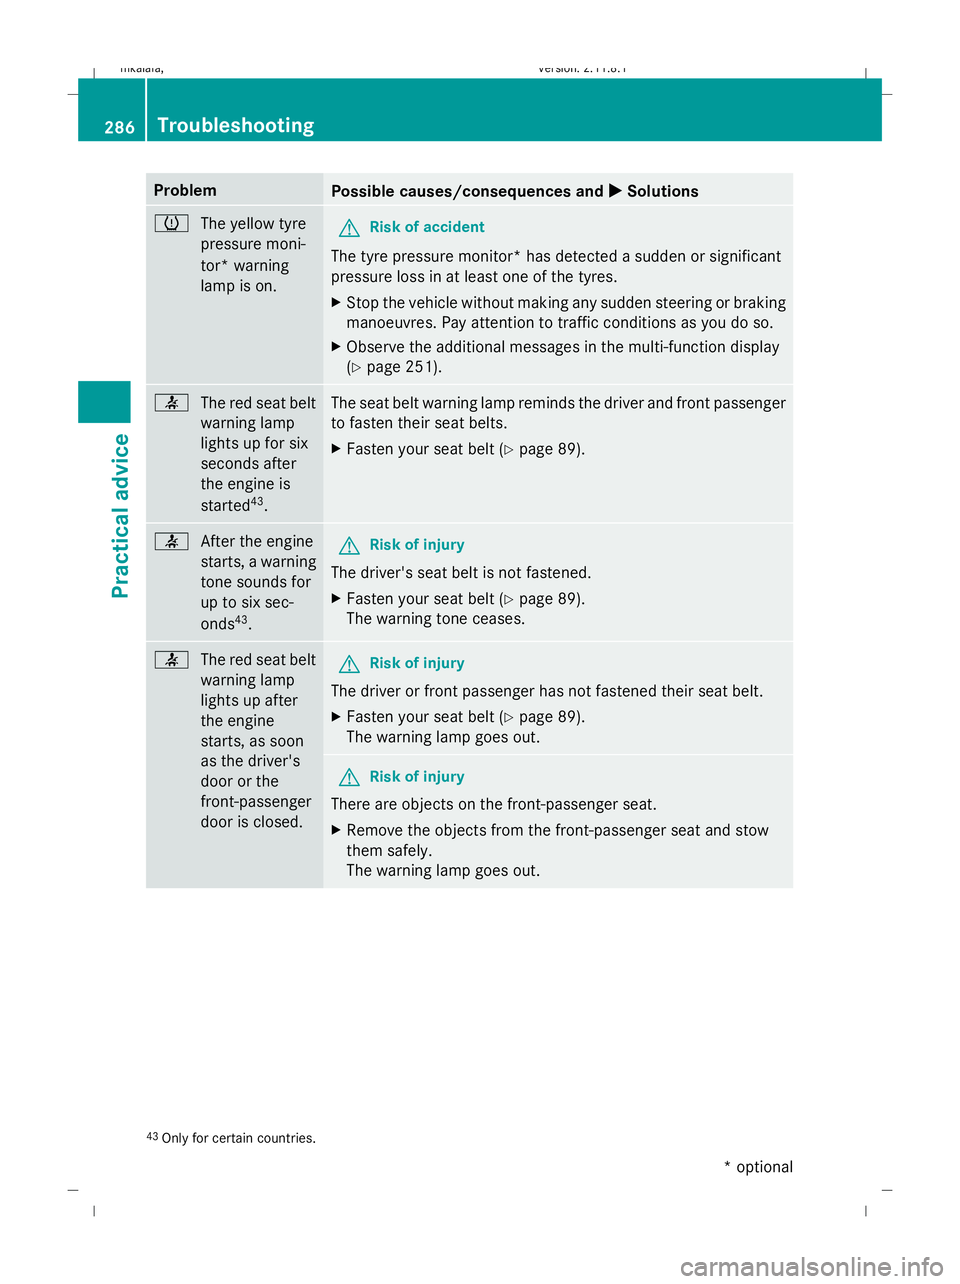
Problem
Possible causes/consequences and
X XSolutions h
The yellow tyre
pressure moni-
tor* warning
lamp is on. G
Risk of accident
The tyre pressure monitor* has detected a sudden or significant
pressure loss in at least one of the tyres.
X Stop the vehicle without making any sudden steering or braking
manoeuvres. Pay attention to traffic conditions as you do so.
X Observe the additional messages in the multi-function display
(Y page 251). 7
The red seat belt
warning lamp
lights up for six
seconds after
the engine is
started 43
. The seat belt warning lamp reminds the driver and front passenger
to fasten their seat belts.
X
Fasten your seat belt (Y page 89).7
After the engine
starts, a warning
tone sounds for
up to six sec-
onds43
. G
Risk of injury
The driver's seat belt is not fastened.
X Fasten your seat belt (Y page 89).
The warning tone ceases. 7
The red seat belt
warning lamp
lights up after
the engine
starts, as soon
as the driver's
door or the
front-passenger
door is closed. G
Risk of injury
The driver or front passenger has not fastened their seat belt.
X Fasten your seat belt (Y page 89).
The warning lamp goes out. G
Risk of injury
There are objects on the front-passenger seat.
X Remove the objects from the front-passenger seat and stow
them safely.
The warning lamp goes out. 43
Only for certain countries. 286
TroubleshootingPractical advice
* optional
212_AKB; 2; 4, en-GB
mkalafa,
Version: 2.11.8.1 2009-05-05T14:17:16+02:00 - Seite 286
Dateiname: 6515346702_buchblock.pdf; erzeugt am 07. May 2009 14:17:12; WK
Page 313 of 373
X
Vehicles without KEYLESS GO*: remove
the key from the ignition lock.
X Vehicles with KEYLESS GO*: open the
driver's door.
The on-board electronics have status 0,
which is the same as the key having been
removed.
X Get out of the vehicle.
X Close the driver’s door.
X Place the warning triangle (Y page 248) at
a suitable distance. Observe legal require-
ments. Using the TIREFIT kit
You can use the TIREFIT kit to seal small
punctures, particularly those in the tyre tread.
You can use TIREFIT at outside temperatures
down to -20 †. G
Risk of accident
In the following cases your safety is especially
endangered, as tyre sealant is insufficient if:
R there are cuts or punctures in the tyre
greater than 4 mm.
R the wheel rim is damaged.
R you have driven at very low tyre pressures
or on a flat tyre.
Do not drive any further. Consult a qualified
specialist workshop which has the necessary
specialist knowledge and tools to carry out
the work required.
Mercedes-Benz recommends that you use a
Mercedes-Benz Service Centre for this pur-
pose. In particular, work relevant to safety or
on safety-related systems must be carried out
at a qualified specialist workshop.
X Do not remove any foreign objects which
have penetrated the tyre, e.g. screws or
nails.
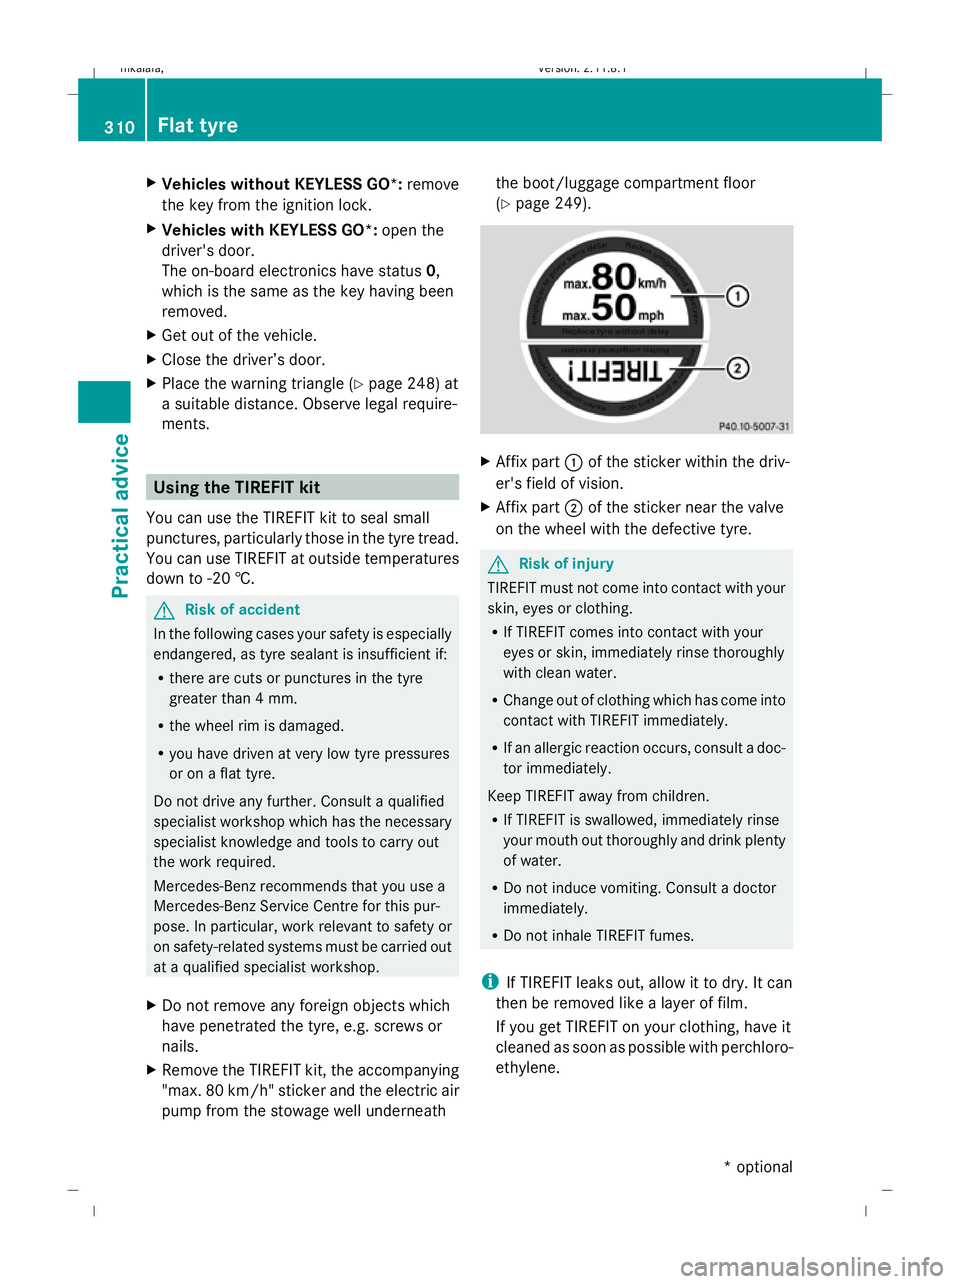
X Remove the TIREFIT kit, the accompanying
"max. 80 km/h" sticker and the electric air
pump from the stowage well underneath the boot/luggage compartment floor
(Y
page 249). X
Affix part :of the sticker within the driv-
er's field of vision.
X Affix part ;of the sticker near the valve
on the wheel with the defective tyre. G
Risk of injury
TIREFIT must not come into contact with your
skin, eyes or clothing.
R If TIREFIT comes into contact with your
eyes or skin, immediately rinse thoroughly
with clean water.
R Change out of clothing which has come into
contact with TIREFIT immediately.
R If an allergic reaction occurs, consult a doc-
tor immediately.
Keep TIREFIT away from children.
R If TIREFIT is swallowed, immediately rinse
your mouth out thoroughly and drink plenty
of water.
R Do not induce vomiting. Consult a doctor
immediately.
R Do not inhale TIREFIT fumes.
i If TIREFIT leaks out, allow it to dry. It can
then be removed like a layer of film.
If you get TIREFIT on your clothing, have it
cleaned as soon as possible with perchloro-
ethylene. 310
Flat tyrePractical advice
* optional
212_AKB; 2; 4, en-GB
mkalafa
,V ersion: 2.11.8.1
2009-05-05T14:17:16+02:00 - Seite 310
Dateiname: 6515346702_buchblock.pdf; erzeugt am 07. May 2009 14:17:20; WK
Page 314 of 373
G
Risk of injury
Comply with the manufacturer's safety
instructions shown on the sticker on the elec-
tric air pump.
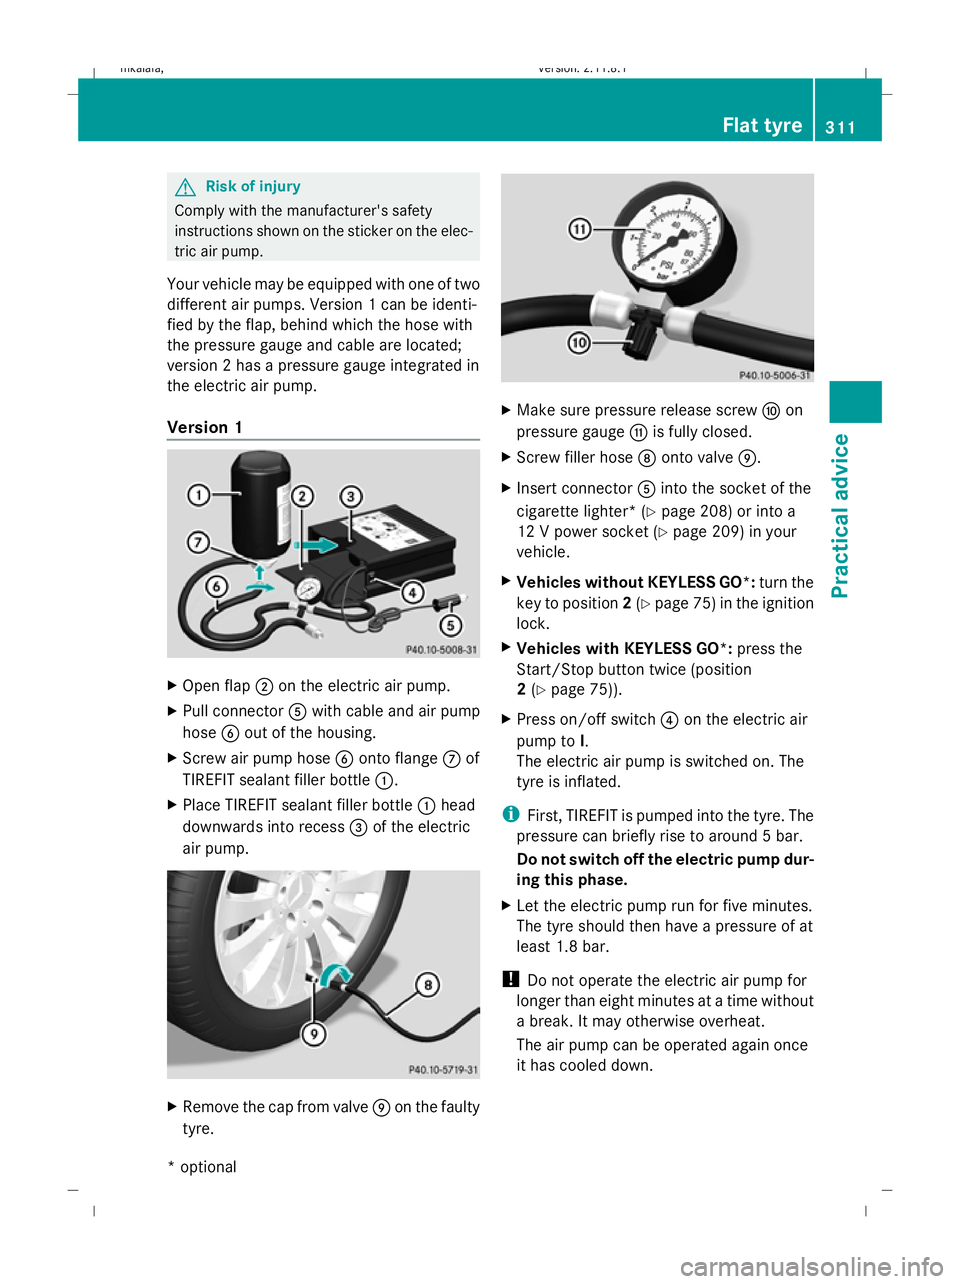
Your vehicle may be equipped with one of two
different air pumps. Version 1 can be identi-
fied by the flap, behind which the hose with
the pressure gauge and cable are located;
version 2 has a pressure gauge integrated in
the electric air pump.
Version 1 X
Open flap ;on the electric air pump.
X Pull connector Awith cable and air pump
hose Bout of the housing.
X Screw air pump hose Bonto flange Cof
TIREFIT sealant filler bottle :.
X Place TIREFIT sealant filler bottle :head
downwards into recess =of the electric
air pump. X
Remove the cap from valve Eon the faulty
tyre. X
Make sure pressure release screw Fon
pressure gauge Gis fully closed.
X Screw filler hose Donto valve E.
X Insert connector Ainto the socket of the
cigarette lighter* (Y page 208) or into a
12 V power socket ( Ypage 209) in your
vehicle.
X Vehicles without KEYLESS GO*: turn the
key to position 2(Y page 75) in the ignition
lock.
X Vehicles with KEYLESS GO*: press the
Start/Stop button twice (position
2 (Y page 75)).
X Press on/off switch ?on the electric air
pump to I.
The electric air pump is switched on. The
tyre is inflated.
i First, TIREFIT is pumped into the tyre. The
pressure can briefly rise to around 5 bar.
Do not switch off the electric pump dur-
ing this phase.
X Let the electric pump run for five minutes.
The tyre should then have a pressure of at
least 1.8 bar.
! Do not operate the electric air pump for
longer than eight minutes at a time without
a break. It may otherwise overheat.
The air pump can be operated again once
it has cooled down. Flat tyre
311Practical advice
* optional
212_AKB; 2; 4, en-GB
mkalafa
,V ersion: 2.11.8.1
2009-05-05T14:17:16+02:00 - Seite 311 Z
Dateiname: 6515346702_buchblock.pdf; erzeugt am 07. May 2009 14:17:21; WK
Page 315 of 373
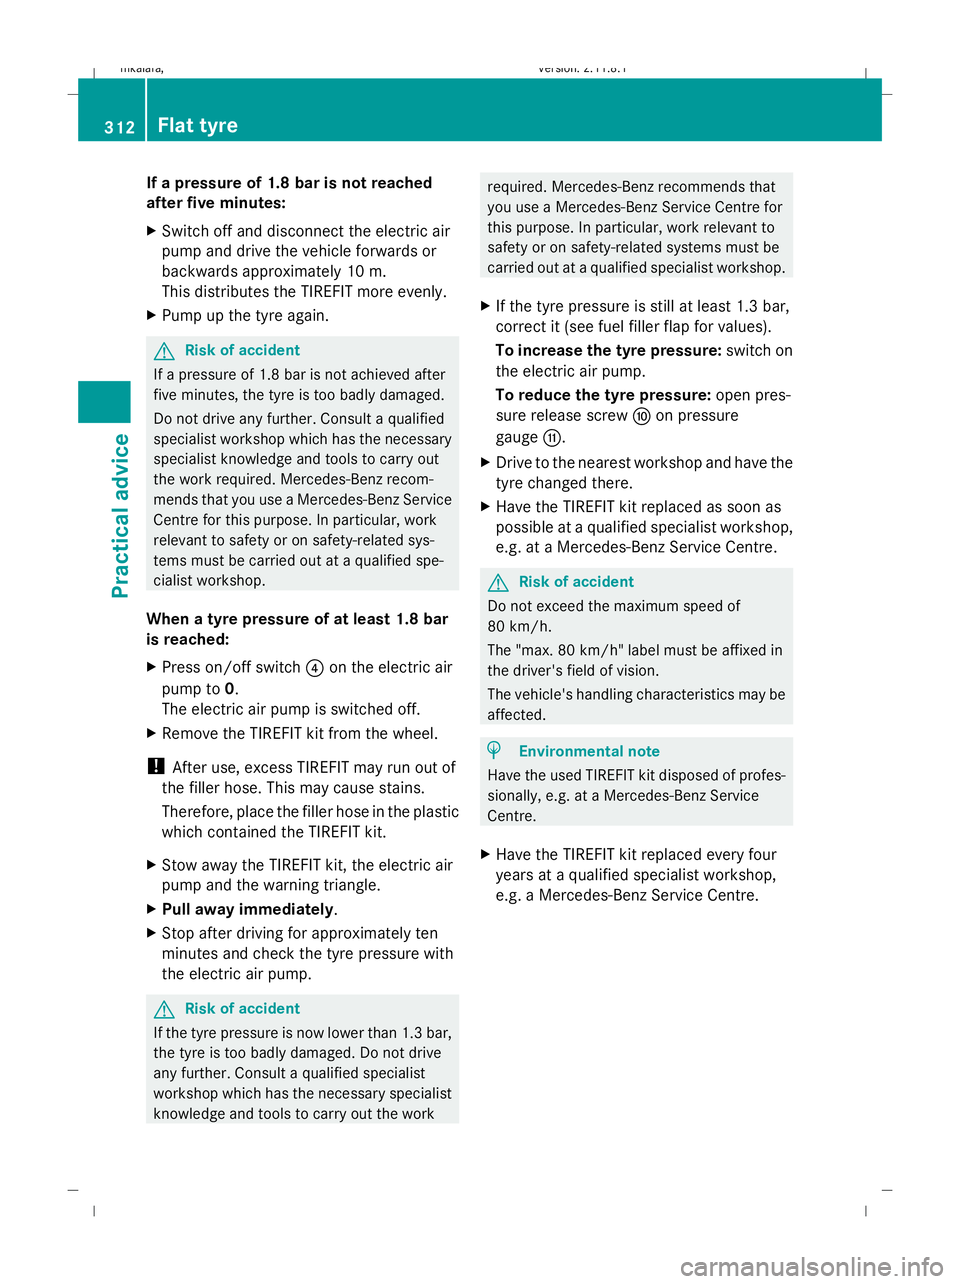
If a pressure of 1.8 bar is not reached
after five minutes:
X Switch off and disconnect the electric air
pump and drive the vehicle forwards or
backwards approximately 10 m.
This distributes the TIREFIT more evenly.
X Pump up the tyre again. G
Risk of accident
If a pressure of 1.8 bar is not achieved after
five minutes, the tyre is too badly damaged.
Do not drive any further. Consult a qualified
specialist workshop which has the necessary
specialist knowledge and tools to carry out
the work required. Mercedes-Benz recom-
mends that you use a Mercedes-Benz Service
Centre for this purpose. In particular, work
relevant to safety or on safety-related sys-
tems must be carried out at a qualified spe-
cialist workshop.
When a tyre pressure of at least 1.8 bar
is reached:
X Press on/off switch ?on the electric air
pump to 0.
The electric air pump is switched off.
X Remove the TIREFIT kit from the wheel.
! After use, excess TIREFIT may run out of
the filler hose. This may cause stains.
Therefore, place the filler hose in the plastic
which contained the TIREFIT kit.
X Stow away the TIREFIT kit, the electric air
pump and the warning triangle.
X Pull away immediately.
X Stop after driving for approximately ten
minutes and check the tyre pressure with
the electric air pump. G
Risk of accident
If the tyre pressure is now lower than 1.3 bar,
the tyre is too badly damaged. Do not drive
any further. Consult a qualified specialist
workshop which has the necessary specialist
knowledge and tools to carry out the work required. Mercedes-Benz recommends that
you use a Mercedes-Benz Service Centre for
this purpose. In particular, work relevant to
safety or on safety-related systems must be
carried out at a qualified specialist workshop.
X If the tyre pressure is still at least 1.3 bar,
correct it (see fuel filler flap for values).
To increase the tyre pressure: switch on
the electric air pump.
To reduce the tyre pressure: open pres-
sure release screw Fon pressure
gauge G.
X Drive to the nearest workshop and have the
tyre changed there.
X Have the TIREFIT kit replaced as soon as
possible at a qualified specialist workshop,
e.g. at a Mercedes-Benz Service Centre. G
Risk of accident
Do not exceed the maximum speed of
80 km/h.
The "max. 80 km/h" label must be affixed in
the driver's field of vision.
The vehicle's handling characteristics may be
affected. H
Environmental note
Have the used TIREFIT kit disposed of profes-
sionally, e.g. at a Mercedes-Benz Service
Centre.
X Have the TIREFIT kit replaced every four
years at a qualified specialist workshop,
e.g. a Mercedes-Benz Service Centre. 312
Flat tyrePractical advice
212_AKB; 2; 4, en-GB
mkalafa
,V ersion: 2.11.8.1
2009-05-05T14:17:16+02:00 - Seite 312
Dateiname: 6515346702_buchblock.pdf; erzeugt am 07. May 2009 14:17:21; WK
Page 316 of 373
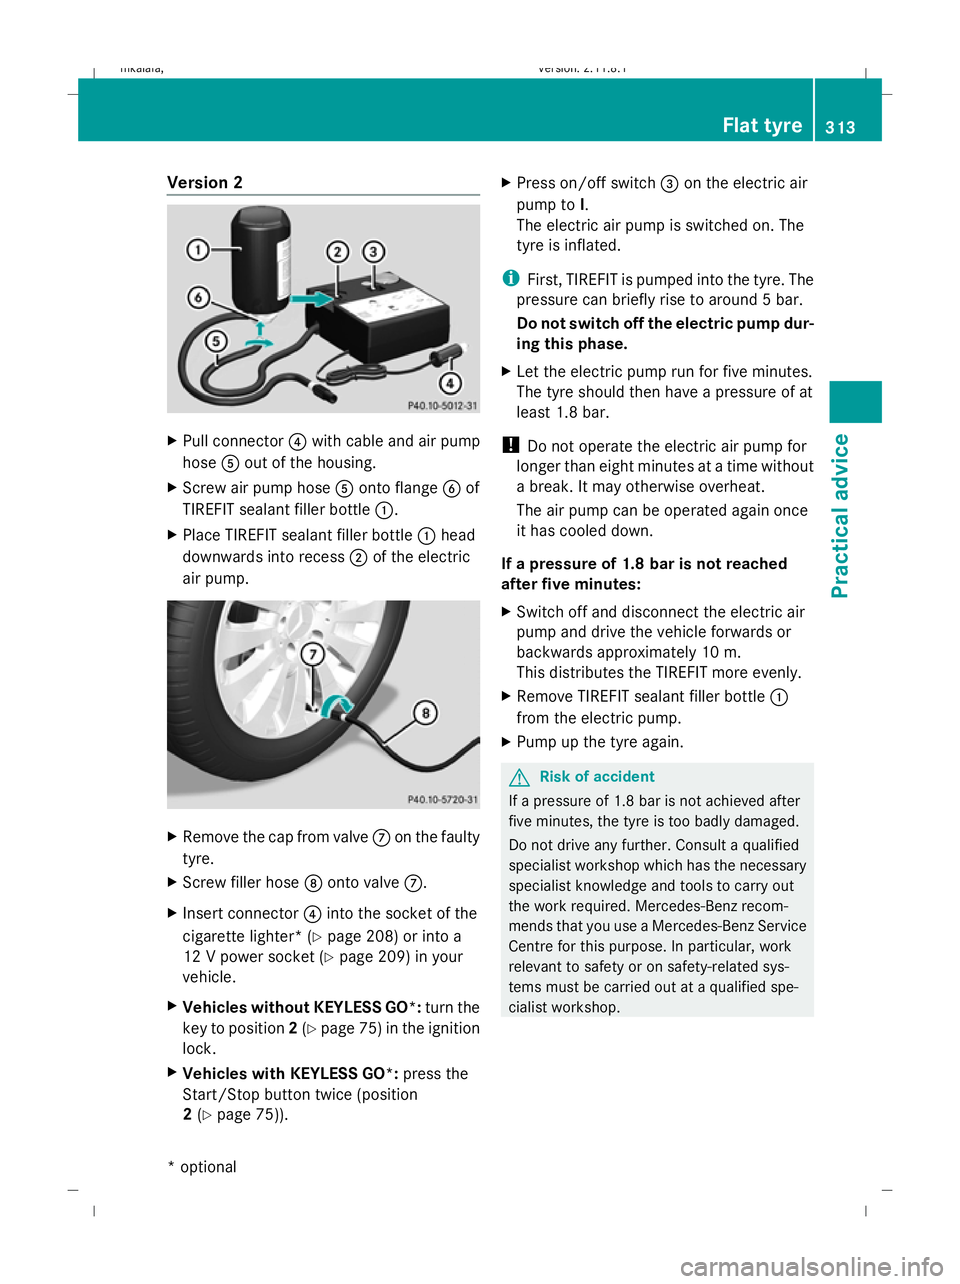
Version 2
X
Pull connector ?with cable and air pump
hose Aout of the housing.
X Screw air pump hose Aonto flange Bof
TIREFIT sealant filler bottle :.
X Place TIREFIT sealant filler bottle :head
downwards into recess ;of the electric
air pump. X
Remove the cap from valve Con the faulty
tyre.
X Screw filler hose Donto valve C.
X Insert connector ?into the socket of the
cigarette lighter* (Y page 208) or into a
12 V power socket ( Ypage 209) in your
vehicle.
X Vehicles without KEYLESS GO*: turn the
key to position 2(Y page 75) in the ignition
lock.
X Vehicles with KEYLESS GO*: press the
Start/Stop button twice (position
2 (Y page 75)). X
Press on/off switch =on the electric air
pump to I.
The electric air pump is switched on. The
tyre is inflated.
i First, TIREFIT is pumped into the tyre. The
pressure can briefly rise to around 5 bar.
Do not switch off the electric pump dur-
ing this phase.
X Let the electric pump run for five minutes.
The tyre should then have a pressure of at
least 1.8 bar.
! Do not operate the electric air pump for
longer than eight minutes at a time without
a break. It may otherwise overheat.
The air pump can be operated again once
it has cooled down.
If a pressure of 1.8 bar is not reached
after five minutes:
X Switch off and disconnect the electric air
pump and drive the vehicle forwards or
backwards approximately 10 m.
This distributes the TIREFIT more evenly.
X Remove TIREFIT sealant filler bottle :
from the electric pump.
X Pump up the tyre again. G
Risk of accident
If a pressure of 1.8 bar is not achieved after
five minutes, the tyre is too badly damaged.
Do not drive any further. Consult a qualified
specialist workshop which has the necessary
specialist knowledge and tools to carry out
the work required. Mercedes-Benz recom-
mends that you use a Mercedes-Benz Service
Centre for this purpose. In particular, work
relevant to safety or on safety-related sys-
tems must be carried out at a qualified spe-
cialist workshop. Flat tyre
313Practical advice
* optional
212_AKB; 2; 4, en-GB
mkalafa,
Version: 2.11.8.1 2009-05-05T14:17:16+02:00 - Seite 313 Z
Dateiname: 6515346702_buchblock.pdf; erzeugt am 07. May 2009 14:17:21; WK
Page 317 of 373
When a tyre pressure of at least 1.8 bar
is reached:
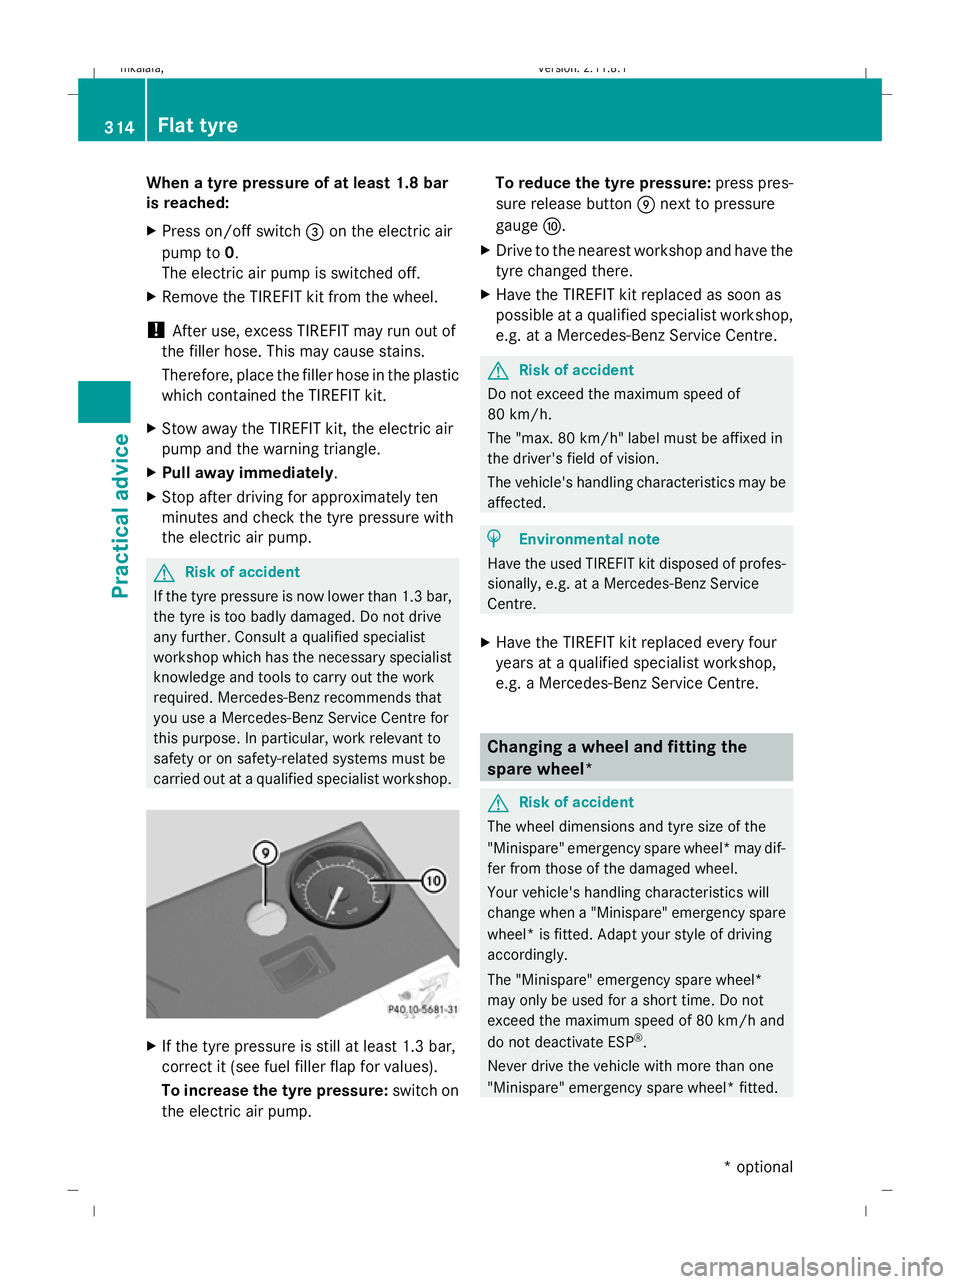
X Press on/off switch =on the electric air
pump to 0.
The electric air pump is switched off.
X Remove the TIREFIT kit from the wheel.
! After use, excess TIREFIT may run out of
the filler hose. This may cause stains.
Therefore, place the filler hose in the plastic
which contained the TIREFIT kit.
X Stow away the TIREFIT kit, the electric air
pump and the warning triangle.
X Pull away immediately.
X Stop after driving for approximately ten
minutes and check the tyre pressure with
the electric air pump. G
Risk of accident
If the tyre pressure is now lower than 1.3 bar,
the tyre is too badly damaged. Do not drive
any further. Consult a qualified specialist
workshop which has the necessary specialist
knowledge and tools to carry out the work
required. Mercedes-Benz recommends that
you use a Mercedes-Benz Service Centre for
this purpose. In particular, work relevant to
safety or on safety-related systems must be
carried out at a qualified specialist workshop. X
If the tyre pressure is still at least 1.3 bar,
correct it (see fuel filler flap for values).
To increase the tyre pressure: switch on
the electric air pump. To reduce the tyre pressure:
press pres-
sure release button Enext to pressure
gauge F.
X Drive to the nearest workshop and have the
tyre changed there.
X Have the TIREFIT kit replaced as soon as
possible at a qualified specialist workshop,
e.g. at a Mercedes-Benz Service Centre. G
Risk of accident
Do not exceed the maximum speed of
80 km/h.
The "max. 80 km/h" label must be affixed in
the driver's field of vision.
The vehicle's handling characteristics may be
affected. H
Environmental note
Have the used TIREFIT kit disposed of profes-
sionally, e.g. at a Mercedes-Benz Service
Centre.
X Have the TIREFIT kit replaced every four
years at a qualified specialist workshop,
e.g. a Mercedes-Benz Service Centre. Changing a wheel and fitting the
spare wheel*
G
Risk of accident
The wheel dimensions and tyre size of the
"Minispare" emergency spare wheel* may dif-
fer from those of the damaged wheel.
Your vehicle's handling characteristics will
change when a "Minispare" emergency spare
wheel* is fitted. Adapt your style of driving
accordingly.
The "Minispare" emergency spare wheel*
may only be used for a short time. Do not
exceed the maximum speed of 80 km/h and
do not deactivate ESP ®
.
Never drive the vehicle with more than one
"Minispare" emergency spare wheel* fitted. 314
Flat tyrePractical advice
* optional
212_AKB; 2; 4, en-GB
mkalafa,
Version: 2.11.8.1 2009-05-05T14:17:16+02:00 - Seite 314
Dateiname: 6515346702_buchblock.pdf; erzeugt am 07. May 2009 14:17:22; WK
Page 321 of 373
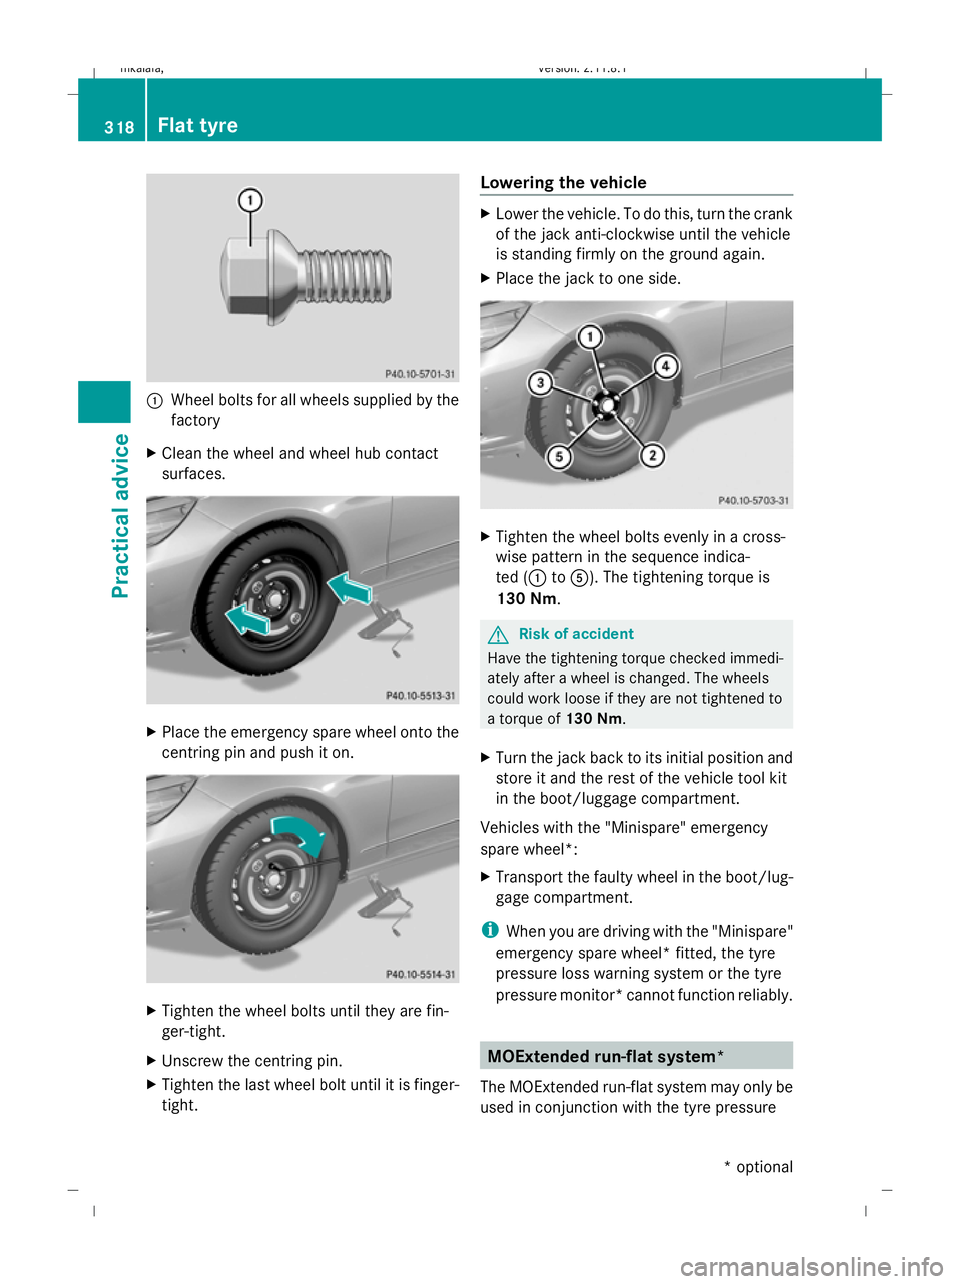
:
Wheel bolts for all wheels supplied by the
factory
X Clean the wheel and wheel hub contact
surfaces. X
Place the emergency spare wheel onto the
centring pin and push it on. X
Tighten the wheel bolts until they are fin-
ger-tight.
X Unscrew the centring pin.
X Tighten the last wheel bolt until it is finger-
tight. Lowering the vehicle X
Lower the vehicle. To do this, turn the crank
of the jack anti-clockwise until the vehicle
is standing firmly on the ground again.
X Place the jack to one side. X
Tighten the wheel bolts evenly in a cross-
wise pattern in the sequence indica-
ted (: toA). The tightening torque is
130 Nm. G
Risk of accident
Have the tightening torque checked immedi-
ately after a wheel is changed. The wheels
could work loose if they are not tightened to
a torque of 130 Nm.
X Turn the jack back to its initial position and
store it and the rest of the vehicle tool kit
in the boot/luggage compartment.
Vehicles with the "Minispare" emergency
spare wheel*:
X Transport the faulty wheel in the boot/lug-
gage compartment.
i When you are driving with the "Minispare"
emergency spare wheel* fitted, the tyre
pressure loss warning system or the tyre
pressure monitor* cannot function reliably. MOExtended run-flat system*
The MOExtended run-flat system may only be
used in conjunction with the tyre pressure 318
Flat tyrePractical advice
* optional
212_AKB; 2; 4, en-GB
mkalafa,
Version: 2.11.8.1 2009-05-05T14:17:16+02:00 - Seite 318
Dateiname: 6515346702_buchblock.pdf; erzeugt am 07. May 2009 14:17:24; WK
Page 322 of 373
loss warning system or with the tyre pressure
monitor*.
! The maximum permissible distance which
can be driven in run-flat mode depends on
the load in the vehicle. It is 80 km if the
vehicle is partially laden and 30 km if fully
laden.
The maximum permissible distance which
can be driven in run-flat mode is counted
from the moment the tyre pressure loss
warning appears in the multi-function dis-
play.
You must not exceed a maximum speed of
80 km/h. G
Risk of accident
The handling characteristics of your vehicle
deteriorate in run-flat mode, for example:
R when cornering
R when braking
R when accelerating rapidly
Adapt your driving style accordingly and avoid
sudden changes in direction and sudden
acceleration, as well as driving over obstacles
(i.e. kerbs, potholes), and driving off-road.
This is particularly the case when the vehicle
is heavily laden.
The maximum permissible distance that can
be driven in run-flat mode depends to a large
extent on the loads placed on the vehicle. It
can be shorter due to high speeds, a heavy
load, sudden acceleration and/or manoeu-
vring, the road surface condition, outside tem-
perature, etc., or further, if you drive carefully
and conservatively.
Do not continue to drive in run-flat mode if:
R you hear banging noises.
R the vehicle starts to shake.
R you see smoke and smell rubber.
R ESP ®
is intervening constantly.
R there are tears in the sidewalls of the tyre. After driving in run-flat mode, you must have
the wheel(s) checked for damage at a quali-
fied specialist workshop which has the nec-
essary specialist knowledge and tools to carry
out the work required. The faulty tyre must be
replaced in every case.
Mercedes-Benz recommends that you use a
Mercedes-Benz Service Centre for this pur-
pose. In particular, work relevant to safety or
on safety-related systems must be carried out
at a qualified specialist workshop.
Vehicles with MOExtended tyres*: if you
change one or all of the tyres, make sure that
you only use tyres marked MOExtended of the
specified size for the vehicle. Battery
Notes on the vehicle battery
In order for the battery to achieve the maxi-
mum possible service life, it must always be
sufficiently charged.
Have the battery charge checked more fre-
quently if you use the vehicle mainly for short
trips or if you leave it standing idle for a
lengthy period.
To prevent damage from corrosion, only
replace the battery with one that has a central
ventilation cover.
Consult a Mercedes-Benz Service Centre if
you wish to leave your vehicle parked up for
a long period of time. G
Risk of injury
Comply with safety precautions and take pro-
tective measures when handling batteries. Risk of explosion
Fire, naked flames and
smoking are prohibited
when handling the battery.
Avoid creating sparks. Battery
319Practical advice
* optional
212_AKB; 2; 4, en-GB
mkalafa,
Version: 2.11.8.1 2009-05-05T14:17:16+02:00 - Seite 319 Z
Dateiname: 6515346702_buchblock.pdf; erzeugt am 07. May 2009 14:17:24; WK