2009 MERCEDES-BENZ E-CLASS ESTATE fuel cap
[x] Cancel search: fuel capPage 19 of 373
Tank
see Fuel tank
Tank capacity .................................... 334
Technical data E 200 CDI BlueEFFICIENCY ...........344
E 200 CGI BlueEFFICIENCY ...........339
E 220 CDI BlueEFFICIENCY ...........344
E 220 CDI BlueEFFICIENCY (Bel-
gium) ............................................. 345
E 250 CDI BlueEFFICIENCY ...........345
E 250 CGI BlueEFFICIENCY ...........339
E 300 ............................................. 340
E 350 ............................................. 340
E 350 4MATIC ................................ 341
E 350 BlueTEC ............................... 347
E 350 CDI 4MATIC BlueEFFI-
CIENCY .......................................... 347
E 350 CDI BlueEFFICIENCY ...........346
E 350 CGI BlueEFFICIENCY ...........341
E 500 ............................................. 342
E 500 4MATIC ................................ 343
E 63 AMG ...................................... 343
Trailer loads ................................... 358
Tyres .............................................. 350
Wheels ........................................... 350
Telephone
see Mobile phone .......................... 128
Telephone compartment ..................189
Telescopic rod (Easy-Pack fix kit) ....203
Temperature Coolant .......................................... 117
Coolant (on-board computer) ......... 123
Engine oil (on-board computer) ...... 123
Outside temperature ..................... .117
Thermatic
Malfunction indicator lamp ............279
Thermotronic
Malfunction indicator lamp ............279
Through-loading ................................ 191
Through-loading feature ...................195
Tightening torque .............................. 318
Time Lap time (on-board computer) .......123
Setting (on-board computer) .......... 132
Setting the time (on-board com-
puter) ............................................. 132
Timer (on-board computer) ..............123TIREFIT kit
Storage location ............................ 250
Using ............................................. 310
Top Tether ............................................ 52
Total distance recorder ....................121
Tourist mode see Intelligent Light System
Tow-away protection ..........................66
Towing ................................................ 326
Towing a trailer Folding in the ball coupling ............237
Folding out the ball coupling ..........234
Towing eye
Fitting ............................................ 325
Removing ....................................... 327
Tow-starting ....................................... 326
Trailer 7-pin connector ............................. 238
Bulb failure indicator for LED
lamps ............................................. 238
Display message ...........265, 270, 274
Power supply ................................. 238
Trailer coupling
see Trailer tow hitch
Trailer loads
Technical data ............................... 358
Trailer tow hitch ................................ 234
Cleaning ......................................... 243
Trailer towing
Blind Spot Assist ........................... 169
Driving tips .................................... 235
ESP ®
................................................ 60
Mounting dimensions ....................356
Parking Guidance ........................... 162
Parktroni c...................................... 159
Transmission output (maximum)
Telephone/two-way radio ..............331
Transport (vehicle) ............................327
Trim strips Cleaning ......................................... 245
Trip computer
On-board computer .......................121
Trip distance ...................................... 121
Trip meter Resetting (on-board computer) ......122
Turn signal
Display message .................... 270, 271 16
Index 212_AKB; 2; 4, en-GB
mkalafa,
Version: 2.11.8.1 2009-05-05T14:17:16+02:00 - Seite 16Dateiname: 6515346702_buchblock.pdf; erzeugt am 07. May 2009 14:15:27; WK
Page 220 of 373
require draining of the fuel tank and fuel
lines. Notify a qualified specialist workshop
and have the fuel tank and fuel lines
drained completely.
When you open or close the vehicle with the
key or KEYLESS GO*, the fuel filler flap is
automatically unlocked or locked.
The position of the fuel filler cap is to the rear
on the right. The position of the fuel filler cap
is displayed in the instrument cluster 8.
The arrow next to the filling pump indicates
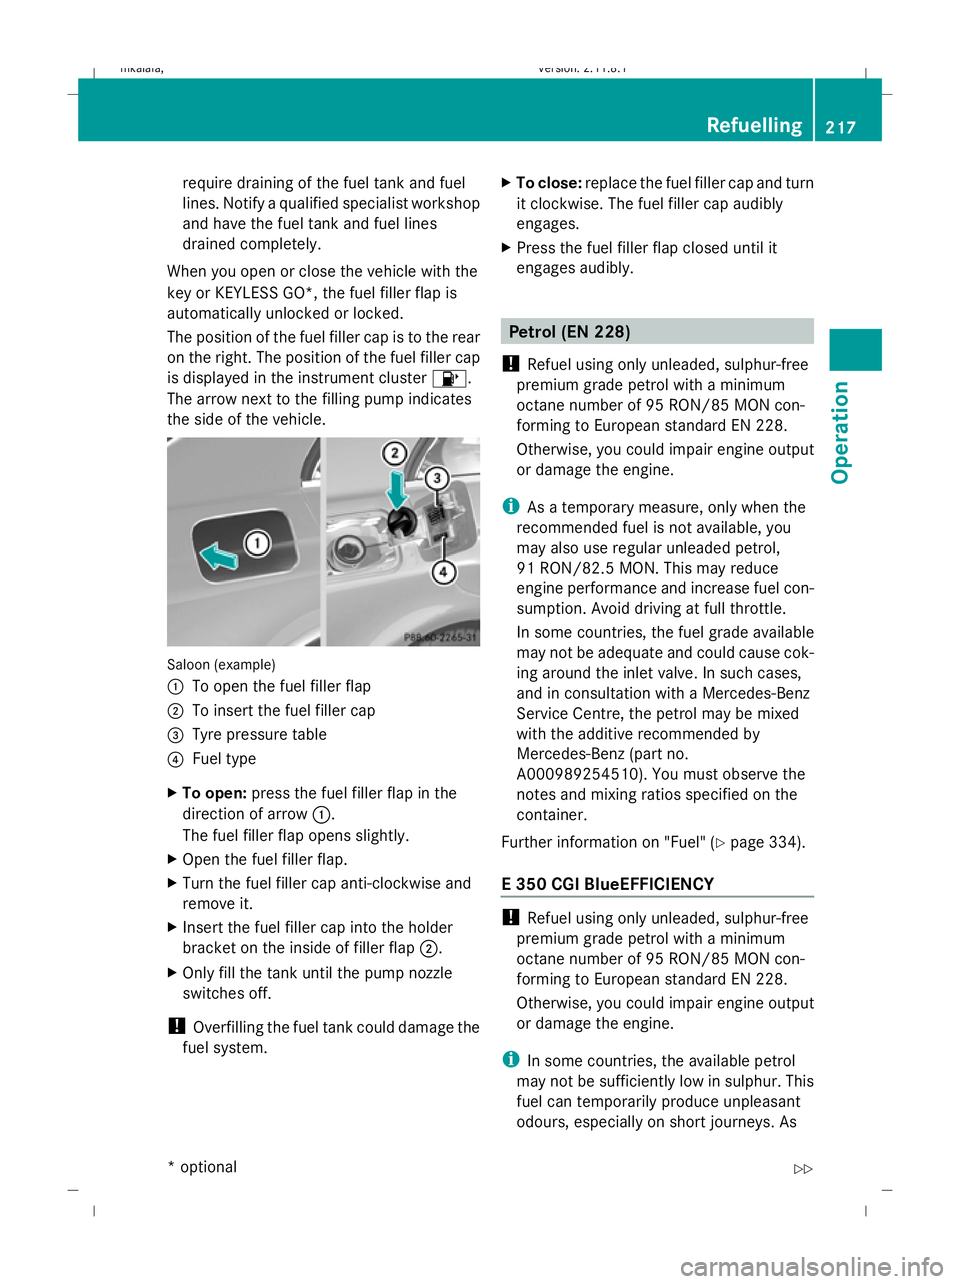
the side of the vehicle. Saloon (example)
:
To open the fuel filler flap
; To insert the fuel filler cap
= Tyre pressure table
? Fuel type
X To open: press the fuel filler flap in the
direction of arrow :.
The fuel filler flap opens slightly.
X Open the fuel filler flap.
X Turn the fuel filler cap anti-clockwise and
remove it.
X Insert the fuel filler cap into the holder
bracket on the inside of filler flap ;.
X Only fill the tank until the pump nozzle
switches off.
! Overfilling the fuel tank could damage the
fuel system. X
To close: replace the fuel filler cap and turn
it clockwise. The fuel filler cap audibly
engages.
X Press the fuel filler flap closed until it
engages audibly. Petrol (EN 228)
! Refuel using only unleaded, sulphur-free
premium grade petrol with a minimum
octane number of 95 RON/85 MON con-
forming to European standard EN 228.
Otherwise, you could impair engine output
or damage the engine.
i As a temporary measure, only when the
recommended fuel is not available, you
may also use regular unleaded petrol,
91 RON/82.5 MON. This may reduce
engine performance and increase fuel con-
sumption. Avoid driving at full throttle.
In some countries, the fuel grade available
may not be adequate and could cause cok-
ing around the inlet valve. In such cases,
and in consultation with a Mercedes-Benz
Service Centre, the petrol may be mixed
with the additive recommended by
Mercedes-Benz (part no.
A000989254510). You must observe the
notes and mixing ratios specified on the
container.
Further information on "Fuel" (Y page 334).
E 350 CGI BlueEFFICIENCY !
Refuel using only unleaded, sulphur-free
premium grade petrol with a minimum
octane number of 95 RON/85 MON con-
forming to European standard EN 228.
Otherwise, you could impair engine output
or damage the engine.
i In some countries, the available petrol
may not be sufficiently low in sulphur. This
fuel can temporarily produce unpleasant
odours, especially on short journeys. As Refuelling
217Operation
* optional
212_AKB; 2; 4, en-GB
mkalafa,
Version: 2.11.8.1 2009-05-05T14:17:16+02:00 - Seite 217 Z
Dateiname: 6515346702_buchblock.pdf; erzeugt am 07. May 2009 14:16:54; WK
Page 229 of 373
dent. Therefore, you should regularly check
the pressure of all the tyres, particularly prior
to long trips, and correct the pressure as nec-
essary.
To test tyre pressure, use a suitable pressure
gauge. The outer appearance of a tyre does
not permit any reliable conclusion about the
tyre pressure. On vehicles fitted with the elec-
tronic tyre pressure monitor*, the tyre pres-
sure can be checked in the on-board com-
puter. G
Risk of accident
Do not fit anything else to the tyre valve other
than the standard valve cap. In particular, ret-
rofitted tyre pressure monitors which are
screwed on to the valve may overload it and
cause it to fail. Due to their design, the valve
is kept open continuously, which may lead to
air loss. G
Risk of accident
Should the tyre pressure drop repeatedly:
R check the tyre for foreign bodies.
R check whether the wheel is losing air or the
valve is leaking.
R make sure that only a valve cap approved
by Mercedes-Benz is fitted on the tyre
valve.
Tyre pressures that are too low have a nega-
tive effect on vehicle safety, which could lead
to your causing an accident.
If possible, you should only correct tyre pres-
sures when the tyres are cold. Depending on
the ambient temperature, the speed you are
driving at and the load on the tyres, the tyre
temperature and thus the tyre pressure may
change by approximately 0.1 bar per 10 †.
Take this into account when checking the
pressure of warm tyres and only correct it if
it is too low for the current operating condi-
tions. Driving with tyre pressure that is too high or
too low can:
R
shorten the service life of the tyres
R increase the likelihood of tyre damage
R have a negative effect on handling charac-
teristics (e.g. by causing aquaplaning)
Also check the pressure of the "Minispare"
emergency spare wheel*. H
Environmental note
Check the tyre pressure regularly, at least
every 14 days.
Speeds up to 210 km/h:
Despite the values stated on the tyre pressure
information label (fuel filler flap), for speeds
up to 210 km/h andwith 16" or 17" tyres,
the values stated can be reduced as follows,
without a reduction in safety:
Saloon: -0.3 bar / (-4 psi)
Estate: -0.2 bar (-3 psi)
This does not apply to vehicles towing a
trailer.
This improves the ride comfort of your vehi-
cle; however, the fuel consumption may
increase slightly. Tyre pressure loss warning
While the vehicle is in motion, the tyre pres-
sure loss warning system monitors the set
tyre pressure using the rotational speed of
the wheels. This enables the system to detect
significant pressure loss in a tyre. If the speed
of rotation of a wheel changes as a result of
a loss of pressure, a corresponding warning
message will appear in the multi-function dis-
play. G
Risk of accident
The tyre pressure loss warning system does
not warn you of an incorrectly set tyre pres-
sure. The table on the inside of the fuel filler
flap will help you decide whether the tyre
pressures should be corrected. 226
Tyres and wheelsOperation
* optional
212_AKB; 2; 4, en-GB
mkalafa,
Version: 2.11.8.1 2009-05-05T14:17:16+02:00 - Seite 226
Dateiname: 6515346702_buchblock.pdf; erzeugt am 07. May 2009 14:16:57; WK
Page 238 of 373
X
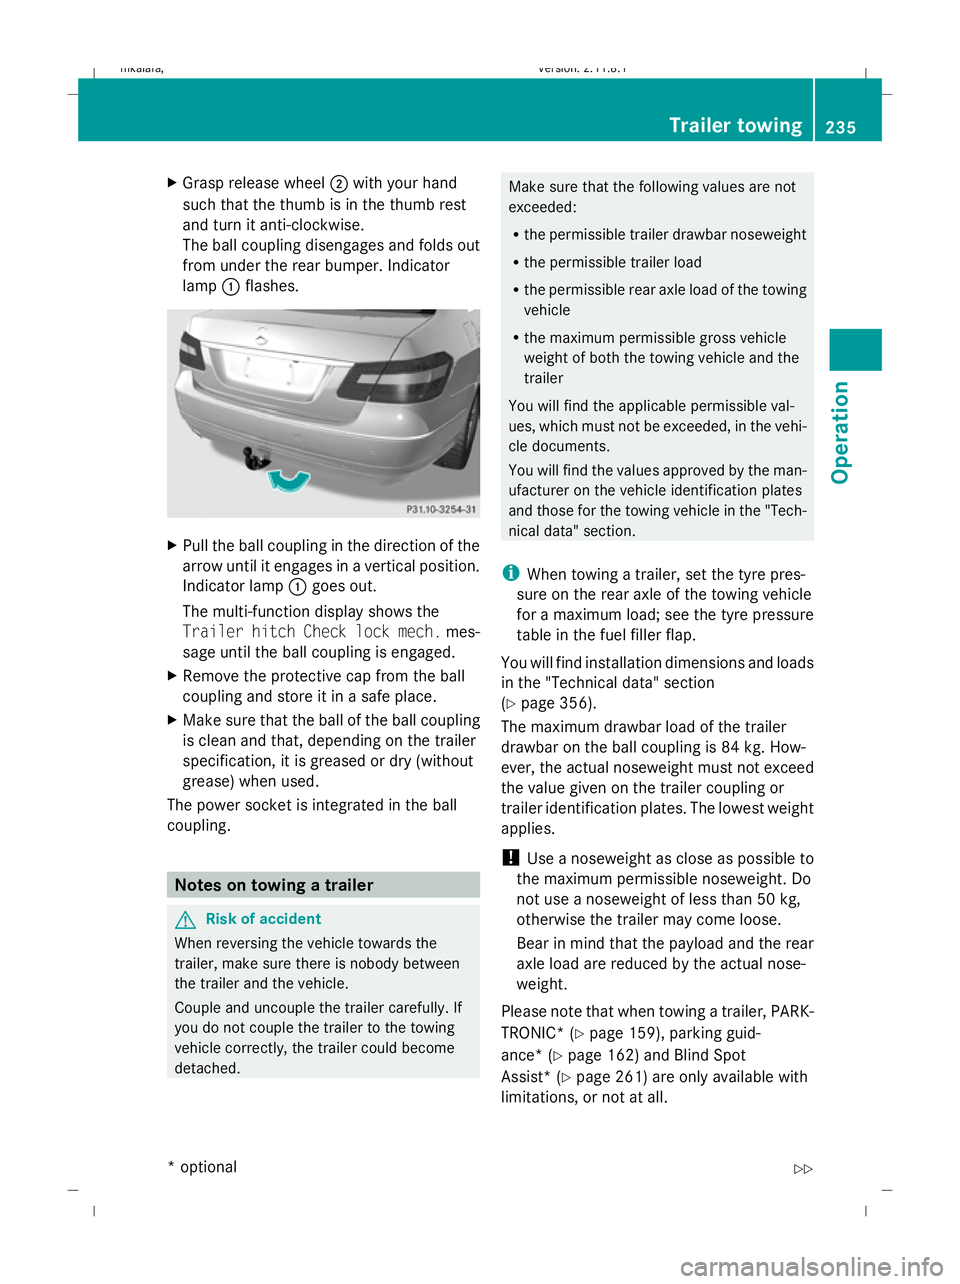
Grasp release wheel ;with your hand
such that the thumb is in the thumb rest
and turn it anti-clockwise.
The ball coupling disengages and folds out
from under the rear bumper. Indicator
lamp :flashes. X
Pull the ball coupling in the direction of the
arrow until it engages in a vertical position.
Indicator lamp :goes out.
The multi-function display shows the
Trailer hitch Check lock mech. mes-
sage until the ball coupling is engaged.
X Remove the protective cap from the ball
coupling and store it in a safe place.
X Make sure that the ball of the ball coupling
is clean and that, depending on the trailer
specification, it is greased or dry (without
grease) when used.
The power socket is integrated in the ball
coupling. Notes on towing a trailer
G
Risk of accident
When reversing the vehicle towards the
trailer, make sure there is nobody between
the trailer and the vehicle.
Couple and uncouple the trailer carefully. If
you do not couple the trailer to the towing
vehicle correctly, the trailer could become
detached. Make sure that the following values are not
exceeded:
R
the permissible trailer drawbar noseweight
R the permissible trailer load
R the permissible rear axle load of the towing
vehicle
R the maximum permissible gross vehicle
weight of both the towing vehicle and the
trailer
You will find the applicable permissible val-
ues, which must not be exceeded, in the vehi-
cle documents.
You will find the values approved by the man-
ufacturer on the vehicle identification plates
and those for the towing vehicle in the "Tech-
nical data" section.
i When towing a trailer, set the tyre pres-
sure on the rear axle of the towing vehicle
for a maximum load; see the tyre pressure
table in the fuel filler flap.
You will find installation dimensions and loads
in the "Technical data" section
(Y page 356).
The maximum drawbar load of the trailer
drawbar on the ball coupling is 84 kg. How-
ever, the actual noseweight must not exceed
the value given on the trailer coupling or
trailer identification plates. The lowest weight
applies.
! Use a noseweight as close as possible to
the maximum permissible noseweight. Do
not use a noseweight of less than 50 kg,
otherwise the trailer may come loose.
Bear in mind that the payload and the rear
axle load are reduced by the actual nose-
weight.
Please note that when towing a trailer, PARK-
TRONIC* ( Ypage 159), parking guid-
ance* (Y page 162) and Blind Spot
Assist* (Y page 261) are only available with
limitations, or not at all. Trailer towing
235Operation
* optional
212_AKB; 2; 4, en-GB
mkalafa
,V ersion: 2.11.8.1
2009-05-05T14:17:16+02:00 - Seite 235 Z
Dateiname: 6515346702_buchblock.pdf; erzeugt am 07. May 2009 14:16:59; WK
Page 239 of 373
i
On vehicles without level control, the
height of the ball coupling will alter accord-
ing to the load placed on the vehicle. If nec-
essary, use a trailer with a height-adjusta-
ble drawbar.
Coupling up a trailer G
Risk of injury
Do not disconnect a trailer with an engaged
overrun brake. Otherwise, your hand could
become trapped between the bumper and
trailer drawbar.
! Do not disconnect a trailer with an
engaged overrun brake. Otherwise, your
vehicle could be damaged by the rebound-
ing of the overrun brake.
X Position the trailer level behind the vehicle.
X Couple up the trailer.
X Establish the electrical connection
between the vehicle and the trailer.
Driving tips G
Risk of accident
If the Check trailer hitch locking
mechanism message appears in the multi-
function display while the vehicle is in motion,
pull over immediately and check whether the
ball coupling is correctly engaged.
i Observe the notes on ESP ®
trailer stabi-
lisation (Y page 60).
In Germany, the maximum permissible speed
for vehicle/trailer combinations depends on
the type of trailer and is either 80 km/h or
100 km/h. Before beginning the journey,
check the trailer's documents to see what the
maximum permitted speed is. G
Risk of accident
Always observe the maximum speed permit-
ted in Germany for vehicle/trailer combina-
tions, even in countries where higher speeds are permitted. This lowers the risk of an acci-
dent.
When towing a trailer, your vehicle's handling
characteristics will be different in comparison
to when driving without a trailer.
The vehicle/trailer combination:
R is heavier
R is restricted in its acceleration and gradi-
ent-climbing capability
R has an increased braking distance
R is affected more by strong crosswinds
R demands more sensitive steering
R consumes more fuel
On long and steep downhill gradients you
must select a lower gear in good time, or on
vehicles with automatic transmission*, select
shift range 1,2or 3.
i This also applies if you have activated
cruise control, Speedtronic or Distronic
Plus*.
This will use the braking effect of the engine,
so less braking will be required to maintain
the speed. This relieves the load on the brake
system and prevents the brakes from over-
heating and wearing too quickly. If you need
additional braking, depress the brake pedal
repeatedly rather than continuously. G
Risk of accident
Never depress the brake pedal continuously
while the vehicle is in motion, e.g. never cause
the brakes to rub by applying constant slight
pedal pressure. This causes the brake system
to overheat, increases the braking distance
and can lead to the brakes failing completely. 236
Trailer towingOperation
* optional
212_AKB; 2; 4, en-GB
mkalafa,
Version: 2.11.8.1 2009-05-05T14:17:16+02:00 - Seite 236
Dateiname: 6515346702_buchblock.pdf; erzeugt am 07. May 2009 14:16:59; WK
Page 336 of 373
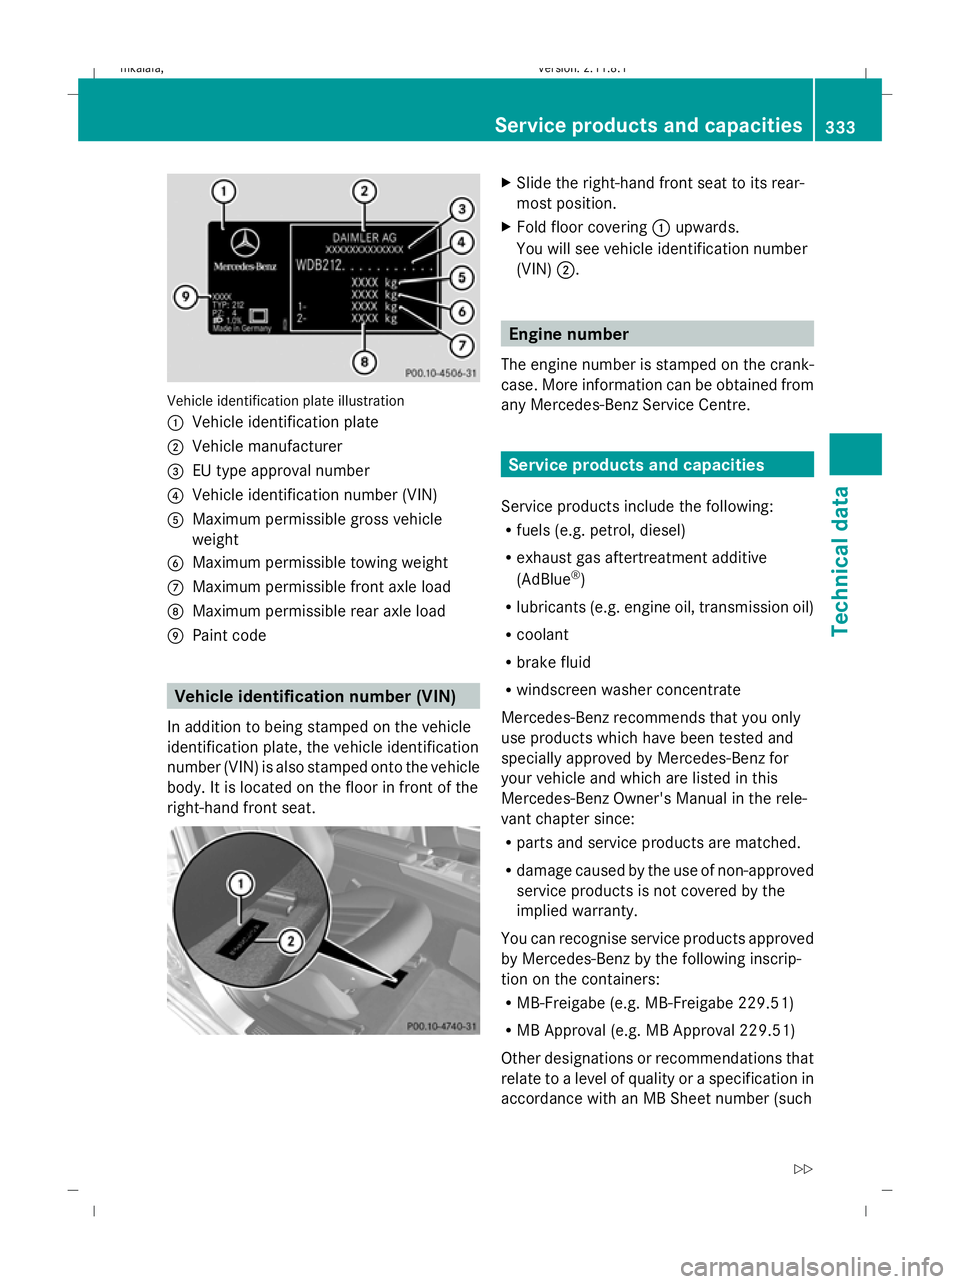
Vehicle identification plate illustration
:
Vehicle identification plate
; Vehicle manufacturer
= EU type approval number
? Vehicle identification number (VIN)
A Maximum permissible gross vehicle
weight
B Maximum permissible towing weight
C Maximum permissible front axle load
D Maximum permissible rear axle load
E Paint code Vehicle identification number (VIN)
In addition to being stamped on the vehicle
identification plate, the vehicle identification
number (VIN) is also stamped onto the vehicle
body. It is located on the floor in front of the
right-hand front seat. X
Slide the right-hand front seat to its rear-
most position.
X Fold floor covering :upwards.
You will see vehicle identification number
(VIN) ;. Engine number
The engine number is stamped on the crank-
case. More information can be obtained from
any Mercedes-Benz Service Centre. Service products and capacities
Service products include the following:
R fuels (e.g. petrol, diesel)
R exhaust gas aftertreatment additive
(AdBlue ®
)
R lubricants (e.g. engine oil, transmission oil)
R coolant
R brake fluid
R windscreen washer concentrate
Mercedes-Benz recommends that you only
use products which have been tested and
specially approved by Mercedes-Benz for
your vehicle and which are listed in this
Mercedes-Benz Owner's Manual in the rele-
vant chapter since:
R parts and service products are matched.
R damage caused by the use of non-approved
service products is not covered by the
implied warranty.
You can recognise service products approved
by Mercedes-Benz by the following inscrip-
tion on the containers:
R MB-Freigabe (e.g. MB-Freigabe 229.51)
R MB Approval (e.g. MB Approval 229.51)
Other designations or recommendations that
relate to a level of quality or a specification in
accordance with an MB Sheet number (such Service products and capacities
333Technical data
212_AKB; 2; 4, en-GB
mkalafa, Version: 2.11.8.1 2009-05-05T14:17:16+02:00 - Seite 333 Z
Dateiname: 6515346702_buchblock.pdf; erzeugt am 07. May 2009 14:17:32; WK
Page 337 of 373
as MB 229.5) have not necessarily been
approved by Mercedes-Benz.
You can obtain further information from any
Mercedes-Benz Service Centre. G
Risk of injury
When handling, storing and disposing of any
service products, please observe the relevant
regulations, as you could otherwise endanger
yourself and others.
Keep service products away from children.
To protect your health, do not allow service
products to come into contact with your eyes
or open wounds. See a doctor immediately if
any service product is swallowed. H
Environmental note
Dispose of service products in an environ-
mentally-responsible manner. Fuel
G
Risk of explosion
Fuel is highly flammable. Fire, naked flames
and smoking are therefore prohibited when
handling fuels.
Before refuelling, turn off the engine and the
auxiliary heating *. G
Risk of injury
Do not allow fuel to come into contact with
skin or clothing.
Allowing fuels to come into direct contact with
your skin or inhaling fuel vapours is damaging
to your health. Tank capacity Total capacity
E 200 CGI BlueEFFICIENCY
E 250 CGI BlueEFFICIENCY
E 200 CDI BlueEFFICIENCY
E 220 CDI BlueEFFICIENCY
E 220 CDI BlueEFFICIENCY
(Belgium)
E 250 CDI BlueEFFICIENCY 59 l
E 63 AMG 66 l
Total capacity
All other models 80 l
Reserve fuel in
E 200 CGI BlueEFFICIENCY
E 250 CGI BlueEFFICIENCY
E 200 CDI BlueEFFICIENCY
E 220 CDI BlueEFFICIENCY
E 220 CDI BlueEFFICIENCY
(Belgium)
E 250 CDI BlueEFFICIENCY Approx-
imately 8 l Reserve fuel in all other
models Approx-
imately 9 l !
Do not use petrol to refuel vehicles with a
diesel engine. Do not use diesel to refuel
vehicles with a petrol engine. Never mix
diesel with petrol. Even small amounts of
the wrong fuel result in damage to the
injection system. Damage resulting from
adding the wrong fuel is not covered by the
implied warranty.
Further information on refuelling and on
fuels (Y page 216)
Notes on fuel consumption The vehicle will use more fuel than usual in
the following situations:334
Service products and capacitiesTechnical data
* optional
212_AKB; 2; 4, en-GB
mkalafa
,V ersion: 2.11.8.1
2009-05-05T14:17:16+02:00 - Seite 334
Dateiname: 6515346702_buchblock.pdf; erzeugt am 07. May 2009 14:17:32; WK
Page 338 of 373
R
at very low temperatures
R in urban traffic
R on short trips
R when towing a trailer
R in mountainous terrain
i Only for certain countries: the respective
current consumption and emission values
of your vehicle can be found in the COC
papers (EC CERTIFICATE OF CONFORM-
ITY). These documents are supplied when
the vehicle is delivered.
The consumption figures for vehicles falling
under the EURO4 standard have been
determined in accordance with EU Direc-
tive 80 /1268 /EEC while figures for vehi-
cles falling under the EURO5 standard have
been determined in accordance with Reg-
ulation (EC) No. 715 / 2007, in each case
based on the currently applicable version.
The values do not refer to a specific vehicle.
Deviations from these values may occur
under normal operating conditions.
! Do not use any special additives, as they
can cause malfunctions and engine dam-
age. Damage resulting from the use of such
additives is not covered by the Mercedes-
Benz implied warranty. H
Environmental note
CO 2(carbon dioxide) is the gas which scien-
tists believe to be principally responsible for
global warming (the greenhouse effect). Your
vehicle's CO 2emissions are directly related to
fuel consumption and therefore depend on:
R efficient use of the fuel by the engine
R driving style
R other non-technical factors, such as envi-
ronmental influences or road conditions
You can minimise your vehicle's CO 2emis-
sions by driving carefully and having it serv-
iced regularly. AdBlue
®
i For BlueTEC vehicles only.
AdBlue ®
is a non-flammable, non-toxic, col-
ourless and odourless water-soluble fluid.
! Only use AdBlue ®
compliant with ISO
22241. The use of special additives is not
permitted.
! Surfaces, such as carpets or paintwork,
which come into contact with AdBlue ®
while refilling should be rinsed immediately
with plenty of water. Immediately after
spilling, remove AdBlue ®
using a damp
cloth and cold water. If AdBlue ®
has
already crystallised, use a sponge and hot
water to clean it off. AdBlue ®
residues crys-
tallise after a certain period of time and soil
the affected surfaces.
High outside temperatures If AdBlue
®
is heated to above 50 † for an
extended period of time, e.g. as a result of
direct sunlight on the AdBlue ®
tank,
AdBlue ®
may decompose. Ammonia vapours
develop as a result. G
Risk of injury
Ammonia vapours may escape if the
AdBlue ®
tank cap is opened at high tempera-
tures. Ammonia vapours have a pungent
odour and are particularly irritating to the
skin, to mucous membranes and to the eyes.
You may experience a burning sensation in
your eyes, nose and throat, as well as cough-
ing and watering of the eyes.
Do not inhale ammonia vapours.
Low outside temperatures AdBlue
®
freezes at a temperature of approx-
imately –11 †. The vehicle is equipped with
an AdBlue ®
preheating system at the factory.
Winter operation is therefore also guaranteed
at temperatures below –11 †. Service products and capacities
335Technical data
212_AKB; 2; 4, en-GB
mkalafa,V ersion: 2.11.8.1
2009-05-05T14:17:16+02:00 - Seite 335 Z
Dateiname: 6515346702_buchblock.pdf; erzeugt am 07. May 2009 14:17:32; WK