2009 MERCEDES-BENZ E-CLASS ESTATE sunroof
[x] Cancel search: sunroofPage 189 of 373
X
Turn the key to position 1or 2in the ignition
lock.
X The sliding/tilting sunroof is raised fully at
the rear.
X Keep the switch pressed for an additional
second.
X Make sure that the sliding/tilting sunroof
can be opened or closed fully again
(Y page 185).
X If this is not the case, consult a qualified
specialist workshop. Panorama sliding sunroof*
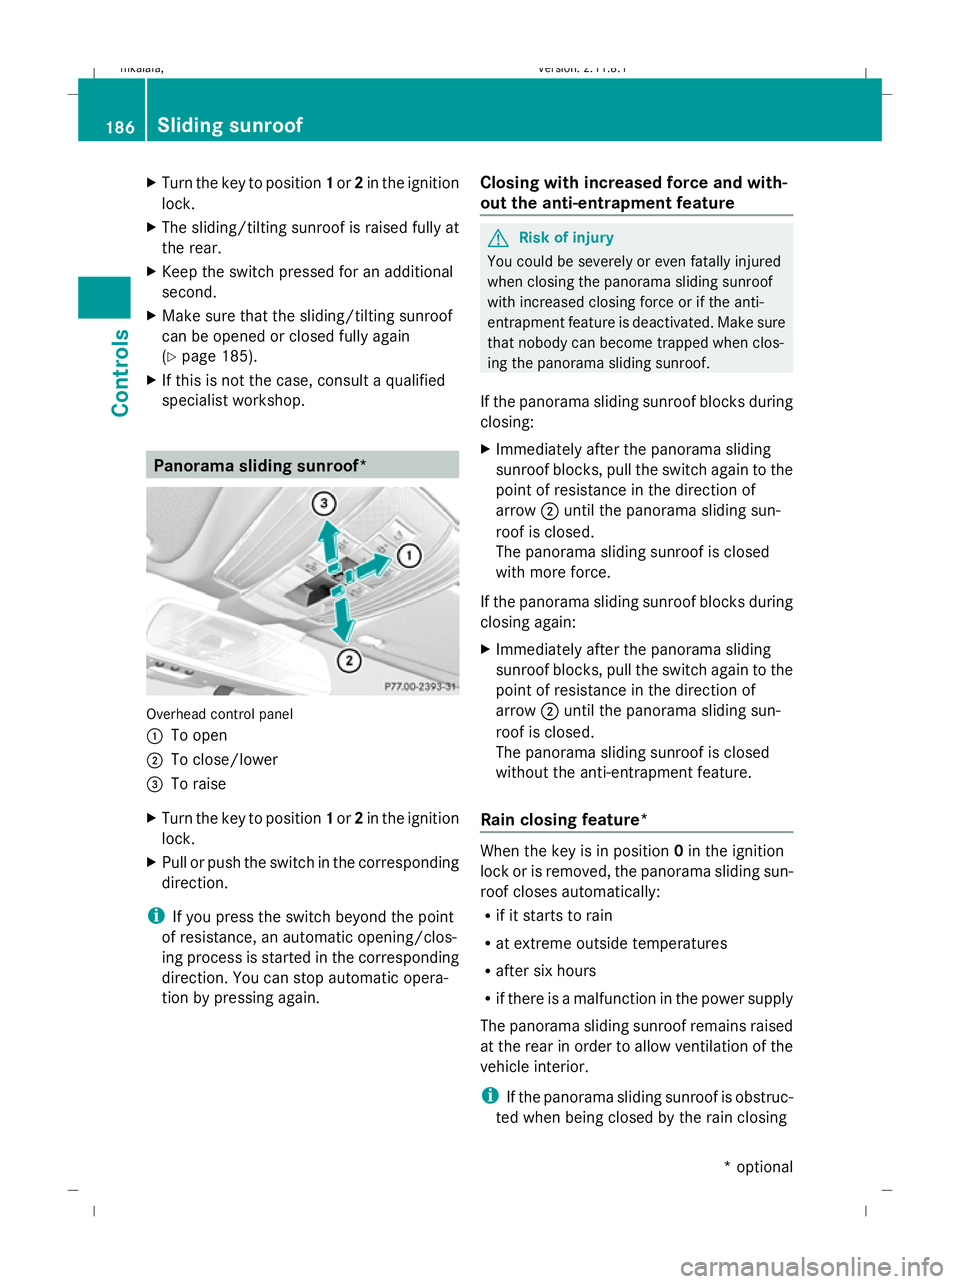
Overhead control panel
:
To open
; To close/lower
= To raise
X Turn the key to position 1or 2in the ignition
lock.
X Pull or push the switch in the corresponding
direction.
i If you press the switch beyond the point
of resistance, an automatic opening/clos-
ing process is started in the corresponding
direction. You can stop automatic opera-
tion by pressing again. Closing with increased force and with-
out the anti-entrapment feature G
Risk of injury
You could be severely or even fatally injured
when closing the panorama sliding sunroof
with increased closing force or if the anti-
entrapment feature is deactivated. Make sure
that nobody can become trapped when clos-
ing the panorama sliding sunroof.
If the panorama sliding sunroof blocks during
closing:
X Immediately after the panorama sliding
sunroof blocks, pull the switch again to the
point of resistance in the direction of
arrow ;until the panorama sliding sun-
roof is closed.
The panorama sliding sunroof is closed
with more force.
If the panorama sliding sunroof blocks during
closing again:
X Immediately after the panorama sliding
sunroof blocks, pull the switch again to the
point of resistance in the direction of
arrow ;until the panorama sliding sun-
roof is closed.
The panorama sliding sunroof is closed
without the anti-entrapment feature.
Rain closing feature* When the key is in position
0in the ignition
lock or is removed, the panorama sliding sun-
roof closes automatically:
R if it starts to rain
R at extreme outside temperatures
R after six hours
R if there is a malfunction in the power supply
The panorama sliding sunroof remains raised
at the rear in order to allow ventilation of the
vehicle interior.
i If the panorama sliding sunroof is obstruc-
ted when being closed by the rain closing 186
Sliding sunroofControls
* optional
212_AKB; 2; 4, en-GB
mkalafa,
Version: 2.11.8.1 2009-05-05T14:17:16+02:00 - Seite 186
Dateiname: 6515346702_buchblock.pdf; erzeugt am 07. May 2009 14:16:33; WK
Page 190 of 373
feature, it opens again slightly. The rain
closing feature is then deactivated.
The panorama sliding sunroof does not close
if:
R it is raised at the rear.
R it is blocked.
R no rain is falling on the area of the wind-
screen being monitored by the rain sensor
(e.g. because the vehicle is under a bridge
or in a carport). Roller sunblinds for the panorama
sliding sunroof*
The roller sunblinds provide protection from
the sun. The two roller sunblinds can only be
opened and closed together when the pano-
rama sliding sunroof is closed. G
Risk of injury
Make sure that nobody can become trapped
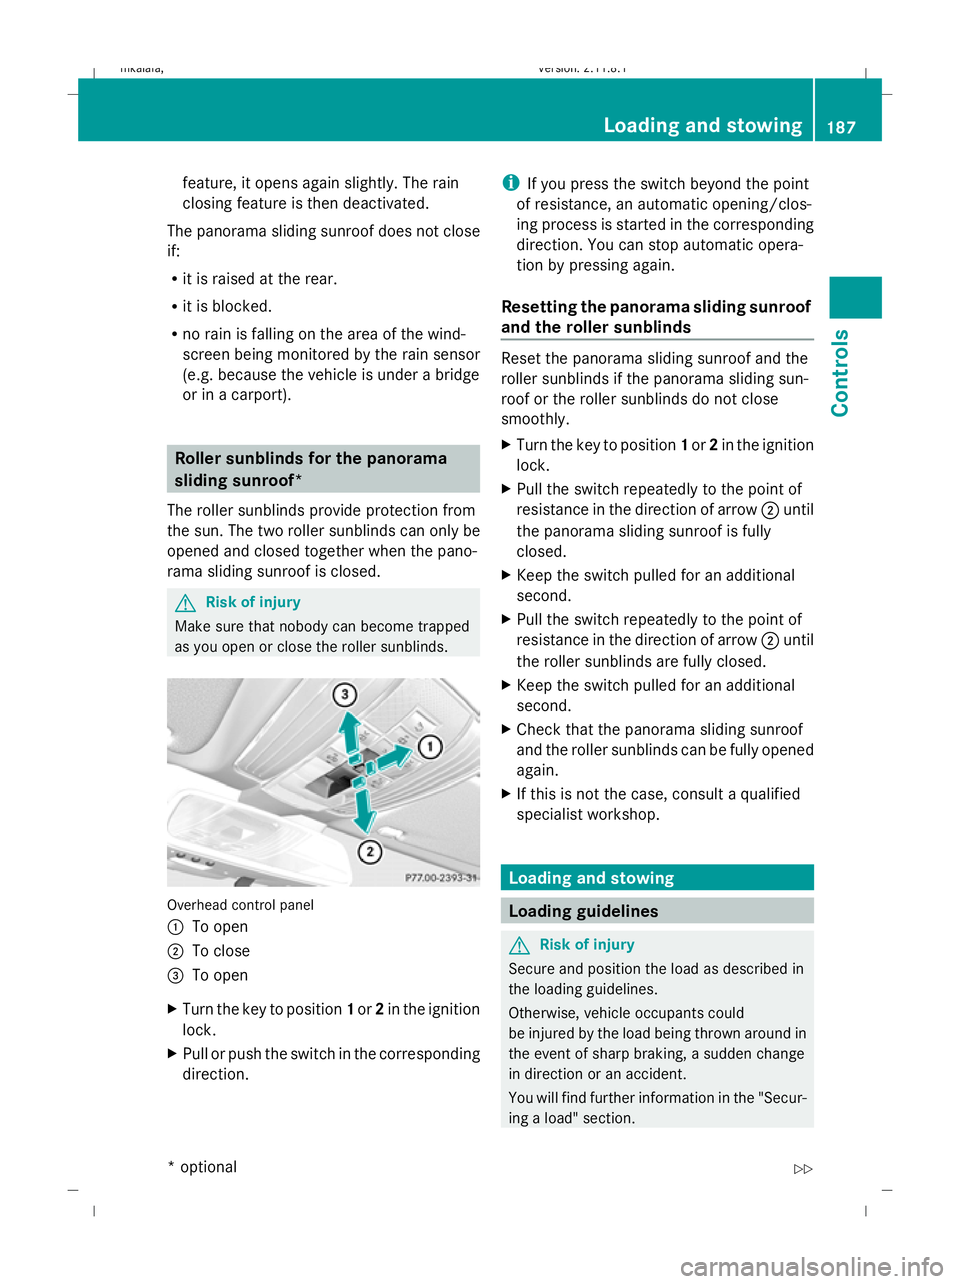
as you open or close the roller sunblinds. Overhead control panel
: To open
; To close
= To open
X Turn the key to position 1or 2in the ignition
lock.
X Pull or push the switch in the corresponding
direction. i
If you press the switch beyond the point
of resistance, an automatic opening/clos-
ing process is started in the corresponding
direction. You can stop automatic opera-
tion by pressing again.
Resetting the panorama sliding sunroof
and the roller sunblinds Reset the panorama sliding sunroof and the
roller sunblinds if the panorama sliding sun-
roof or the roller sunblinds do not close
smoothly.
X Turn the key to position 1or 2in the ignition
lock.
X Pull the switch repeatedly to the point of
resistance in the direction of arrow ;until
the panorama sliding sunroof is fully
closed.
X Keep the switch pulled for an additional
second.
X Pull the switch repeatedly to the point of
resistance in the direction of arrow ;until
the roller sunblinds are fully closed.
X Keep the switch pulled for an additional
second.
X Check that the panorama sliding sunroof
and the roller sunblinds can be fully opened
again.
X If this is not the case, consult a qualified
specialist workshop. Loading and stowing
Loading guidelines
G
Risk of injury
Secure and position the load as described in
the loading guidelines.
Otherwise, vehicle occupants could
be injured by the load being thrown around in
the event of sharp braking, a sudden change
in direction or an accident.
You will find further information in the "Secur-
ing a load" section. Loading and stowing
187Controls
* optional
212_AKB; 2; 4, en-GB
mkalafa,
Version: 2.11.8.1 2009-05-05T14:17:16+02:00 - Seite 187 Z
Dateiname: 6515346702_buchblock.pdf; erzeugt am 07. May 2009 14:16:33; WK
Page 209 of 373
X
Use tab ;to detach EASY-PACK loading
sill protector :from the magnets and
place it over the loading sill.
X Close the EASY-PACK folding luggage-com-
partment floor.
! Before closing the tailgate, refasten the
EASY-PACK loading sill protector on the
underside of the EASY-PACK folding lug-
gage-compartment floor.
The EASY-PACK loading sill protector could
otherwise be damaged. Roof rack*
G
Risk of accident and injury
An incorrectly secured roof rack, ski rack or
load could become detached from the vehi-
cle. These objects may be thrown around and
can injure you or others, or cause an accident.
Follow the roof rack/ski rack manufacturer's
installation instructions and special instruc-
tions for use.
The roof load raises the vehicle's centre of
gravity, thereby affecting vehicle handling.
You must always observe the maximum roof
load of 100 kg. Always adapt your driving style
to the prevailing road, traffic and weather
conditions and drive with particular care if the
roof is laden.
! Mercedes-Benz recommends that you
only use roof rack systems which have
been tested and approved for Mercedes-
Benz vehicles. This helps to prevent dam-
age to the vehicle.
Position the load on the roof rack in such a
way that the vehicle will not sustain dam-
age even when it is in motion.
Ensure that, depending on the vehicle's
equipment, you can raise the sliding/tilting
sunroof* or panorama sliding sunroof* fully
and open the boot lid/tailgate completely. Saloon
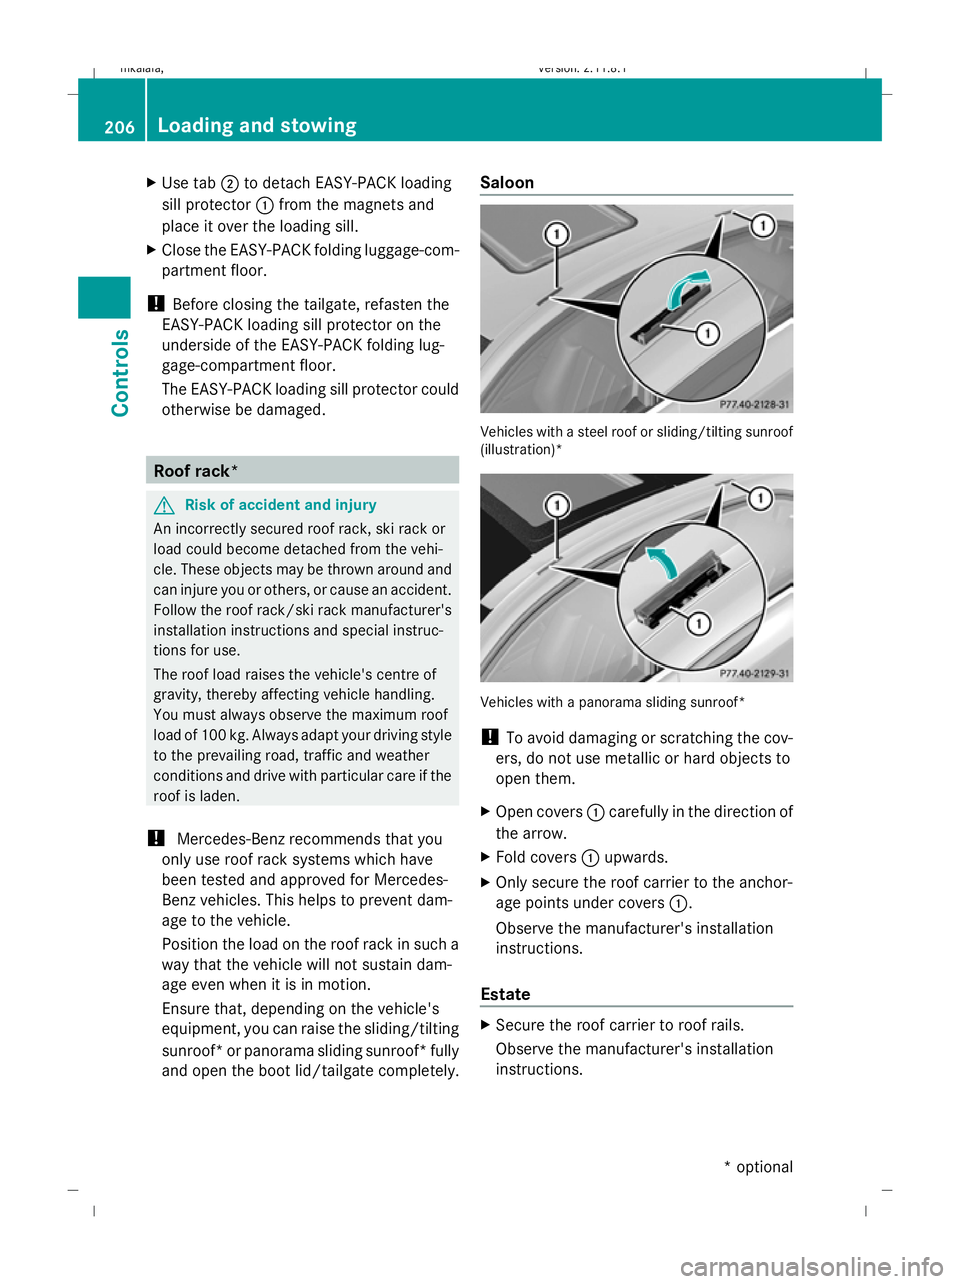
Vehicles with a steel roof or sliding/tilting sunroof
(illustration)*
Vehicles with a panorama sliding sunroof*
! To avoid damaging or scratching the cov-
ers, do not use metallic or hard objects to
open them.
X Open covers :carefully in the direction of
the arrow.
X Fold covers :upwards.
X Only secure the roof carrier to the anchor-
age points under covers :.
Observe the manufacturer's installation
instructions.
Estate X
Secure the roof carrier to roof rails.
Observe the manufacturer's installation
instructions. 206
Loading and stowingControls
* optional
212_AKB; 2; 4, en-GB
mkalafa,
Version: 2.11.8.1 2009-05-05T14:17:16+02:00 - Seite 206
Dateiname: 6515346702_buchblock.pdf; erzeugt am 07. May 2009 14:16:48; WK
Page 334 of 373
Retrofitting two-way radios and
mobile phones (RF transmitters)
Use the Technical Specification
ISO/TS 21609 46
implementation regulation
when retrofitting RF (radio frequency) trans-
mitters.
If your vehicle has fittings for two-way radio
equipment (e.g. taxis, hire cars or official vehi-
cles), use the power supply or aerial connec-
tions intended for use with the basic wiring.
Be sure to observe the manufacturer's addi-
tional instructions when installing the fittings.
! Damage resulting from installation work
that has not been carried out correctly is
not covered by the Mercedes-Benz implied
warranty.
To ensure correct installation, Mercedes-
Benz recommends having this work done
at a Mercedes-Benz Service Centre or at a
qualified specialist workshop.
Transmission output Transmission output at the aerial base must
not exceed the maximum values below. Waveband Maximum trans-
mission output
(PEAK)
Short wave
(f < 54 MHz) 100 W
4 m waveband 30 W
2 m waveband 50 W
Trunked radio/Tetra 35 W
70 cm waveband 35 W
GSM 900/AMPS 10 W
GSM 1800 10 W
UMTS 10 W Aerial positions
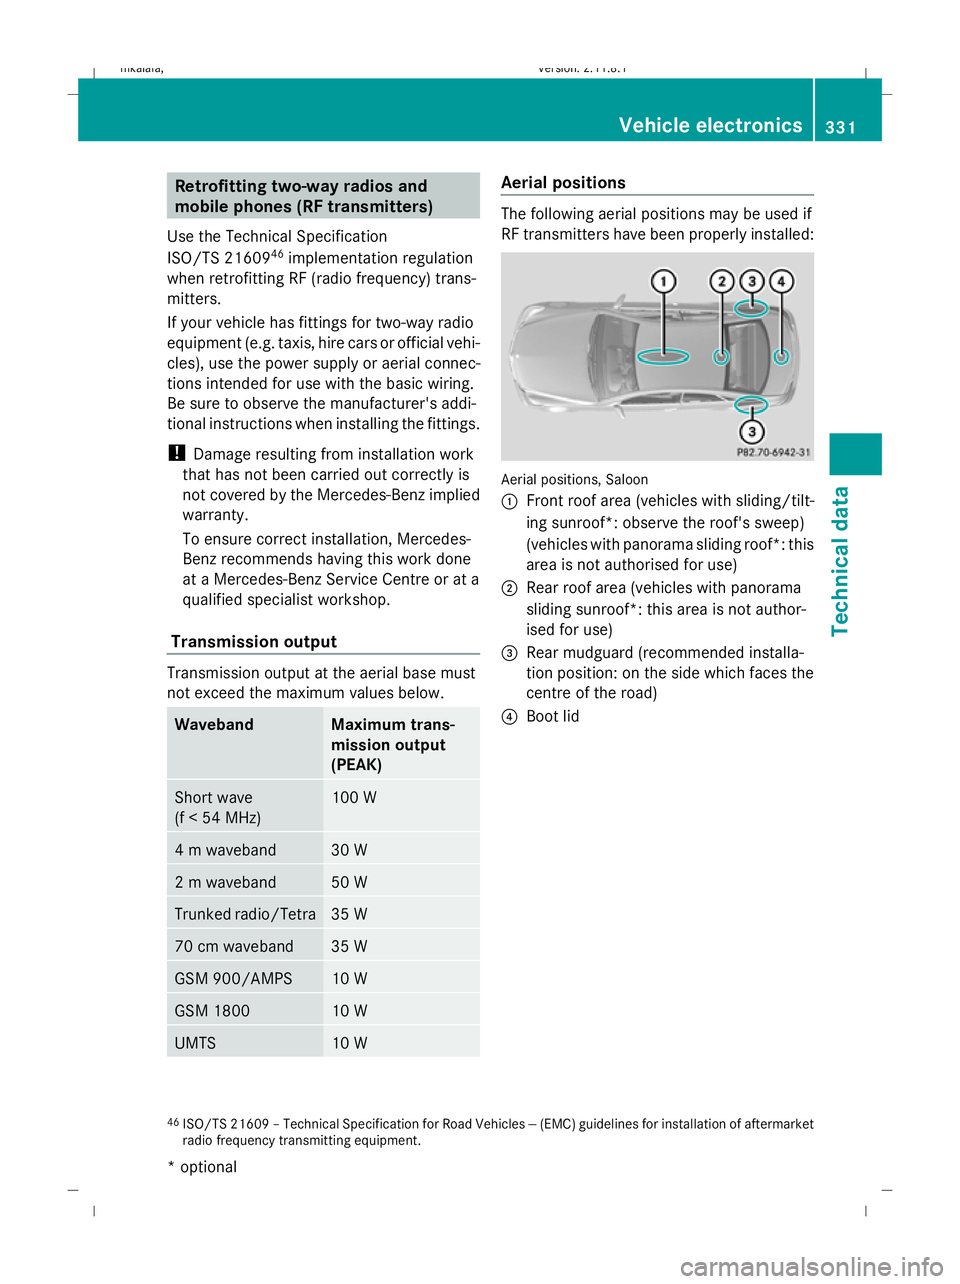
The following aerial positions may be used if
RF transmitters have been properly installed:
Aerial positions, Saloon
:
Front roof area (vehicles with sliding/tilt-
ing sunroof*: observe the roof's sweep)
(vehicles with panorama sliding roof*: this
area is not authorised for use)
; Rear roof area (vehicles with panorama
sliding sunroof*: this area is not author-
ised for use)
= Rear mudguard (recommended installa-
tion position: on the side which faces the
centre of the road)
? Boot lid
46 ISO/TS 21609 – Technical Specification for Road Vehicles -- (EMC) guidelines for installation of aftermarket
radio frequency transmitting equipment. Vehicle electronics
331Technical data
* optional
212_AKB; 2; 4, en-GB
mkalafa
,V ersion: 2.11.8.1
2009-05-05T14:17:16+02:00 - Seite 331 Z
Dateiname: 6515346702_buchblock.pdf; erzeugt am 07. May 2009 14:17:31; WK
Page 335 of 373
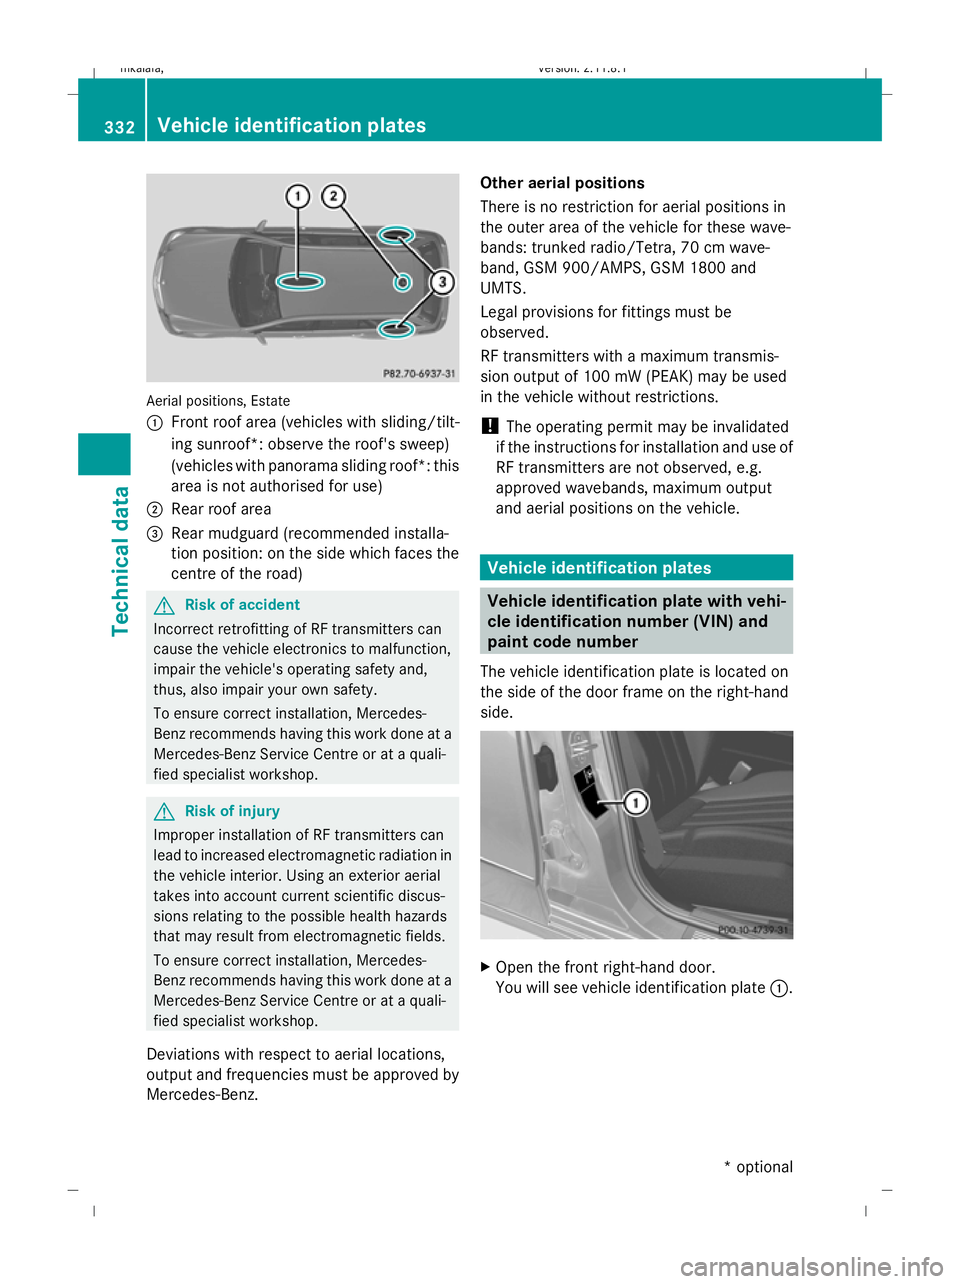
Aerial positions, Estate
:
Front roof area (vehicles with sliding/tilt-
ing sunroof*: observe the roof's sweep)
(vehicles with panorama sliding roof*: this
area is not authorised for use)
; Rear roof area
= Rear mudguard (recommended installa-
tion position: on the side which faces the
centre of the road) G
Risk of accident
Incorrect retrofitting of RF transmitters can
cause the vehicle electronics to malfunction,
impair the vehicle's operating safety and,
thus, also impair your own safety.
To ensure correct installation, Mercedes-
Benz recommends having this work done at a
Mercedes-Benz Service Centre or at a quali-
fied specialist workshop. G
Risk of injury
Improper installation of RF transmitters can
lead to increased electromagnetic radiation in
the vehicle interior. Using an exterior aerial
takes into account current scientific discus-
sions relating to the possible health hazards
that may result from electromagnetic fields.
To ensure correct installation, Mercedes-
Benz recommends having this work done at a
Mercedes-Benz Service Centre or at a quali-
fied specialist workshop.
Deviations with respect to aerial locations,
output and frequencies must be approved by
Mercedes-Benz. Other aerial positions
There is no restriction for aerial positions in
the outer area of the vehicle for these wave-
bands: trunked radio/Tetra, 70 cm wave-
band, GSM 900/AMPS, GSM 1800 and
UMTS.
Legal provisions for fittings must be
observed.
RF transmitters with a maximum transmis-
sion output of 100 mW (PEAK) may be used
in the vehicle without restrictions.
!
The operating permit may be invalidated
if the instructions for installation and use of
RF transmitters are not observed, e.g.
approved wavebands, maximum output
and aerial positions on the vehicle. Vehicle identification plates
Vehicle identification plate with vehi-
cle identification number (VIN) and
paint code number
The vehicle identification plate is located on
the side of the door frame on the right-hand
side. X
Open the front right-hand door.
You will see vehicle identification plate :.332
Vehicle identification platesTechnical data
* optional
212_AKB; 2; 4, en-GB
mkalafa
,V ersion: 2.11.8.1
2009-05-05T14:17:16+02:00 - Seite 332
Dateiname: 6515346702_buchblock.pdf; erzeugt am 07. May 2009 14:17:31; WK