2009 MERCEDES-BENZ E-CLASS ESTATE remove seats
[x] Cancel search: remove seatsPage 56 of 373
X
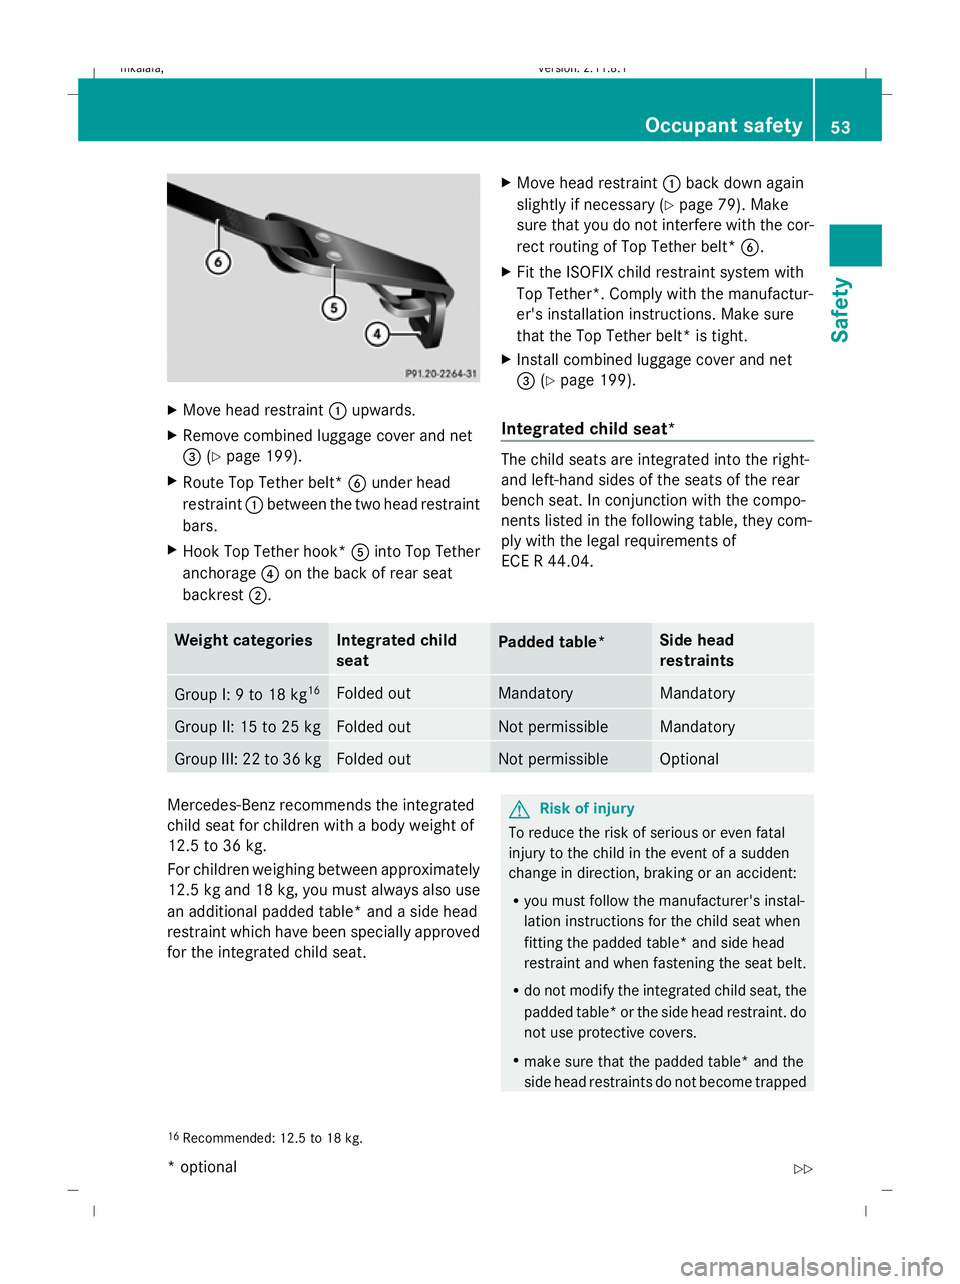
Move head restraint :upwards.
X Remove combined luggage cover and net
= (Ypage 199).
X Route Top Tether belt* Bunder head
restraint :between the two head restraint
bars.
X Hook Top Tether hook* Ainto Top Tether
anchorage ?on the back of rear seat
backrest ;. X
Move head restraint :back down again
slightly if necessary (Y page 79). Make
sure that you do not interfere with the cor-
rect routing of Top Tether belt* B.
X Fit the ISOFIX child restraint system with
Top Tether*. Comply with the manufactur-
er's installation instructions. Make sure
that the Top Tether belt* is tight.
X Install combined luggage cover and net
= (Ypage 199).
Integrated child seat* The child seats are integrated into the right-
and left-hand sides of the seats of the rear
bench seat. In conjunction with the compo-
nents listed in the following table, they com-
ply with the legal requirements of
ECE R 44.04.
Weight categories Integrated child
seat
Padded table* Side head
restraints
Group I: 9 to 18 kg
16 Folded out Mandatory Mandatory
Group II: 15 to 25 kg Folded out Not permissible Mandatory
Group III: 22 to 36 kg Folded out Not permissible Optional
Mercedes-Benz recommends the integrated
child seat for children with a body weight of
12.5 to 36 kg.
For children weighing between approximately
12.5 kg and 18 kg, you must always also use
an additional padded table* and a side head
restraint which have been specially approved
for the integrated child seat. G
Risk of injury
To reduce the risk of serious or even fatal
injury to the child in the event of a sudden
change in direction, braking or an accident:
R you must follow the manufacturer's instal-
lation instructions for the child seat when
fitting the padded table* and side head
restraint and when fastening the seat belt.
R do not modify the integrated child seat, the
padded table* or the side head restraint. do
not use protective covers.
R make sure that the padded table* and the
side head restraints do not become trapped
16 Recommended: 12.5 to 18 kg. Occupant safety
53Safety
* optional
212_AKB; 2; 4, en-GB
mkalafa,
Version: 2.11.8.1 2009-05-05T14:17:16+02:00 - Seite 53 Z
Dateiname: 6515346702_buchblock.pdf; erzeugt am 07. May 2009 14:15:40; WK
Page 58 of 373
Folding in the child seat
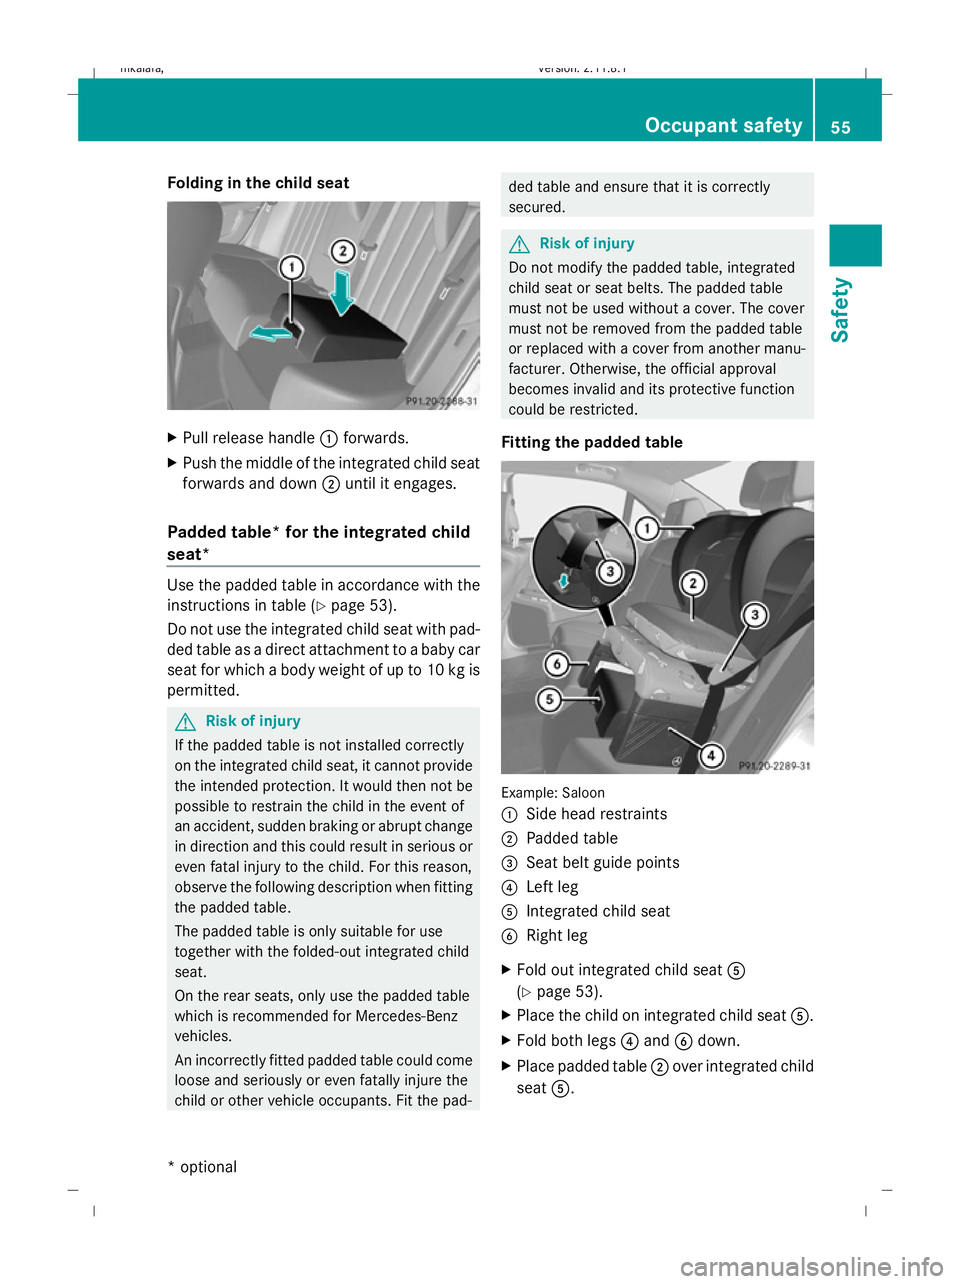
X
Pull release handle :forwards.
X Push the middle of the integrated child seat
forwards and down ;until it engages.
Padded table* for the integrated child
seat* Use the padded table in accordance with the
instructions in table (Y
page 53).
Do not use the integrated child seat with pad-
ded table as a direct attachment to a baby car
seat for which a body weight of up to 10 kg is
permitted. G
Risk of injury
If the padded table is not installed correctly
on the integrated child seat, it cannot provide
the intended protection. It would then not be
possible to restrain the child in the event of
an accident, sudden braking or abrupt change
in direction and this could result in serious or
even fatal injury to the child. For this reason,
observe the following description when fitting
the padded table.
The padded table is only suitable for use
together with the folded-out integrated child
seat.
On the rear seats, only use the padded table
which is recommended for Mercedes-Benz
vehicles.
An incorrectly fitted padded table could come
loose and seriously or even fatally injure the
child or other vehicle occupants. Fit the pad- ded table and ensure that it is correctly
secured.
G
Risk of injury
Do not modify the padded table, integrated
child seat or seat belts. The padded table
must not be used without a cover. The cover
must not be removed from the padded table
or replaced with a cover from another manu-
facturer. Otherwise, the official approval
becomes invalid and its protective function
could be restricted.
Fitting the padded table Example: Saloon
:
Side head restraints
; Padded table
= Seat belt guide points
? Left leg
A Integrated child seat
B Right leg
X Fold out integrated child seat A
(Y page 53).
X Place the child on integrated child seat A.
X Fold both legs ?and Bdown.
X Place padded table ;over integrated child
seat A. Occupant safety
55Safety
* optional
212_AKB; 2; 4, en-GB
mkalafa
,V ersion: 2.11.8.1
2009-05-05T14:17:16+02:00 - Seite 55 Z
Dateiname: 6515346702_buchblock.pdf; erzeugt am 07. May 2009 14:15:41; WK
Page 79 of 373
Seats
Points to remember
You will find information about folding the
rear bench seat forwards in the "Through-
loading feature in the rear bench seat"
(Saloon) (Y page 195) and "EASY-PACK load-
ing-aid feature rear bench seat (Estate)"
(Y page 196) sections.
Depending on the vehicle's equipment, the
seats can adjusted either manually/electri-
cally or electrically*. G
Risk of injury
The seats can still be adjusted when there is
no key in the ignition lock. For this reason,
children should never be left unsupervised in
the vehicle. They could become trapped when
adjusting a seat. G
Risk of accident
Only adjust the driver's seat when the vehicle
is stationary. You will otherwise be distracted
from the road and traffic conditions and you
could lose control of the vehicle as a result of
the seat moving. This could cause an acci-
dent. G
Risk of injury
Make sure that nobody can become trapped
when you adjust the seat.
Observe the notes concerning the airbag sys-
tem.
Secure children as recommended; see "Chil-
dren in the vehicle" section. G
Risk of injury
Make sure that the central area of the head
restraint supports the back of your head at
about eye level. You could seriously injure
your neck if your head is not correctly sup-
ported by the head restraint in the event of an
accident. Never travel without a correctly
adjusted and engaged head restraint.
! When you move the seats, make sure that
there are no objects in the footwell or behind the seats. Otherwise, you could
damage the seats and the objects.
i The head restraints in the front seats are
fitted with the NECK-PRO system
(Y page 43). For this reason, it is not pos-
sible to remove the head restraints from
the front seats.
The head restraints cannot be removed
from the rear compartment seats on vehi-
cles without the through-loading feature*.
Please contact a Mercedes-Benz Service
Centre for more information. Adjusting the seats manually and
electrically Seat fore-and-aft adjustment
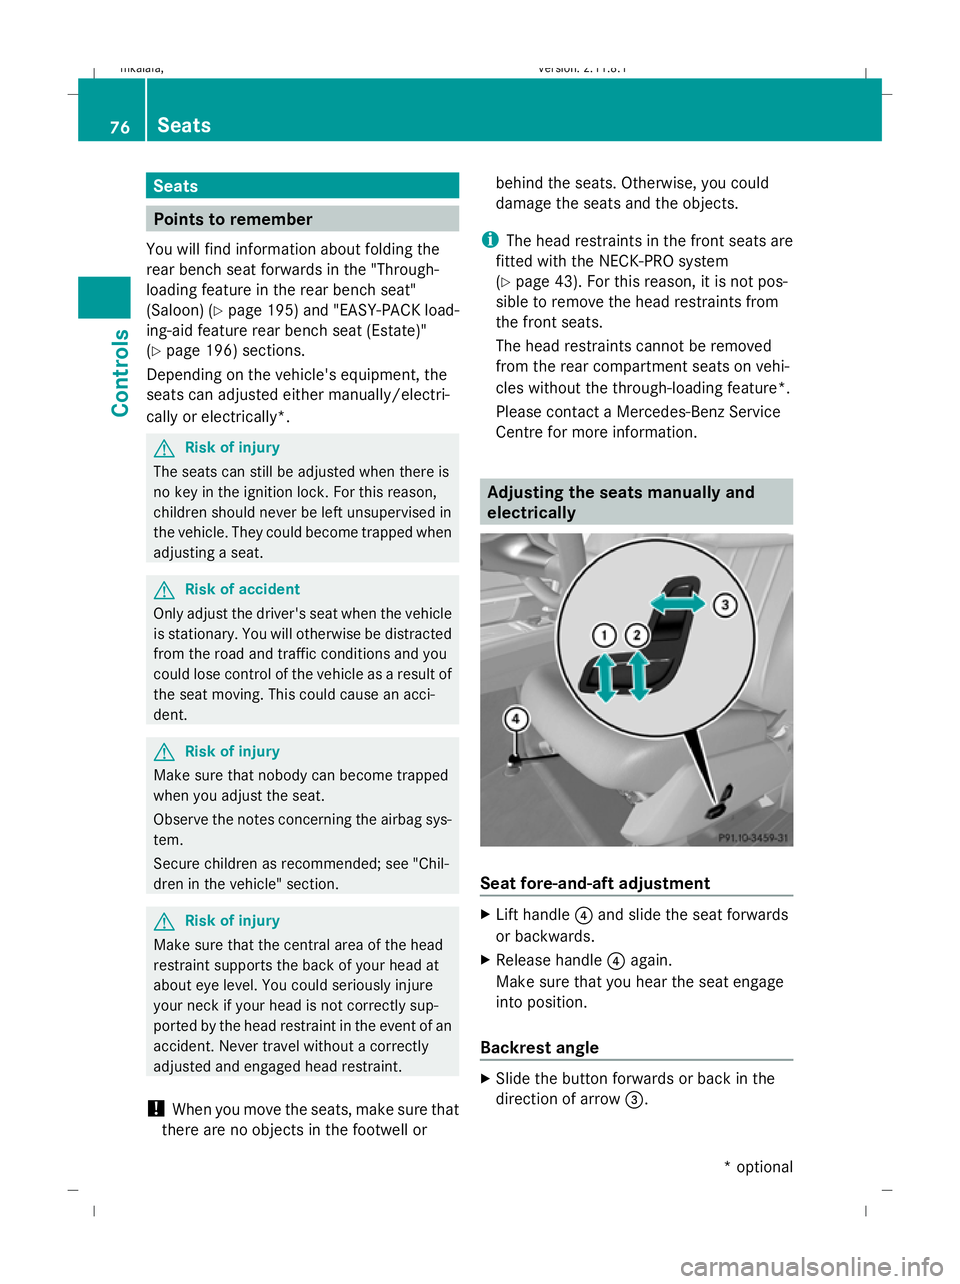
X
Lift handle ?and slide the seat forwards
or backwards.
X Release handle ?again.
Make sure that you hear the seat engage
into position.
Backrest angle X
Slide the button forwards or back in the
direction of arrow =.76
SeatsControls
* optional
212_AKB; 2; 4, en-GB
mkalafa,
Version: 2.11.8.1 2009-05-05T14:17:16+02:00 - Seite 76
Dateiname: 6515346702_buchblock.pdf; erzeugt am 07. May 2009 14:15:49; WK
Page 83 of 373
X
Release the rear seat backrest and fold it
slightly forwards ( Ypage 195).
X To remove: pull the head restraint up to
the stop.
X Press release catch :and pull the head
restraint out of the guides.
X To refit: insert the head restraint so that
the notches on the bar are on the left when
viewed in the direction of travel.
X Push the head restraint down until you hear
it click into place.
X Fold back the rear seat backrest until it
engages (Y page 195). Multicontour seat*
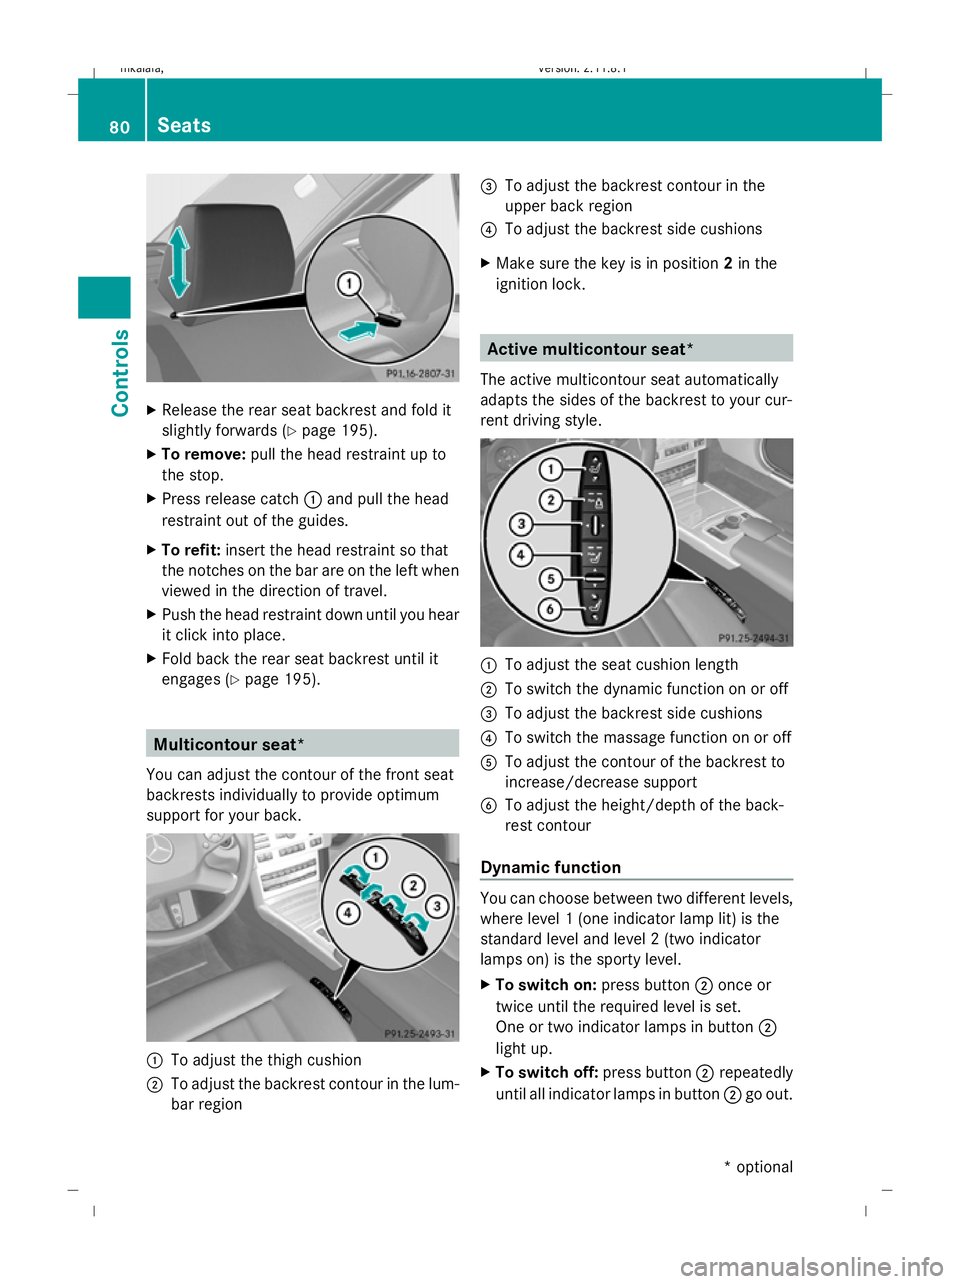
You can adjust the contour of the front seat
backrests individually to provide optimum
support for your back. :
To adjust the thigh cushion
; To adjust the backrest contour in the lum-
bar region =
To adjust the backrest contour in the
upper back region
? To adjust the backrest side cushions
X Make sure the key is in position 2in the
ignition lock. Active multicontour seat*
The active multicontour seat automatically
adapts the sides of the backrest to your cur-
rent driving style. :
To adjust the seat cushion length
; To switch the dynamic function on or off
= To adjust the backrest side cushions
? To switch the massage function on or off
A To adjust the contour of the backrest to
increase/decrease support
B To adjust the height/depth of the back-
rest contour
Dynamic function You can choose between two different levels,
where level 1 (one indicator lamp lit) is the
standard level and level 2 (two indicator
lamps on) is the sporty level.
X To switch on: press button;once or
twice until the required level is set.
One or two indicator lamps in button ;
light up.
X To switch off: press button;repeatedly
until all indicator lamps in button ;go out. 80
SeatsCont
rols
* optional
212_AKB; 2; 4, en-GB
mkalafa
,V ersion: 2.11.8.1
2009-05-05T14:17:16+02:00 - Seite 80
Dateiname: 6515346702_buchblock.pdf; erzeugt am 07. May 2009 14:15:52; WK
Page 86 of 373
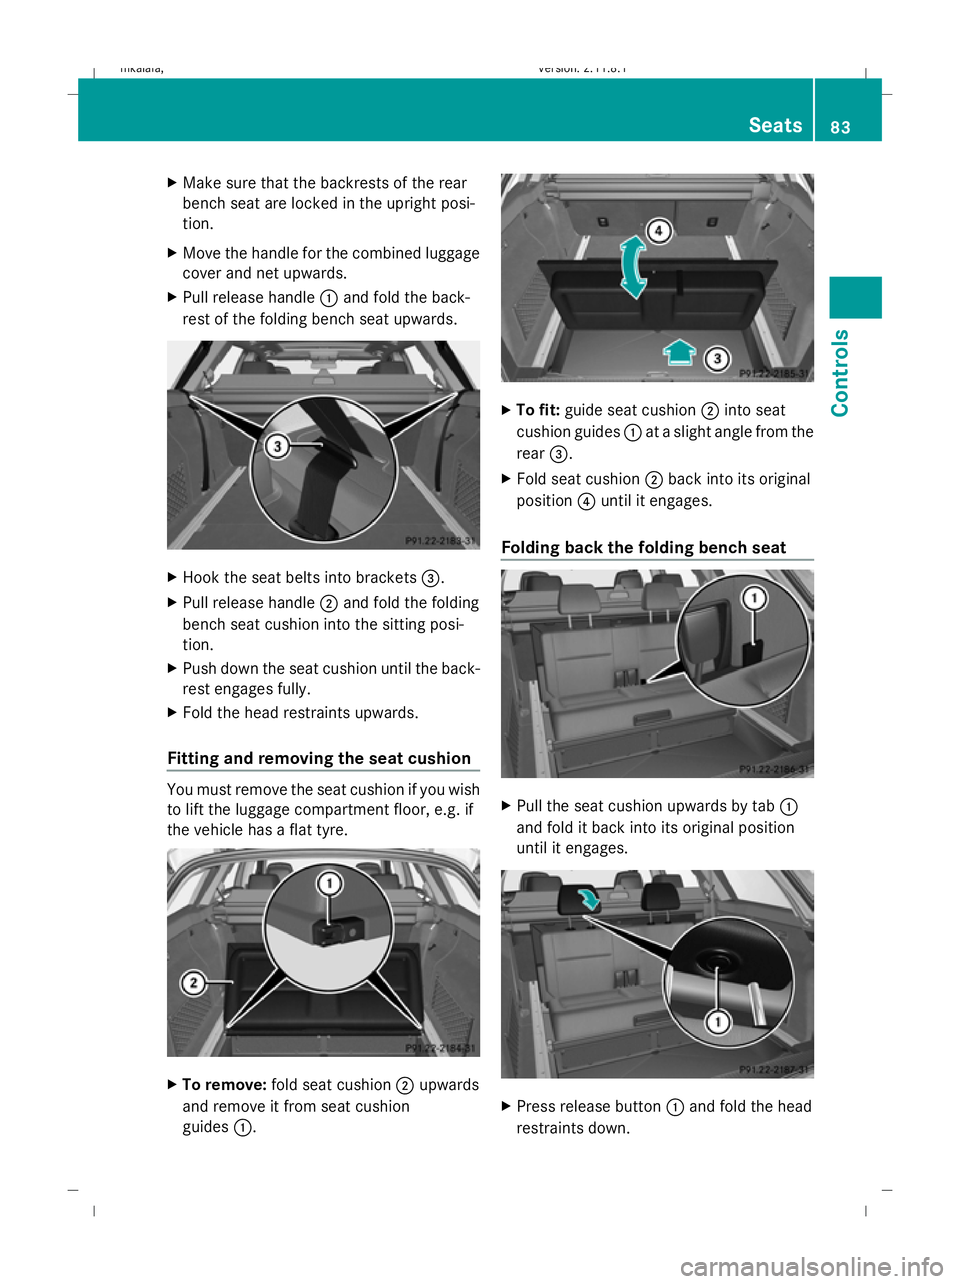
X
Make sure that the backrests of the rear
bench seat are locked in the upright posi-
tion.
X Move the handle for the combined luggage
cover and net upwards.
X Pull release handle :and fold the back-
rest of the folding bench seat upwards. X
Hook the seat belts into brackets =.
X Pull release handle ;and fold the folding
bench seat cushion into the sitting posi-
tion.
X Push down the seat cushion until the back-
rest engages fully.
X Fold the head restraints upwards.
Fitting and removing the seat cushion You must remove the seat cushion if you wish
to lift the luggage compartment floor, e.g. if
the vehicle has a flat tyre. X
To remove: fold seat cushion ;upwards
and remove it from seat cushion
guides :. X
To fit: guide seat cushion ;into seat
cushion guides :at a slight angle from the
rear =.
X Fold seat cushion ;back into its original
position ?until it engages.
Folding back the folding bench seat X
Pull the seat cushion upwards by tab :
and fold it back into its original position
until it engages. X
Press release button :and fold the head
restraints down. Seats
83Controls
212_AKB; 2; 4, en-GB
mkalafa, Version: 2.11.8.1 2009-05-05T14:17:16+02:00 - Seite 83 Z
Dateiname: 6515346702_buchblock.pdf; erzeugt am 07. May 2009 14:15:54; WK
Page 199 of 373
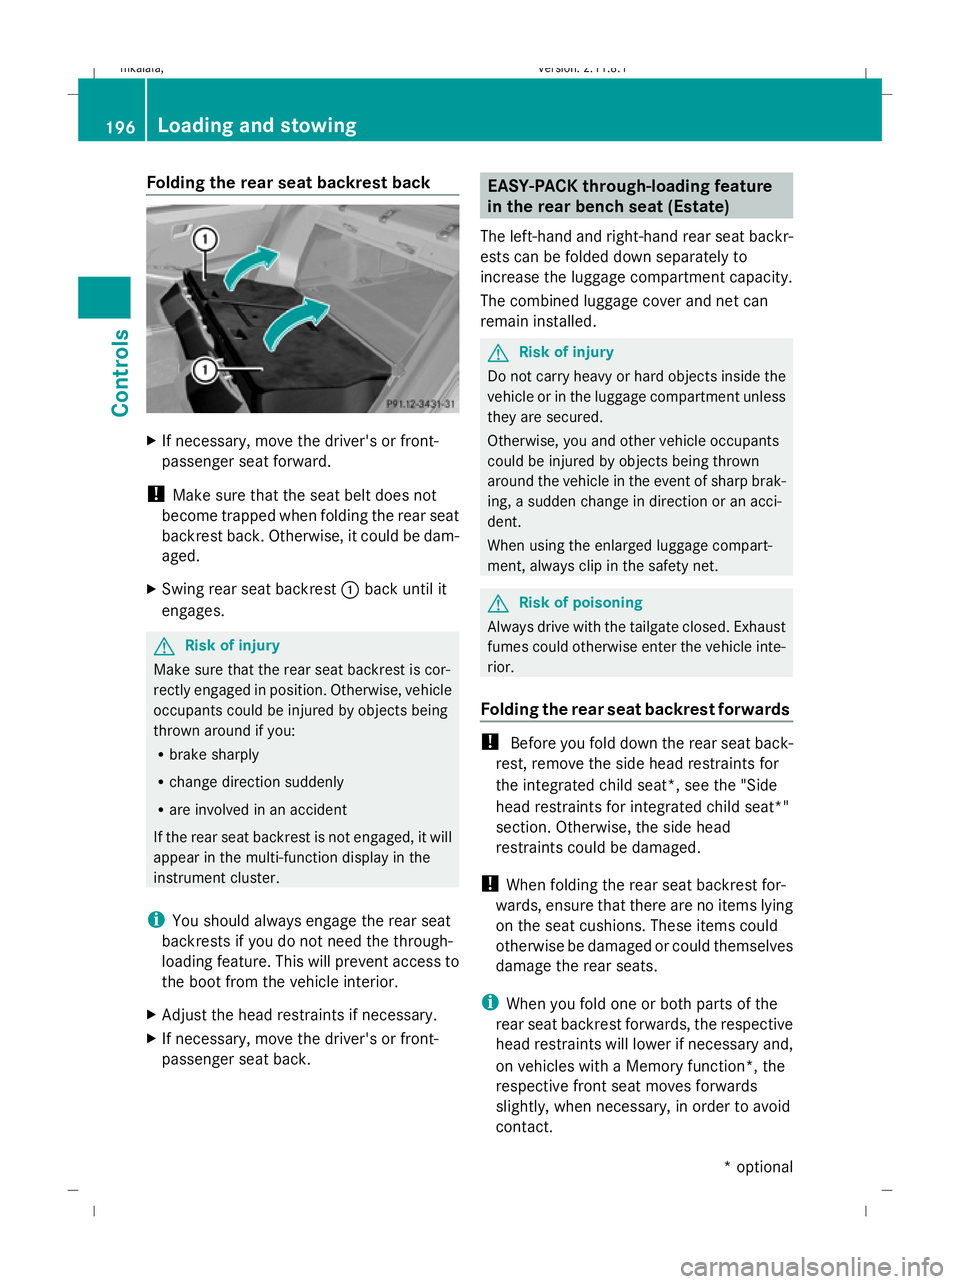
Folding the rear seat backrest back
X
If necessary, move the driver's or front-
passenger seat forward.
! Make sure that the seat belt does not
become trapped when folding the rear seat
backrest back. Otherwise, it could be dam-
aged.
X Swing rear seat backrest :back until it
engages. G
Risk of injury
Make sure that the rear seat backrest is cor-
rectly engaged in position. Otherwise, vehicle
occupants could be injured by objects being
thrown around if you:
R brake sharply
R change direction suddenly
R are involved in an accident
If the rear seat backrest is not engaged, it will
appear in the multi-function display in the
instrument cluster.
i You should always engage the rear seat
backrests if you do not need the through-
loading feature. This will prevent access to
the boot from the vehicle interior.
X Adjust the head restraints if necessary.
X If necessary, move the driver's or front-
passenger seat back. EASY-PACK through-loading feature
in the rear bench seat (Estate)
The left-hand and right-hand rear seat backr-
ests can be folded down separately to
increase the luggage compartment capacity.
The combined luggage cover and net can
remain installed. G
Risk of injury
Do not carry heavy or hard objects inside the
vehicle or in the luggage compartment unless
they are secured.
Otherwise, you and other vehicle occupants
could be injured by objects being thrown
around the vehicle in the event of sharp brak-
ing, a sudden change in direction or an acci-
dent.
When using the enlarged luggage compart-
ment, always clip in the safety net. G
Risk of poisoning
Always drive with the tailgate closed. Exhaust
fumes could otherwise enter the vehicle inte-
rior.
Folding the rear seat backrest forwards !
Before you fold down the rear seat back-
rest, remove the side head restraints for
the integrated child seat*, see the "Side
head restraints for integrated child seat*"
section. Otherwise, the side head
restraints could be damaged.
! When folding the rear seat backrest for-
wards, ensure that there are no items lying
on the seat cushions. These items could
otherwise be damaged or could themselves
damage the rear seats.
i When you fold one or both parts of the
rear seat backrest forwards, the respective
head restraints will lower if necessary and,
on vehicles with a Memory function*, the
respective front seat moves forwards
slightly, when necessary, in order to avoid
contact. 196
Loading and stowingCont
rols
* optional
212_AKB; 2; 4, en-GB
mkalafa
,V ersion: 2.11.8.1
2009-05-05T14:17:16+02:00 - Seite 196
Dateiname: 6515346702_buchblock.pdf; erzeugt am 07. May 2009 14:16:40; WK
Page 206 of 373
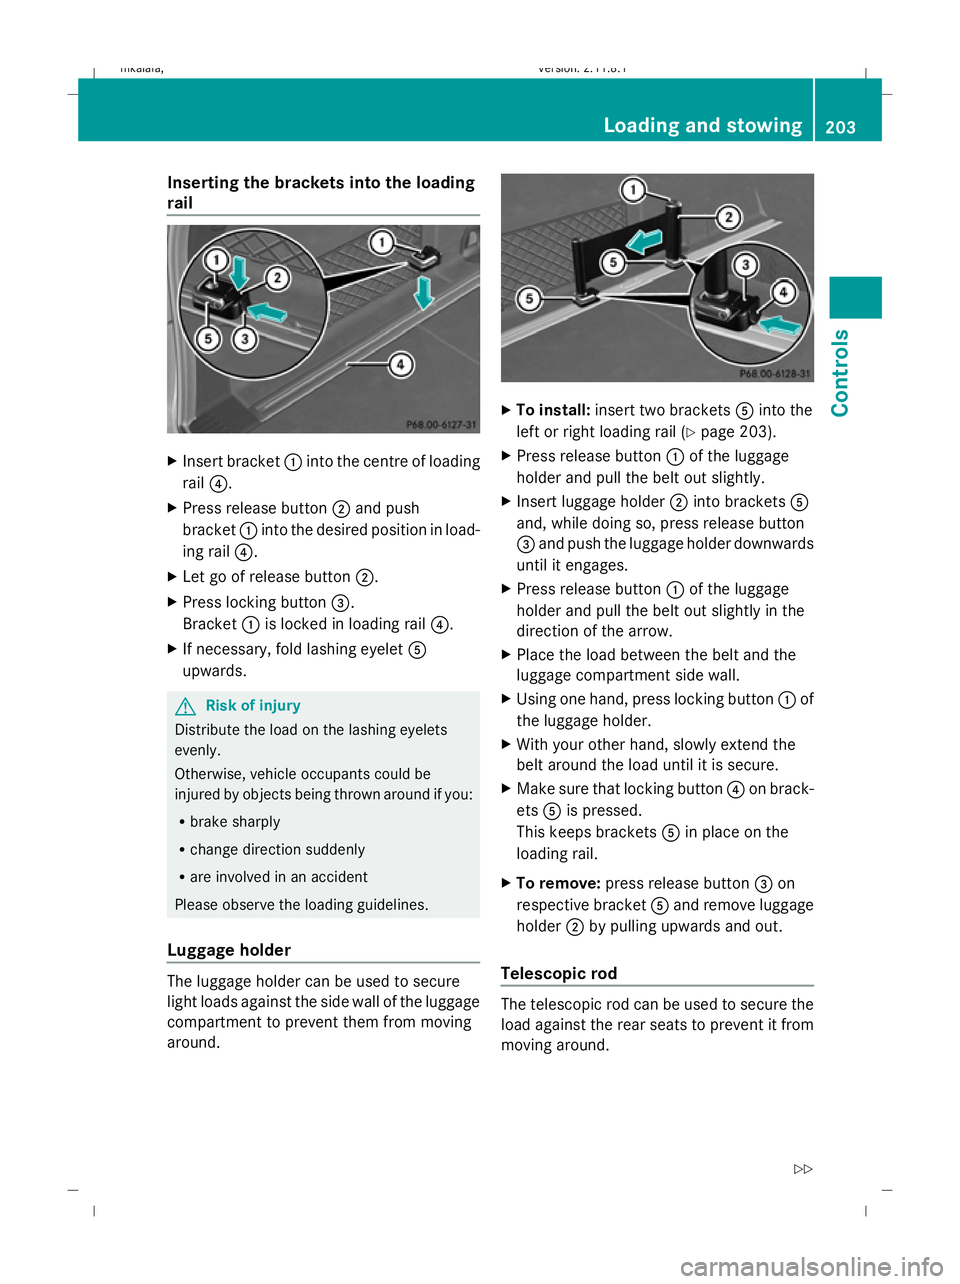
Inserting the brackets into the loading
rail X
Insert bracket :into the centre of loading
rail ?.
X Press release button ;and push
bracket :into the desired position in load-
ing rail ?.
X Let go of release button ;.
X Press locking button =.
Bracket :is locked in loading rail ?.
X If necessary, fold lashing eyelet A
upwards. G
Risk of injury
Distribute the load on the lashing eyelets
evenly.
Otherwise, vehicle occupants could be
injured by objects being thrown around if you:
R brake sharply
R change direction suddenly
R are involved in an accident
Please observe the loading guidelines.
Luggage holder The luggage holder can be used to secure
light loads against the side wall of the luggage
compartment to prevent them from moving
around. X
To install: insert two brackets Ainto the
left or right loading rail (Y page 203).
X Press release button :of the luggage
holder and pull the belt out slightly.
X Insert luggage holder ;into brackets A
and, while doing so, press release button
= and push the luggage holder downwards
until it engages.
X Press release button :of the luggage
holder and pull the belt out slightly in the
direction of the arrow.
X Place the load between the belt and the
luggage compartment side wall.
X Using one hand, press locking button :of
the luggage holder.
X With your other hand, slowly extend the
belt around the load until it is secure.
X Make sure that locking button ?on brack-
ets Ais pressed.
This keeps brackets Ain place on the
loading rail.
X To remove: press release button =on
respective bracket Aand remove luggage
holder ;by pulling upwards and out.
Telescopic rod The telescopic rod can be used to secure the
load against the rear seats to prevent it from
moving around. Loading and stowing
203Controls
212_AKB; 2; 4, en-GB
mkalafa,V ersion: 2.11.8.1
2009-05-05T14:17:16+02:00 - Seite 203 Z
Dateiname: 6515346702_buchblock.pdf; erzeugt am 07. May 2009 14:16:46; WK
Page 292 of 373
Problem
Possible causes/consequences and
X
X Solutions The active bonnet func-
tion (pedestrian protec-
tion) has been trig-
gered. Your vehicle has been involved in a frontal collision.
X
Reset the triggered active bonnet (pedestrian protection)
(Y page 302). The NECK-PRO head
restraints on the driv-
er's and the front-pas-
senger's seats have
been triggered. Your vehicle has been involved in a rear-end collision.
X
Reset the NECK-PRO head restraints (Y page 303).Fuel and fuel tank
Problem
Possible causes/consequences and
X
X Solutions Fuel is leaking from the
vehicle.
G
Risk of explosion or fire
The fuel line or the fuel tank is defective.
X Turn the key to position 0(Y page 75) in the ignition lock imme-
diately and remove it.
X Do not restart the engine under any circumstances.
X Consult a qualified specialist workshop. The fuel filler flap can-
not be opened. The fuel filler flap is not released.
Or:
The key batteries are discharged.
X
Unlock the vehicle using the emergency key element
(Y page 299).
X Open the boot/tailgate (Y page 72).
X Manually unlock the tailgate using the emergency release
(Y page 301). The fuel filler flap is released, but the opening mechanism is jam-
med.
X
Release the fuel filler flap by hand (Y page 301).
X Consult a qualified specialist workshop. Troubleshooting
289Practical advice
212_AKB; 2; 4, en-GB
mkalafa, Version: 2.11.8.1 2009-05-05T14:17:16+02:00 - Seite 289 Z
Dateiname: 6515346702_buchblock.pdf; erzeugt am 07. May 2009 14:17:13; WK