2009 MERCEDES-BENZ CL COUPE ESP
[x] Cancel search: ESPPage 117 of 421

tion steering wheel or select the
6but-
ton from the telephone basic menu.
Redialling
X Change to the telephone basic menu.
X Press the 6button on the telephone
keypad.
or
X Select SENDfrom the telephone basic menu
and press W.
The list of dialled numbers appears. The
most recently dialled number is at the top.
X To select and place a call: slideZVÆand
use Wto select an entry, or press the
6 button on the COMAND control unit.
Calling voicemail 14
You can only call voicemail if the voicemail
number on the SIM card is stored under the
4 button on your mobile phone.
X Press and hold the 4button on the tele-
phone keypad.
Functions available during a single call
connection Telephone operation with a single call
:
Person you are calling
; Receiver symbol: here 6indicating an
active phone connection
= NEW to call other parties 15 ?
To switch the microphone for the hands-
free system on/off
A To send DTMF tones 16
B To end a call
Switching the microphone for the hands-
free system on/off
This function is also available during an active
phone call.
X To switch off: selectMike off from the
telephone basic menu.
If the microphone is switched off, the dis-
play shows the Qsymbol and the The
microphone is off message appears for
a short period.
X To switch on: selectMike on from the
telephone basic menu.
The Qsymbol goes out. You will briefly see
the The microphone is on message.
DTMF tone transmission 16
Answering machines or other devices can be
controlled by DTMF tones, e.g. for remote
query functions.
Dial the respective number to listen to your
answering machine, for example.
X Select DTMFfrom the telephone basic menu
during a conversation.
14 This function is only available if it is supported by the mobile phone network provider.
15 This function is only available if the telephone supports HFP1.5 and above.
16 Not available for all mobile phones. 114
Telephone*COMAND
* optional
216_AKB; 2; 3, en-GB
bjanott,
Version: 2.11.7.7 2009-02-27T14:54:17+01:00 - Seite 114
Dateiname: 6515230602_buchblock.pdf; erzeugt am 04. Mar 2009 11:15:08; WK
Page 121 of 421

X
Select the desired text message from the
text message inbox.
X Select Options QDetails.
The detailed view appears.
X To close the detailed view: slideXVY.
Reading a text message X
Select the desired text message from the
text message inbox.
X Press W.
X To scroll through the display or to
select telephone numbers in the text:
slide ZVÆ.
The display scrolls up or down line by line,
or skips to the next or previous telephone
number and automatically highlights it.
X To return to the list: slideXVY.
Listening to a text message*
You can set the language (Y page 163) and
the speed of the read-aloud func-
tion* (Y page 160).
X Select and open the desired text message
from the text message inbox.
X Press Wand select Read aloud.
X To end reading aloud: pressWand select
End reading aloud.
Writing a new text message X
Select Newfrom the "SMS" menu. Entering the recipient
:
Recipient of the new text message
; To enter a telephone number using the
address book
= Input speller
X To enter the text message recipient
from the phone book: select;using the
COMAND controller.
X Select the desired recipient from the phone
book (Y page 120).
X To enter the recipient's phone number
manually: use the COMAND controller to
select the desired digits with input speller
=.
or
X Use the telephone keypad to enter the
desired digits.
i You can also respond directly to a text
message; the recipient will then be auto-
matically accepted. To do so, simply select
OptionsQReply in the text message
inbox. 118
Telephone*COMAND
* optional
216_AKB; 2; 3, en-GB
bjanott,
Version: 2.11.7.7 2009-02-27T14:54:17+01:00 - Seite 118
Dateiname: 6515230602_buchblock.pdf; erzeugt am 04. Mar 2009 11:15:09; WK
Page 122 of 421
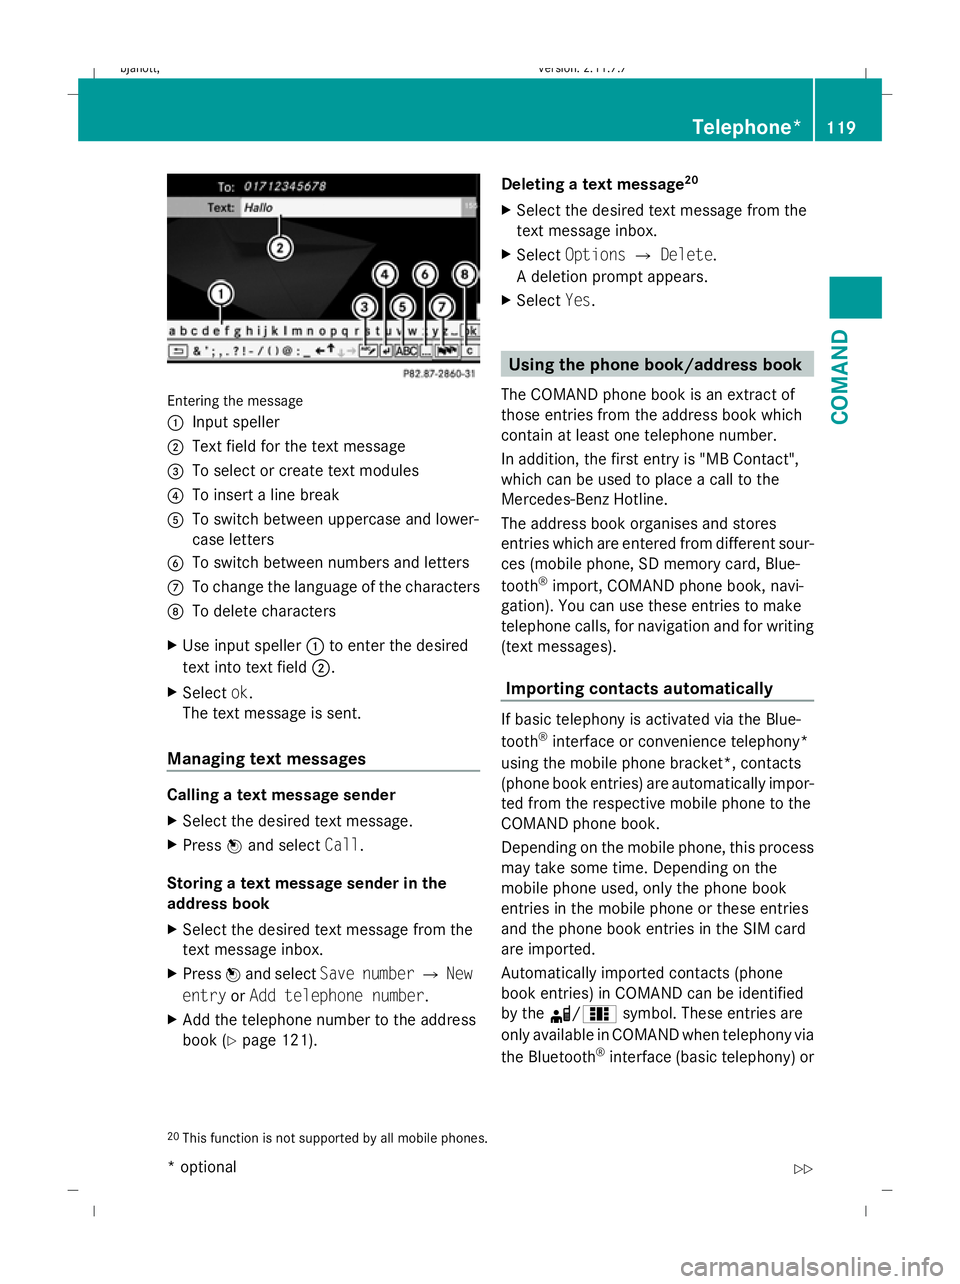
Entering the message
: Input speller
; Text field for the text message
= To select or create text modules
? To insert a line break
A To switch between uppercase and lower-
case letters
B To switch between numbers and letters
C To change the language of the characters
D To delete characters
X Use input speller :to enter the desired
text into text field ;.
X Select ok.
The text message is sent.
Managing text messages Calling a text message sender
X
Select the desired text message.
X Press Wand select Call.
Storing a text message sender in the
address book
X Select the desired text message from the
text message inbox.
X Press Wand select Save number QNew
entry orAdd telephone number .
X Add the telephone number to the address
book (Y page 121). Deleting a text message
20
X Select the desired text message from the
text message inbox.
X Select Options QDelete .
A deletion prompt appears.
X Select Yes. Using the phone book/address book
The COMAND phone book is an extract of
those entries from the address book which
contain at least one telephone number.
In addition, the first entry is "MB Contact",
which can be used to place a call to the
Mercedes-Benz Hotline.
The address book organises and stores
entries which are entered from different sour-
ces (mobile phone, SD memory card, Blue-
tooth ®
import, COMAND phone book, navi-
gation). You can use these entries to make
telephone calls, for navigation and for writing
(text messages).
Importing contacts automatically If basic telephony is activated via the Blue-
tooth
®
interface or convenience telephony*
using the mobile phone bracket*, contacts
(phone book entries) are automatically impor-
ted from the respective mobile phone to the
COMAND phone book.
Depending on the mobile phone, this process
may take some time. Depending on the
mobile phone used, only the phone book
entries in the mobile phone or these entries
and the phone book entries in the SIM card
are imported.
Automatically imported contacts (phone
book entries) in COMAND can be identified
by the d/0 symbol. These entries are
only available in COMAND when telephony via
the Bluetooth ®
interface (basic telephony) or
20 This function is not supported by all mobile phones. Telephone*
119COMAND
* optional
216_AKB; 2; 3, en-GB
bjanott,
Version: 2.11.7.7
2009-02-27T14:54:17+01:00 - Seite 119 Z
Dateiname: 6515230602_buchblock.pdf; erzeugt am 04. Mar 2009 11:15:09; WK
Page 123 of 421

using the mobile phone bracket* (conveni-
ence telephony*) is activated.
Importing contacts manually i
Manually imported contacts are always
available. Automatically imported contacts
are available only when basic telephony via
the Bluetooth ®
interface or convenience
telephony* using the mobile phone
bracket* is activated.
You can import existing data manually:
R from the memory card
R via the Bluetooth ®
interface (e.g. Blue-
tooth ®
telephone, Bluetooth ®
PC)
X To import data: load the memory card or
activate Bluetooth ®
in COMAND
(Y page 106) and on the Bluetooth ®
tele-
phone or PC (see operating instructions of
the respective mobile phone/PC).
X Select Data/connectionsQImport
contactsQ From Memory card.
X Select AddorOverwrite .
X To cancel data import: pressW.
or
X Press the %button.
If the data has been imported, the Import
procedure successful message is dis-
played.
If the COMAND phone book memory is full,
this message appears in the display: Mem‐
ory full. Contacts could not be
completely imported. i
If you switch over to another main func-
tion (e.g. navigation) while importing data,
the import will be cancelled. If you switch
to another function while importing vCards
from the memory card, the import will not
be cancelled.
Calling up contacts/details You can call up contacts with the list or by
using the input speller.
Phone book/address book basic display
:
List
¤Entry with navigable data*
\ Entry with voice tag – see separate
operating instructions for LINGUA-
TRONIC*
¥ Address book entry
d Mobile phone entry
0 SIM card entry
® Bluetooth ®
entry
¯ Memory card entry
G Entry with multiple phone numbers
; Two-line speller
B To change the language of the char-
acters
p To select the character set
F To delete your selection
¬ To confirm your selection
% Back 120
Telephone*COMAND
* optional
216_AKB; 2; 3, en-GB
bjanott
,V ersion: 2.11.7.7
2009-02-27T14:54:17+01:00 - Seite 120
Dateiname: 6515230602_buchblock.pdf; erzeugt am 04. Mar 2009 11:15:10; WK
Page 125 of 421

B
To select the language
p To select the character set
*/E To select uppercase and low-
ercase letters
% Back
F To delete your selection
¬ To confirm your selection
? Preset phone category
X Enter the respective data in the data fields.
X To enter data in the data field: select the
respective characters from input speller
=.
X To move the cursor in the data field:
select the respective characters from input
speller =.
X To change data fields: slideZVuntil the
input speller is hidden.
X Slide ZVÆ and push W.
or
X Press Æin the input speller.
X To cancel data entry:select Back.
If one of the data fields contains data, a
prompt will appear asking whether you
wish to store the entry.
X To store data entry: select¬.
The entry is created in the phone book and
in the address book.
Deleting contacts X
To select a contact: selectData/connec‐
tions QDelete contacts. You can select and delete the following
types of contact here:
R
Internal contacts
R Imported from the memory card
R Imported via Bluetooth
R Delete all
X To confirm your selection: pressW.
A prompt appears asking whether the data
should be deleted.
X Select Yes.
i Automatically imported contacts cannot
be deleted (Y page 119).
Calling a number stored in an entry Using the phone book
X
Select Name.
X Call up the contact (Y page 120).
X Contact with multiple phone numbers
(with G
G symbol): turncVd and
press W.
or
X Press SEND on the telephone keypad.
X Contact with one telephone number
(without G
G symbol): pressW.
or
X Press SEND on the telephone keypad.
Using the address book
X Select Data/connections.
X Open Address book.
X Call up the contact (Y page 120).
X Press the Wbutton.
X Turn cVd and press W.
or
X Press SEND on the telephone keypad.
Starting route guidance to an entry* i
You can use this function once you have
stored a destination in the destination
memory (Y page 158). COMAND also 122
Telephone*COMAND
* optional
216_AKB; 2; 3, en-GB
bjanott,
Version: 2.11.7.7 2009-02-27T14:54:17+01:00 - Seite 122
Dateiname: 6515230602_buchblock.pdf; erzeugt am 04. Mar 2009 11:15:10; WK
Page 126 of 421

stores the destination with the complete
navigable address data in the address
book.
X Search for an address book entry using the
¤ symbol.
X Display the details about an entry and high-
light the address data field.
X Select OptionsQNavigateQStart.
i You may only select Navigateif the
address data field contains complete, nav-
igable data. This is indicated by the ¤sym-
bol.
Voice tags* i
Voice tags are entered via LINGUA-
TRONIC* – see the separate operating
instructions for LINGUATRONIC*
Adding or changing a voice tag
i You can add one voice tag per address
book entry.
X Search for an address book entry with or
without a voice tag (¦ symbol).
X Select Options QVoice tag QAdd or
Change.
The subsequent operation is voice-control-
led. LINGUATRONIC* guides you through
the menus.
Deleting a voice tag
X Search for an address book entry with a
voice tag.
X Select Options QVoice tag Q
Delete.
A deletion prompt appears. Listening to a voice tag
X
Search for an address book entry with a
voice tag.
X Select Options QVoice tag QLis‐
ten.
You will hear the voice tag. Using call lists
COMAND displays lists of calls received
(including missed calls) and made during
phone operation.
i The respective menu item can only be
selected if calls have already been made or
received in COMAND or if the call lists have
been imported from the telephone.
Selecting an entry from the call list X
Press the Sfunction button.
X Select Call lists.
A menu appears. X
Select Incoming calls orCalls dial‐
led.
The corresponding list appears. Telephone*
123COMAND
* optional
216_AKB; 2; 3, en-GB
bjanott,
Version: 2.11.7.7 2009-02-27T14:54:17+01:00 - Seite 123 Z
Dateiname: 6515230602_buchblock.pdf; erzeugt am 04. Mar 2009 11:15:10; WK
Page 128 of 421

?
Data field for telephone number (filled in
automatically)
A Two-line speller
X For the following steps, follow the instruc-
tions as described in the "Add new contact"
section ( Ypage 121):
R switching the data field
R entering data
R deleting an entry
R cancelling an entry
R storing an entry
Adding to an existing entry in the address
book
X Open a call list.
X Select the list entry.
X Select OptionsQ Save number .
X Select Addto add an entry.
X Select a number category, e.g. Home.
X Select a telephone category, e.g. Mobile.
X Select Next (save) .
The search menu for address book entries
appears.
X Search for the desired entry (Y page 120).
X Once the search is completed, confirm the
selection.
COMAND stores the data if there are fewer
than five numbers assigned to the entry you
are searching for in the selected number
category.
You will see a message to this effect.
If five numbers are stored for the entry you
are searching for, a prompt will appear ask-
ing whether you wish to overwrite one of
the existing numbers.
X Select YesorNo. X
Confirm your selection.
If you select Yes, a selection list with the
five existing numbers is displayed.
X Select the number to be overwritten.
COMAND overwrites the selected number
with the new data. Navigation system* (introduction)
Safety notes
G
Risk of accident
For safety reasons, only enter a new destina-
tion when the vehicle is stationary.
COMAND calculates the route to the destina-
tion without taking account of the following,
for example:
R traffic lights
R stop and give way signs
R parking or stopping restrictions
R lane narrowing
R other road and traffic controls and regula-
tions
For this reason, you must always observe the
respective road and traffic rules and regula-
tions during your journey. Road and traffic
controls and regulations always have priority
over the navigation announcements gener-
ated by the system. General notes
Operational readiness of the navigation
system In vehicles for certain countries, the naviga-
tion system is not operational immediately
after delivery because the map software is
not pre-installed there.
If this is the case, you will see the following
message when you switch to navigation
mode:
The map software must be
installed. Please insert the DVD
containing the map software. Navigation system* (introduction)
125COMAND
* optional
216_AKB; 2; 3, en-GB
bjanott,
Version: 2.11.7.7 2009-02-27T14:54:17+01:00 - Seite 125 Z
Dateiname: 6515230602_buchblock.pdf; erzeugt am 04. Mar 2009 11:15:11; WK
Page 133 of 421
X
To set the map orientation: selectNavi
Q Map display.
The map display list appears. A #dot indi-
cates the current setting.
X Select North orientation, Direction
of travel ,Bird's-eye-view or3-D
map .
X To exit the menu: slideXVY.
Setting special destination symbols You can set the special destinations you wish
to have displayed as symbols on the map.
Special destinations are, for example, filling
stations, hotels, cinemas and restaurants.
The following settings are possible:
R Standard symbols (symbol display deter-
mined by the factory settings)
R Personal symbols (you can determine
the symbols yourself)
R No symbols
X To set: selectNaviQSpecial desti‐
nation symbols on map .
The map display list appears. A #dot indi-
cates the current setting.
X Select Standard symbols orPersonal
symbols orNo symbols.
If you select Personal symbols, the list of
special destinations appears.
X To activate/deactivate the symbol dis-
play: select the respective special destina-
tion.
Depending on their previous status the
symbols are switched on/off. If a tick is
shown, this indicates that the display is
switched on. You can switch on the symbol
displays for more than one special destina-
tion.
i The list shows all symbols that are con-
tained on the digital map across all coun-
tries. However, not all special destinations
are available in all countries. As a result,
certain special destination symbols may not be displayed on the map, even if the
symbol display is switched on.
X To exit the menu: slideXVY.
Selecting text information on the map Below the map shown, COMAND can display
various items of text information:
R time of arrival and distance from destina-
tion
R current street
R geo-coordinates
R none
Arrival time and distance to destination
X To display: selectNaviQText infor‐
mation on map .
The selection list appears. A #dot indi-
cates the current setting.
X Select Arrival time/Distance.
This will switch the display for arrival time
and distance to destination on or off,
depending on the previous setting.
Current street
You can set whether COMAND displays the
street you are currently driving on at the bot-
tom of the map.
X To display: selectNaviQText infor‐
mation on map .
The selection list appears. A #dot indi-
cates the current setting.
X Select Current street .
This will either show or hide the current
street, depending on the previous setting. 130
Navigation system* (introduction)COMAND
* optional
216_AKB; 2; 3, en-GB
bjanott,
Version: 2.11.7.7 2009-02-27T14:54:17+01:00 - Seite 130
Dateiname: 6515230602_buchblock.pdf; erzeugt am 04. Mar 2009 11:15:13; WK