2009 MERCEDES-BENZ CL COUPE ESP
[x] Cancel search: ESPPage 92 of 421

X
To save the setting: pressW.
X To exit the menu: slideXVY. Interactive content
DVDs can contain interactive content (e.g. a
video game). In a video game, you may be able
to influence events by selecting and trigger-
ing actions. The type and number of actions
depend on the DVD.
X To select an action: slideZVÆ orXVY .
X To trigger an action: pressW. TV*
General notes
The TV tuner is designed to receive analogue
terrestrial TV channels (all standards) and
digital TV channels conforming to the DVB-T
standard 8
.
Automatic picture shutoff If the vehicle is travelling faster than approx-
imately 6 km/h, the picture and teletext in TV
mode on the driver's side automatically
switch off. The following message appears in
the display:
In order not to distract
the driver, the picture is faded out
while the vehicle is in motion . As
soon as the vehicle speed drops below about
3 km/h, the picture switches back on again.
Switching off the picture and sound The constantly changing reception conditions
while the vehicle is in motion can interrupt the
signal. If the reception is too poor, COMAND
may switch off the sound and freeze or hide
the picture. In this case, you will see the
respective symbol in the display. TV menu overview
The following menus are available:
R TV Q Station, Save station, Channel
input, Brightness, Contrast, Colour, Auto,
16:9 optimised, 4:3, Widescreen, Channel
fix, TV standard, Audio 1, Audio 2
R Memory QAutostore, Channel preset list
R Info QInformation on current programme
(digital stations only)
R Teletext QSwitch on teletext
R Sound QTrebles, basses, balance/fader,
surround sound* Switching to TV mode
X Select VideoQTV. Hiding or showing the control menu
X To show: slideZVÆ.
X To hide: slideZVÆ.
or
X Wait for approximately eight seconds. Control menu displayed
:
Selected TV channel
; Current programme (digital TV receiver
only)
= Next station
? Current programme on the next TV chan-
nel in the list (digital TV receiver only)
8 DVB-T may not be available in some countries, or may not be available in all areas. TV*
89COMAND
* optional
216_AKB; 2; 3, en-GB
bjanott,
Version: 2.11.7.7
2009-02-27T14:54:17+01:00 - Seite 89 Z
Dateiname: 6515230602_buchblock.pdf; erzeugt am 04. Mar 2009 11:15:02; WK
Page 99 of 421

Selecting music files
X
Select All music files.
This function copies all music files on the
selected data carrier. The symbol in front
of All music files is filled in.
X Select Next.
The copying menu appears.
Starting the copying process :
To copy from a memory card
; To copy to the MUSIC REGISTER
= Memory requirement; see "Calling up
memory space info" (Y page 96)
? To start the copying process
A Name of the data carrier from which data
is being copied and storage location
B To cancel copying of music files
C Data carrier position in the media list
X Select Start.
Copying begins. The progress bar indicates
the status of the copying procedure.
X To exit without copying music files:
select Back.
X To select the destination folder: scroll up
or down and select the respective folder.
Once copying is complete, you hear the
first track on the album copied. The MUSIC
REGISTER display appears. Now you can
copy more music files to the MUSIC REG-
ISTER.
! Under no circumstances should you
remove the memory card while you are copying data from it. This will generate
unusable data in the MUSIC REGISTER.
:
Progress bar
i It may take some time for the music to be
copied, depending on the amount of data.
The time required may vary depending on
the data source. If there is not enough
memory space, you will see a message to
this effect.
X To cancel copying: selectCancel.
Music files up until the point of cancellation
are stored in the MUSIC REGISTER. Deleting all music files
This function deletes all music files from the
MUSIC REGISTER.
! The deletion procedure may take several
minutes. In order to prevent malfunctions,
do not use COMAND during this time.
X Select MUSIC REGISTERQDelete all
music files.
A prompt appears, asking whether the
entry should be deleted. Calling up memory space info
X Select MUSIC REGISTERQMemory info.
You see a window with details about:
R storage capacity
R available memory 96
MUSIC REGISTER*COMAND
* optional
216_AKB; 2; 3, en-GB
bjanott,
Version: 2.11.7.7 2009-02-27T14:54:17+01:00 - Seite 96
Dateiname: 6515230602_buchblock.pdf; erzeugt am 04. Mar 2009 11:15:04; WK
Page 100 of 421

R
occupied memory
R content (folders, tracks) Folder functions
You can view the MUSIC REGISTER contents,
modify data and delete it.
Calling up the MUSIC REGISTER X
Select Rename/delete files.
or
X Press Wwhen the display/selection win-
dow is active.
You see the contents of the current folder. :
Folder selection symbol
; Icon for music file
= Current folder
X To select one folder higher: select the
U symbol.
The display changes to the next folder up.
Changing the folder/track name X
Select Rename/delete files.
X To select a folder/track: slideZVÆ or
turn cVd.
X Select Options QChange.
X Enter a name for the folder/track in the
entry line.
X To store changes: select¬. Deleting folders/tracks X
Select Rename/delete files.
X To select a folder/track: slideZVÆ or
turn cVd.
X Select Options QDelete.
A query appears. Playback options
The following options are available to you:
R Normal track sequence
You will hear the tracks in the normal order
(e.g. track 1, 2, 3, etc.).
R Random media
The tracks in the currently active medium
are played in random order.
R Random track list
The tracks in the currently active track list
are played in random order.
X To select options: switch to MUSIC REG-
ISTER (Y page 95).
X Select MUSIC REGISTER.
The options list appears. A #dot indicates
the option selected.
X Select an option.
The option is switched on. For all options
except "Normal track sequence", you will
see a corresponding display in the display/
selection window. See example of display
(Y page 95), item B.
i The "Normal track sequence" option is
automatically selected when you change
the medium you are currently listening to
or when you select a different medium. If
an option is selected, it remains selected
after COMAND is switched on or off. MUSIC REGISTER*
97COMAND
* optional
216_AKB; 2; 3, en-GB
bjanott,
Version: 2.11.7.7 2009-02-27T14:54:17+01:00 - Seite 97 Z
Dateiname: 6515230602_buchblock.pdf; erzeugt am 04. Mar 2009 11:15:04; WK
Page 102 of 421
i
Never leave external devices in the vehi-
cle as extreme temperatures (e.g. if sub-
jected to direct sunlight or at extremely low
outside temperatures) may prevent them
from functioning correctly (see separate
operating instructions of the respective
device). Mercedes-Benz does not take
responsibility for any damage to external
devices. :
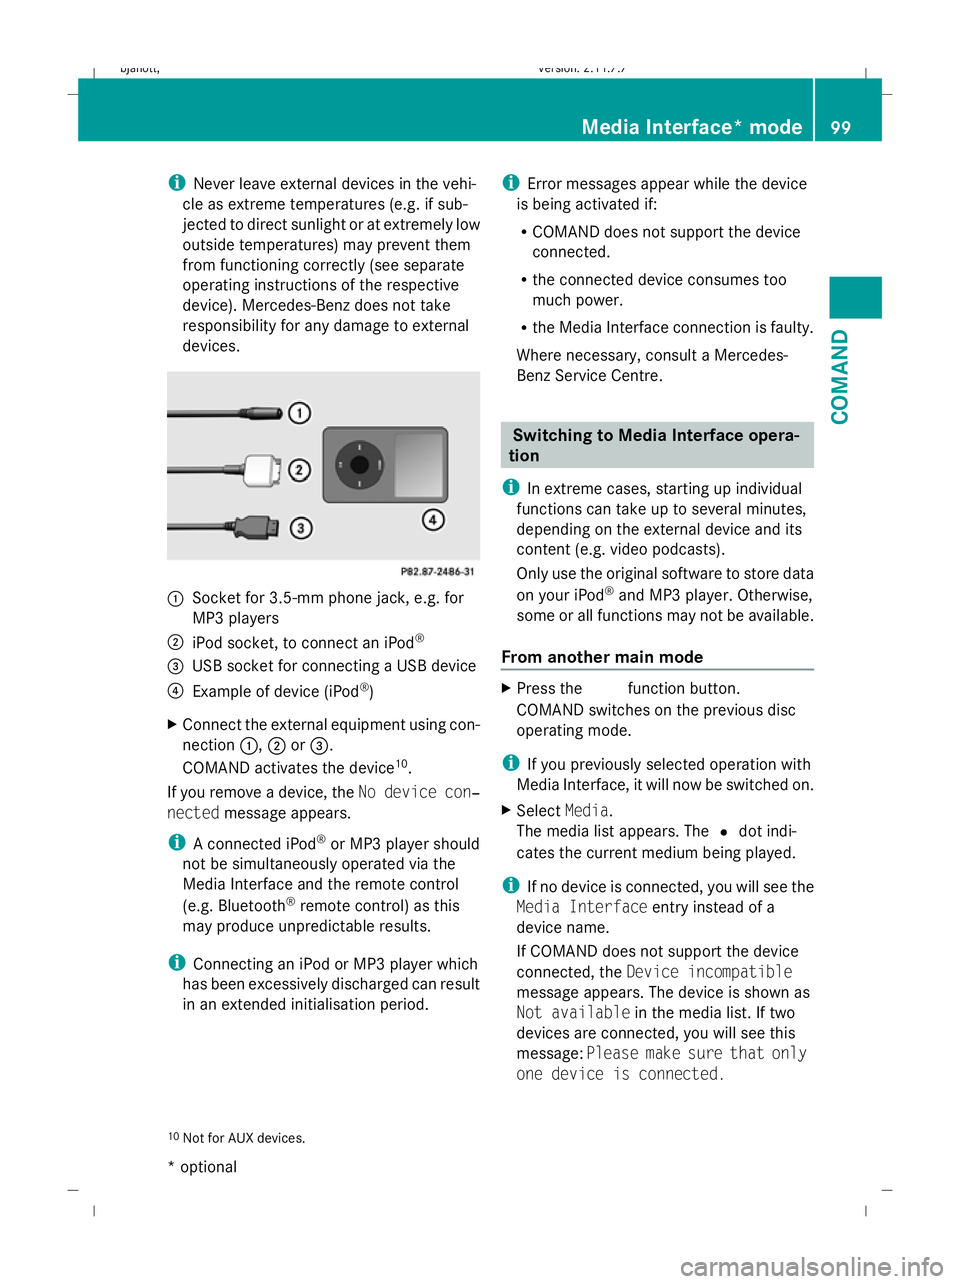
Socket for 3.5-mm phone jack, e.g. for
MP3 players
; iPod socket, to connect an iPod ®
= USB socket for connecting a USB device
? Example of device (iPod ®
)
X Connect the external equipment using con-
nection :,;or=.
COMAND activates the device 10
.
If you remove a device, the No device con‐
nected message appears.
i A connected iPod ®
or MP3 player should
not be simultaneously operated via the
Media Interface and the remote control
(e.g. Bluetooth ®
remote control) as this
may produce unpredictable results.
i Connecting an iPod or MP3 player which
has been excessively discharged can result
in an extended initialisation period. i
Error messages appear while the device
is being activated if:
R COMAND does not support the device
connected.
R the connected device consumes too
much power.
R the Media Interface connection is faulty.
Where necessary, consult a Mercedes-
Benz Service Centre. Switching to Media Interface opera-
tion
i In extreme cases, starting up individual
functions can take up to several minutes,
depending on the external device and its
content (e.g. video podcasts).
Only use the original software to store data
on your iPod ®
and MP3 player. Otherwise,
some or all functions may not be available.
From another main mode X
Press the Rfunction button.
COMAND switches on the previous disc
operating mode.
i If you previously selected operation with
Media Interface, it will now be switched on.
X Select Media.
The media list appears. The #dot indi-
cates the current medium being played.
i If no device is connected, you will see the
Media Interface entry instead of a
device name.
If COMAND does not support the device
connected, the Device incompatible
message appears. The device is shown as
Not available in the media list. If two
devices are connected, you will see this
message: Please make sure that only
one device is connected.
10 Not for AUX devices. Media Interface* mode
99COMAND
* optional
216_AKB; 2; 3, en-GB
bjanott,
Version: 2.11.7.7 2009-02-27T14:54:17+01:00 - Seite 99 Z
Dateiname: 6515230602_buchblock.pdf; erzeugt am 04. Mar 2009 11:15:04; WK
Page 103 of 421

X
Confirm your entry with W.
COMAND activates the connected device.
You will see a message to this effect. The
basic display then appears. Example display: iPod mode
:
Type of data medium
; Track number
= Track name
? Visual time display
A Track time
B Visual track display
C Current playback settings (no icon for
"Normal track sequence")
D Sound settings
E Media list
F Album name (if supplied)
G Categories, playlists and/or folders
H Artist (if supplied)
I Playback options
i Type of data medium :connected is
indicated by the corresponding icon for
iPod ®
, MP3 player or USB mass storage
device.
i If the device connected does not contain
any playable tracks, a message appears to
this effect. From audio mode X
Connect an external device (Y page 98).
COMAND activates the device. The basic
display then appears.
or
X Select AudioQMedia Interface . Selecting
music files
i COMAND displays the data stored on the
iPod ®
, MP3 player or USB mass storage
device according to the filing structure
used in the respective medium.
Selecting by skipping to a track X
To skip forwards or backwards to a
track: slideXVY or turn cVd.
or
X Press the 9or: button on the multi-
function steering wheel.
i Skipping forward skips to the next track.
Skipping backwards skips to the beginning
of the current track if the track has been
playing for more than eight seconds. If the
track has been playing for less than eight
seconds, it skips to the start of the previous
track. If you have selected a playback
option other than Normal track
sequence, the track sequence is random.
Selecting using the number keypad X
To make an entry: press theUbutton.
An input menu appears. The number of
characters available for input depends on
the number of stored tracks.
X To enter a track number: press a number
key, such as q.
The digit is entered in the first position in
the input line.
i COMAND will ignore and not display an
invalid digit. 100
Media Interface* modeCOMAND
* optional
216_AKB; 2; 3, en-GB
bjanott
,V ersion: 2.11.7.7
2009-02-27T14:54:17+01:00 - Seite 100
Dateiname: 6515230602_buchblock.pdf; erzeugt am 04. Mar 2009 11:15:05; WK
Page 104 of 421

X
If desired, enter further digits.
X To confirm your entry: pressW.
or
X Press and hold the number key for the last
number of the desired track number.
The selected track is played.
Fast forward/rewind X
If the display/selection window is
active: slideXVY and hold until you reach
the desired position.
i On an iPod ®
, the fast rewind function can
only be used within the currently playing
track. Selecting a category/playlist/folder
iPod ®
and selected MP3 players You can select tracks for an iPod
®
and MP3
player according to categories and folders.
Categories can include:
R Current track list
R Playlists
R Artists
R Albums
R Tracks
R Podcasts
R Genres
R Composers
R Audiobooks
i Some playback categories contain the
All entry. When this entry has been selec-
ted, the entire content of the category
selected will be played.
USB devices For USB mass storage devices, you can select
folders and also playlists (if available). When
playing back from playlists, COMAND can also display the respective album and artist
name (metadata), if these have been uploa-
ded to the system.
Playlists are indicated in the display by a spe-
cial icon. When you open the playlist, the cor-
responding tracks are opened and playback
begins when you select a track.
For USB mass storage devices, you can
choose to display the metadata contained in
the tags of the encoded music data, or to dis-
play the file and directory names during play-
back.
X
To display album and artist name: select
Media Interface QDisplay Meta‐
data.
Selecting a category and opening a
folder X
To open a category list/folder: pressW
when the display/selection window is
active.
or
X Select Music.
You will see the available categories or the
folder content (e.g. other folders).
i The Music menu item is not available until
the device has been activated. Example of display: category list
:
Device icon and device name, or the cat-
egory selected
; Selectable categories Media Interface* mode
101COMAND
* optional
216_AKB; 2; 3, en-GB
bjanott,
Version: 2.11.7.7 2009-02-27T14:54:17+01:00 - Seite 101 Z
Dateiname: 6515230602_buchblock.pdf; erzeugt am 04. Mar 2009 11:15:05; WK
Page 105 of 421

X
To select a category/folder: slideZVÆ
or turn cVdand confirm with W.
You will see the content of the selected
category or selected folder.
i If the data still has to be read from the
connected device, you will see the Please
wait... message.
X If necessary, repeat this operating step
until the tracks in the desired folder/album
appear. Example of display: current track list
:
Icon for next folder up
; Current category
= Track icon
? Current track
X To select a track: slideZVÆor turn
cV dand confirm with W.
The track is played.
X To select one folder higher: selectU
and confirm.
i The U icon is always listed right at the
top of the folder in question. Playing the content of a category or
folder
X Select a category or folder.
X Press Wfor longer than two seconds.
The content of the category or folder selec-
ted is played in accordance with the play-
back option (Y page 103) selected. Alphabetical track selection
iPod ®
and MP3 player i
This function is available for alphabeti-
cally sorted categories and folders.
X Select a category, e.g. Artists.
The available artists appear.
X Press the corresponding number key once
or repeatedly to select the initial letter of
the desired artist. For example, to select an
artist whose name begins with "C", press
the l number key three times.
You see the available letters at the bottom
edge of the display.
i If there is no entry beginning with the let-
ter entered, the last entry beginning with
the previous letter is shown at the top of
the list.
i For an iPod ®
and MP3 player, the quality
of the search results is highly dependent on
the version and language variant of the
software (e.g. iTunes ®
version) used to
populate the device.
USB mass storage devices i
This function is available for alphabeti-
cally sorted directories. This function is not
available for playlists, for example.
X In a directory, press the appropriate num-
ber key once or several times to select the
first letter of the artist's name (e.g. for an 102
Media Interface* modeCOMAND
* optional
216_AKB; 2; 3, en-GB
bjanott,
Version: 2.11.7.7 2009-02-27T14:54:17+01:00 - Seite 102
Dateiname: 6515230602_buchblock.pdf; erzeugt am 04. Mar 2009 11:15:05; WK
Page 111 of 421
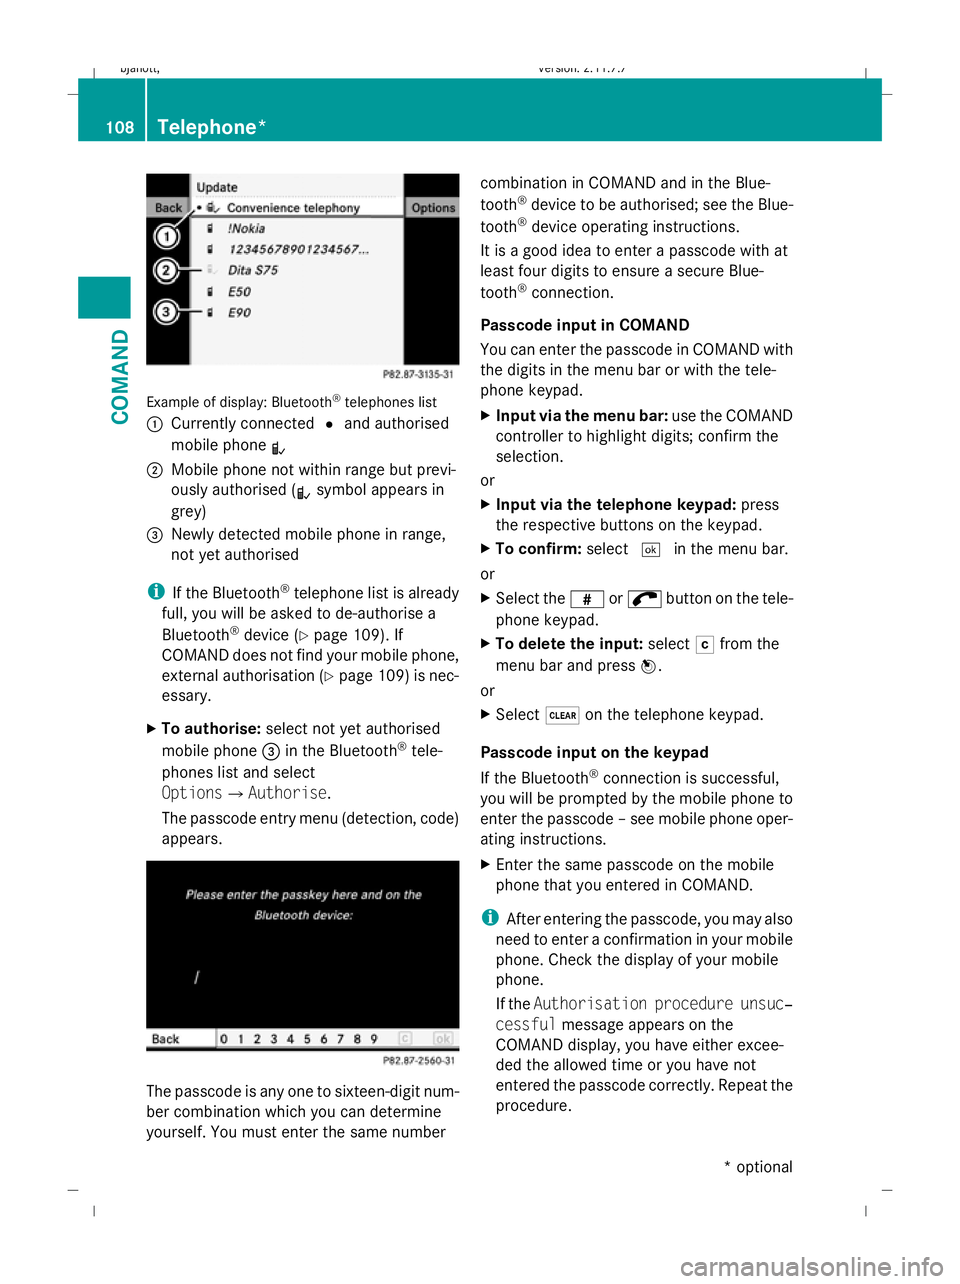
Example of display: Bluetooth
®
telephones list
: Currently connected #and authorised
mobile phone L
; Mobile phone not within range but previ-
ously authorised ( Lsymbol appears in
grey)
= Newly detected mobile phone in range,
not yet authorised
i If the Bluetooth ®
telephone list is already
full, you will be asked to de-authorise a
Bluetooth ®
device (Y page 109). If
COMAND does not find your mobile phone,
external authorisation (Y page 109) is nec-
essary.
X To authorise: select not yet authorised
mobile phone =in the Bluetooth ®
tele-
phones list and select
OptionsQAuthorise.
The passcode entry menu (detection, code)
appears. The passcode is any one to sixteen-digit num-
ber combination which you can determine
yourself. You must enter the same number combination in COMAND and in the Blue-
tooth
®
device to be authorised; see the Blue-
tooth ®
device operating instructions.
It is a good idea to enter a passcode with at
least four digits to ensure a secure Blue-
tooth ®
connection.
Passcode input in COMAND
You can enter the passcode in COMAND with
the digits in the menu bar or with the tele-
phone keypad.
X Input via the menu bar: use the COMAND
controller to highlight digits; confirm the
selection.
or
X Input via the telephone keypad: press
the respective buttons on the keypad.
X To confirm: select¬in the menu bar.
or
X Select the zor; button on the tele-
phone keypad.
X To delete the input: selectFfrom the
menu bar and press W.
or
X Select $on the telephone keypad.
Passcode input on the keypad
If the Bluetooth ®
connection is successful,
you will be prompted by the mobile phone to
enter the passcode – see mobile phone oper-
ating instructions.
X Enter the same passcode on the mobile
phone that you entered in COMAND.
i After entering the passcode, you may also
need to enter a confirmation in your mobile
phone. Check the display of your mobile
phone.
If the Authorisation procedure unsuc‐
cessful message appears on the
COMAND display, you have either excee-
ded the allowed time or you have not
entered the passcode correctly. Repeat the
procedure. 108
Telephone*COMAND
* optional
216_AKB; 2; 3, en-GB
bjanott,
Version: 2.11.7.7 2009-02-27T14:54:17+01:00 - Seite 108
Dateiname: 6515230602_buchblock.pdf; erzeugt am 04. Mar 2009 11:15:06; WK