2009 HYUNDAI TUCSON stop start
[x] Cancel search: stop startPage 157 of 273
2
DRIVING YOUR HYUNDAI
22
o Take care of your tires. Keep them in-
flated to the recommended pressure.
Incorrect inflation, either too much or
too little, results in unnecessary tire
wear. Check the tire pressures at least
once a month.
o Be sure that the wheels are aligned
correctly. Improper alignment can re-
sult from hitting curbs or driving too fast
over irregular surfaces. Poor alignment
causes faster tire wear and may also
result in other problems as well as
greater fuel consumption.
o Keep your car in good condition. For
better fuel economy and reduced main-
tenance costs, maintain your car in ac-
cordance with the maintenance sched-
ule in Section 5. If you drive your car in
severe conditions, more frequent main-
tenance is required (see Section 5 for
details).
o Keep your car clean. For maximum
service, your Hyundai should be kept
clean and free of corrosive materials. It
is especially important that mud, dirt,
ice, etc. not be allowed to accumulate
on the underside of the car. This extra
weight can result in increased fuel con-
sumption and also contribute to corro-
sion.o Travel lightly. Don't carry unnecessary
weight in your car. Weight reduces fuel
economy.
o Don't let the engine idle longer than
necessary. If you are waiting (and not in
traffic), turn off your engine and restart
only when you're ready to go.
o Remember, your Hyundai does not re-
quire extended warm-up. After the en-
gine has started, allow the engine to run
for 10 to 20 seconds prior to placing the
vehicle in gear. In very cold weather,
however, give your engine a slightly
longer warm-up period.
o Don't "lug" or "over-rev" the engine.
Lugging is driving too slowly in too high
a gear resulting in the engine bucking.
If this happens, shift to a lower gear.
Over-revving is racing the engine be-
yond its safe limit. This can be avoided
by shifting at the recommended speeds.
o Use your air conditioning sparingly. The
air conditioning system is operated by
engine power so your fuel economy is
reduced when you use it.
DRIVING FOR ECONOMYC140A02A-AATYou can save fuel and get more miles from
your car if you follow these suggestions:
o Drive smoothly. Accelerate at a moder-
ate rate. Don't make "jack-rabbit" starts
or full-throttle shifts and maintain a
steady cruising speed. Don't race be-
tween stoplights. Try to adjust your
speed to that of the other traffic so you
don't have to change speeds unneces-
sarily. Avoid heavy traffic whenever pos-
sible. Always maintain a safe distance
from other vehicles so you can avoid
unnecessary braking. This also reduces
brake wear.
o Drive at a moderate speed. The faster
you drive, the more fuel your car uses.
Driving at a moderate speed, espe-
cially on the highway, is one of the most
effective ways to reduce fuel consump-
tion.
o Don't "ride" the brake or clutch pedal.
This can increase fuel consumption and
also increase wear on these compo-
nents. In addition, driving with your foot
resting on the brake pedal may cause
the brakes to overheat, which reduces
their effectiveness and may lead to more
serious consequences.
Page 163 of 273
2
DRIVING YOUR HYUNDAI
28
C190F01O-AATTrailer or Vehicle Towing Tips1. Before towing, check hitch and safety
chain connections as well as proper
operation of the trailer running lights,
brake lights, and turn signals.
2. Trailer towing requires more fuel than
normal conditions.
3. To maintain engine braking efficiency,
do not tow a trailer with the transaxle in
fifth gear (manual transaxle) or over-
drive (automatic transaxle).
4. Always secure items in the trailer to
prevent load shift while driving.
5. Check the condition and air pressure of
all tires on the trailer and your car. Low
tire pressure can seriously affect the
handling. Also check the spare tire.
6. The vehicle/trailer combination is more
affected by crosswind and buffeting.
When being passed by a large vehicle,
keep a constant speed and steer straight
ahead. If there is too much wind buffet-
ing, slow down to get out of the other
vehicle's air turbulence.
7. When parking your car and trailer, es-
pecially on a hill, be sure to follow all the
normal precautions. Turn your front
wheel into the curb, set the parking
brake firmly, and put the transaxle in 1st
or Reverse (manual) or Park (automatic).
In addition, place wheel chocks at each
of the trailer's tires.8. If the trailer has electric brakes, start
your vehicle and trailer moving, and
then apply the trailer brake controller by
hand to be sure the brakes are working.
This lets you check your electrical con-
nection at the same time.
9. During your trip, check occasionally to
be sure that the load is secure, and that
the lights and any trailer brakes are still
working.
10. Avoid jerky starts, sudden accelera-
tion or sudden stops.
11. Avoid sharp turns and rapid lane
changes.
12. Avoid holding the brake pedal down
too long or too frequently. This could
cause the brakes to overheat, resulting
in reduced braking efficiency.
13. When going down a hill, shift into a
lower gear and use the engine braking
effect.
When ascending a long grade, down-
shift the transaxle to a lower gear and
reduce speed to reduce chances of
engine overloading and/or overheat-
ing.
14. If you have to stop while going uphill,
do not hold the vehicle in place by
pressing on the accelerator. This can
cause the automatic transaxle to over-
heat. Use the parking brake or
footbrake.
15.If the transaxle shifts frequently while
going up a hill, shift down one gear.
!
WARNING:
o Improperly loading your vehicle and
trailer can seriously affect its steer-
ing and braking performance causing
a crash which could cause serious
injury or death.
o Towing a trailer affected vehicle han-
dling and braking.
o Drive more slowly when towing a trailer
and allow more distance when brak-
ing.
o Be careful when driving in slippery
and windy conditions.
o Be careful when turning and while
driving up and down hills.
o Do not exceed 45 mph or the posted
towing speed limit, whichever is lower.
Page 175 of 273

36WHAT TO DO IN AN EMERGENCY
!
TPMS (Tire pressure moni-
toring system) malfunction
indicator
The TPMS malfunction indicator turns
on and stays on when there is a problem
with the Tire Pressure Monitoring Sys-
tem. If the system is able to correctly
detect an under-inflation warning at the
same time as system failure then it will
illuminate both the TPMS malfunction
and the low tire pressure telltale e. g. if
Front Left sensor fails, the TPMS mal-
function indicator turns on, but if Front Low tire pressure telltale
When the tire pressure monitoring sys-
tem warning telltale is illuminated, one
or more of your tires is significantly
under-inflated.
Immediately reduce your speed, avoid
hard cornering and anticipate increased
stopping distances. You should stop
and check your tires as soon as pos-
sible. Inflate the tires to the proper
pressure as indicated on the vehicle’s
placard or tire inflation pressure label
located on the driver’s side center pillar
outer panel. If you cannot reach a ser-
vice station or if the tire cannot hold the
newly added air, replace the low pres-
sure tire with the temporary spare tire.
Then the TPMS malfunction indicator
may turn on and the Low Tire Pressure
telltale may turn off after restarting and
about 20 minutes of continuous driving
before you have the low-pressure tire
repaired and replaced on the vehicle.WARNING - Low pressure
damage
Significantly low tire pressure makes
the vehicle unstable and can contrib-
ute to loss of vehicle control and
increased braking distances.
Continued driving on low pressure
tires can cause the tires to overheat
and fail.
CAUTION - Changing tem-
peratures
In winter or cold weather, the low tire
pressure telltale may be illuminated
if the tire pressure was adjusted to
the recommended tire inflation pres-
sure in warm weather. It does not
mean your TPMS is malfunctioning
because the decreased temperature
leads to a proportional lowering of
tire pressure.
When you drive your vehicle from a
warm area to a cold area or from a
cold area to a warm area, or the
outside temperature is greatly higher
or lower, you should check the tire
inflation pressure and adjust the tires
to the recommended tire inflation
pressure.
!
Page 203 of 273
5
VEHICLE MAINTENANCE REQUIREMENTS
9
F070L01A-AATo Suspension Mounting BoltsCheck the suspension connections for
looseness or damage. Retighten to the
specified torque.
F070G02A-AATo Brake FluidCheck brake fluid level in the brake fluid
reservoir. The level should be between
"MIN" and "MAX" marks on the side of the
reservoir. Use only hydraulic brake fluid
conforming to DOT 3 or DOT 4.F070F01A-AATo Brake Hoses and LinesVisually check for proper installation, chaf-
ing, cracks, deterioration and any leak-
age. Replace any deteriorated or dam-
aged parts immediately.
F070K01A-AATo Exhaust Pipe and MufflerVisually inspect the exhaust pipes, muffler
and
hangers for cracks, deterioration, or dam-
age. Start the engine and listen carefully
for any exhaust gas leakage. Tighten con-
nections or replace parts as necessary.
F070J01A-AATo Brake Pads, Calipers and RotorsCheck the pads for excessive wear, discs
for run out and wear, and calipers for fluid
leakage.F070H01O-AATo Rear Brake Discs and Linings/
Parking BrakeCheck the rear brake discs and linings for
scoring, burning, leaking fluid, broken parts,
and excessive wear. Inspect the parking
brake system including the parking brake
lever and cables. For detailed service pro-
cedures, refer to the Shop Manual.
F070M01A-AATo Steering Gear Box, Linkage &
Boots/Lower Arm Ball JointWith the vehicle stopped and engine off,
check for excessive free-play in the steer-
ing wheel.
Check the linkage for bends or damage.
Check the dust boots and ball joints for
deterioration, cracks, or damage. Replace
any damaged parts.
F070Q01A-AATo Air Conditioning RefrigerantCheck the air conditioning lines and con-
nections for leakage and damage. Check
air conditioning performance according to
the relevant shop manual if necessary.F070P01A-AATo Driveshafts and BootsCheck the drive shafts, boots and clamps
for cracks, deterioration, or damage. Re-
place any damaged parts and, if neces-
sary, repack the grease.F070N01A-AATo Power Steering Pump, Belt and
HosesCheck the power steering pump and hoses
for leakage and damage. Replace any
damaged or leaking parts immediately.
Inspect the power steering belt for evi-
dence of cuts, cracks, excessive wear,
oiliness and proper tension. Replace or
adjust it if necessary.
Page 211 of 273
6
DO-IT-YOURSELF MAINTENANCE
7
6. Install a new oil filter in accordance with
the instructions on the carton or on the
filter itself. Do not over-tighten. (Tight-
ening torque : 1.2 ~ 1.6 kgf.m) Be sure
that the mounting surface on the engine
is clean and that the old gasket is re-
moved completely. Lubricate the new
gasket on the filter with clean engine oil
before installation.
7. Remove the engine oil level dipstick.
8. Refill the crankcase with the recom-
mended engine oil. Refer to the speci-
fication in chapter 9 for engine oil ca-
pacity.
!
PROPOSITION 65 WARNING:
This product contains a chemical known
to the State of California to cause can-
cer. Used engine oil may cause irritation
or cancer of the skin if left in contact with
the skin for prolonged periods of time.
Used engine oil contains chemicals that
have caused cancer in laboratory ani-
mals. Always protect your skin by wash-
ing your hands thoroughly with soap and
warm water as soon as possible after
handling used oil.
!
WARNING:
Be very careful when draining the en-
gine oil as it may be hot enough to burn
you! 2. Open the hood and remove the engine
oil filler cap.
3. Slide underneath the car and loosen
the drain plug by turning it counter-
clockwise with a wrench of the proper
size. Be sure that a drain pan is in
position to catch the oil as it drains out,
then remove the drain plug.
4. When the oil has stopped draining, re-
place the drain plug using a new washer
and retighten by turning it clockwise.
Oil pan drain plug tightening torque:
3.5 ~ 4.5 kgf.m (2.7L)
4.0 ~ 4.5 kgf.m (2.0L)
5. Remove the oil filter by turning it coun-
terclockwise with a oil filter wrench of
the proper size. A certain amount of oil
will come out when you remove the
filter. So be sure to have your drain pan
in place underneath it.
CAUTION:
Slowly pour the recommended oil using
by a funnel. Do not overfill! Engine dam-
age may occur if overfilled.
!
9. Start the engine and check to be sure no
oil is leaking from the drain plug or oil
filter.
10. Shut off the engine and recheck the oil
level.
NOTE:Always dispose of used engine oil in an
environmentally acceptable manner. It
is suggested that it be placed in a sealed
container and taken to a service station
for reclamation. Do not pour the oil on the
ground or put it in with the household
trash.
Page 213 of 273
6
DO-IT-YOURSELF MAINTENANCE
9
!
!
WARNING:
The cooling fan is controlled by engine
coolant temperature and may some-
times operate even when the engine is
not running. Use extreme caution when
working near the blades of the coolant
fan so that you are not injured by a
rotating fan blade. As the engine coolant
temperature decreases, the fan will au-
tomatically shut off. This is a normal
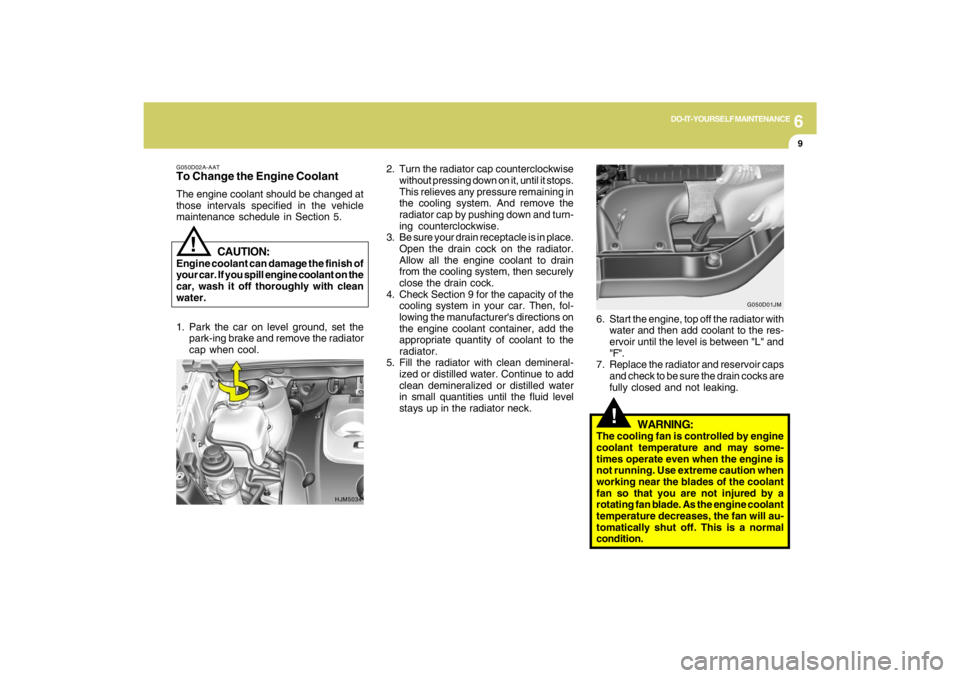
condition. 2. Turn the radiator cap counterclockwise
without pressing down on it, until it stops.
This relieves any pressure remaining in
the cooling system. And remove the
radiator cap by pushing down and turn-
ing counterclockwise.
3. Be sure your drain receptacle is in place.
Open the drain cock on the radiator.
Allow all the engine coolant to drain
from the cooling system, then securely
close the drain cock.
4. Check Section 9 for the capacity of the
cooling system in your car. Then, fol-
lowing the manufacturer's directions on
the engine coolant container, add the
appropriate quantity of coolant to the
radiator.
5. Fill the radiator with clean demineral-
ized or distilled water. Continue to add
clean demineralized or distilled water
in small quantities until the fluid level
stays up in the radiator neck.6. Start the engine, top off the radiator with
water and then add coolant to the res-
ervoir until the level is between "L" and
"F".
7. Replace the radiator and reservoir caps
and check to be sure the drain cocks are
fully closed and not leaking.
G050D02A-AATTo Change the Engine CoolantThe engine coolant should be changed at
those intervals specified in the vehicle
maintenance schedule in Section 5.
HJM5034G050D01JM
CAUTION:
Engine coolant can damage the finish of
your car. If you spill engine coolant on the
car, wash it off thoroughly with clean
water.
1. Park the car on level ground, set the
park-ing brake and remove the radiator
cap when cool.
Page 229 of 273
6
DO-IT-YOURSELF MAINTENANCE
25
POWER STEERING FLUID
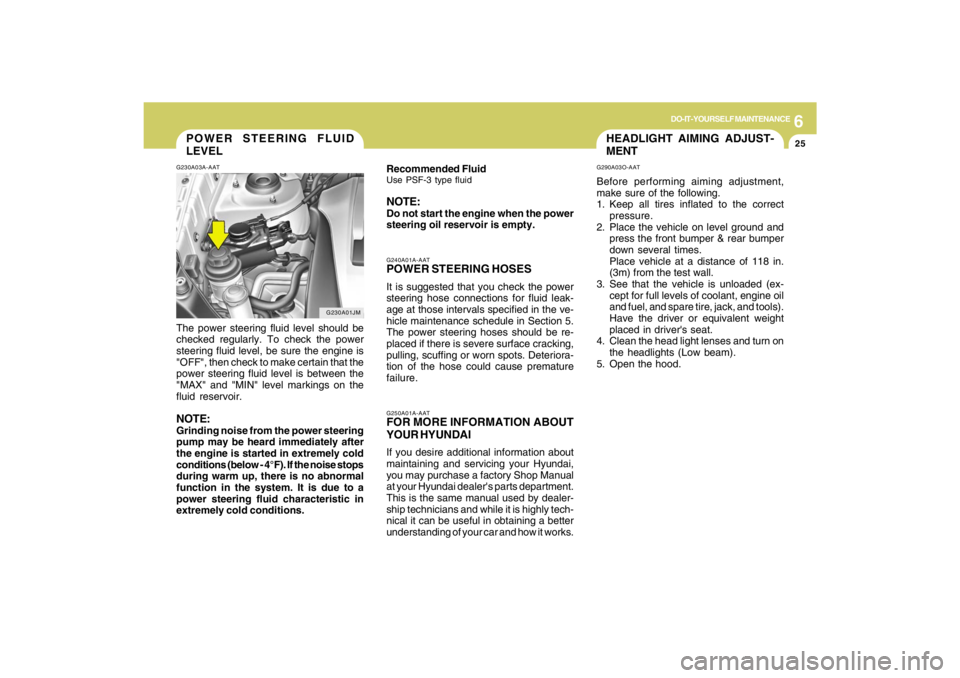
LEVELG230A03A-AATThe power steering fluid level should be
checked regularly. To check the power
steering fluid level, be sure the engine is
"OFF", then check to make certain that the
power steering fluid level is between the
"MAX" and "MIN" level markings on the
fluid reservoir.NOTE:Grinding noise from the power steering
pump may be heard immediately after
the engine is started in extremely cold
conditions (below - 4°F). If the noise stops
during warm up, there is no abnormal
function in the system. It is due to a
power steering fluid characteristic in
extremely cold conditions.
G230A01JM
HEADLIGHT AIMING ADJUST-
MENTG290A03O-AATBefore performing aiming adjustment,
make sure of the following.
1. Keep all tires inflated to the correct
pressure.
2. Place the vehicle on level ground and
press the front bumper & rear bumper
down several times.
Place vehicle at a distance of 118 in.
(3m) from the test wall.
3. See that the vehicle is unloaded (ex-
cept for full levels of coolant, engine oil
and fuel, and spare tire, jack, and tools).
Have the driver or equivalent weight
placed in driver's seat.
4. Clean the head light lenses and turn on
the headlights (Low beam).
5. Open the hood.
G250A01A-AATFOR MORE INFORMATION ABOUT
YOUR HYUNDAIIf you desire additional information about
maintaining and servicing your Hyundai,
you may purchase a factory Shop Manual
at your Hyundai dealer's parts department.
This is the same manual used by dealer-
ship technicians and while it is highly tech-
nical it can be useful in obtaining a better
understanding of your car and how it works.G240A01A-AATPOWER STEERING HOSESIt is suggested that you check the power
steering hose connections for fluid leak-
age at those intervals specified in the ve-
hicle maintenance schedule in Section 5.
The power steering hoses should be re-
placed if there is severe surface cracking,
pulling, scuffing or worn spots. Deteriora-
tion of the hose could cause premature
failure. Recommended FluidUse PSF-3 type fluidNOTE:Do not start the engine when the power
steering oil reservoir is empty.
Page 239 of 273
6
DO-IT-YOURSELF MAINTENANCE
35
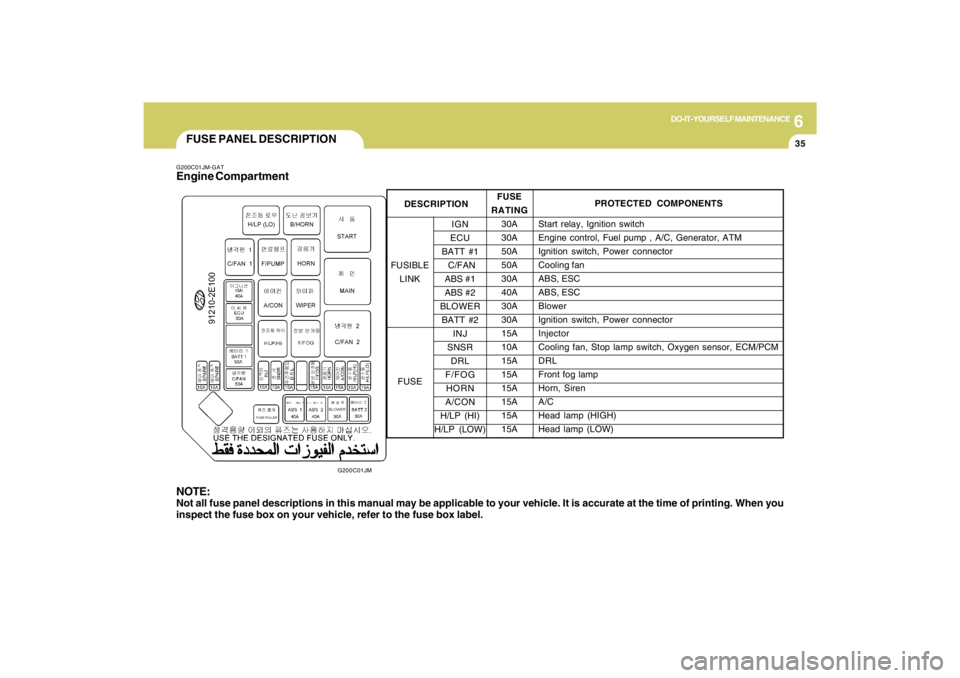
FUSE PANEL DESCRIPTIONG200C01JM-GATEngine Compartment
G200C01JM
NOTE:Not all fuse panel descriptions in this manual may be applicable to your vehicle. It is accurate at the time of printing. When you
inspect the fuse box on your vehicle, refer to the fuse box label.
FUSE
RATING
30A
30A
50A
50A
30A
40A
30A
30A
15A
10A
15A
15A
15A
15A
15A
15APROTECTED COMPONENTS
Start relay, Ignition switch
Engine control, Fuel pump , A/C, Generator, ATM
Ignition switch, Power connector
Cooling fan
ABS, ESC
ABS, ESC
Blower
Ignition switch, Power connector
Injector
Cooling fan, Stop lamp switch, Oxygen sensor, ECM/PCM
DRL
Front fog lamp
Horn, Siren
A/C
Head lamp (HIGH)
Head lamp (LOW)
IGN
ECU
BATT #1
C/FAN
ABS #1
ABS #2
BLOWER
BATT #2
INJ
SNSR
DRL
F/FOG
HORN
A/CON
H/LP (HI)
H/LP (LOW) FUSIBLE
LINK
FUSE
DESCRIPTION