2009 Hyundai Santa Fe airbag
[x] Cancel search: airbagPage 9 of 269
F9
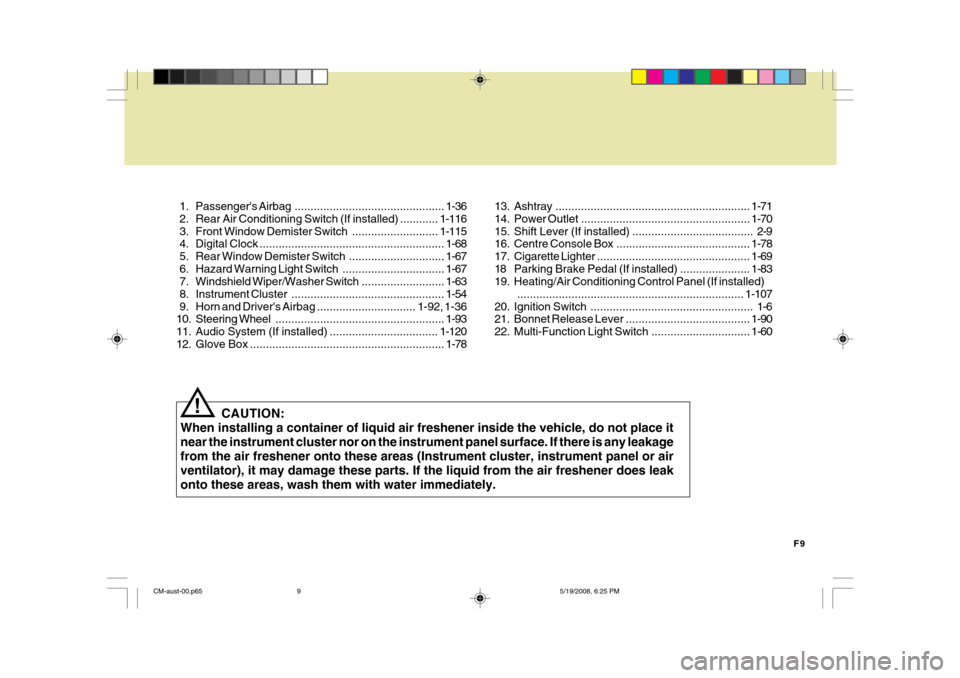
1. Passenger's
Airbag............................................... 1-36
2. Rear Air Conditioning Sw itch (If installed) ............1-116
3. Front Window Demister Switch........................... 1-115
4. Digital Clock .......................................................... 1-68
5. Rear Window Demi ster Switch .............................. 1-67
6. Hazard Warning Light Switch................................ 1-67
7. Windshield W iper/Washer Switch ..........................1-63
8. Instrument Cluster ................................................ 1-54
9. Horn and Driver' s Airbag ............................... 1-92, 1-36
10. Steering Wheel ..................................................... 1-93
11. Audio System (If installed) .................................. 1-120
12. Glove Box ............................................................. 1-78
CAUTION:
When installing a container of liquid air freshener inside the vehicle, do not place it near the instrument cluster nor on the instrument panel surface. If there is any leakagefrom the air freshener onto these areas (Instrument cluster, instrument panel or airventilator), it may damage these parts. If the liquid from the air freshener does leakonto these areas, wash them with water immediately.
! 13. Ashtray
............................................................. 1-71
14. Power Outlet ..................................................... 1-70
15. Shift Lever (If installed) ...................................... 2-9
16. Centre Console Box .......................................... 1-78
17. Cigarette Lighter ................................................ 1-69
18 Parking Brake Pedal (If installed) ...................... 1-83
19. Heating/Air Conditioning Control Panel (If installed)
....................................................................... 1-107
20. Ignition Switch ................................................... 1-6
21. Bonnet Release Lever ....................................... 1-90
22. Multi-Function Light Switch ............................... 1-60
CM-aust-00.p65 5/19/2008, 6:25 PM
9
Page 10 of 269
YOUR VEHICLE AT A GLANCE
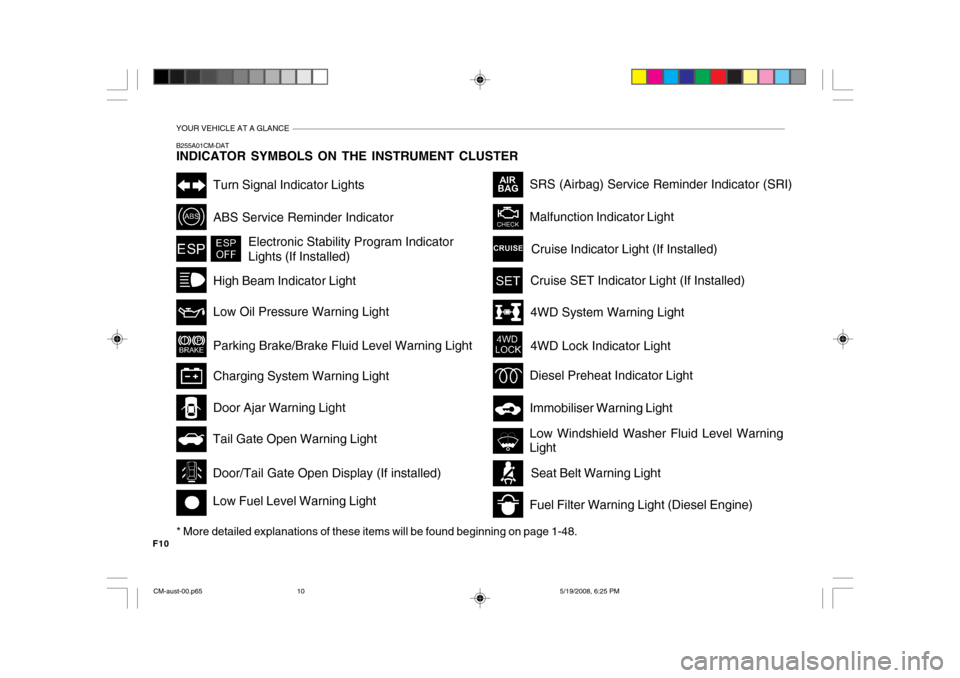
F10B255A01CM-DAT INDICATOR SYMBOLS ON THE INSTRUMENT CLUSTER
* More detailed explanations of these items will be found beginning on page 1-48.
4WD System Warning Light
Malfunction Indicator Light
SRS (Airbag) Service Reminder Indicator (SRI)
Tail Gate Open Warning Light
Low Fuel Level Warning Light Door Ajar Warning Light
ABS Service Reminder Indicator
Turn Signal Indicator Lights
High Beam Indicator Light Low Oil Pressure Warning Light Parking Brake/Brake Fluid Level Warning Light Charging System Warning Light
Immobiliser Warning Light
4WD Lock Indicator Light
Electronic Stability Program Indicator Lights (If Installed)
Cruise SET Indicator Light (If Installed)
Door/Tail Gate Open Display (If installed)
Cruise Indicator Light (If Installed)
Low Windshield Washer Fluid Level Warning LightSeat Belt Warning Light
Diesel Preheat Indicator Light
Fuel Filter Warning Light (Diesel Engine)
CM-aust-00.p65 5/19/2008, 6:25 PM
10
Page 12 of 269
Fuel Recommendations ................................................ 1-2
Running In Your New Hyundai ..................................... 1-4
Immobiliser System ...................................................... 1-4
Door Locks ................................................................... 1-6
Theft-Alarm System ...................................................... 1-9Power Windows........................................................... 1-14
Seats ........................................................................... 1-15
Seat Belts .................................................................... 1-24
Child Restraint System ................................................ 1-28
Supplemental Restraint (AIRBAG ) System................. 1-35
Instrument Cluster and Indicator Lights .......................1-44
Warning and Indicator Lights....................................... 1-48
Trip Computer .............................................................. 1-57
Multi-function Light Switch ........................................... 1-60
Windshield Wiper/Washer Switch ................................1-63
Sunroof ........................................................................ 1-73
Mirror ........................................................................... 1-79
Bonnet Release ........................................................... 1-90
Cruise Co ntrol.............................................................. 1-94
Heating and Cooling Control .......... ..............................1-99
Antenna ..................................................................... 1-118
Stereo Sound System ............................................... 1-119
Audio System ............................................................ 1-122
FEATURES OF YOUR HYUNDAI
1
1
CM-aust-1a.p65
5/21/2008, 2:04 PM
1
Page 27 of 269
1FEATURES OF YOUR HYUNDAI
16
!WARNING:
To minimise risk of severe injury in the event of a collision or a sudden stop, both the driver and passengerseatbacks should always be in an upright position while the vehicle is in motion. The protection providedby the seat belts and airbags in a frontal collision may be reduced sig- nificantly when the seatbacks arereclined. There is greater risk that the driver and passenger will slide under the seat belt which may resultin serious injury if a crash occurs when the seatbacks are reclined. The seat belt cannot provide fullprotection to an occupant if the seatback is reclined.!WARNING:
B080D01JM
o For maximum effectiveness in case of an accident, the headrest should be adjusted so the middle of theheadrest is at the same height of the center of gravity of an occupant's head. Generally, thecenter of gravity of most people's head is similar with the height of the top of their eyes. Also, adjustthe headrest as close to your head as possible. For this reason, the use of a cushion that holds thebody away from the seatback should not be recommended.
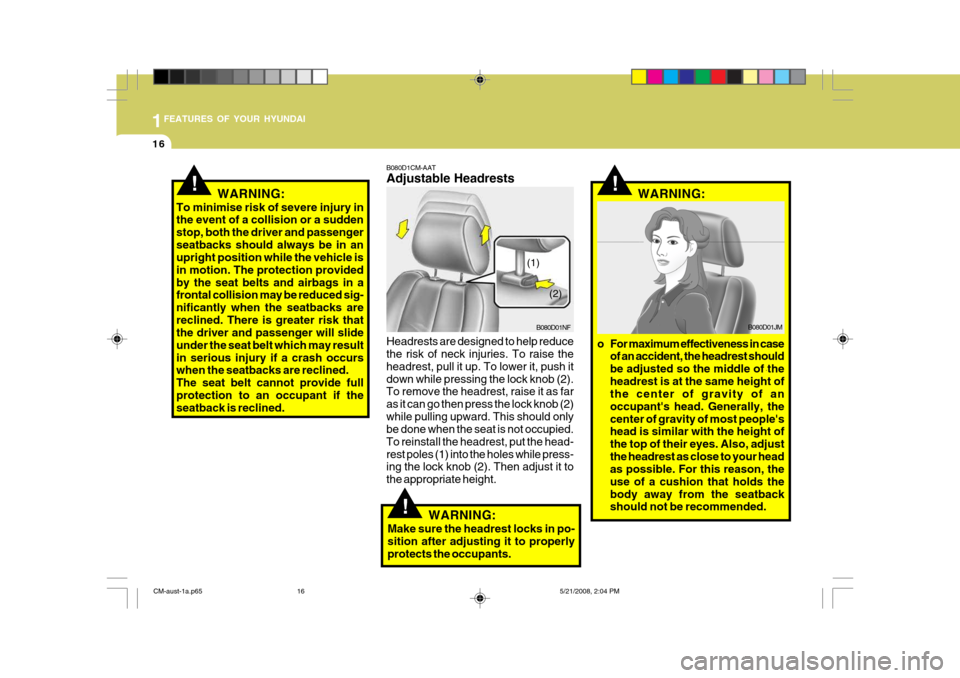
(1)
B080D01NF
B080D1CM-AAT Adjustable Headrests Headrests are designed to help reduce the risk of neck injuries. To raise the headrest, pull it up. To lower it, push itdown while pressing the lock knob (2). To remove the headrest, raise it as far as it can go then press the lock knob (2)while pulling upward. This should only be done when the seat is not occupied. To reinstall the headrest, put the head-rest poles (1) into the holes while press- ing the lock knob (2). Then adjust it to the appropriate height.
!WARNING:
Make sure the headrest locks in po- sition after adjusting it to properly protects the occupants. (2)
CM-aust-1a.p65
5/21/2008, 2:04 PM
16
Page 29 of 269
1FEATURES OF YOUR HYUNDAI
18
!
!
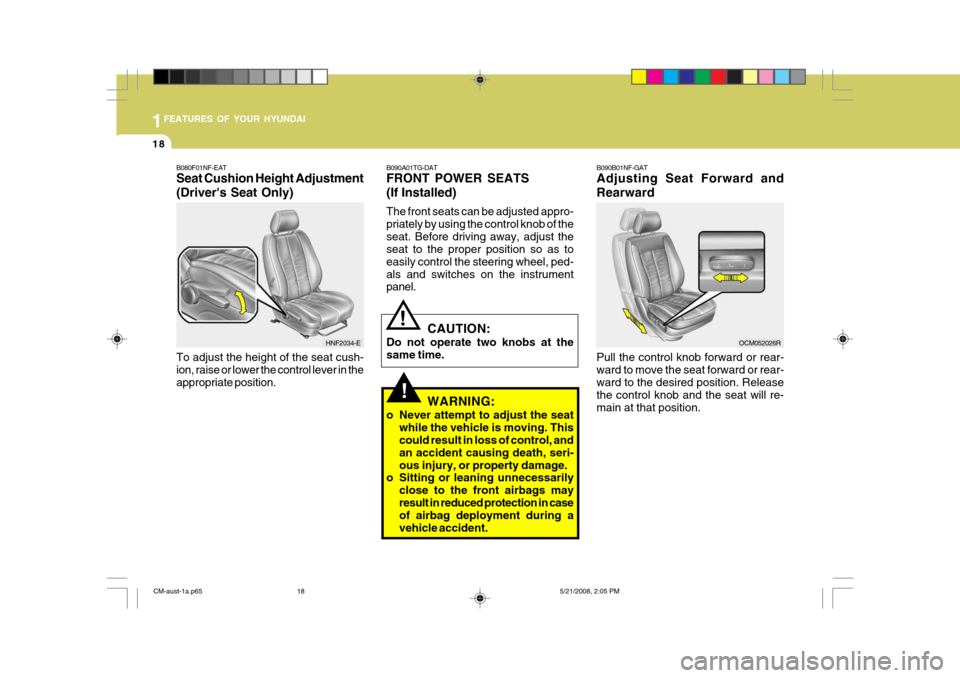
B090A01TG-DAT FRONT POWER SEATS (If Installed) The front seats can be adjusted appro- priately by using the control knob of theseat. Before driving away, adjust the seat to the proper position so as to easily control the steering wheel, ped-als and switches on the instrument panel.
CAUTION:
Do not operate two knobs at the same time.
WARNING:
o Never attempt to adjust the seat while the vehicle is moving. This could result in loss of control, and an accident causing death, seri-ous injury, or property damage.
o Sitting or leaning unnecessarily
close to the front airbags mayresult in reduced protection in case of airbag deployment during a vehicle accident.
B080F01NF-EAT Seat Cushion Height Adjustment (Driver's Seat Only) To adjust the height of the seat cush- ion, raise or lower the control lever in theappropriate position.
HNF2034-E
B090B01NF-GAT Adjusting Seat Forward and Rearward Pull the control knob forward or rear- ward to move the seat forward or rear-ward to the desired position. Release the control knob and the seat will re- main at that position.OCM052026R
CM-aust-1a.p65
5/21/2008, 2:05 PM
18
Page 30 of 269
1
FEATURES OF YOUR HYUNDAI
19
!
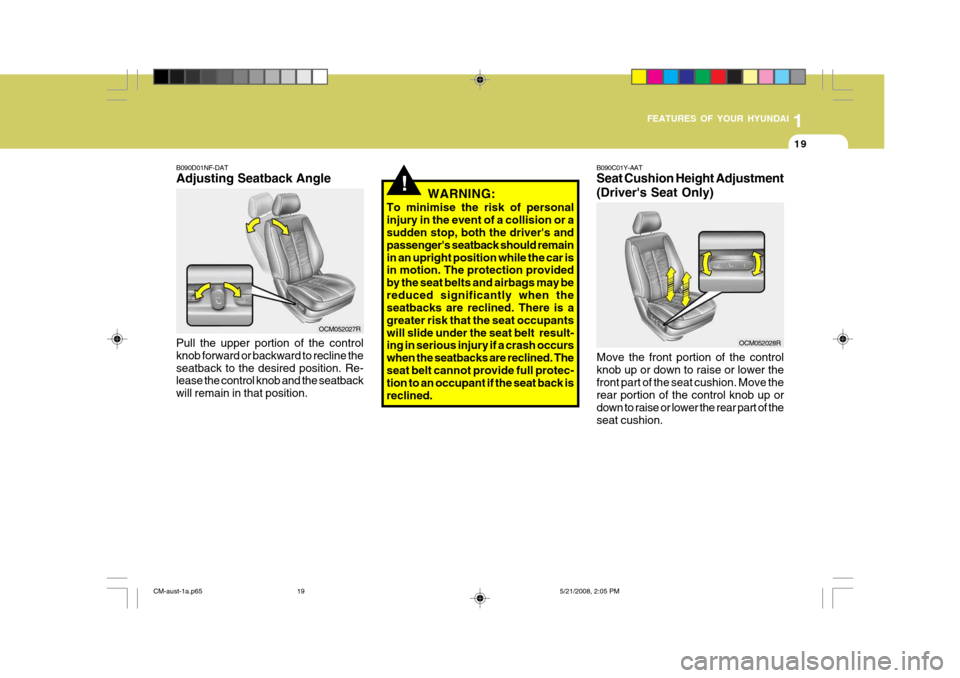
B090D01NF-DAT Adjusting Seatback Angle Pull the upper portion of the control knob forward or backward to recline theseatback to the desired position. Re- lease the control knob and the seatback will remain in that position. WARNING:
To minimise the risk of personalinjury in the event of a collision or a sudden stop, both the driver's and passenger's seatback should remainin an upright position while the car is in motion. The protection provided by the seat belts and airbags may bereduced significantly when the seatbacks are reclined. There is a greater risk that the seat occupantswill slide under the seat belt result- ing in serious injury if a crash occurs when the seatbacks are reclined. Theseat belt cannot provide full protec- tion to an occupant if the seat back is reclined.
OCM052027R B090C01Y-AAT Seat Cushion Height Adjustment (Driver's Seat Only) Move the front portion of the control knob up or down to raise or lower thefront part of the seat cushion. Move the rear portion of the control knob up or down to raise or lower the rear part of theseat cushion.
OCM052028R
CM-aust-1a.p65
5/21/2008, 2:05 PM
19
Page 42 of 269
1
FEATURES OF YOUR HYUNDAI
31
!
B230G01CM-DAT Installation on the Outboard of the Rear Seat NOTE:
o Before installing the child restraint
system, read the instructions sup- plied by the child restraint systemmanufacturer.
o If the seat belt does not operate as
described, have the systemchecked immediately by your authorised Hyundai dealer. WARNING:
o Do not install any child restraint system in the front passenger seat.Should an accident occur and cause the passenger side airbagto deploy, it could severely injure or kill an infant or child seated in an infant or child seat. Therefore,only use a child restraint system in the rear seat of your vehicle.
o Before installing Child Restraint System to vehicles fitted with Cur-tain Airbags, always refer to safety notices for Curtain Airbag sys-tems on this manual. Whenever installing child restraints, use only approved devices and refer to"Child Restraint System" to en- sure correct installation and occu- pant protection is maximised.
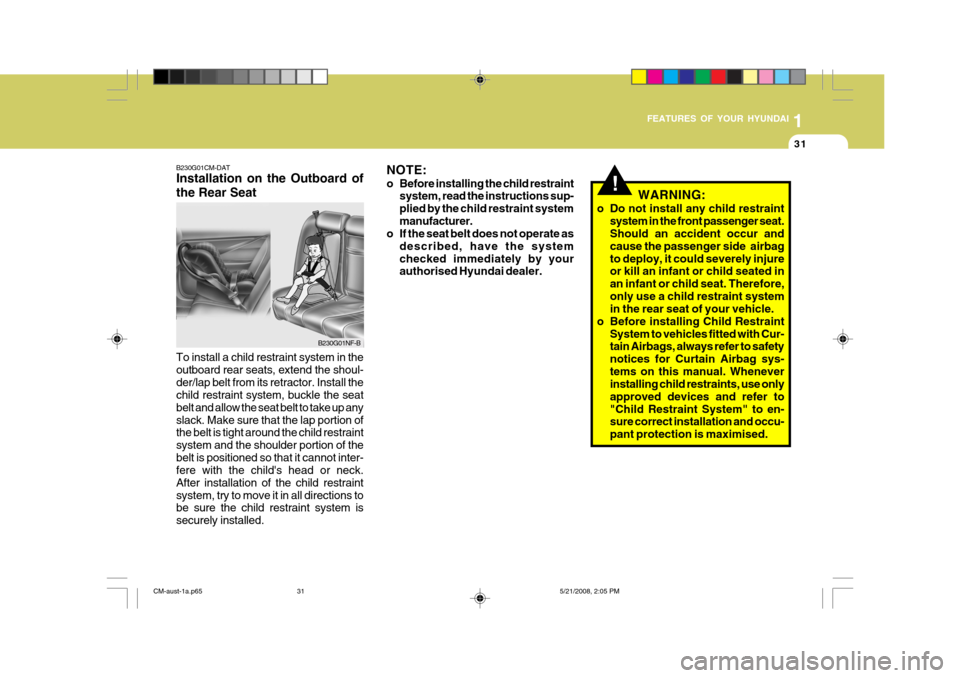
To install a child restraint system in theoutboard rear seats, extend the shoul-der/lap belt from its retractor. Install the child restraint system, buckle the seat belt and allow the seat belt to take up anyslack. Make sure that the lap portion of the belt is tight around the child restraint system and the shoulder portion of thebelt is positioned so that it cannot inter- fere with the child's head or neck. After installation of the child restraintsystem, try to move it in all directions to be sure the child restraint system is securely installed.
B230G01NF-B
CM-aust-1a.p65
5/21/2008, 2:05 PM
31
Page 43 of 269
1FEATURES OF YOUR HYUNDAI
32
!WARNING:
To obtain maximum benefit from a pre-tensioner seat belt:
1. The seat belt must be worn cor- rectly.
2. The seat belt must be adjusted to the correct position.
NOTE:
o Both the driver's and front passenger's pre-tensioner seat belts will be activated in certainfrontal collisions. The pre- tensioner seat belts can be acti- vated with the airbags. The pre-tensioners will be activated even if the seat belts are not being worn at the time of the collision.
o When the pre-tensioner seat belts are activated, a loud noise may beheard and fine dust, which mayappear to be smoke, may be vis- ible in the passenger compart- ment. These are normal operatingconditions and are not hazard- ous.
B180B01O-D
Passenger's airbag
1
Driver's airbag
2
3
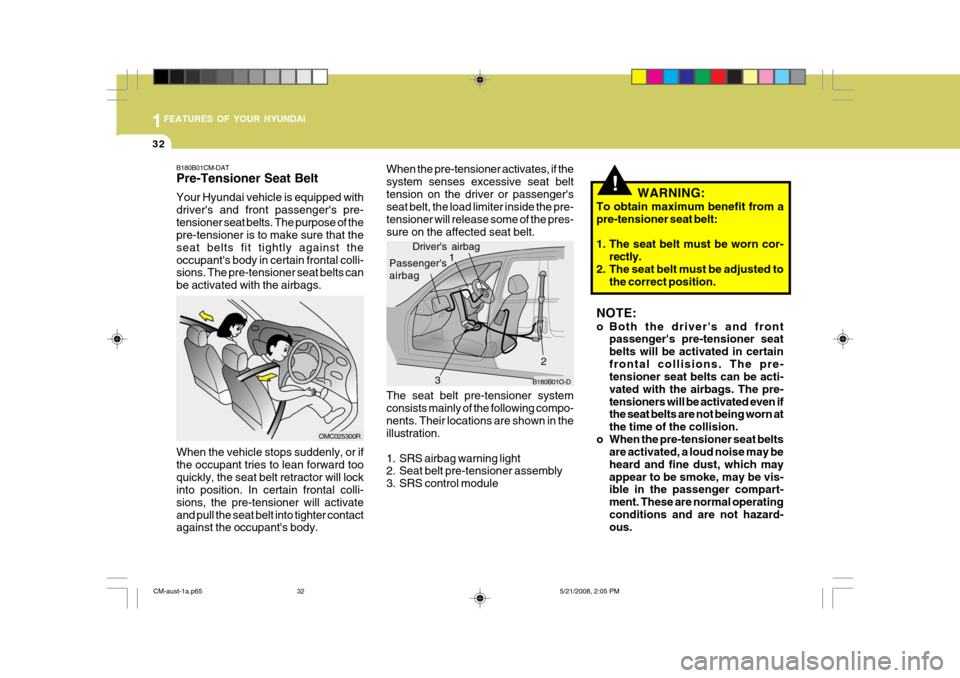
When the pre-tensioner activates, if the system senses excessive seat belttension on the driver or passenger's seat belt, the load limiter inside the pre- tensioner will release some of the pres-sure on the affected seat belt. The seat belt pre-tensioner system consists mainly of the following compo-nents. Their locations are shown in the illustration.
1. SRS airbag warning light
2. Seat belt pre-tensioner assembly
3. SRS control module
B180B01CM-DAT Pre-Tensioner Seat Belt Your Hyundai vehicle is equipped with driver's and front passenger's pre-tensioner seat belts. The purpose of the pre-tensioner is to make sure that the seat belts fit tightly against theoccupant's body in certain frontal colli- sions. The pre-tensioner seat belts can be activated with the airbags. When the vehicle stops suddenly, or if the occupant tries to lean forward tooquickly, the seat belt retractor will lock into position. In certain frontal colli- sions, the pre-tensioner will activateand pull the seat belt into tighter contact against the occupant's body.
OMC025300R
CM-aust-1a.p65
5/21/2008, 2:05 PM
32