Page 114 of 270
 to switch
power on.
Press the power")
113
GENERAL
1.Power on/ off knob – Volume control
knob
2.Mute button
3.Audio control button
4.Up button
5.Down button
Power On/Off
Press the power on/off knob (1) to switch
power on.
Press the power on/off knob (1) again to
switch power off.
Volume Up/Down
Turn the volume control knob (1) clock-
wise to increase the volume.
Turn the volume control knob (1) counter
clockwise to decrease the volume. RADIO ANTENNA
(for versions/markets, where provided)
The radio antenna at the front of the roof
can be folded down and is removable. To
fold the antenna rearward, be sure to grip
the bottom of antenna. To remove the an-
tenna, turn it counterclockwise. To rein-
stall the antenna, turn it clockwise firmly
by hand.
IMPORTANT To avoid damage to the ra-
dio antenna:
❒Remove the antenna when using an au-
tomatic vehicle wash.
❒Remove or fold down the antenna
when the antenna hits anything such as
a low ceiling in a parking garage or
putting a vehicle cover over your ve-
hicle.
80G143
Mute On/Off
Press the mute button (2) to temporari-
ly muffle the sound.
Press the mute button (2) again to restore
the sound to the preceding level.
NOTE
❒In CD mode, play is temporarily
stopped (pause) instead of muting.
❒If power is switched off, or if some but-
ton is pressed, mute is automatically re-
leased.
Audio Control
Bass / Treble / Balance / Fader can be ad-
justed.
Press the audio control button (3) to se-
lect the desired item.
79J189
071-128 SEDICI LUM FL GB 1E 19-06-2009 12:05 Pagina 113
Page 118 of 270
 to
select PTY mode.
❒Turn the volume control knob (1) to
select a desired PTY.
Turning the volume knob (1) c")
117
PTY Search
Programs can be searched for by PTY.
❒Press the program type button (11) to
select PTY mode.
❒Turn the volume control knob (1) to
select a desired PTY.
Turning the volume knob (1) clockwise
changes the items in the following or-
der. (Turning it counter clockwise
changes them in the reverse order.)
NO PTY / NEWS / AFFAIRS / INFO /
SPORTS / EDUCATE / DRAMA /
CULTURE / SCIENCE / VARIED / POP
/ ROCK / EASY M / LIGHT M / CLAS-
SICS / OTHER M / WEATHER / FI-
NANCE / CHILDREN / SOCIAL / RE-
LIGION / PHONE IN / TRAVEL /
LEISURE / JAZZ / COUNTRY / NA-
TION M / OLDIES / FOLK M / DOC-
UMENT / (NEWS)
❒Press the up button (4) or the down
button (5) while PTY is displayed.
Search begins.
NOTE If the specified PTY is not received,
the unit displays “NOTHING”, and then
PTY again. If the up button (4) or the
down button (5) is pressed, the same PTY
is searched for again.CD PLAYER
4.Up button
5.Down button
12.CD button
13.Eject button
14.Scan button
15.Repeat button
16.Random play button
CD Mode
CD mode is selected by pressing the CD
button (12) when power is off or in oth-
er modes
NOTE
❒CD mode is not selected if no CD is
in the unit.
❒If the mode has changed to CD changer
mode, press the CD button (12) again.
79J192
CD Insert/Eject
To insert a CD, make sure that its label
side is up.
To eject it, press the eject button (13).
NOTE The “CD IN” indicator remains lit
while a CD is in the unit. Be careful not to
insert a CD when the “CD IN” indicator
is lit.
Track Selection
The desired track can be selected by
pressing the up button (4) or the down
button (5).
(4): Next track
(5): Preceding track (Press it twice)
Fast Forward/Fast Reverse
Play speed increases while the up button
(4) or down button (5) is kept depressed.
(4): Fast forward
(5): Fast reverse
NOTE
❒When the present track in REPEAT
play mode comes to its end, it returns
to normal play.
❒If Fast Forward is kept to the end of the
disc, it returns to the first track.
071-128 SEDICI LUM FL GB 1E 19-06-2009 12:05 Pagina 117
Page 133 of 270

132
FUEL FILLER CAP
The fuel filler cap is located on the left rear
side of the vehicle. The fuel filler lid can be
unlocked by pulling up the opener lever lo-
cated on the outboard side of the driver’s
seat and locked by simply closing the lid.
GEARSHIFT LEVER
Your vehicle is equipped with either a
manual transaxle or automatic transaxle.
The gearshift lever for each transaxle type
is shown in the illustrations. For details on
how to use the transaxle, refer to “Using
the Transaxle” in the “OPERATING
YOUR VEHICLE” section.
63J051
80J2033
Remove the fuel filler cap
slowly. The fuel may be un-
der pressure and may spray out, caus-
ing injury.
WARNING
Gasoline is extremely flam-
mable. Do not smoke when
refueling, and make sure there are no
open flames or sparks in the area.
WARNING
Manual transaxle: to change
gears properly you must
push the clutch pedal fully down. It is
therefore essential that there is noth-
ing under the pedals: make sure the
mats are lying flat and do not get in
the way of the pedals.
WARNING
IMPORTANT Do not drive with your
hand resting on the gear lever as the force
exerted, even if slight, could lead over time
to premature wear on the gearbox inter-
nal components.
5-speed manual transaxle (for Gasoline engine)
77J021Automatic transaxle
6-speed manual transaxle (for Diesel engine)
129-148 SEDICI LUM FL GB 1E 19-06-2009 13:31 Pagina 132
Page 134 of 270
133
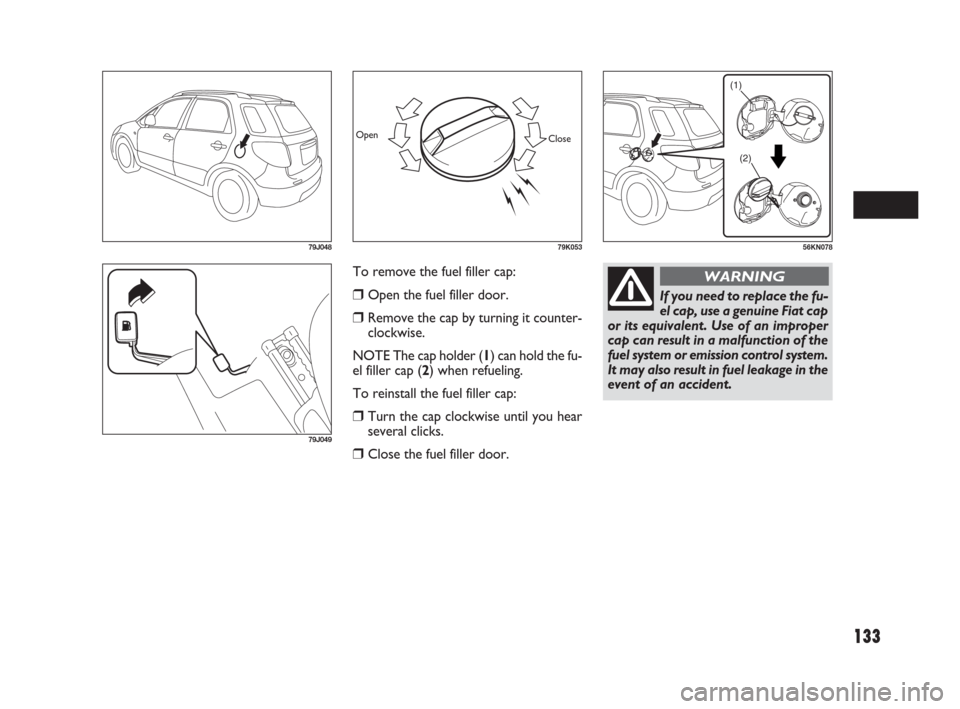
To remove the fuel filler cap:
�Open the fuel filler door.
�Remove the cap by turning it counter-
clockwise.
NOTE The cap holder (1) can hold the fu-
el filler cap (2) when refueling.
To reinstall the fuel filler cap:
�Turn the cap clockwise until you hear
several clicks.
�Close the fuel filler door.
79J048
(1)
(2)
56KN078
79J049
79K053
Open
Close
If you need to replace the fu-
el cap, use a genuine Fiat cap
or its equivalent. Use of an improper
cap can result in a malfunction of the
fuel system or emission control system.
It may also result in fuel leakage in the
event of an accident.
WARNING
129-148 SEDICI LUM FL GB 1E 19-06-2009 13:31 Pagina 133
Page 135 of 270

134
IMPORTANT After folding the rear
seatback forward, do not allow any for-
eign material to enter the lock opening.
This may cause damage to the inside of
the lock and prevent the seatback from
being locked securely.
�
Pull the lock release strap (1) rearward
to unlatch the seat cushion.
FOLDING REAR SEATS
The rear seats of your vehicle can be fold-
ed forward to provide additional cargo
space.
To fold the rear seats forward:
�Hook the webbing of the outboard lap-
shoulder belts in the belt hangers.
IMPORTANT When you move a seat-
back, make sure the belt webbing is
hooked in the seat belt hangers so the seat
belts are not caught by the seatback, seat
hinge, or seat latch. This helps prevent
damage to the belt system.
�Make sure the belt webbing is not twist-
ed.
�Stow the seat belt buckles of the cen-
ter and right seating position as shown
in the illustration.
IMPORTANT When you fold the rear
seatback forward, stow the seat belt buck-
les of the center and right seating position
into the seat first. This helps prevent be-
ing caught by the seat and being damaged.
�Lower the adjustable head restraint
fully.
�Pull the release lever on the top of each
split seat, and fold the seatbacks for-
ward.
79J121
79J213
(1)
63J057
79J123
When you unlatch the rear
seat cushion, be careful that
your face or hands are not injured
from the seat popping up.
WARNING
129-148 SEDICI LUM FL GB 1E 19-06-2009 13:31 Pagina 134
Page 137 of 270

136
�Pull down the seat cushion until it locks
into place.IMPORTANT
�When returning the rear seat cushion
to the normal position, make sure that
there is nothing around the striker. Any
foreign materials prevent the seat cush-
ion from being locked securely.
�When returning the rear seat cushion
to the normal position, make sure that
there is nothing under the seat cushion.
This prevents damage to the seat cush-
ion.
�Make sure that the rear seat cushion
is securely locked. If it is not, you will
see the partial red on the lock release
strap. To return the seat to the normal position,
follow the procedure below.
�Unhook the strap from the head re-
straint and stow the strap to the back
of the seat cushion as shown in the il-
lustration. Make sure to adjust the strap
length to avoid any slack or twist.
79J12679J12979J168
When returning the rear seat
cushion to the normal posi-
tion, be careful that your finger is not
caught between the lock and the
floor.
WARNING
129-148 SEDICI LUM FL GB 1E 19-06-2009 13:31 Pagina 136
Page 138 of 270
137
SUN VISOR
The sun visors can be pulled down to
block glare coming through the wind-
shield, or they can be unhooked and
turned to the side to block glare coming
through the side window.
IMPORTANT After securing the rear
seatback, make sure that it is locked se-
curely. If it is not, you will see red in the
release lever.
Do not put your hand into
the rear seatback lock open-
ing, or your finger may get caught and
be injured.
WARNING79J161
79J12763J130
LOCK UNLOCKRed
IMPORTANT When unhooking and
hooking a sun visor, be sure to handle it
by the hard plastic parts or the sun visor
can be damaged.
�Raise the seatback until it locks into
place.
After returning the seat, try moving the
seat and seatback to make sure they are
securely latched.
129-148 SEDICI LUM FL GB 1E 19-06-2009 13:31 Pagina 137
Page 141 of 270
❒Push the under-hood release lever
sideways with your finger, as shown
in the illustration. While pushing the
lever, lift up the engine hood.
ENGINE HOOD
To open the engine hood:
❒Pull the hood release handle located on
the outboard side of the driver’s side
of the instrument panel. This will dis-
engage the engine hood lock halfway.
140
ASSIST GRIPS
(for versions/markets, where provided)
Assist grips are provided for convenience.
IMPORTANT To avoid damaging the as-
sist grip and the molded headlining, do not
hang down the assist grip.
54G24979J077
80J045
129-148 SEDICI LUM FL GB 1E 23-06-2009 9:11 Pagina 140