2009 FIAT SEDICI lock
[x] Cancel search: lockPage 29 of 270
28
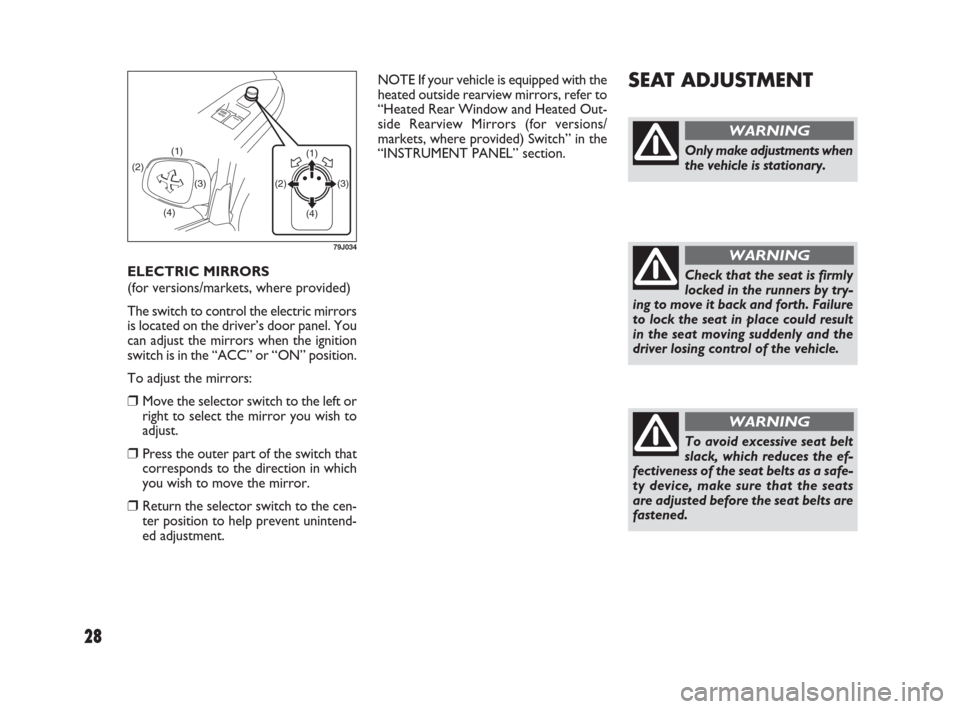
ELECTRIC MIRRORS
(for versions/markets, where provided)
The switch to control the electric mirrors
is located on the driver’s door panel. You
can adjust the mirrors when the ignition
switch is in the “ACC” or “ON” position.
To adjust the mirrors:
❒Move the selector switch to the left or
right to select the mirror you wish to
adjust.
❒Press the outer part of the switch that
corresponds to the direction in which
you wish to move the mirror.
❒Return the selector switch to the cen-
ter position to help prevent unintend-
ed adjustment.
SEAT ADJUSTMENT
(2)
(4)(3) (1)(1)
(3) (2)
(4)
79J034
Only make adjustments when
the vehicle is stationary.
WARNING
To avoid excessive seat belt
slack, which reduces the ef-
fectiveness of the seat belts as a safe-
ty device, make sure that the seats
are adjusted before the seat belts are
fastened.
WARNING
Check that the seat is firmly
locked in the runners by try-
ing to move it back and forth. Failure
to lock the seat in place could result
in the seat moving suddenly and the
driver losing control of the vehicle.
WARNING
NOTE If your vehicle is equipped with the
heated outside rearview mirrors, refer to
“Heated Rear Window and Heated Out-
side Rearview Mirrors (for versions/
markets, where provided) Switch” in the
“INSTRUMENT PANEL” section.
009-056 SEDICI LUM FL GB 1E 19-06-2009 14:11 Pagina 28
Page 30 of 270
29
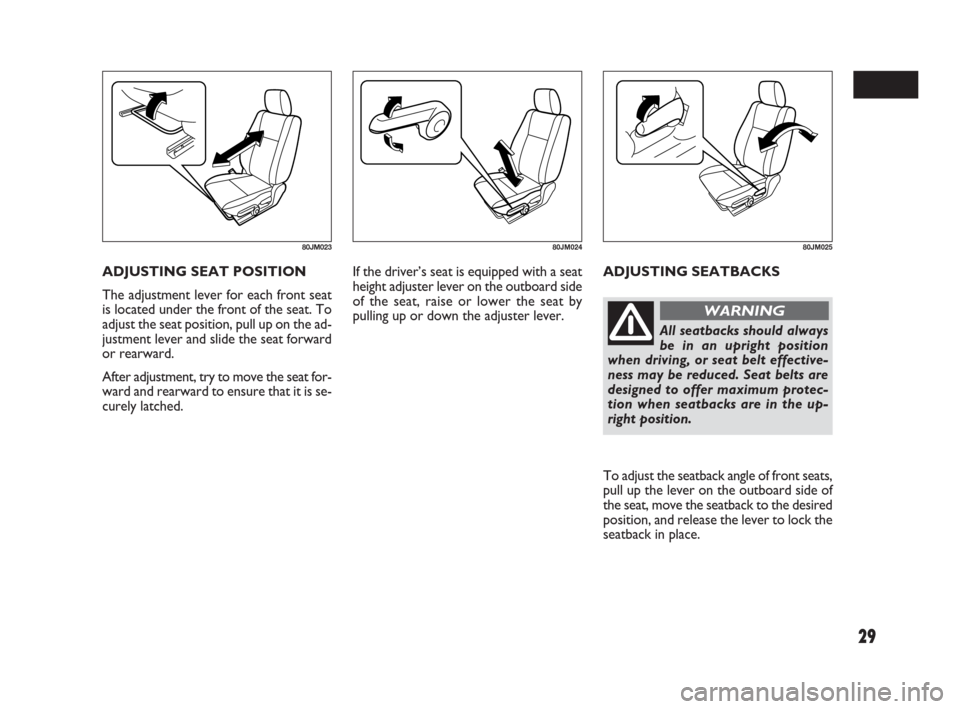
If the driver’s seat is equipped with a seat
height adjuster lever on the outboard side
of the seat, raise or lower the seat by
pulling up or down the adjuster lever.ADJUSTING SEATBACKS ADJUSTING SEAT POSITION
The adjustment lever for each front seat
is located under the front of the seat. To
adjust the seat position, pull up on the ad-
justment lever and slide the seat forward
or rearward.
After adjustment, try to move the seat for-
ward and rearward to ensure that it is se-
curely latched.
80JM02380JM02480JM025
All seatbacks should always
be in an upright position
when driving, or seat belt effective-
ness may be reduced. Seat belts are
designed to offer maximum protec-
tion when seatbacks are in the up-
right position.
WARNING
To adjust the seatback angle of front seats,
pull up the lever on the outboard side of
the seat, move the seatback to the desired
position, and release the lever to lock the
seatback in place.
009-056 SEDICI LUM FL GB 1E 19-06-2009 14:11 Pagina 29
Page 31 of 270
30
NOTE It may be necessary to recline the
seatback to provide enough overhead
clearance to remove the head restraint. Front
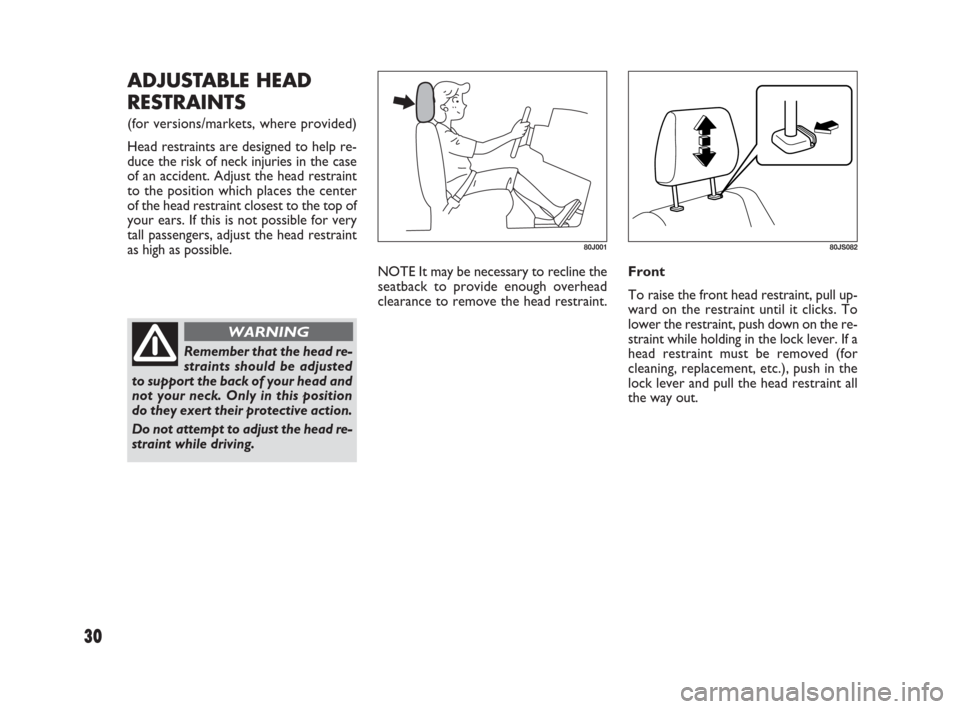
To raise the front head restraint, pull up-
ward on the restraint until it clicks. To
lower the restraint, push down on the re-
straint while holding in the lock lever. If a
head restraint must be removed (for
cleaning, replacement, etc.), push in the
lock lever and pull the head restraint all
the way out.
ADJUSTABLE HEAD
RESTRAINTS
(for versions/markets, where provided)
Head restraints are designed to help re-
duce the risk of neck injuries in the case
of an accident. Adjust the head restraint
to the position which places the center
of the head restraint closest to the top of
your ears. If this is not possible for very
tall passengers, adjust the head restraint
as high as possible.
80J00180JS082
Remember that the head re-
straints should be adjusted
to support the back of your head and
not your neck. Only in this position
do they exert their protective action.
Do not attempt to adjust the head re-
straint while driving.
WARNING
009-056 SEDICI LUM FL GB 1E 19-06-2009 14:11 Pagina 30
Page 32 of 270
31
SEAT BELTS AND CHILD
RESTRAINT SYSTEMS
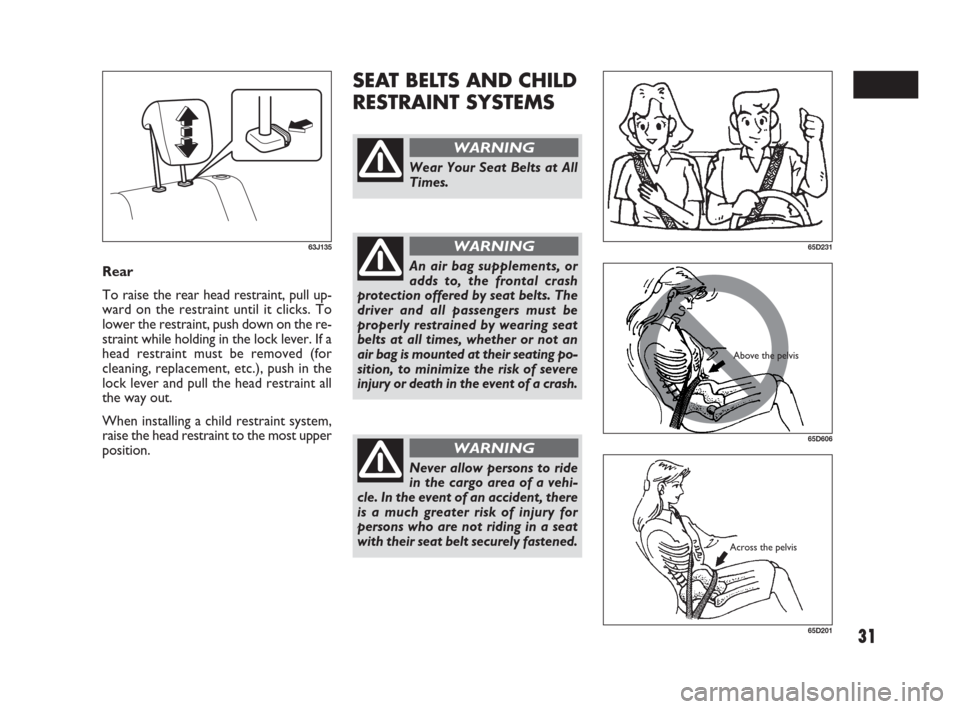
Rear
To raise the rear head restraint, pull up-
ward on the restraint until it clicks. To
lower the restraint, push down on the re-
straint while holding in the lock lever. If a
head restraint must be removed (for
cleaning, replacement, etc.), push in the
lock lever and pull the head restraint all
the way out.
When installing a child restraint system,
raise the head restraint to the most upper
position.
63J135
Wear Your Seat Belts at All
Times.
WARNING
An air bag supplements, or
adds to, the frontal crash
protection offered by seat belts. The
driver and all passengers must be
properly restrained by wearing seat
belts at all times, whether or not an
air bag is mounted at their seating po-
sition, to minimize the risk of severe
injury or death in the event of a crash.
WARNING65D231
65D606
Above the pelvis
Never allow persons to ride
in the cargo area of a vehi-
cle. In the event of an accident, there
is a much greater risk of injury for
persons who are not riding in a seat
with their seat belt securely fastened.
WARNING
65D201
Across the pelvis
009-056 SEDICI LUM FL GB 1E 19-06-2009 14:11 Pagina 31
Page 34 of 270

33
LAP-SHOULDER BELT
Emergency Locking Retractor
(ELR)
The seat belt has an emergency locking
retractor (ELR), which is designed to lock
the seat belt only during a sudden stop
or impact. It also may lock if you pull the
belt across your body very quickly. If this
happens, let the belt go back to unlock it,
then pull the belt across your body more
slowly.
Safety reminder
To reduce the risk of sliding under the belt
during a collision, position the lap portion
of the belt across your lap as low on your
hips as possible and adjust it to a snug fit
by pulling the shoulder portion of the belt
upward through the latch plate. The length
of the diagonal shoulder strap adjusts it-
self to allow freedom of movement.
Avoid contamination of seat
belt webbing by polishes,
oils, chemicals, and particularly bat-
tery acid. Cleaning may safely be car-
ried out using mild soap and water.
For children, if the shoulder belt irri-
tates the neck or face, move the child
closer to the center of the vehicle.
All seatbacks should always be in an
upright position when driving, or seat
belt effectiveness may be reduced.
Seat belts are designed to offer max-
imum protection when seatbacks are
in the upright position.
WARNING
60A038
Sit up straight and
fully back
Low on hips
60A040
Low on hips
Under no circumstances
should the components of
the seat belts and pretensioners be
tampered with or removed. Any op-
eration should be carried out by qual-
ified and authorised personnel. Al-
ways contact a Fiat Dealership.
WARNING
009-056 SEDICI LUM FL GB 1E 19-06-2009 14:11 Pagina 33
Page 37 of 270
36
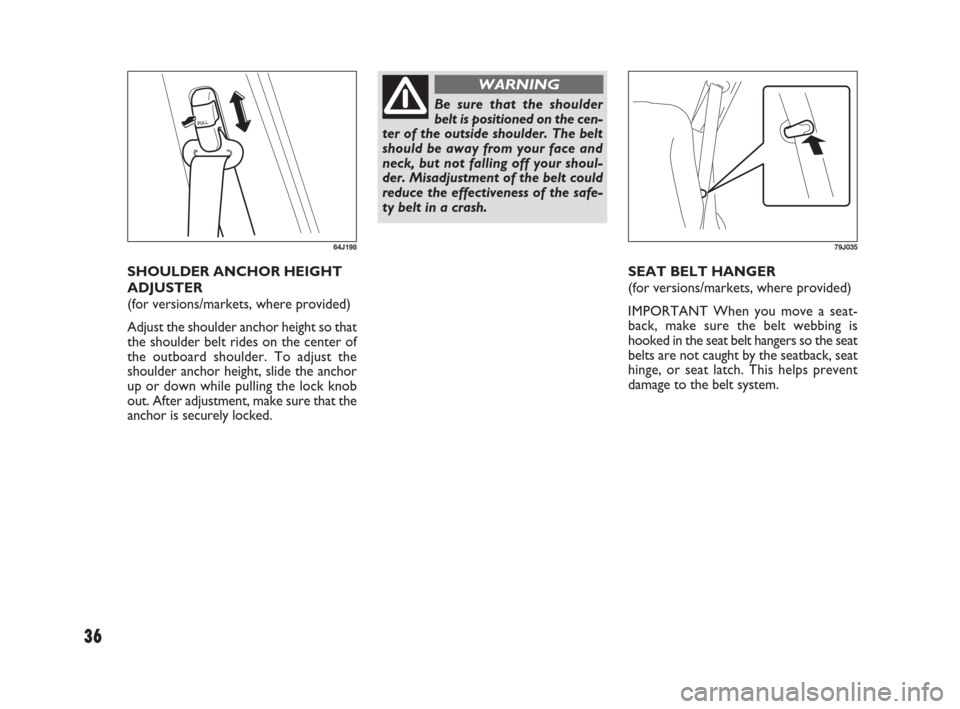
SEAT BELT HANGER
(for versions/markets, where provided)
IMPORTANT When you move a seat-
back, make sure the belt webbing is
hooked in the seat belt hangers so the seat
belts are not caught by the seatback, seat
hinge, or seat latch. This helps prevent
damage to the belt system. SHOULDER ANCHOR HEIGHT
ADJUSTER
(for versions/markets, where provided)
Adjust the shoulder anchor height so that
the shoulder belt rides on the center of
the outboard shoulder. To adjust the
shoulder anchor height, slide the anchor
up or down while pulling the lock knob
out. After adjustment, make sure that the
anchor is securely locked.
64J198
Be sure that the shoulder
belt is positioned on the cen-
ter of the outside shoulder. The belt
should be away from your face and
neck, but not falling off your shoul-
der. Misadjustment of the belt could
reduce the effectiveness of the safe-
ty belt in a crash.
WARNING
79J035
009-056 SEDICI LUM FL GB 1E 19-06-2009 14:11 Pagina 36
Page 47 of 270
The pretensioner is located in each front
seat belt retractor. The pretensioner tight-
ens the seat belt so the belt fits the oc-
cupant’s body more snugly in the event of
a frontal crash. The retractors will remain
locked after the pretensioners are acti-
vated. Upon activation, some noise will oc-
cur and some smoke may be released.
These conditions are not harmful and do
not indicate a fire in the vehicle.
The driver and all passengers must be
properly restrained by wearing seat belts
at all times, whether or not a pretension-
er is equipped at their seating position, to
minimize the risk of severe injury or death
in the event of a crash.
Sit fully back in the seat; sit up straight; do
not lean forward or sideways. Adjust the
belt so the lap portion of the belt is worn
low across the pelvis, not across the waist.
Please refer to the “Seat Adjustment” sec-
tion and the instructions and precautions
about the seat belts in this “Seat Belts and
Child Restraint Systems” section for de-
tails on proper seat and seat belt adjust-
ments.
Service on or around the
pretensioner system compo-
nents or wiring must be performed
only by an authorized Fiat Dealership
who is specially trained. Improper ser-
vice could result in unintended acti-
vation of pretensioners or could ren-
der the pretensioner inoperative. Ei-
ther of these two conditions may re-
sult in personal injury.
WARNING
To prevent damage or unintended activa-
tion of the pretensioners, be sure the bat-
tery is disconnected and the ignition switch
has been in the “LOCK” position for at
least 90 seconds before performing any
electrical service work on your Fiat.
Do not touch pretensioner system com-
ponents or wiring. The wires are wrapped
with yellow tape or yellow tubing, and the
couplers are yellow. When scrapping your
Fiat, ask your Fiat Dealership, body repair
shop, or scrap yard for assistance. Please note that the pretensioners along
with the air bags will activate only in se-
vere frontal collisions. They are not de-
signed to activate in rear impacts, side im-
pacts, rollovers, or minor frontal colli-
sions. The pretensioners can be activat-
ed only once. If the pretensioners are ac-
tivated (that is, if the air bags are activat-
ed), have the pretensioner system ser-
viced by an authorized Fiat Dealership as
soon as possible.
If the “AIR BAG” light on the instrument
cluster does not blink or come on briefly
when the ignition switch is turned to the
“ON” position, stays on for more than 10
seconds, or comes on while driving, the
pretensioner system or the air bag system
may not work properly. Have both sys-
tems inspected by an authorized Fiat Deal-
ership as soon as possible.
46
009-056 SEDICI LUM FL GB 1E 19-06-2009 14:11 Pagina 46
Page 55 of 270
Note that even though your vehicle may
be moderately damaged in a collision, the
collision may not have been severe enough
to trigger the front or side air bags to in-
flate. If your vehicle sustains ANY front-
end or side damage, have the air bag sys-
tem inspected by an authorized Fiat Deal-
ership to ensure it is in proper working
order.
Your vehicle is equipped with a diagnostic
module which records information about
the air bag system if the air bags deploy
in a crash. The module records informa-
tion about overall system status, which
sensors activated the deployment.SERVICING THE AIR BAG
SYSTEM
If the air bags inflate, have the air bags and
related components replaced by an au-
thorized Fiat Dealership as soon as pos-
sible.
If your vehicle ever gets in deep water and
the driver’s floor is submerged, the air bag
controller could be damaged. If it does,
have the air bag system inspected by the
Fiat Dealership as soon as possible.
Special procedures are required for ser-
vicing or replacing an air bag. For that rea-
son, only an authorized Fiat Dealership
should be allowed to service or replace
your air bags. Please remind anyone who
services your Fiat that it has air bags.Service on or around air bag components
or wiring must be performed only by an
authorized Fiat Dealership. Improper ser-
vice could result in unintended air bag de-
ployment or could render the air bag in-
operative. Either of these two conditions
may result in severe injury.
To prevent damage or unintended infla-
tion of the air bag system, be sure the bat-
tery is disconnected and the ignition
switch has been in the “LOCK” position
for at least 90 seconds before perform-
ing any electrical service work on your Fi-
at. Do not touch air bag system compo-
nents or wires. The wires are wrapped
with yellow tape or yellow tubing, and the
couplers are yellow for easy identification.
Scrapping a vehicle that has an uninflated
air bag can be hazardous. Ask your Fiat
Dealership, body repair shop or scrap
yard for help with disposal.
54
009-056 SEDICI LUM FL GB 1E 19-06-2009 14:11 Pagina 54