Page 201 of 270

200
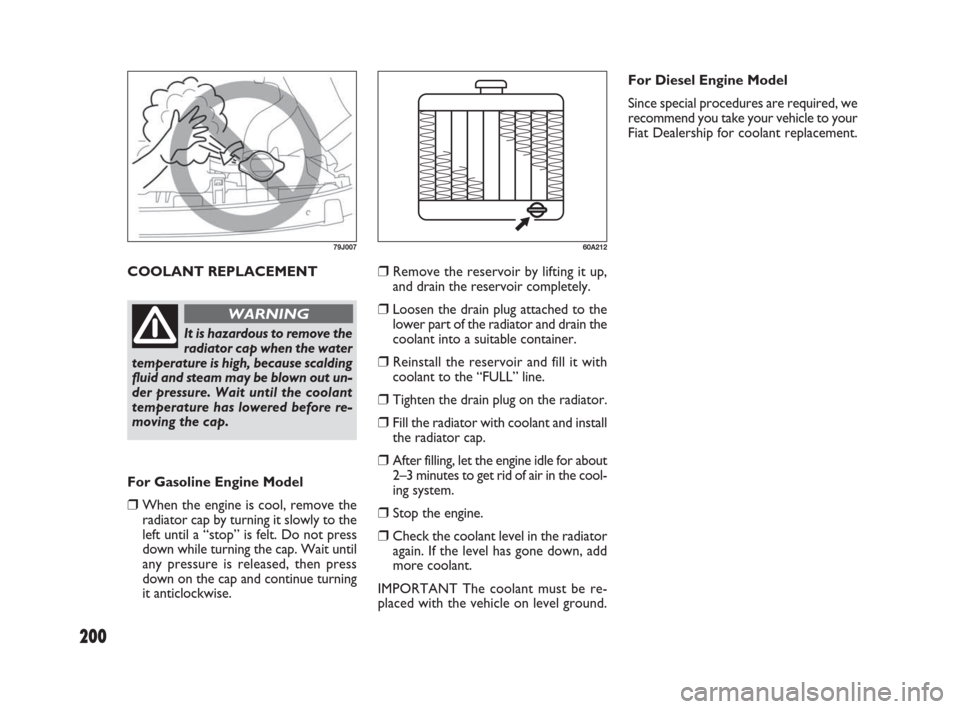
COOLANT REPLACEMENT
79J007
It is hazardous to remove the
radiator cap when the water
temperature is high, because scalding
fluid and steam may be blown out un-
der pressure. Wait until the coolant
temperature has lowered before re-
moving the cap.
WARNING
For Gasoline Engine Model
❒When the engine is cool, remove the
radiator cap by turning it slowly to the
left until a “stop” is felt. Do not press
down while turning the cap. Wait until
any pressure is released, then press
down on the cap and continue turning
it anticlockwise.For Diesel Engine Model
Since special procedures are required, we
recommend you take your vehicle to your
Fiat Dealership for coolant replacement.
❒Remove the reservoir by lifting it up,
and drain the reservoir completely.
❒Loosen the drain plug attached to the
lower part of the radiator and drain the
coolant into a suitable container.
❒Reinstall the reservoir and fill it with
coolant to the “FULL” line.
❒Tighten the drain plug on the radiator.
❒Fill the radiator with coolant and install
the radiator cap.
❒After filling, let the engine idle for about
2–3 minutes to get rid of air in the cool-
ing system.
❒Stop the engine.
❒Check the coolant level in the radiator
again. If the level has gone down, add
more coolant.
IMPORTANT The coolant must be re-
placed with the vehicle on level ground.
60A212
183-230 SEDICI LUM FL GB 1E 19-06-2009 11:00 Pagina 200
Page 208 of 270

207
STEERING
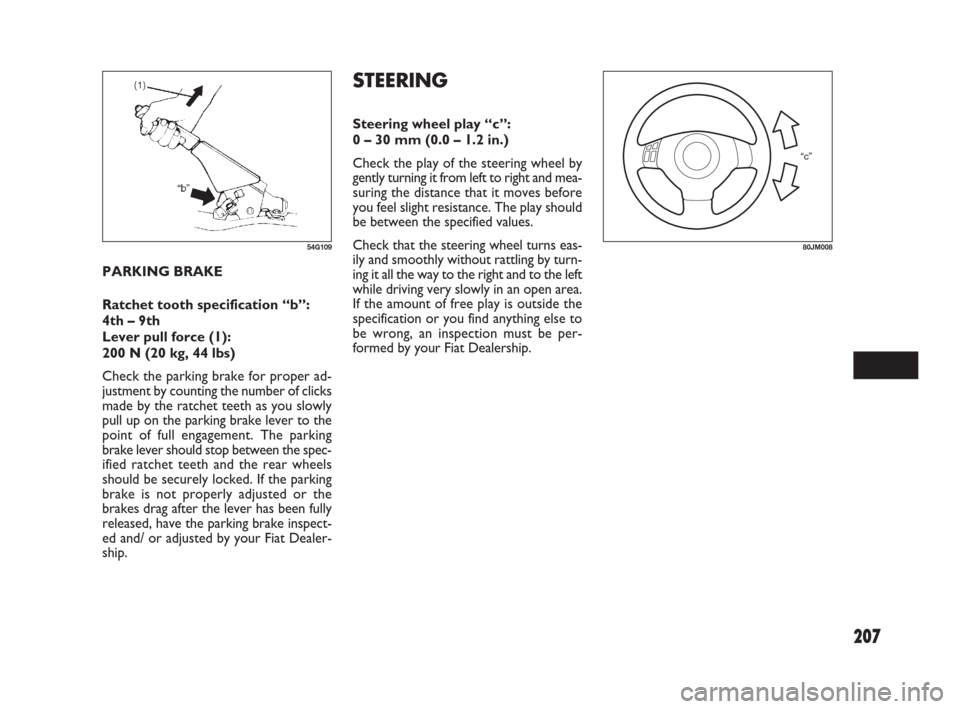
Steering wheel play “c”:
0 – 30 mm (0.0 – 1.2 in.)
Check the play of the steering wheel by
gently turning it from left to right and mea-
suring the distance that it moves before
you feel slight resistance. The play should
be between the specified values.
Check that the steering wheel turns eas-
ily and smoothly without rattling by turn-
ing it all the way to the right and to the left
while driving very slowly in an open area.
If the amount of free play is outside the
specification or you find anything else to
be wrong, an inspection must be per-
formed by your Fiat Dealership. PARKING BRAKE
Ratchet tooth specification “b”:
4th – 9th
Lever pull force (1):
200 N (20 kg, 44 lbs)
Check the parking brake for proper ad-
justment by counting the number of clicks
made by the ratchet teeth as you slowly
pull up on the parking brake lever to the
point of full engagement. The parking
brake lever should stop between the spec-
ified ratchet teeth and the rear wheels
should be securely locked. If the parking
brake is not properly adjusted or the
brakes drag after the lever has been fully
released, have the parking brake inspect-
ed and/ or adjusted by your Fiat Dealer-
ship.
54G109
“c”
80JM008
183-230 SEDICI LUM FL GB 1E 19-06-2009 11:00 Pagina 207
Page 217 of 270
216
(1) (2)
(3)
(4)
(5)
62J085
(28) (27) (26) (25) (6) (7) (9) (11)
(12) (13) (14) (15) (16) (17) (18) (19)
(24)
(8) (10)
(22) (21)
(23) (20)
79J092
80A
50A
50A
80A
80A
15A
15A
20A
60A
40A
30A
30A
30A
50A
30AAll electric load
Power window, Ignition Wiper, Starter
Tail light, Rear defogger, Door lock, Hazard/
Horn, Dome
Heater, Air compressor, Power steering
Radiator fan, Front fog light, Head light
Head light (Right) fuse
Head light (Left) fuse
Front fog light fuse
Power steering control module fuse
ABS motor fuse
Radiator fan fuse
ABS solenoid fuse
Starting motor fuse
Ignition switch fuse
Blower fan fuse FUSES IN THE ENGINE COMPARTMENT
For Gasoline Engine Model
Main fuse / Primary fuse
(1)
(2)
(3)
(4)
(5)
(6)
(7)
(8)
(9)
(10)
(11)
(12)
(13)
(14)
(15)
183-230 SEDICI LUM FL GB 1E 19-06-2009 11:00 Pagina 216
Page 218 of 270
217
20A
15A
15A
15A
–
–
–
–
–
–
–
–
–
–Air compressor fuse
Throttle motor fuse
Automatic transaxle fuse (for versions/markets, where provided)
Fuel injection fuse
Automatic transaxle relay (for versions/markets, where provided)
Air compressor relay
Fuel pump relay
Condenser fan relay
Front fog light relay
Throttle motor relay
FI MAIN
Starting motor relay
Radiator fan relay
Shift lock relay
Main fuse / Primary fuse
(16)
(17)
(18)
(19)
(20)
(21)
(22)
(23)
(24)
(25)
(26)
(27)
(28)
(29)
183-230 SEDICI LUM FL GB 1E 19-06-2009 11:00 Pagina 217
Page 221 of 270
220
15A
15A
10A
10A
15A
15A
30A
30A
10A
15A
10A
10A
10A
20A
15A
10A
15A
10A
10A
15A
30A
15A
10A
79J093
79J011
Rear wiper
Ignition coil
Back-up light
Meter
Accessory
Accessory 2
Power window
Wiper
IG1 SIG
Air bag
Anti-lock brake system
Tail light
Stop light
Door lock
4WD light
ST SIG
Seat heater
IG 2 SIG
Rear fog light
Dome
Rear defogger
Horn / Hazard
Fiat CODE (Immobilizer) FUSES UNDER THE DASH BOARD
Main fuse / Primary fuse
(1)
(2)
(3)
(4)
(5)
(6)
(7)
(8)
(9)
(10)
(11)
(12)
(13)
(14)
(15)
(16)
(17)
(18)
(19)
(20)
(21)
(22)
(23)
183-230 SEDICI LUM FL GB 1E 19-06-2009 11:00 Pagina 220
Page 224 of 270
223
SIDE TURN SIGNAL LIGHT
As the bulb is built-in type, the light as-
sembly must be replaced. Remove the light
assembly by sliding the light housing left-
ward with your finger.
64J195
OTHER GENERAL LIGHTS
Bulb holder
1.Removal
2.Installation
To remove a bulb holder from a light
housing, turn the holder counterclockwise
and pull it out. To install the holder, push
the holder in and turn it clockwise.
(1)
(1) (2)(2)
54G123
(1)
(2) (3)
(4)
54G124
Bulb
3.Removal
4.Installation
There are two types of bulb, “Full glass
type” (1) and “Glass/ metal type” (2).
To remove and install a full glass type bulb
(1), simply pull out or push in the bulb.
To remove a glass metal type bulb (2)
from a bulb holder, push in the bulb and
turn it counterclockwise. To install a new
bulb, push it in and turn it clockwise.
You can access the individual bulb or bulb
holders as follows.
183-230 SEDICI LUM FL GB 1E 19-06-2009 11:00 Pagina 223
Page 225 of 270
224
(1)(2)
80JM123
(1)
(2)
80JM11480JM071
(3)
79JM025
Front turn signal light (1)
Front position light (2)
Front fog light
(for versions/markets, where provided)
NOTE To replace the bulb easily, turn the
steering wheel to the opposite side of the
replacing fog light.
❒ Insert a flat blade screwdriver into the
hole (2) and remove the clips (1) by twi-
st the driver as shown in the illustration.
❒ Remove the bolts (3).❒ Open the fender cover. Disconnect the
coupler with pushing the lock release.
❒ Turn the bulb holder counterclockwi-
se and remove it.
183-230 SEDICI LUM FL GB 1E 19-06-2009 11:00 Pagina 224
Page 228 of 270

227
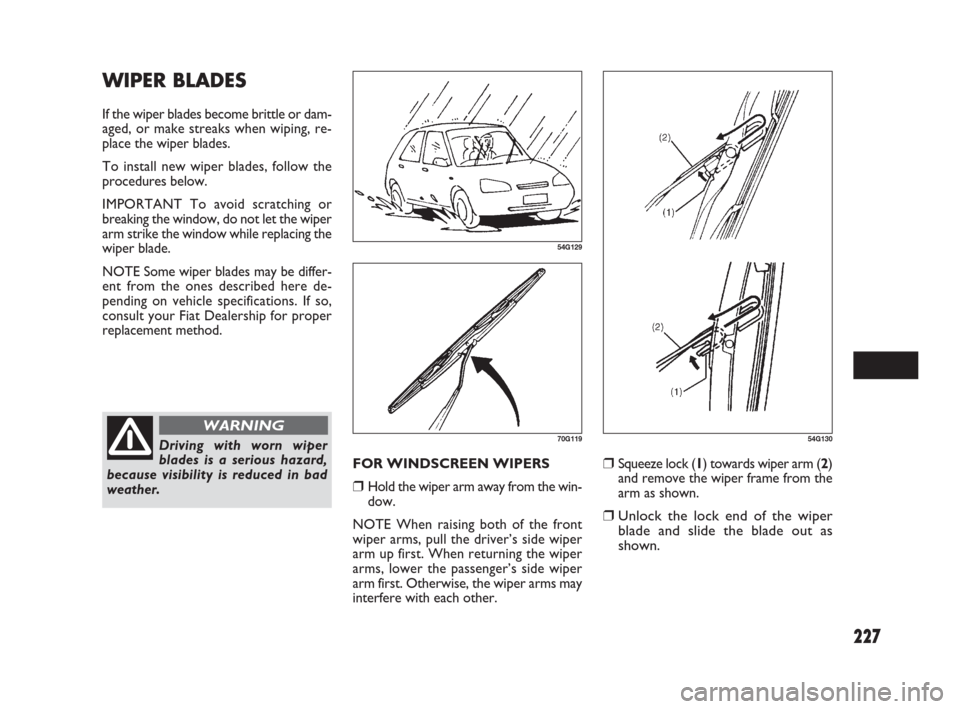
❒Squeeze lock (1) towards wiper arm (2)
and remove the wiper frame from the
arm as shown.
❒Unlock the lock end of the wiper
blade and slide the blade out as
shown.
54G130
WIPER BLADES
If the wiper blades become brittle or dam-
aged, or make streaks when wiping, re-
place the wiper blades.
To install new wiper blades, follow the
procedures below.
IMPORTANT To avoid scratching or
breaking the window, do not let the wiper
arm strike the window while replacing the
wiper blade.
NOTE Some wiper blades may be differ-
ent from the ones described here de-
pending on vehicle specifications. If so,
consult your Fiat Dealership for proper
replacement method.
FOR WINDSCREEN WIPERS
❒Hold the wiper arm away from the win-
dow.
NOTE When raising both of the front
wiper arms, pull the driver’s side wiper
arm up first. When returning the wiper
arms, lower the passenger’s side wiper
arm first. Otherwise, the wiper arms may
interfere with each other.
54G129
Driving with worn wiper
blades is a serious hazard,
because visibility is reduced in bad
weather.
WARNING70G119
183-230 SEDICI LUM FL GB 1E 19-06-2009 11:00 Pagina 227