2009 FIAT SEDICI lock
[x] Cancel search: lockPage 229 of 270
228
60A260
54G132
54G13365D151
54G134
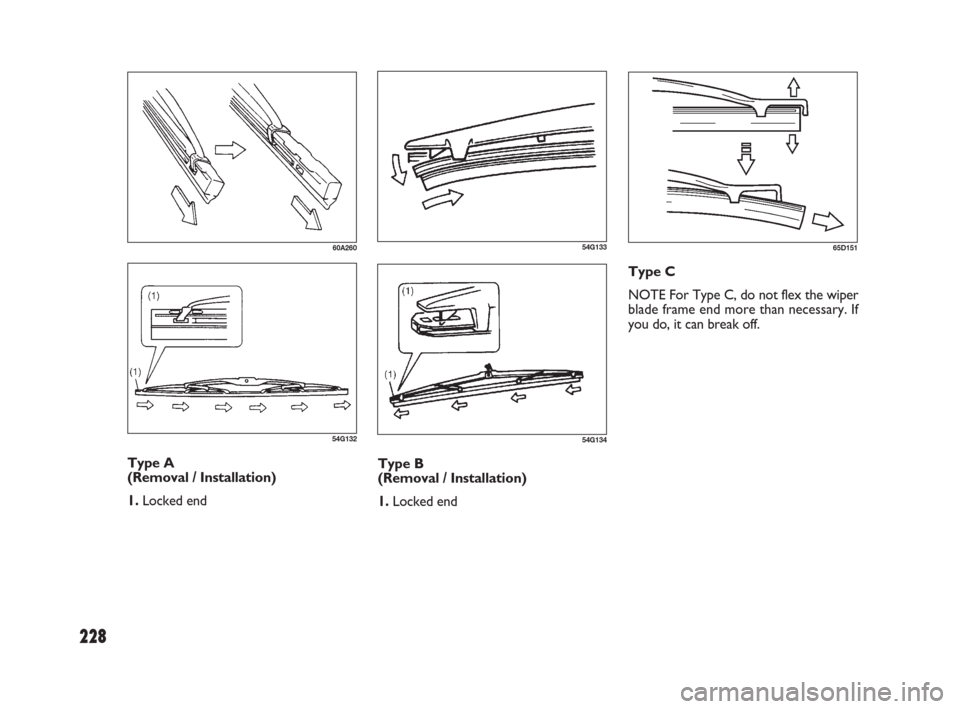
Type A
(Removal / Installation)
1. Locked endType B
(Removal / Installation)
1. Locked endType C
NOTE For Type C, do not flex the wiper
blade frame end more than necessary. If
you do, it can break off.
183-230 SEDICI LUM FL GB 1E 19-06-2009 11:00 Pagina 228
Page 230 of 270
229
54G13565D151
80G146
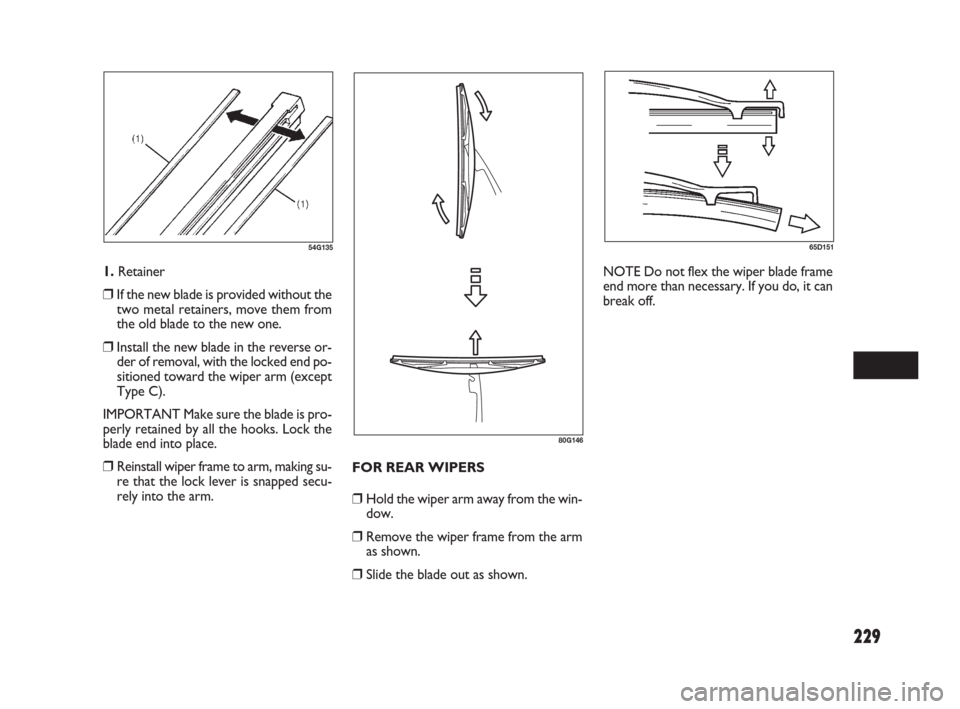
1. Retainer
❒ If the new blade is provided without the
two metal retainers, move them from
the old blade to the new one.
❒ Install the new blade in the reverse or-
der of removal, with the locked end po-
sitioned toward the wiper arm (except
Type C).
IMPORTANT Make sure the blade is pro-
perly retained by all the hooks. Lock the
blade end into place.
❒ Reinstall wiper frame to arm, making su-
re that the lock lever is snapped secu-
rely into the arm.FOR REAR WIPERS
❒ Hold the wiper arm away from the win-
dow.
❒ Remove the wiper frame from the arm
as shown.
❒ Slide the blade out as shown.NOTE Do not flex the wiper blade frame
end more than necessary. If you do, it can
break off.
183-230 SEDICI LUM FL GB 1E 19-06-2009 11:00 Pagina 229
Page 233 of 270
232
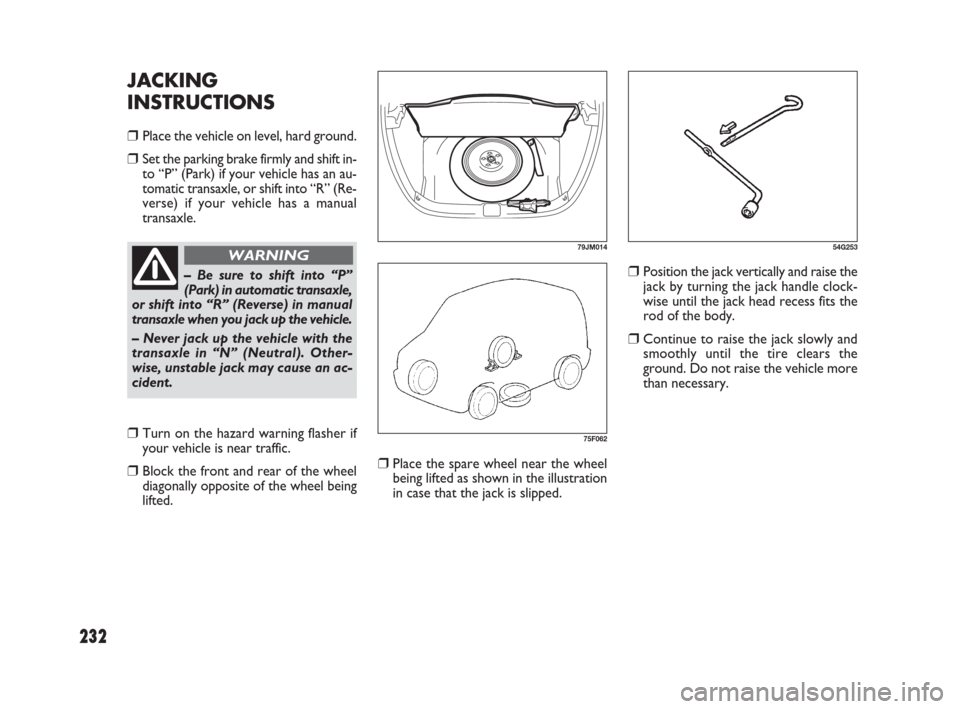
❒Place the spare wheel near the wheel
being lifted as shown in the illustration
in case that the jack is slipped.
❒Position the jack vertically and raise the
jack by turning the jack handle clock-
wise until the jack head recess fits the
rod of the body.
❒Continue to raise the jack slowly and
smoothly until the tire clears the
ground. Do not raise the vehicle more
than necessary.
JACKING
INSTRUCTIONS
❒Place the vehicle on level, hard ground.
❒Set the parking brake firmly and shift in-
to “P” (Park) if your vehicle has an au-
tomatic transaxle, or shift into “R” (Re-
verse) if your vehicle has a manual
transaxle.
79JM014
75F062
– Be sure to shift into “P”
(Park) in automatic transaxle,
or shift into “R” (Reverse) in manual
transaxle when you jack up the vehicle.
– Never jack up the vehicle with the
transaxle in “N” (Neutral). Other-
wise, unstable jack may cause an ac-
cident.
WARNING
❒Turn on the hazard warning flasher if
your vehicle is near traffic.
❒Block the front and rear of the wheel
diagonally opposite of the wheel being
lifted.
54G253
231-238 SEDICI LUM FL GB 1E 19-06-2009 11:06 Pagina 232
Page 236 of 270
235
2-WHEEL DRIVE (2WD)
MANUAL TRANSAXLE
Manual transaxle vehicles may be towed
using either of the following methods.
❒From the front, with the front wheels
lifted and the rear wheels on the
ground. Before towing, make sure that
the parking brake is released.
❒From the rear, with the rear wheels lift-
ed and the front wheels on the ground,
provided the steering and drivetrain are
in operational condition. Before tow-
ing, make sure that transaxle is in neu-
tral, the steering wheel is unlocked (the
ignition key should be in the “ACC” po-
sition), and the steering wheel is se-
cured with a clamping device designed
for towing service.
IMPORTANT The steering column is not
strong enough to withstand shocks trans-
mitted from the front wheels during tow-
ing. Always unlock the steering wheel be-
fore towing.
TOWING
If you need to have your vehicle towed,
contact a professional service. Your deal-
er can provide you with detailed towing
instructions.
IMPORTANT To help avoid damage to
your vehicle during towing, proper equip-
ment and towing procedures must be
used.
2- WHEEL DRIVE (2WD)
AUTOMATIC TRANSAXLE
Automatic transaxle vehicles may be
towed using either of the following meth-
ods.
❒From the front, with the front wheels
lifted and the rear wheels on the
ground. Before towing, make sure that
the parking brake is released.
❒From the rear, with the rear wheels lift-
ed and a dolly under the front wheels.
IMPORTANT Towing your vehicle with
the front wheels on the ground can result
in damage to the automatic transaxle.4-WHEEL DRIVE (4WD)
Your vehicle should be towed under one
of the following conditions:
❒With all four wheels on a flat-bed truck.
❒With the front or rear wheels lifted and
a dolly under the other wheels.
❒If you can shift the 2WD/4WD switch
to the “2WD” mode, and if the steer-
ing and drive train are in good condi-
tion and the engine can be started, the
vehicle may also be towed according to
the instructions in the “Towing Your
Vehicle (recreational towing)” section.
IMPORTANT Towing your vehicle with
front and/or rear wheels on the ground
can result in damage to the automatic
transaxle and/or the 4WD drive system.
231-238 SEDICI LUM FL GB 1E 19-06-2009 11:06 Pagina 235
Page 239 of 270
238
(1)
68KM037
(1)
68KM038
IF YOU CANNOT
SHIFT AUTOMATIC
TRANSAXLE
GEARSHIFT LEVER
OUT OF “P” (PARK)
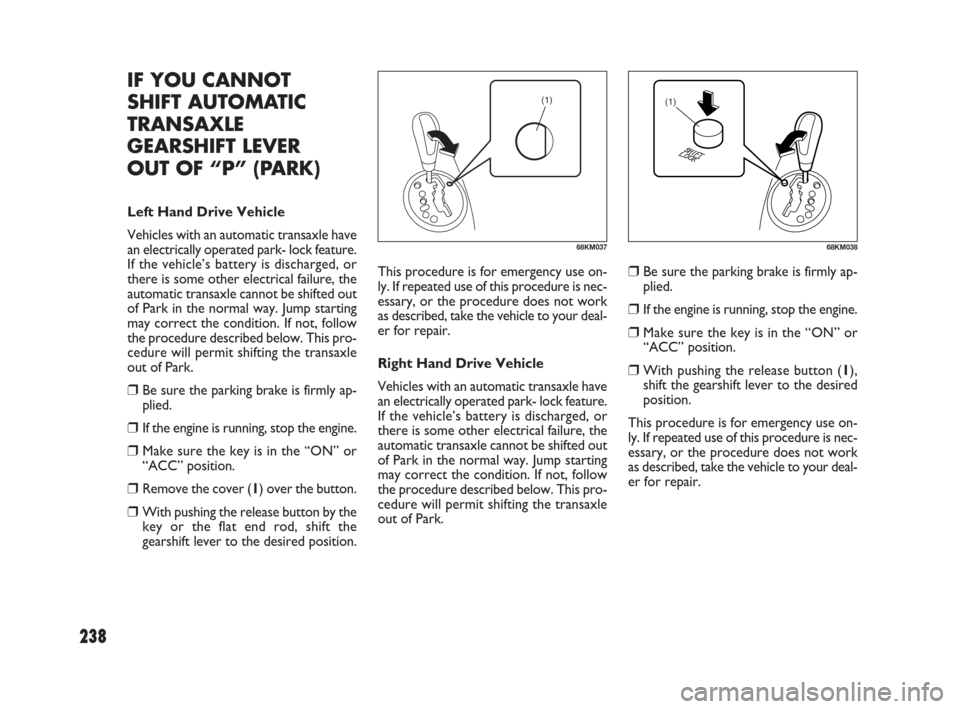
Left Hand Drive Vehicle
Vehicles with an automatic transaxle have
an electrically operated park- lock feature.
If the vehicle’s battery is discharged, or
there is some other electrical failure, the
automatic transaxle cannot be shifted out
of Park in the normal way. Jump starting
may correct the condition. If not, follow
the procedure described below. This pro-
cedure will permit shifting the transaxle
out of Park.
❒Be sure the parking brake is firmly ap-
plied.
❒If the engine is running, stop the engine.
❒Make sure the key is in the “ON” or
“ACC” position.
❒Remove the cover (1) over the button.
❒With pushing the release button by the
key or the flat end rod, shift the
gearshift lever to the desired position.This procedure is for emergency use on-
ly. If repeated use of this procedure is nec-
essary, or the procedure does not work
as described, take the vehicle to your deal-
er for repair.
Right Hand Drive Vehicle
Vehicles with an automatic transaxle have
an electrically operated park- lock feature.
If the vehicle’s battery is discharged, or
there is some other electrical failure, the
automatic transaxle cannot be shifted out
of Park in the normal way. Jump starting
may correct the condition. If not, follow
the procedure described below. This pro-
cedure will permit shifting the transaxle
out of Park.
❒Be sure the parking brake is firmly ap-
plied.
❒If the engine is running, stop the engine.
❒Make sure the key is in the “ON” or
“ACC” position.
❒With pushing the release button (1),
shift the gearshift lever to the desired
position.
This procedure is for emergency use on-
ly. If repeated use of this procedure is nec-
essary, or the procedure does not work
as described, take the vehicle to your deal-
er for repair.
231-238 SEDICI LUM FL GB 1E 19-06-2009 11:06 Pagina 238
Page 247 of 270
246
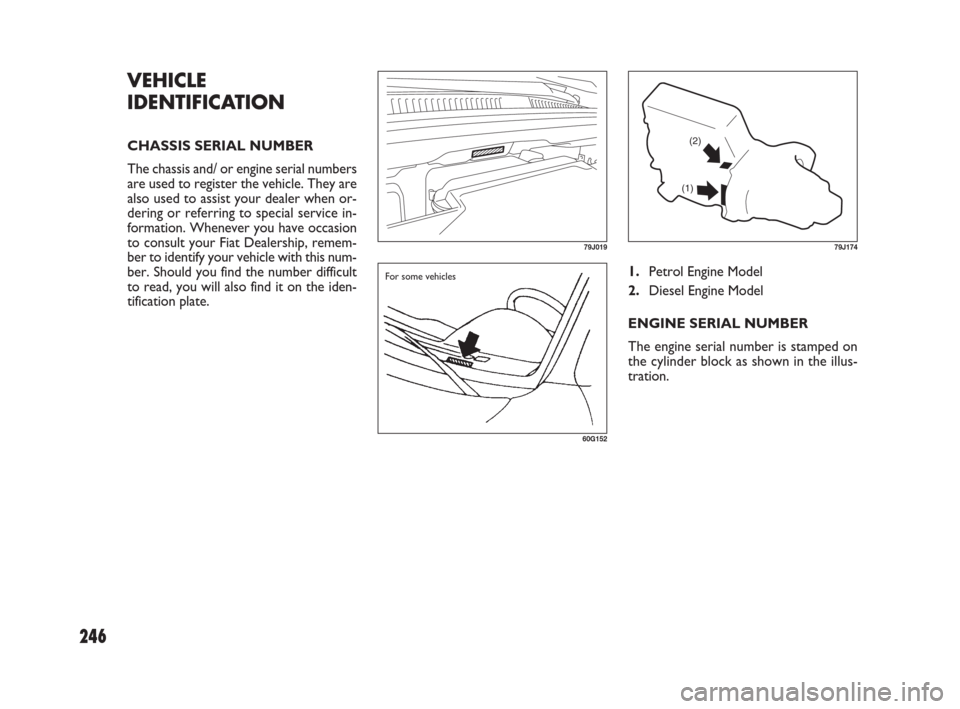
1.Petrol Engine Model
2.Diesel Engine Model
ENGINE SERIAL NUMBER
The engine serial number is stamped on
the cylinder block as shown in the illus-
tration.
VEHICLE
IDENTIFICATION
CHASSIS SERIAL NUMBER
The chassis and/ or engine serial numbers
are used to register the vehicle. They are
also used to assist your dealer when or-
dering or referring to special service in-
formation. Whenever you have occasion
to consult your Fiat Dealership, remem-
ber to identify your vehicle with this num-
ber. Should you find the number difficult
to read, you will also find it on the iden-
tification plate.
79J019
60G152
For some vehicles
(2)
(1)
79J174
245-248 SEDICI LUM FL GB 1E 19-06-2009 11:09 Pagina 246
Page 253 of 270
252
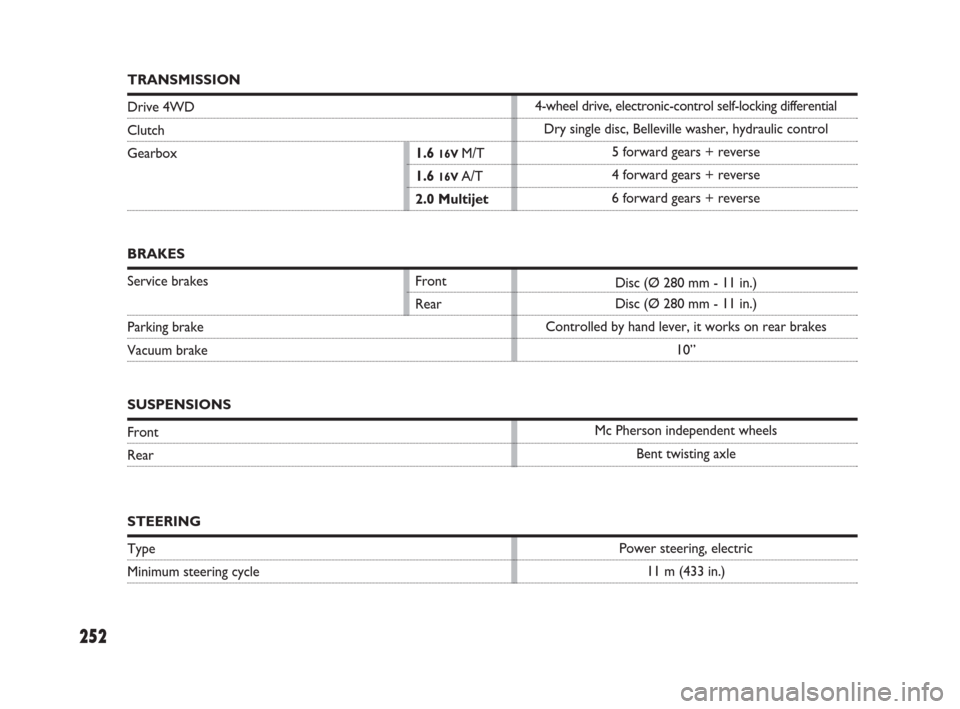
BRAKES
Service brakes Front
Rear
Parking brake
Vacuum brake
SUSPENSIONS
Front
Rear
STEERING
Type
Minimum steering cycleDisc (Ø 280 mm - 11 in.)
Disc (Ø 280 mm - 11 in.)
Controlled by hand lever, it works on rear brakes
10”
Mc Pherson independent wheels
Bent twisting axle
Power steering, electric
11 m (433 in.)
TRANSMISSION
Drive 4WD
Clutch
Gearbox1.6 16V M/T
1.6 16V A/T
2.0 Multijet4-wheel drive, electronic-control self-locking differential
Dry single disc, Belleville washer, hydraulic control
5 forward gears + reverse
4 forward gears + reverse
6 forward gears + reverse
249-254 SEDICI LUM FL GB 1E 19-06-2009 11:10 Pagina 252
Page 262 of 270
261
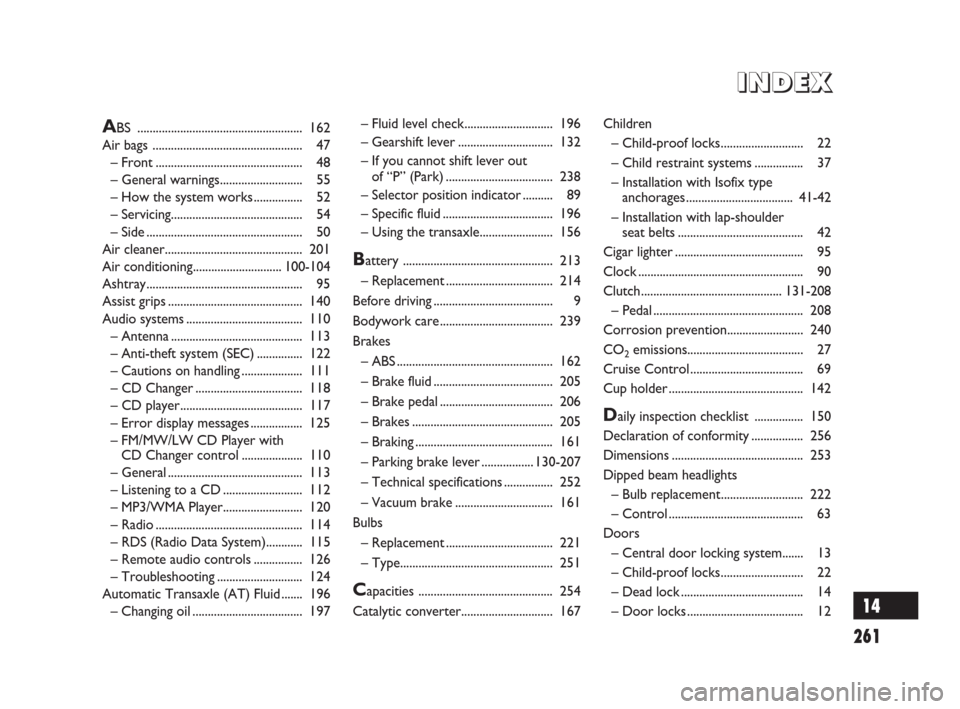
– Fluid level check............................. 196
– Gearshift lever............................... 132
– If you cannot shift lever out
of “P” (Park)................................... 238
– Selector position indicator .......... 89
– Specific fluid.................................... 196
– Using the transaxle........................ 156
Battery ................................................. 213
– Replacement ................................... 214
Before driving....................................... 9
Bodywork care..................................... 239
Brakes
– ABS................................................... 162
– Brake fluid....................................... 205
– Brake pedal ..................................... 206
– Brakes.............................................. 205
– Braking ............................................. 161
– Parking brake lever.................130-207
– Technical specifications ................ 252
– Vacuum brake ................................ 161
Bulbs
– Replacement ................................... 221
– Type.................................................. 251
Capacities ............................................ 254
Catalytic converter.............................. 167Children
– Child-proof locks........................... 22
– Child restraint systems ................ 37
– Installation with Isofix type
anchorages...................................41-42
– Installation with lap-shoulder
seat belts......................................... 42
Cigar lighter .......................................... 95
Clock ...................................................... 90
Clutch..............................................131-208
– Pedal................................................. 208
Corrosion prevention......................... 240
CO
2emissions...................................... 27
Cruise Control ..................................... 69
Cup holder ............................................ 142
Daily inspection checklist ................ 150
Declaration of conformity ................. 256
Dimensions........................................... 253
Dipped beam headlights
– Bulb replacement........................... 222
– Control ............................................ 63
Doors
– Central door locking system....... 13
– Child-proof locks........................... 22
– Dead lock ........................................ 14
– Door locks ...................................... 12
ABS ...................................................... 162
Air bags ................................................. 47
– Front................................................ 48
– General warnings........................... 55
– How the system works ................ 52
– Servicing........................................... 54
– Side................................................... 50
Air cleaner............................................. 201
Air conditioning.............................100-104
Ashtray................................................... 95
Assist grips............................................ 140
Audio systems...................................... 110
– Antenna ........................................... 113
– Anti-theft system (SEC) ............... 122
– Cautions on handling .................... 111
– CD Changer................................... 118
– CD player........................................ 117
– Error display messages................. 125
– FM/MW/LW CD Player with
CD Changer control .................... 110
– General ............................................ 113
– Listening to a CD .......................... 112
– MP3/WMA Player.......................... 120
– Radio................................................ 114
– RDS (Radio Data System)............ 115
– Remote audio controls ................ 126
– Troubleshooting ............................ 124
Automatic Transaxle (AT) Fluid ....... 196
– Changing oil .................................... 197
I I
N N
D D
E E
X X
14
261-268 SEDICI LUM FL GB 1E 19-06-2009 11:12 Pagina 261