2009 FIAT SEDICI reset
[x] Cancel search: resetPage 70 of 270
69
(2)
(1)
(4)
(3) (6)
(5)
FSUV1650
CRUISE CONTROL
(for versions/markets, where provided)
Cruise Control is an electronic device to
assist driving, which makes it possible to
maintain the vehicle at the desired speed
without the need to press the accelerator.
The device must only be used in particu-
lar safety conditions, at a speed above 40
km/h (25 mph), on long stretches of strai-
ght, dry road with little change in speed
(e.g. motorways). Therefore it is not re-
commended to use this device on extra-
urban roads with traffic. Do not use it in
cities.
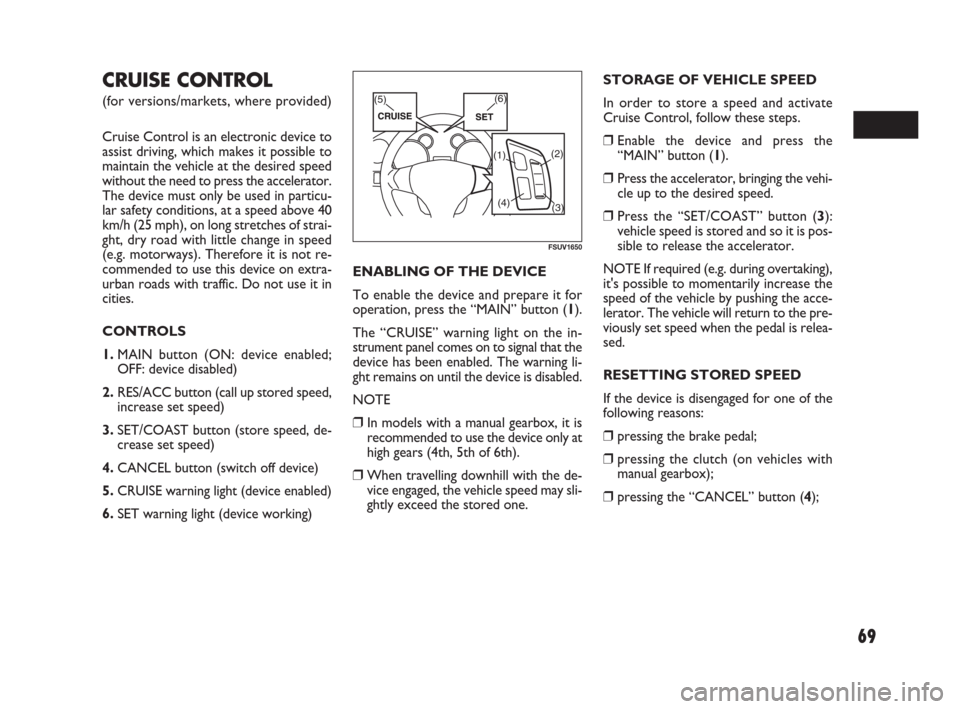
CONTROLS
1.MAIN button (ON: device enabled;
OFF: device disabled)
2.RES/ACC button (call up stored speed,
increase set speed)
3.SET/COAST button (store speed, de-
crease set speed)
4.CANCEL button (switch off device)
5.CRUISE warning light (device enabled)
6.SET warning light (device working)ENABLING OF THE DEVICE
To enable the device and prepare it for
operation, press the “MAIN” button (1).
The “CRUISE” warning light on the in-
strument panel comes on to signal that the
device has been enabled. The warning li-
ght remains on until the device is disabled.
NOTE
❒ In models with a manual gearbox, it is
recommended to use the device only at
high gears (4th, 5th of 6th).
❒ When travelling downhill with the de-
vice engaged, the vehicle speed may sli-
ghtly exceed the stored one.STORAGE OF VEHICLE SPEED
In order to store a speed and activate
Cruise Control, follow these steps.
❒ Enable the device and press the
“MAIN” button (1).
❒ Press the accelerator, bringing the vehi-
cle up to the desired speed.
❒ Press the “SET/COAST” button (3):
vehicle speed is stored and so it is pos-
sible to release the accelerator.
NOTE If required (e.g. during overtaking),
it's possible to momentarily increase the
speed of the vehicle by pushing the acce-
lerator. The vehicle will return to the pre-
viously set speed when the pedal is relea-
sed.
RESETTING STORED SPEED
If the device is disengaged for one of the
following reasons:
❒ pressing the brake pedal;
❒ pressing the clutch (on vehicles with
manual gearbox);
❒ pressing the “CANCEL” button (4);
057-070 SEDICI LUM FL GB 1E 19-06-2009 10:32 Pagina 69
Page 71 of 270
70
❒ following ESP®system intervention (for
versions/markets, where provided),
to reset the stored speed, follow these
steps.
❒ Accelerate gently, bringing the vehicle
close to the stored speed.
❒ Engage the gear selected at the time the
previous speed was stored.
❒ Press the “RES/ACC” button (2).
INCREASE IN STORED SPEED
When Cruise Control is operating, there
are two ways to increase the stored
speed:
❒ by pressing the accelerator and then
storing the new speed reached,
or
❒ by pressing the “RES/ACC” button (2).
Each time the button is pressed, this
corresponds to a constant increase in
speed, while holding the button down
increases the speed in a continuous
manner.REDUCTION OF STORED
SPEED
When Cruise Control is operating, there
are two ways to reduce the stored speed:
❒ by disengaging the device and then sto-
ring the new speed,
or
❒ by pressing the “SET/COAST” button
(3). Each time the button is pressed, this
corresponds to a constant decrease in
speed, while holding the button down
decreases the speed in a continuous
manner.
DISENGAGING OF THE DEVICE
The device is disengaged in one of the fol-
lowing cases:
❒ pressing the “CANCEL” button (4);
❒ pressing the brake pedal;
❒ pressing the clutch (on vehicles with
manual gearbox);
❒ switching off the engine (starter swit-
ch set to “OFF”);
❒ by disabling the system (“MAIN” but-
ton (1) set to “OFF”);
❒ when the vehicle speed is reduced by
approximately 20% compared with the
set speed;❒ when the vehicle speed is below 36
km/h (22 mph);
❒ in the event of ESP
®system interven-
tion (where provided);
❒ in the event of system breakdown.
NOTE By pressing the accelerator, the sy-
stem is not actually disengaged, but the re-
quired acceleration takes precedence over
maintaining the stored speed: Cruise Con-
trol, however, remains enabled and will
return to the previous condition once the
accelerator has been released, without ha-
ving to press the “RES/ACC” button (2).
IMPORTANT When travelling with the
device on, never set the gearshift lever to
neutral.
IMPORTANT In the event of malfunction
or failure, disable the device (“MAIN” but-
ton (1) set to “OFF”) and see your Fiat
Dealership.
057-070 SEDICI LUM FL GB 1E 19-06-2009 10:32 Pagina 70
Page 78 of 270
77
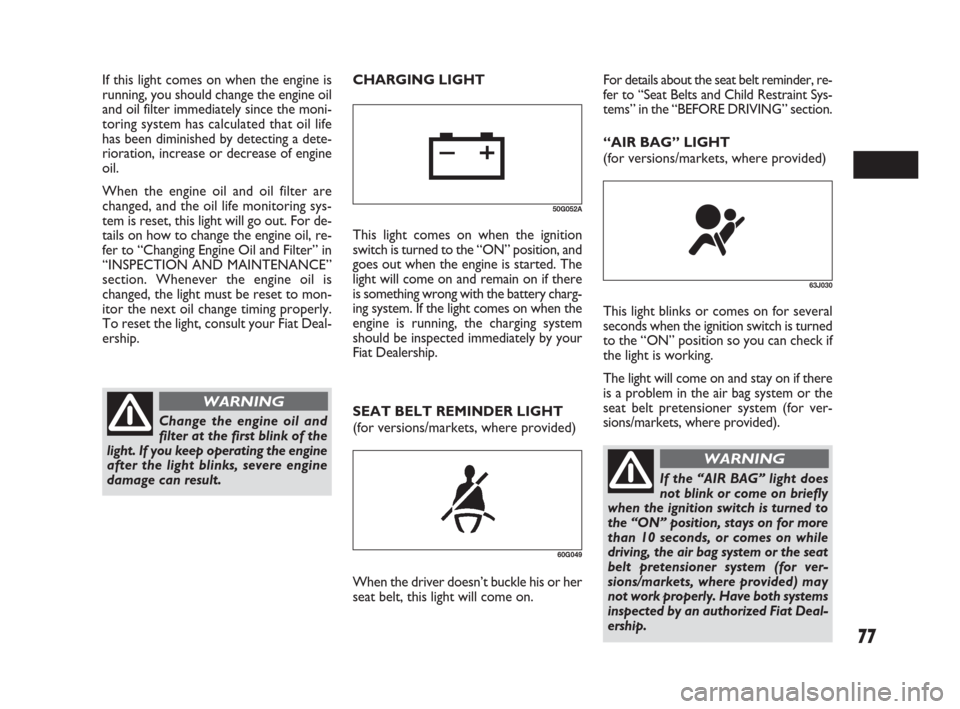
SEAT BELT REMINDER LIGHT
(for versions/markets, where provided)
60G049
When the driver doesn’t buckle his or her
seat belt, this light will come on.
63J030
This light blinks or comes on for several
seconds when the ignition switch is turned
to the “ON” position so you can check if
the light is working.
The light will come on and stay on if there
is a problem in the air bag system or the
seat belt pretensioner system (for ver-
sions/markets, where provided). CHARGING LIGHT
50G052A
This light comes on when the ignition
switch is turned to the “ON” position, and
goes out when the engine is started. The
light will come on and remain on if there
is something wrong with the battery charg-
ing system. If the light comes on when the
engine is running, the charging system
should be inspected immediately by your
Fiat Dealership.For details about the seat belt reminder, re-
fer to “Seat Belts and Child Restraint Sys-
tems” in the “BEFORE DRIVING” section.
“AIR BAG” LIGHT
(for versions/markets, where provided)
Change the engine oil and
filter at the first blink of the
light. If you keep operating the engine
after the light blinks, severe engine
damage can result.
WARNING
If this light comes on when the engine is
running, you should change the engine oil
and oil filter immediately since the moni-
toring system has calculated that oil life
has been diminished by detecting a dete-
rioration, increase or decrease of engine
oil.
When the engine oil and oil filter are
changed, and the oil life monitoring sys-
tem is reset, this light will go out. For de-
tails on how to change the engine oil, re-
fer to “Changing Engine Oil and Filter” in
“INSPECTION AND MAINTENANCE”
section. Whenever the engine oil is
changed, the light must be reset to mon-
itor the next oil change timing properly.
To reset the light, consult your Fiat Deal-
ership.
If the “AIR BAG” light does
not blink or come on briefly
when the ignition switch is turned to
the “ON” position, stays on for more
than 10 seconds, or comes on while
driving, the air bag system or the seat
belt pretensioner system (for ver-
sions/markets, where provided) may
not work properly. Have both systems
inspected by an authorized Fiat Deal-
ership.
WARNING
071-128 SEDICI LUM FL GB 1E 19-06-2009 12:05 Pagina 77
Page 88 of 270
87
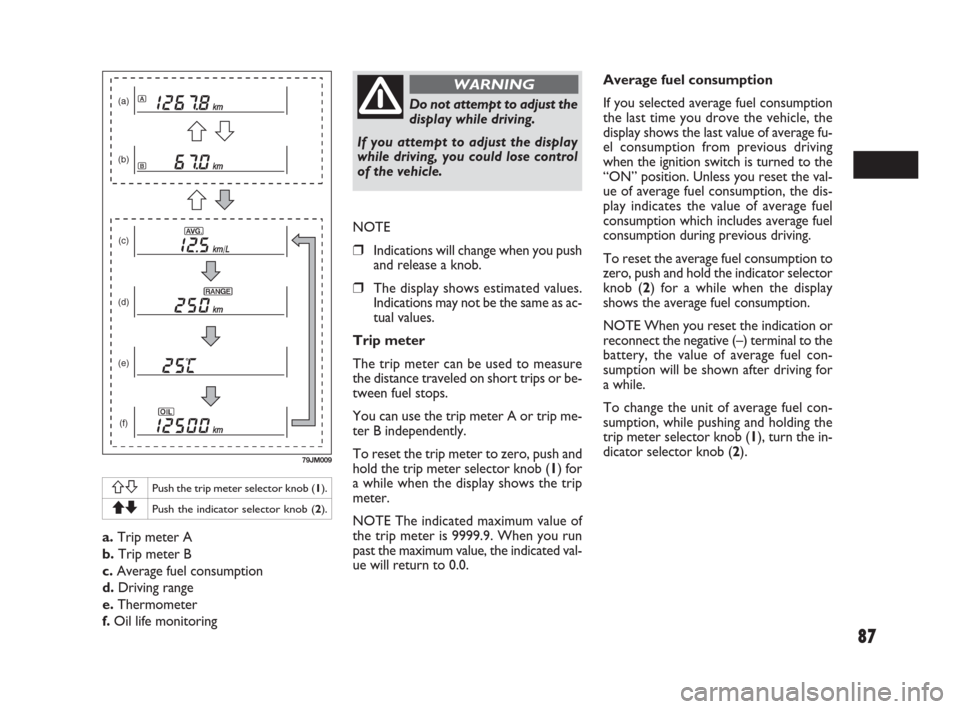
a.Trip meter A
b.Trip meter B
c.Average fuel consumption
d.Driving range
e.Thermometer
f.Oil life monitoring
(a)
(b)
(c)
(d)
(e)
(f)
79JM009
ASPush the trip meter selector knob (1).
QZPush the indicator selector knob (2).
Do not attempt to adjust the
display while driving.
If you attempt to adjust the display
while driving, you could lose control
of the vehicle.
WARNING
NOTE
❒Indications will change when you push
and release a knob.
❒The display shows estimated values.
Indications may not be the same as ac-
tual values.
Trip meter
The trip meter can be used to measure
the distance traveled on short trips or be-
tween fuel stops.
You can use the trip meter A or trip me-
ter B independently.
To reset the trip meter to zero, push and
hold the trip meter selector knob (1) for
a while when the display shows the trip
meter.
NOTE The indicated maximum value of
the trip meter is 9999.9. When you run
past the maximum value, the indicated val-
ue will return to 0.0.Average fuel consumption
If you selected average fuel consumption
the last time you drove the vehicle, the
display shows the last value of average fu-
el consumption from previous driving
when the ignition switch is turned to the
“ON” position. Unless you reset the val-
ue of average fuel consumption, the dis-
play indicates the value of average fuel
consumption which includes average fuel
consumption during previous driving.
To reset the average fuel consumption to
zero, push and hold the indicator selector
knob (2) for a while when the display
shows the average fuel consumption.
NOTE When you reset the indication or
reconnect the negative (–) terminal to the
battery, the value of average fuel con-
sumption will be shown after driving for
a while.
To change the unit of average fuel con-
sumption, while pushing and holding the
trip meter selector knob (1), turn the in-
dicator selector knob (2).
071-128 SEDICI LUM FL GB 1E 19-06-2009 12:05 Pagina 87
Page 90 of 270
89
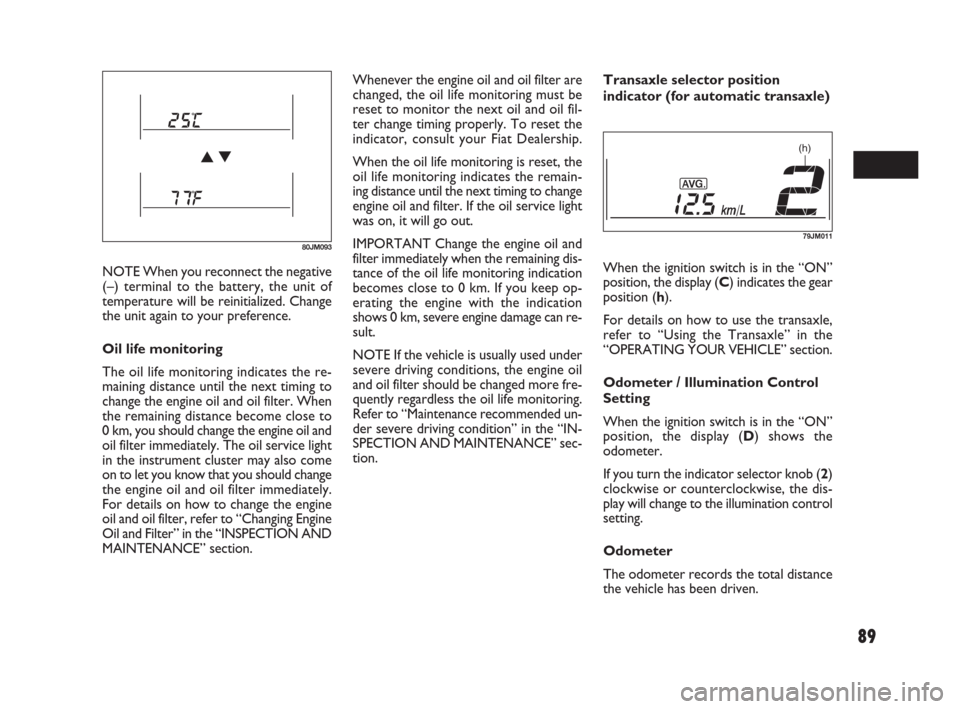
NOTE When you reconnect the negative
(–) terminal to the battery, the unit of
temperature will be reinitialized. Change
the unit again to your preference.
Oil life monitoring
The oil life monitoring indicates the re-
maining distance until the next timing to
change the engine oil and oil filter. When
the remaining distance become close to
0 km, you should change the engine oil and
oil filter immediately. The oil service light
in the instrument cluster may also come
on to let you know that you should change
the engine oil and oil filter immediately.
For details on how to change the engine
oil and oil filter, refer to “Changing Engine
Oil and Filter” in the “INSPECTION AND
MAINTENANCE” section.Whenever the engine oil and oil filter are
changed, the oil life monitoring must be
reset to monitor the next oil and oil fil-
ter change timing properly. To reset the
indicator, consult your Fiat Dealership.
When the oil life monitoring is reset, the
oil life monitoring indicates the remain-
ing distance until the next timing to change
engine oil and filter. If the oil service light
was on, it will go out.
IMPORTANT Change the engine oil and
filter immediately when the remaining dis-
tance of the oil life monitoring indication
becomes close to 0 km. If you keep op-
erating the engine with the indication
shows 0 km, severe engine damage can re-
sult.
NOTE If the vehicle is usually used under
severe driving conditions, the engine oil
and oil filter should be changed more fre-
quently regardless the oil life monitoring.
Refer to “Maintenance recommended un-
der severe driving condition” in the “IN-
SPECTION AND MAINTENANCE” sec-
tion.Transaxle selector position
indicator (for automatic transaxle)
When the ignition switch is in the “ON”
position, the display (C) indicates the gear
position (h).
For details on how to use the transaxle,
refer to “Using the Transaxle” in the
“OPERATING YOUR VEHICLE” section.
Odometer / Illumination Control
Setting
When the ignition switch is in the “ON”
position, the display (D) shows the
odometer.
If you turn the indicator selector knob (2)
clockwise or counterclockwise, the dis-
play will change to the illumination control
setting.
Odometer
The odometer records the total distance
the vehicle has been driven.
80JM093
(h)
79JM011
071-128 SEDICI LUM FL GB 1E 19-06-2009 12:05 Pagina 89
Page 115 of 270
114
NOTE The Auto Volume Control (AVC)
function automatically adjusts (increas-
es/decreases) the sound volume in accor-
dance with vehicle speed.
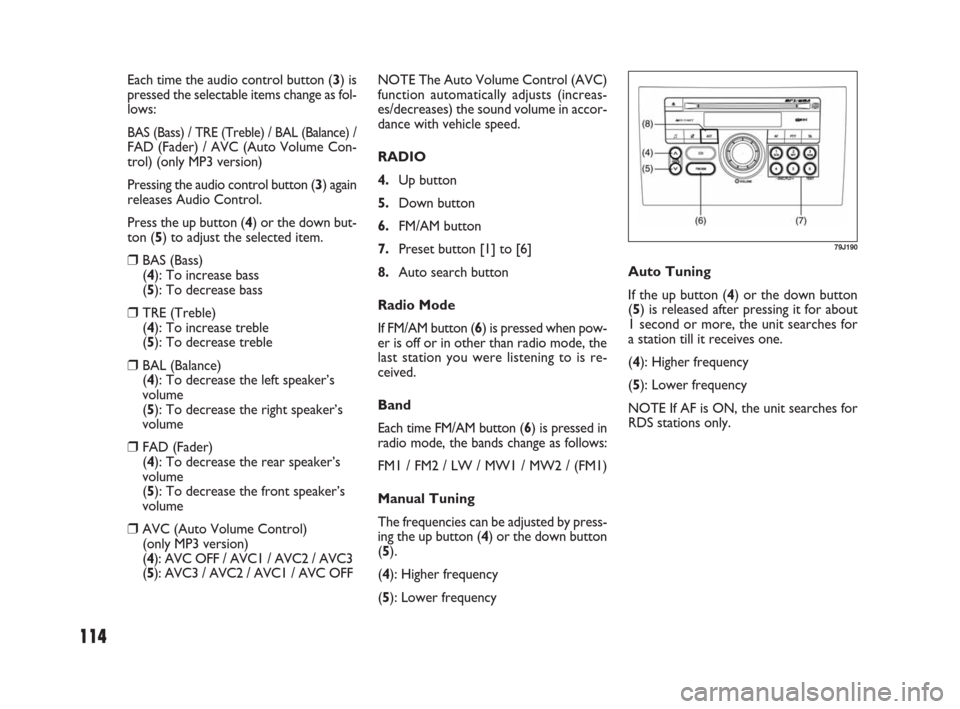
RADIO
4.Up button
5.Down button
6.FM/AM button
7.Preset button [1] to [6]
8.Auto search button
Radio Mode
If FM/AM button (6) is pressed when pow-
er is off or in other than radio mode, the
last station you were listening to is re-
ceived.
Band
Each time FM/AM button (6) is pressed in
radio mode, the bands change as follows:
FM1 / FM2 / LW / MW1 / MW2 / (FM1)
Manual Tuning
The frequencies can be adjusted by press-
ing the up button (4) or the down button
(5).
(4): Higher frequency
(5): Lower frequency Each time the audio control button (3) is
pressed the selectable items change as fol-
lows:
BAS (Bass) / TRE (Treble) / BAL (Balance) /FAD (Fader) / AVC (Auto Volume Con-
trol) (only MP3 version)
Pressing the audio control button (3) again
releases Audio Control.
Press the up button (4) or the down but-
ton (5) to adjust the selected item.
❒BAS (Bass)
(4): To increase bass
(5): To decrease bass
❒TRE (Treble)
(4): To increase treble
(5): To decrease treble
❒BAL (Balance)
(4): To decrease the left speaker’s
volume
(5): To decrease the right speaker’s
volume
❒FAD (Fader)
(4): To decrease the rear speaker’s
volume
(5): To decrease the front speaker’s
volume
❒AVC (Auto Volume Control)
(only MP3 version)
(4): AVC OFF / AVC1 / AVC2 / AVC3
(5): AVC3 / AVC2 / AVC1 / AVC OFFAuto Tuning
If the up button (4) or the down button
(5) is released after pressing it for about
1 second or more, the unit searches for
a station till it receives one.
(4): Higher frequency
(5): Lower frequency
NOTE If AF is ON, the unit searches for
RDS stations only.
79J190
071-128 SEDICI LUM FL GB 1E 19-06-2009 12:05 Pagina 114
Page 116 of 270
115
NOTE
❒Auto Preset can be released by press-
ing the auto search button (8) while au-
to preset is in process.
❒Stations can be preset for FM1, FM2,
LW, MW1, and MW2 respectively.
❒Up to six stations can be preset. If sta-
tions in good receiving condition are
not found, the number of stations pre-
set may be less than six.
❒After you have preset stations, the sta-
tion preset under the button with num-
ber [1] is received. If none of stations
is found, the unit is reset to the pre-
ceding frequency.
❒When stations are preset, the new da-
ta is written over the old data.
❒If AF is ON, only RDS stations are pre-
set.
Preset Station Calling
By pressing any of the preset buttons (7)
with numbers [1] to [6], the correspond-
ing station preset can be received.
NOTE If the button for a station not pre-
set is pressed, the unit displays “- - -”. Manual Preset
If any of the preset buttons (7) with num-
bers [1] to [6] is pressed for about 2 sec-
onds or more, the station received cor-
responding to the pressed button is pre-
set.
NOTE
❒Stations can be preset for FM1, FM2,
LW, MW1, and MW2 respectively.
❒When stations are preset, the new da-
ta is written over the old data.
Auto Preset
By pressing auto search button (8) for
about 2 seconds or longer, six stations in
good receiving condition on the band now
selected can be automatically preset.RDS (Radio Data System)
1.Power on/off knob – Volume control
knob
4.Up button
5.Down button
9.Auto frequency button
10.Traffic announcement button
11.Program type button
What is RDS?
Some FM stations are broadcasting added
data compatible with RDS. This radio set of-
fers convenient functions using such data.
RDS service availability varies with areas.
Please understand the following functions
are not available in some areas.
❒ AF (Alternative Frequency)
The unit searches for a station in better
receiving condition that emits the same
programme as now received, and auto-
matically selects that station.
071-128 SEDICI LUM FL GB 1E 19-06-2009 12:05 Pagina 115
Page 125 of 270
124
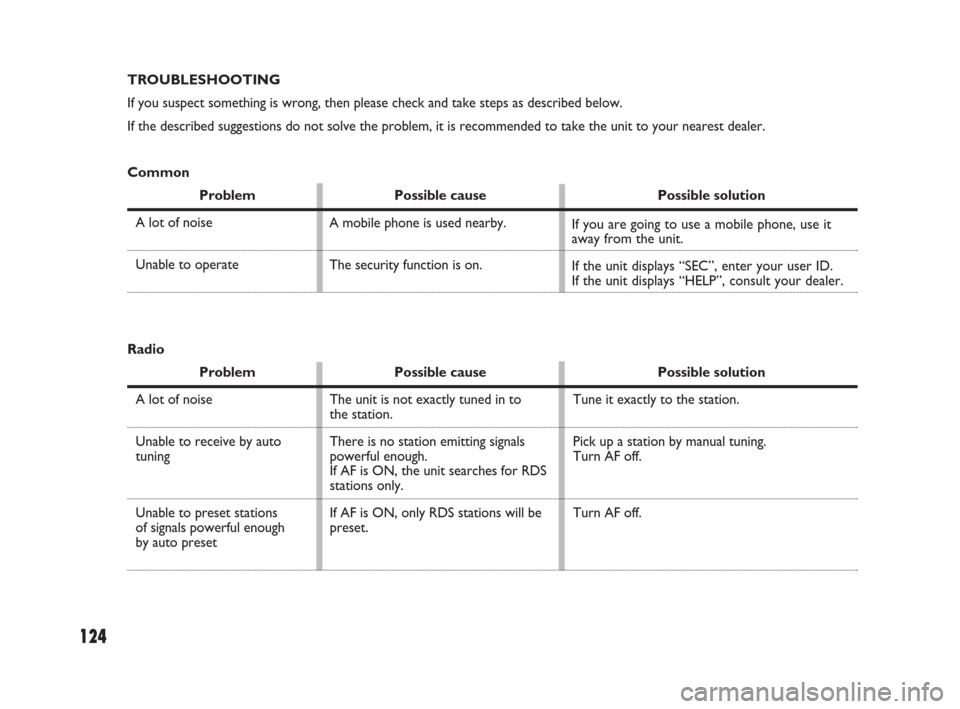
TROUBLESHOOTING
If you suspect something is wrong, then please check and take steps as described below.
If the described suggestions do not solve the problem, it is recommended to take the unit to your nearest dealer.
Common
Problem Possible cause Possible solution
A lot of noise
Unable to operate
A mobile phone is used nearby.
The security function is on.If you are going to use a mobile phone, use it
away from the unit.
If the unit displays “SEC”, enter your user ID.
If the unit displays “HELP”, consult your dealer.
Radio
Problem Possible cause Possible solution
A lot of noise
Unable to receive by auto
tuning
Unable to preset stations
of signals powerful enough
by auto preset
Tune it exactly to the station.
Pick up a station by manual tuning.
Turn AF off.
Turn AF off. The unit is not exactly tuned in to
the station.
There is no station emitting signals
powerful enough.
If AF is ON, the unit searches for RDS
stations only.
If AF is ON, only RDS stations will be
preset.
071-128 SEDICI LUM FL GB 1E 19-06-2009 12:05 Pagina 124