Page 221 of 526
electrical devices or increase engine speed (if at idle). If
the charging system light remains on, it means that the
vehicle is experiencing a problem with the charging
system. Obtain SERVICE IMMEDIATELY. See an autho-
rized dealer.
24. Malfunction Indicator Light (MIL)
The Malfunction Indicator Light (MIL) is part of
an onboard diagnostic system called OBD. The
OBD system monitors engine and automatic
transmission control systems. The MIL will turn on when
the key is in the ON position before engine start. If the
MIL does not come on when turning the key from LOCK
to ON, have the condition checked promptly.
Certain conditions such as a loose or missing gas cap,
poor fuel quality, etc., may illuminate the MIL after
engine start. The vehicle should be serviced if the MILstays on through several of your typical driving cycles. In
most situations, the vehicle will drive normally and will
not require towing.
The MIL flashes to alert you to serious conditions that
could lead to immediate loss of power or severe catalytic
converter damage. The vehicle should be serviced as
soon as possible if this occurs.
25. Oil Pressure Warning Light
This light indicates low engine oil pressure. The
light should turn on momentarily when the engine
is started. If the light turns on while driving, stop the
vehicle, and shut OFF the engine as soon as possible. A
single chime will sound when this light turns on.
Do not operate the vehicle until the cause is corrected.
This light does not show how much oil is in the engine.
The engine oil level must be checked using the procedure
shown in Section 7.
UNDERSTANDING YOUR INSTRUMENT PANEL 219
4
Page 224 of 526
Electronic Vehicle Information Center (EVIC)
Displays
When the appropriate conditions exist, the EVIC displays
the following messages:
•Turn Signal On (with a continuous warning chime if
the vehicle is driven more than 1 mile [1.6 km] with
either turn signal on)
•Left Front Turn Signal Light Out (with a single chime)
•Left Rear Turn Signal Light Out (with a single chime)
•Right Front Turn Signal Light Out (with a single
chime)
•Right Rear Turn Signal Light Out (with a single chime)
•RKE Battery Low (with a single chime)
•Memory #1/#2 Profile Set
•Memory #1/#2 Profile Recall
•Memory System Disabled – Vehicle Not In PARK (with
a single chime)
•Memory System Disabled – Seat Belt Buckled (with a
single chime)
•Personal Settings Not Available – Vehicle Not in PARK
•Left/Right Front Door Ajar (one or more, with a single
chime if speed is above 1 mph [1.6 km/h])
•Left/Right Rear Door Ajar (one or more, with a single
chime if speed is above 1 mph [1.6 km/h])
•Door(s) Ajar (with a single chime if vehicle is in
motion)
•Trunk Ajar (with a single chime)
•Low Washer Fluid (with a single chime)
222 UNDERSTANDING YOUR INSTRUMENT PANEL
Page 236 of 526
When OFF is selected, only the MEMORY switch on the
driver’s door trim panel will recall memory profiles. To
make your selection, press and release the FUNCTION
SELECT button until “ON” or “OFF” appears. Refer to
“Driver Memory Seat” in Section 3.
“Sound Horn with Remote Key Lock”
When ON is selected, a short horn sound will occur when
the RKE LOCK button is pressed. This feature may be
selected with or without the flash lights on lock/unlock
feature. To make your selection, press and release the
FUNCTION SELECT button until “ON” or “OFF”
appears.
“Rain Sensing Intermittent Wipers” — If Equipped
When ON is selected, the system will automatically
activate the windshield wipers if it senses moisture on
the windshield. To make your selection, press and release
the FUNCTION SELECT button until “ON” or “OFF”
appears. When OFF is selected, the system reverts to the
standard intermittent wiper operation.
“Automatically Move Seat Back on Exit” — If
Equipped
This feature provides automatic driver seat positioning to
enhance driver mobility when entering and exiting the
vehicle. To make your selection, press and release the
FUNCTION SELECT button until “ON” or “OFF” ap-
pears.
NOTE:The seat will return to the memorized seat
location (if Recall Memory with Remote Key Unlock is set
to ON) when the RKE transmitter is used to unlock the
door. Refer to “Easy Entry/Exit Seat” under “Driver
Memory Seat” in Section 3.
“Flash Lights with Remote Key Lock”
When ON is selected, the front and rear turn signals will
flash when the doors are locked or unlocked with the
RKE transmitter. This feature may be selected with or
without the sound horn on lock feature selected. To make
234 UNDERSTANDING YOUR INSTRUMENT PANEL
Page 237 of 526
your selection, press and release the FUNCTION SE-
LECT button until “ON” or “OFF” appears.
“Headlights On with Wipers” (Available with Auto
Headlights Only)
When ON is selected, and the HEADLIGHT switch is in
the AUTO position, the headlights will turn on approxi-
mately 10 seconds after the wipers are turned on. The
headlights will also turn off when the wipers are turned
off if they were turned on by this feature. To make your
selection, press and release the FUNCTION SELECT
button until “ON” or “OFF” appears.
NOTE:Turning the headlights on during the daytime
causes the instrument panel lights to dim. To increase the
brightness, refer to “Lights” in Section 3.
“Delay Turning Headlights Off”
When this feature is selected, the driver can choose to
have the headlights remain on for 0, 30, 60, or 90 secondswhen exiting the vehicle. To make your selection, press
and release the FUNCTION SELECT button until “0,”
“30,” “60,” or “90” appears.
“Tilt Mirrors Down in Reverse” — If Equipped
When ON is selected, the outside rearview mirrors will
tilt downward when the ignition switch is in the ON
position and the transmission is in the REVERSE posi-
tion. The mirrors will move back to their previous
position when the transmission is shifted out of RE-
VERSE. To make your selection, press and release the
FUNCTION SELECT button until “ON” or “OFF”
appears.
“Turn Headlights On with Remote Key Unlock”
When this feature is selected, the headlights will activate
and remain on for up to 90 seconds when the doors are
unlocked with the RKE transmitter. To make your selec-
tion, press and release the FUNCTION SELECT button
until “OFF,” “30 sec.,” “60 sec.,” or “90 sec.” appears.
UNDERSTANDING YOUR INSTRUMENT PANEL 235
4
Page 239 of 526

“Turn-by-Turn Navigation” — If Equipped
When ON is selected, the turn-by-turn directions will
appear in the display as the vehicle approaches a desig-
nated turn within a programmed route. To make your
selection, press and release the FUNCTION SELECT
button until “ON” or “OFF” appears.
“Display Units of Measure in”
The EVIC, odometer, and uconnect�gps (if equipped)
can be changed between English and Metric units of
measure. To make your selection, press and release the
FUNCTION SELECT button until “US” or “METRIC”
appears.
“Automatic High Beams” — If Equipped
When this feature is selected, the high beam headlights
will deactivate automatically under certain conditions. To
make your selection, press and release the FUNCTION
SELECT button until “ON” or “OFF” appears. Refer to
“SmartBeams” in Section 3.
SETTING THE ANALOG CLOCK
To set the analog clock at the top center of the instrument
panel, press and hold the button until the setting is
correct.
Analog Clock
UNDERSTANDING YOUR INSTRUMENT PANEL 237
4
Page 244 of 526
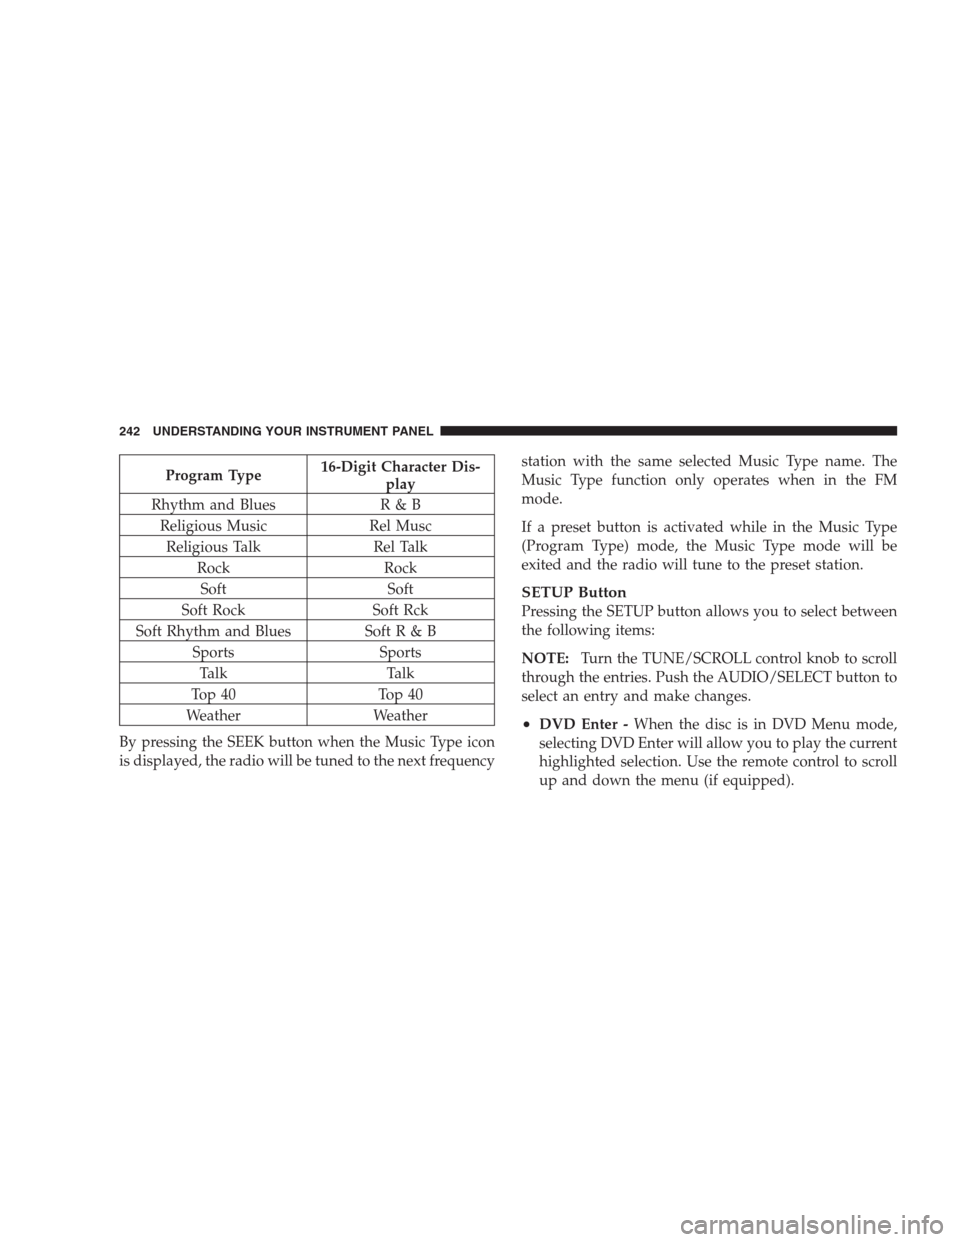
Program Type16-Digit Character Dis-
play
Rhythm and Blues R & B
Religious Music Rel Musc
Religious Talk Rel Talk
Rock Rock
Soft Soft
Soft Rock Soft Rck
Soft Rhythm and Blues Soft R & B
Sports Sports
Talk Talk
Top 40 Top 40
Weather Weather
By pressing the SEEK button when the Music Type icon
is displayed, the radio will be tuned to the next frequencystation with the same selected Music Type name. The
Music Type function only operates when in the FM
mode.
If a preset button is activated while in the Music Type
(Program Type) mode, the Music Type mode will be
exited and the radio will tune to the preset station.
SETUP Button
Pressing the SETUP button allows you to select between
the following items:
NOTE:Turn the TUNE/SCROLL control knob to scroll
through the entries. Push the AUDIO/SELECT button to
select an entry and make changes.
•DVD Enter -When the disc is in DVD Menu mode,
selecting DVD Enter will allow you to play the current
highlighted selection. Use the remote control to scroll
up and down the menu (if equipped).
242 UNDERSTANDING YOUR INSTRUMENT PANEL
Page 255 of 526

intended for home and other limited viewing uses only,
unless otherwise authorized by Macrovision. Reverse
engineering or disassembly is prohibited.
DTS™
�DTS™�and�DTS™ 2.0�are trademarks of Digital The-
ater Systems, Inc.
AM/FM/CD/DVD RADIO (RER/REN) – IF
EQUIPPED
NOTE:The sales code is located on the lower right side
of the unit’s faceplate.
The REN and RER radios contain a CD/DVD player, USB
port, and a 30-gigabyte hard drive (HDD). Sirius Satellite
Radio is optional. The 6.5 in (16.5 cm) touch screen allows
for easy menu selection.
The RER radio also contains a Global Positioning System
(GPS)-based Navigation system.Refer to your uconnect�tunes (REN) or (RER) user’s
manual for detailed operating instructions.
Operating Instructions — Voice Recognition
System (VR) — If Equipped
For the radio, refer to “Voice Recognition System (VR)” in
Section 3.
Operating Instructions — uconnect�phone — If
Equipped
Refer to “uconnect�phone” in Section 3.
Clock Setting Procedure
uconnect�gps — RER only
The GPS receiver used in this system is synchronized to
the time data being transmitted by the GPS satellite. The
satellite clock is Greenwich Mean Time (GMT). This is the
worldwide standard for time. This makes the system’s
clock very accurate once the appropriate time zone and
daylight savings information is set.
UNDERSTANDING YOUR INSTRUMENT PANEL 253
4
Page 256 of 526
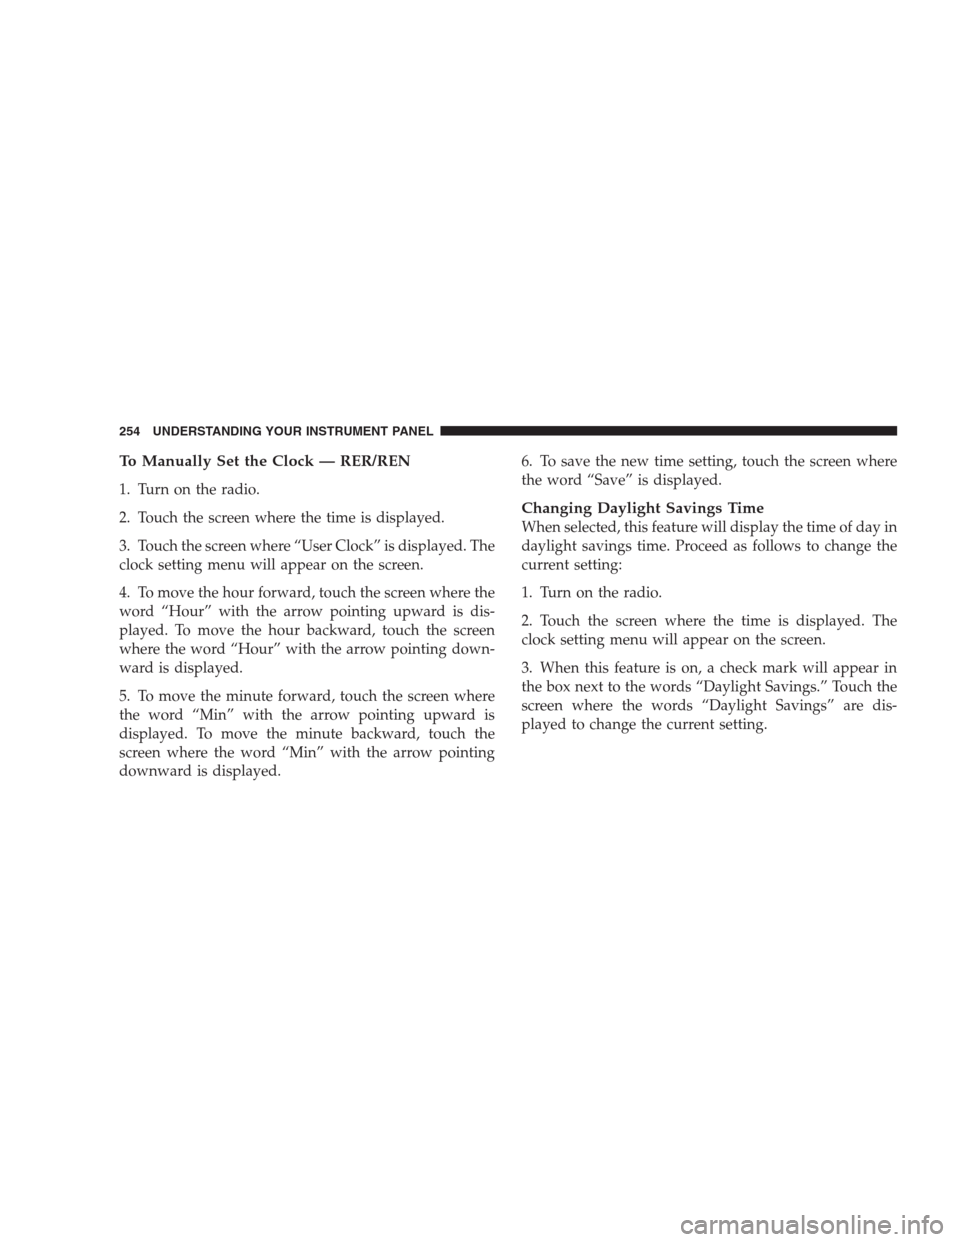
To Manually Set the Clock — RER/REN
1. Turn on the radio.
2. Touch the screen where the time is displayed.
3. Touch the screen where “User Clock” is displayed. The
clock setting menu will appear on the screen.
4. To move the hour forward, touch the screen where the
word “Hour” with the arrow pointing upward is dis-
played. To move the hour backward, touch the screen
where the word “Hour” with the arrow pointing down-
ward is displayed.
5. To move the minute forward, touch the screen where
the word “Min” with the arrow pointing upward is
displayed. To move the minute backward, touch the
screen where the word “Min” with the arrow pointing
downward is displayed.6. To save the new time setting, touch the screen where
the word “Save” is displayed.
Changing Daylight Savings Time
When selected, this feature will display the time of day in
daylight savings time. Proceed as follows to change the
current setting:
1. Turn on the radio.
2. Touch the screen where the time is displayed. The
clock setting menu will appear on the screen.
3. When this feature is on, a check mark will appear in
the box next to the words “Daylight Savings.” Touch the
screen where the words “Daylight Savings” are dis-
played to change the current setting.
254 UNDERSTANDING YOUR INSTRUMENT PANEL