Page 78 of 526
SAFETY TIPS
Transporting Passengers
NEVER TRANSPORT PASSENGERS IN THE CARGO
AREA.
WARNING!
•It is extremely dangerous to ride in a cargo area,
inside or outside of a vehicle. In a collision, people
riding in these areas are more likely to be seri-
ously injured or killed.
•Do not allow people to ride in any area of your
vehicle that is not equipped with seats and seat
belts.
•Be sure everyone in your vehicle is in a seat and
using a seat belt properly.
Exhaust Gas
WARNING!
Exhaust gases can injure or kill. They contain carbon
monoxide (CO), which is colorless and odorless.
Breathing it can make you unconscious and can
eventually poison you. To avoid breathing (CO)
follow these safety tips:
Do not run the engine in a closed garage or in confined
areas any longer than needed to move your vehicle in or
out of the area.
If it is necessary to sit in a parked vehicle with the engine
running, adjust your heating or cooling controls to force
outside air into the vehicle. Set the blower at high speed.
76 THINGS TO KNOW BEFORE STARTING YOUR VEHICLE
Page 130 of 526
On vehicles equipped with rear heated seats, the seats
closest to the doors are heated. The controls for these
seats are located on the rear of the center console.Press the switch once to select High-level heat-
ing. Press the switch a second time to select
Low-level heating. Press the switch a third time
to shut the heating elements Off. Two indica-
tors will illuminate for High, one for Low, and none for
Off.
If the High-level heating is selected, the system will
automatically switch to Low-level heating after approxi-
mately 30 minutes of continuous operation. At that time,
the number of indicators illuminated changes from two
to one, indicating the change. Operation on the Low-level
setting also turns Off automatically after approximately
30 minutes.
NOTE:Once a heat setting is selected, heat will be felt
within two to five minutes.
Rear Heated Seat Switch
128 UNDERSTANDING THE FEATURES OF YOUR VEHICLE
Page 187 of 526
6. Firmly press and release the “learn” or “training”
button. The name and color of the button may vary by
manufacturer.
NOTE:There are 30 seconds in which to initiate the next
step after the “Learn” button has been pressed.
7. Return to the vehicle and press the programmed
HomeLink�button twice (holding the button for two
seconds each time). If the device is plugged in and
activates, programming is complete.
If the device does not activate, press the button a third
time (for two seconds) to complete the training.
If you have any problems, or require assistance, please
call toll-free 1–800–355–3515 or, on the Internet at
www.HomeLink.com for information or assistance.
To program the remaining two HomeLink�buttons,
repeat each step for each remaining button. DO NOT
erase the channels.Gate Operator/Canadian Programming
Canadian radio-frequency laws require transmitter sig-
nals to “time-out” (or quit) after several seconds of
transmission – which may not be long enough for
HomeLink�to pick up the signal during programming.
Similar to this Canadian law, some U.S. gate operators are
designed to “time-out” in the same manner.
It may be helpful to unplug the device during the cycling
process to prevent possible overheating of the garage
door or gate motor.
If you are having difficulties programming a garage door
opener or a gate operator, replace “Programming
HomeLink” Step 3 with the following:
3. Continue to press and hold the HomeLink�button
while you press and release - every two seconds
(“cycle”) your hand-held transmitter until HomeLink�
UNDERSTANDING THE FEATURES OF YOUR VEHICLE 185
3
Page 206 of 526
▫Operating Instructions — Video
Entertainment System (VES)™
(If Equipped)....................... 286
�Kicker�High Performance Sound System With
Driver-Selectable Surround (DSS)
– If Equipped......................... 287
�uconnect studios�(Sirius Backseat TV™)
— If Equipped........................ 288
�Video Entertainment System (VES)™
— If Equipped........................ 288
�Remote Sound System Controls
— If Equipped........................ 291�CD/DVD Maintenance................. 292
�Radio Operation And Cellular Phones....... 293
�Climate Controls...................... 294
▫Manual Air Conditioning And Heating
System............................ 294
▫Automatic Temperature Control
— If Equipped...................... 297
▫Operating Tips...................... 302
204 UNDERSTANDING YOUR INSTRUMENT PANEL
Page 296 of 526
CLIMATE CONTROLS
The air conditioning and heating system is designed to
make you comfortable in all types of weather.
Manual Air Conditioning and Heating SystemBlower Control
The rotary knob on the left controls the
blower. The control has an OFF posi-
tion and four speed settings.The
blower will remain on until the con-
trol is turned to the OFF position or
the ignition is turned OFF.
NOTE:For vehicles equipped with Remote Start, the
climate controls will not function during Remote Start
operation if the blower control is left in the “O” (Off)
position.
Manual Temperature Controls
294 UNDERSTANDING YOUR INSTRUMENT PANEL
Page 299 of 526
Automatic Temperature Control — If Equipped
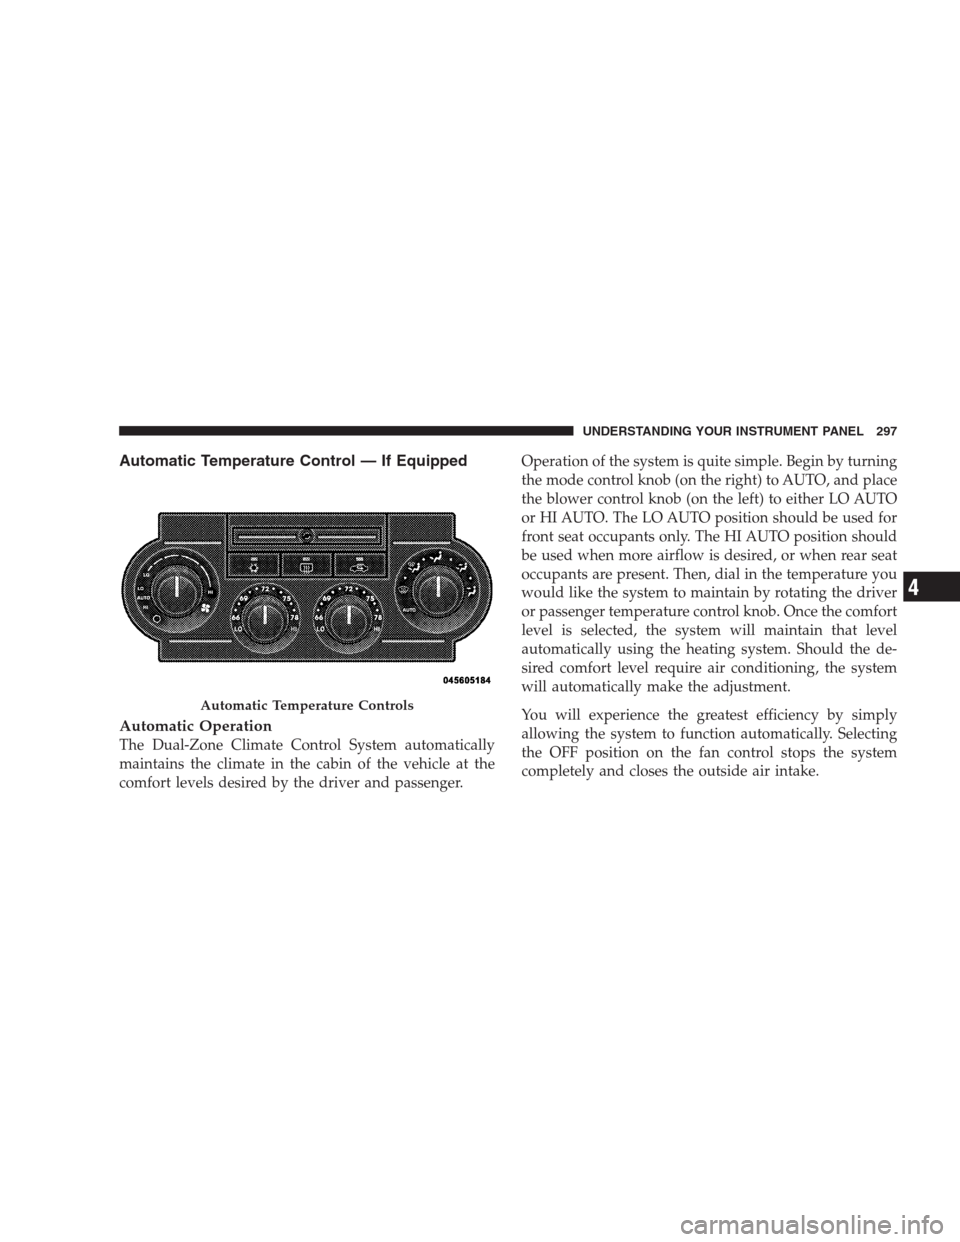
Automatic Operation
The Dual-Zone Climate Control System automatically
maintains the climate in the cabin of the vehicle at the
comfort levels desired by the driver and passenger.Operation of the system is quite simple. Begin by turning
the mode control knob (on the right) to AUTO, and place
the blower control knob (on the left) to either LO AUTO
or HI AUTO. The LO AUTO position should be used for
front seat occupants only. The HI AUTO position should
be used when more airflow is desired, or when rear seat
occupants are present. Then, dial in the temperature you
would like the system to maintain by rotating the driver
or passenger temperature control knob. Once the comfort
level is selected, the system will maintain that level
automatically using the heating system. Should the de-
sired comfort level require air conditioning, the system
will automatically make the adjustment.
You will experience the greatest efficiency by simply
allowing the system to function automatically. Selecting
the OFF position on the fan control stops the system
completely and closes the outside air intake.
Automatic Temperature Controls
UNDERSTANDING YOUR INSTRUMENT PANEL 297
4
Page 304 of 526
NOTE:To control the air conditioning manually, the
mode selector must be moved out of the AUTO position.
•Recirculation Control
This button can be used to block out smoke,
odors, dust, high humidity, or if rapid cooling
is desired. The Recirculation mode should only
be used temporarily. An indicator in the button
illuminates when the Recirculation mode is active. You
may use this feature separately.
NOTE:Extended use of recirculation may cause the
windows to fog. If the interior of the windows begins to
fog, press the recirculation button to return to outside air.
Some temp/humidity conditions will cause captured
interior air to condense on windows and hamper visibil-
ity. For this reason, the system will not allow recirculation
to be selected while in Defrost or Defrost/Floor mode.Attempting to use the recirculation while in these modes
will cause the indicator in the control button to blink and
then turn off.
Operating Tips
NOTE:Refer to the chart at the end of this section for
suggested control settings for various weather condi-
tions.
Summer Operation
The engine cooling system in air-conditioned vehicles
must be protected with a high-quality antifreeze coolant
to provide proper corrosion protection and to protect
against engine overheating. A 50% solution of ethylene
glycol antifreeze coolant in water is recommended. Refer
to “Maintenance Procedures” in Section 7 for proper
coolant selection.
302 UNDERSTANDING YOUR INSTRUMENT PANEL
Page 305 of 526
Winter Operation
Use of the air Recirculation mode during Winter months
is not recommended because it may cause window
fogging.
Vacation Storage
Any time you store your vehicle or keep it out of service
(i.e., vacation) for two weeks or more, run the air
conditioning system at idle for about five minutes in the
fresh air and high blower setting. This will insure ad-
equate system lubrication to minimize the possibility of
compressor damage when the system is started again.
Window Fogging
Interior fogging on the windshield can be quickly re-
moved by turning the mode selector to Defrost. The
Defrost/Floor mode can be used to maintain a clear
windshield and provide sufficient heating. If side win-
dow fogging becomes a problem increase blower speed.
Vehicle windows tend to fog on the inside in mild but
rainy or humid weather.NOTE:Recirculate without A/C should not be used for
long periods, as fogging may occur.
Outside Air Intake
Make sure the air intake, located directly in front of the
windshield, is free of obstructions such as leaves. Leaves
collected in the air intake may reduce airflow, and if they
enter the plenum, they could plug the water drains. In
Winter months, make sure the air intake is clear of ice,
slush, and snow.
A/C Air Filter
The climate control system filters outside air containing
dust, pollen and some odors. Strong odors cannot be
totally filtered out. Refer to “Maintenance Procedures” in
Section 7 for filter replacement instructions.
UNDERSTANDING YOUR INSTRUMENT PANEL 303
4