Page 87 of 526
MIRRORS
Inside Day/Night Mirror
A two-point pivot system allows for horizontal and
vertical mirror adjustment. Adjust the mirror to center on
the view through the rear window. The mirror should be
adjusted while set in the day position (toward the wind-
shield).
Headlight glare can be reduced by moving the small
control under the mirror to the night position (toward the
rear of the vehicle).
Automatic Dimming Inside Mirror — If Equipped
This mirror automatically adjusts for headlight glare
from vehicles behind you. You can turn the feature on or
off by pressing the button at the base of the mirror. A light
next to the button will illuminate to indicate when the
dimming feature is activated.
Adjusting Rearview Mirror
UNDERSTANDING THE FEATURES OF YOUR VEHICLE 85
3
Page 88 of 526
CAUTION!
To avoid damage to the mirror during cleaning, never
spray any cleaning solution directly onto the mirror.
Apply the solution onto a clean cloth and wipe the
mirror clean.
Outside Mirrors
To receive maximum benefit, adjust the outside mirror(s)
to center on the adjacent lane of traffic and a slight
overlap of the view obtained from the inside mirror.
NOTE:The passenger-side convex outside mirror will
give a much wider view to the rear, and especially of the
lane next to your vehicle.
WARNING!
Vehicles and other objects seen in the passenger-side
convex mirror will look smaller and farther away
than they really are. Relying too much on your
passenger-side convex mirror could cause you to
collide with another vehicle or other object. Use your
inside mirror when judging the size or distance of a
vehicle seen in the passenger-side convex mirror.
Automatic Dimming Mirror
86 UNDERSTANDING THE FEATURES OF YOUR VEHICLE
Page 89 of 526
Outside Mirrors Folding Feature — If Equipped
Some models have outside mirrors that are hinged. The
hinge allows the mirror to pivot forward and rearward to
resist damage. The hinge has three detent positions, full
forward, full rearward and normal.
Outside Mirror Auto Dimmer — If Equipped
This mirror automatically adjusts for annoying headlight
glare from vehicles behind you. You can turn this feature
on or off by pressing the button at the base of the inside
rearview mirror. This feature is also available on the
passenger outside mirror of mirrors equipped with turn
signal and approach lighting.
Outside Mirrors with Turn Signal and Approach
Lighting — If Equipped
Driver and passenger outside mirrors with turn signal
and approach lighting contain four LEDs, which are
located in the upper outer corner of each mirror.Three of the LEDs are turn signal indicators, which flash
with the corresponding turn signal lights in the front and
rear of the vehicle. Turning on the hazard flashers will
also activate these LEDs.
The fourth (uppermost) LED supplies illuminated entry
lighting, which turns on in both mirrors when you use
the Remote Keyless Entry (RKE) transmitter or open any
door. This LED shines outward to illuminate the front
and rear door handles. It also shines downward to
illuminate the area in front of the doors.
The Illuminated Entry lighting fades to off after about
30 seconds or it will fade to off immediately once the
ignition switch is turned ON from the LOCK position.
NOTE:The approach lighting will not function when
the shift lever is moved out of the PARK position.
UNDERSTANDING THE FEATURES OF YOUR VEHICLE 87
3
Page 90 of 526
Tilt Mirrors in Reverse — If Equipped
Tilt Mirrors in Reverse provides automatic outside mirror
positioning which will aid the driver ’s view of the
ground rearward of the front doors. The outside mirrors
will move slightly downward from the present position
when the vehicle is shifted into the REVERSE position.
The outside mirrors will then return to the original
position when the vehicle is shifted out of the REVERSE
position. Each stored memory setting will have an asso-
ciated Tilt Mirrors in Reverse position.
NOTE:The Tilt Mirrors in Reverse feature is not en-
abled when delivered from the factory. The Tilt Mirrors in
Reverse feature can be enabled or disabled through the
customer programmable features in the Electronic Ve-
hicle Information Center (EVIC), refer to “Tilt Mirrors in
Reverse” under “Customer-Programmable Features” un-
der “Electronic Vehicle Information Center (EVIC)” in
Section 4.
Power Mirrors
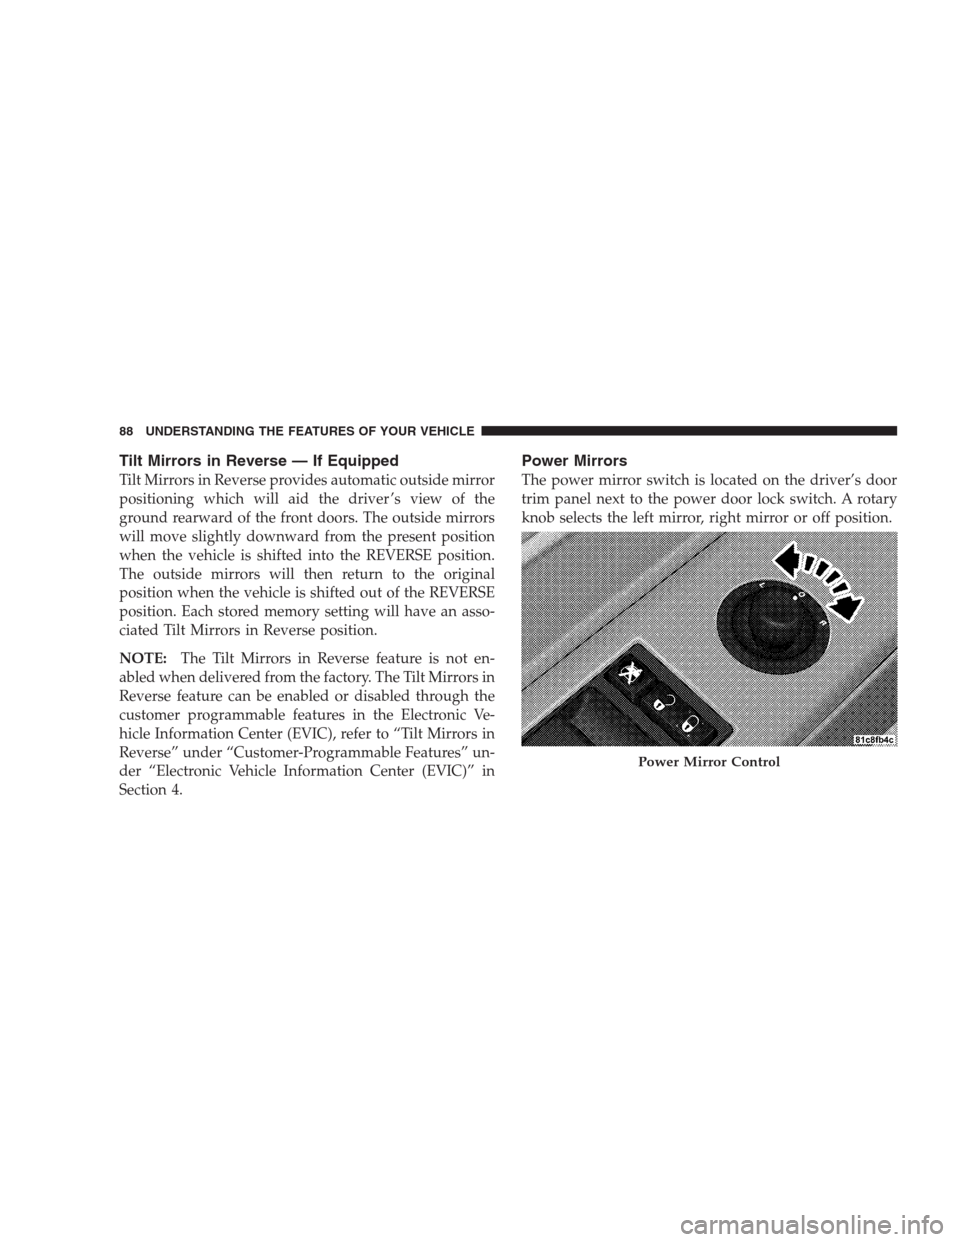
The power mirror switch is located on the driver’s door
trim panel next to the power door lock switch. A rotary
knob selects the left mirror, right mirror or off position.
Power Mirror Control
88 UNDERSTANDING THE FEATURES OF YOUR VEHICLE
Page 93 of 526

it your purse, pocket, or briefcase), as long as your phone
is turned on and has been paired to the vehicle’s
uconnect�phone. The uconnect�phone allows up to
seven cellular phones to be linked to the system. Only
one linked (or paired) cellular phone can be used with the
system at a time. The system is available in English,
Spanish, or French languages.
Phone Button
The rearview mirror contains the microphone
for the system (depending on the type of
mirror and radio equipped), and either the
radio or the mirror has the two control buttons
(PHONE Button and VOICE RECOGNITION button)
that will enable you to access the system.
Voice Recognition Button
Actual button location may vary with the ra-
dio. The individual buttons are described in the
“Operation” section.The uconnect�phone can be used with any Hands-Free
Profile certified Bluetooth�cellular phone. See the
uconnect�website for supported phones. If your cellular
phone supports a different profile (e.g., Headset Profile)
you may not be able to use any uconnect�phone
features. Refer to your cellular service provider or the
phone manufacturer for details.
The uconnect�phone is fully integrated with the vehi-
cle’s audio system. The volume of the uconnect�phone
can be adjusted either from the radio volume control
knob or from the steering wheel radio control (right
switch), if so equipped.
The radio display will be used for visual prompts from
the uconnect�phone such as�CELL�or caller ID on
certain radios.
Operation
Voice commands can be used to operate the uconnect�
phone and to navigate through the uconnect�phone
UNDERSTANDING THE FEATURES OF YOUR VEHICLE 91
3
Page 112 of 526
To restore the Voice Recognition system to factory default
settings, enter the Voice Training session via the above
procedure and follow the prompts.
Voice Recognition (VR)
•
For best performance, adjust the rearview mirror to
provide at least1�2in (1 cm) gap between the overhead
console (if equipped) and the mirror.
•Always wait for the beep before speaking.
•Speak normally, without pausing, just as you would
speak to a person sitting a few feet/meters away from
you.
•Make sure that no one other than you is speaking
during a voice recognition period.
•Performance is maximized under:
•low-to-medium blower setting,
•low-to-medium vehicle speed,
•low road noise,
•smooth road surface,
•fully closed windows,
•dry weather condition.
•Even though the system is designed for users speaking
in North American English, French, and Spanish ac-
cents, the system may not always work for some.
•When navigating through an automated system such
as voice mail, or when sending a page, at the end of
speaking the digit string, make sure to say�Send.�
•Storing names in the phonebook when the vehicle is
not in motion is recommended.
•It is not recommended to store similar sounding
names in the uconnect�phonebook.
110 UNDERSTANDING THE FEATURES OF YOUR VEHICLE
Page 140 of 526
The Headlights On with Wipers feature can be turned on
or off through the Electronic Vehicle Information Center
(EVIC) (if equipped). Refer to ”Headlights On with
Wipers,” under “Personal Settings (Customer-
Programmable Features)” under “Electronic Vehicle In-
formation Center (EVIC)” in Section 4.
SmartBeams — If Equipped
The SmartBeam system provides increased forward light-
ing at night by automating high beam control through
the use of a digital camera mounted on the inside
rearview mirror. This camera detects vehicle specific light
and automatically switches from high beams to low
beams until the approaching vehicle is out of view.
To Activate
1. Select “Automatic High Beams — ON” through the
EVIC. Refer to “Automatic High Beams,” under “Per-
sonal Settings (Customer-Programmable Features)” un-
der “Electronic Vehicle Information Center (EVIC)” in
Section 4.
2. Rotate the headlight switch counterclockwise to the
AUTO (A) position.
3. Push the multifunction lever away from you to switch
the headlights to the high beam position. Refer to “Mul-
tifunction Lever” in this section.
NOTE:This system will not activate until the vehicle is
at or above 25 mph (40 km/h).
To Deactivate
Perform either of the following steps to deactivate the
SmartBeam system.
138 UNDERSTANDING THE FEATURES OF YOUR VEHICLE
Page 180 of 526
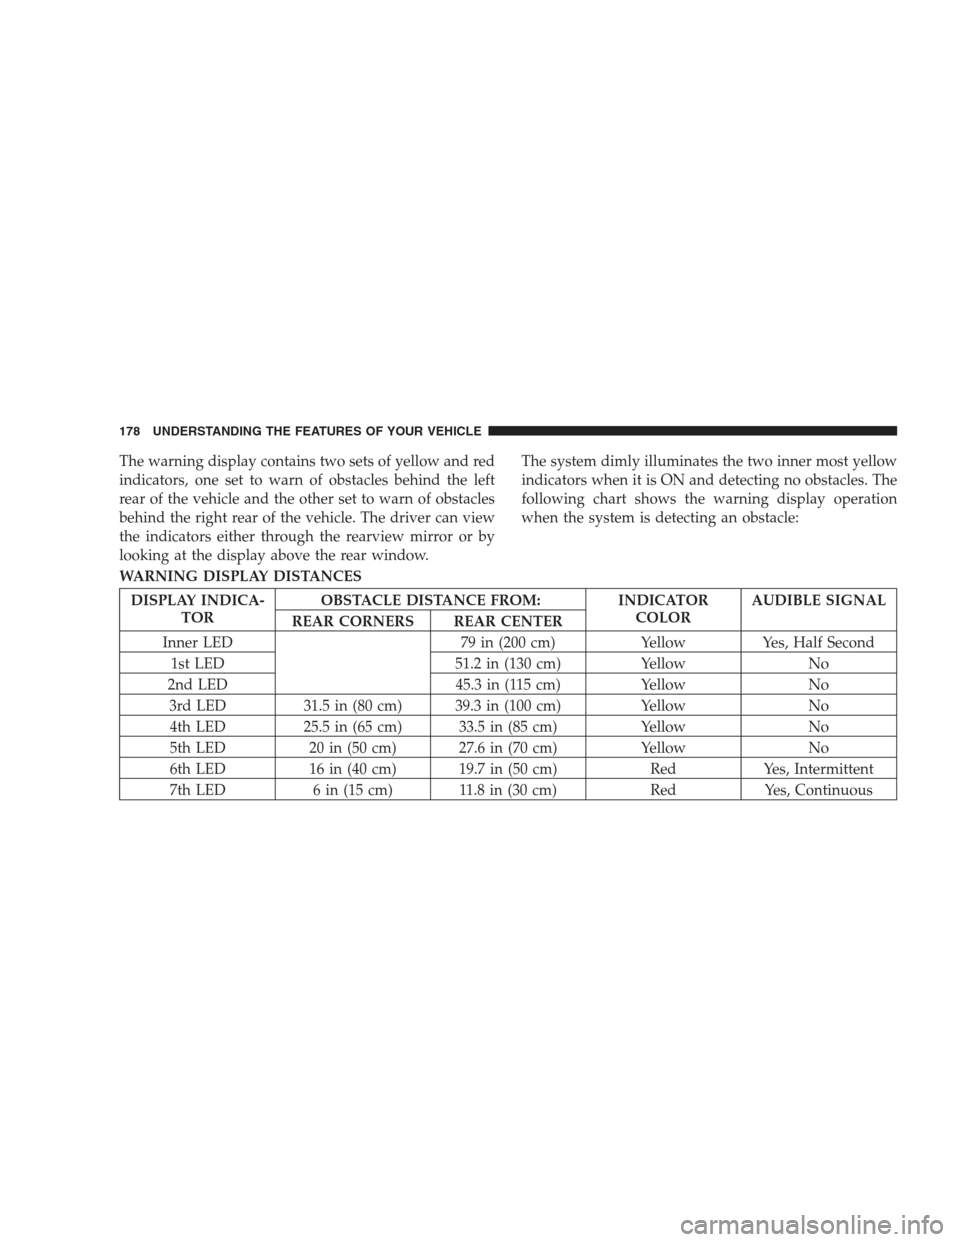
The warning display contains two sets of yellow and red
indicators, one set to warn of obstacles behind the left
rear of the vehicle and the other set to warn of obstacles
behind the right rear of the vehicle. The driver can view
the indicators either through the rearview mirror or by
looking at the display above the rear window.The system dimly illuminates the two inner most yellow
indicators when it is ON and detecting no obstacles. The
following chart shows the warning display operation
when the system is detecting an obstacle:
WARNING DISPLAY DISTANCES
DISPLAY INDICA-
TOROBSTACLE DISTANCE FROM: INDICATOR
COLORAUDIBLE SIGNAL
REAR CORNERS REAR CENTER
Inner LED 79 in (200 cm) Yellow Yes, Half Second
1st LED 51.2 in (130 cm) Yellow No
2nd LED 45.3 in (115 cm) Yellow No
3rd LED 31.5 in (80 cm) 39.3 in (100 cm) Yellow No
4th LED 25.5 in (65 cm) 33.5 in (85 cm) Yellow No
5th LED 20 in (50 cm) 27.6 in (70 cm) Yellow No
6th LED 16 in (40 cm) 19.7 in (50 cm) Red Yes, Intermittent
7th LED 6 in (15 cm) 11.8 in (30 cm) Red Yes, Continuous
178 UNDERSTANDING THE FEATURES OF YOUR VEHICLE