Page 1376 of 1903

Downloaded from www.Manualslib.com manuals search engine ON-VEHICLE SERVICE
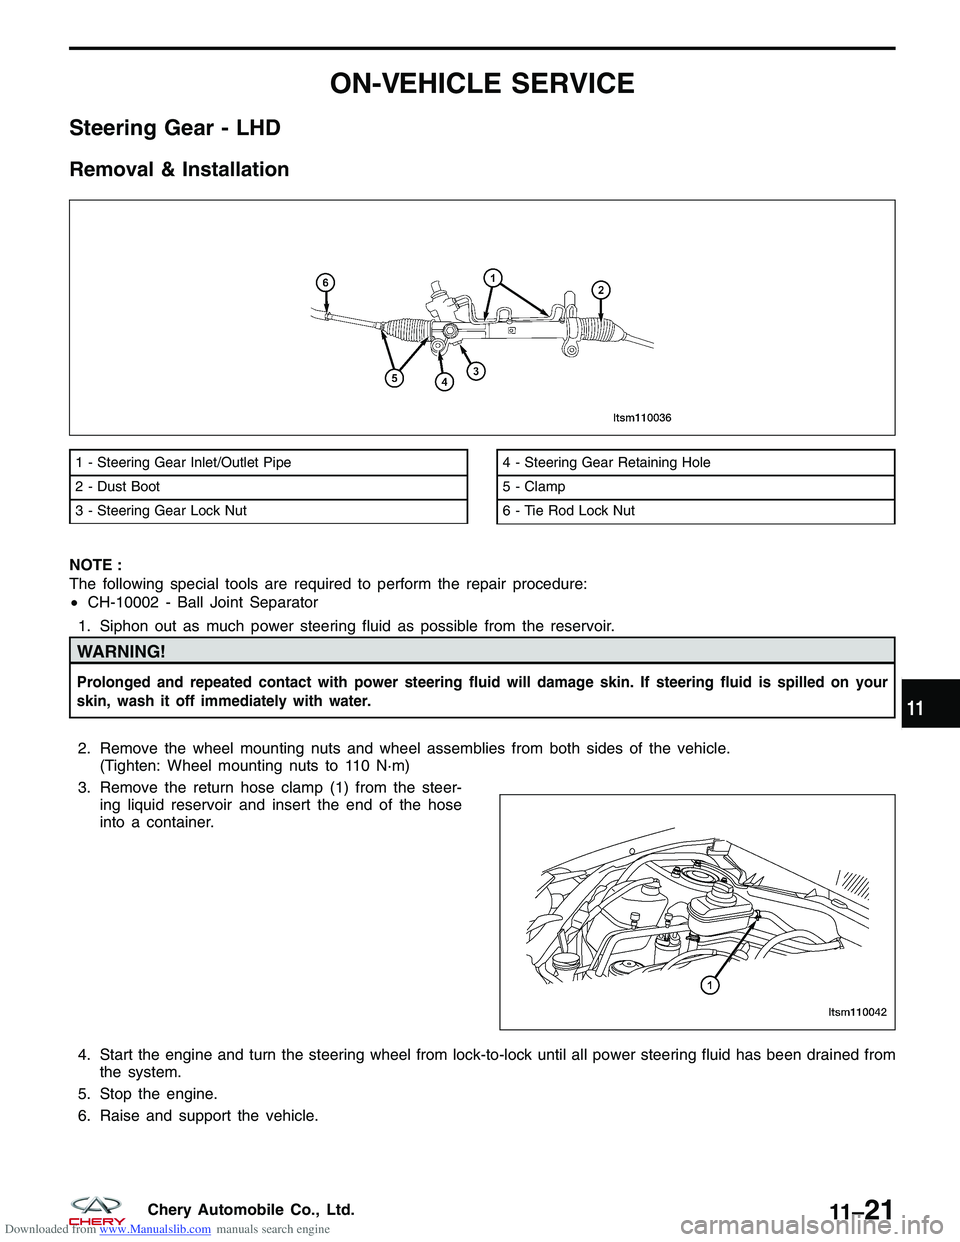
Steering Gear - LHD
Removal & Installation
NOTE :
The following special tools are required to perform the repair procedure:
•CH-10002 - Ball Joint Separator
1. Siphon out as much power steering fluid as possible from the reservoir.
WARNING!
Prolonged and repeated contact with power steering fluid will damage skin. If steering fluid is spilled on your
skin, wash it off immediately with water.
2. Remove the wheel mounting nuts and wheel assemblies from both sides of the vehicle. (Tighten: Wheel mounting nuts to 110 N·m)
3. Remove the return hose clamp (1) from the steer- ing liquid reservoir and insert the end of the hose
into a container.
4. Start the engine and turn the steering wheel from lock-to-lock until all power steering fluid has been drained from the system.
5. Stop the engine.
6. Raise and support the vehicle.
1 - Steering Gear Inlet/Outlet Pipe
2 - Dust Boot
3 - Steering Gear Lock Nut4 - Steering Gear Retaining Hole
5 - Clamp
6 - Tie Rod Lock Nut
LTSM110036
LTSM110042
11
11 –21Chery Automobile Co., Ltd.
Page 1380 of 1903

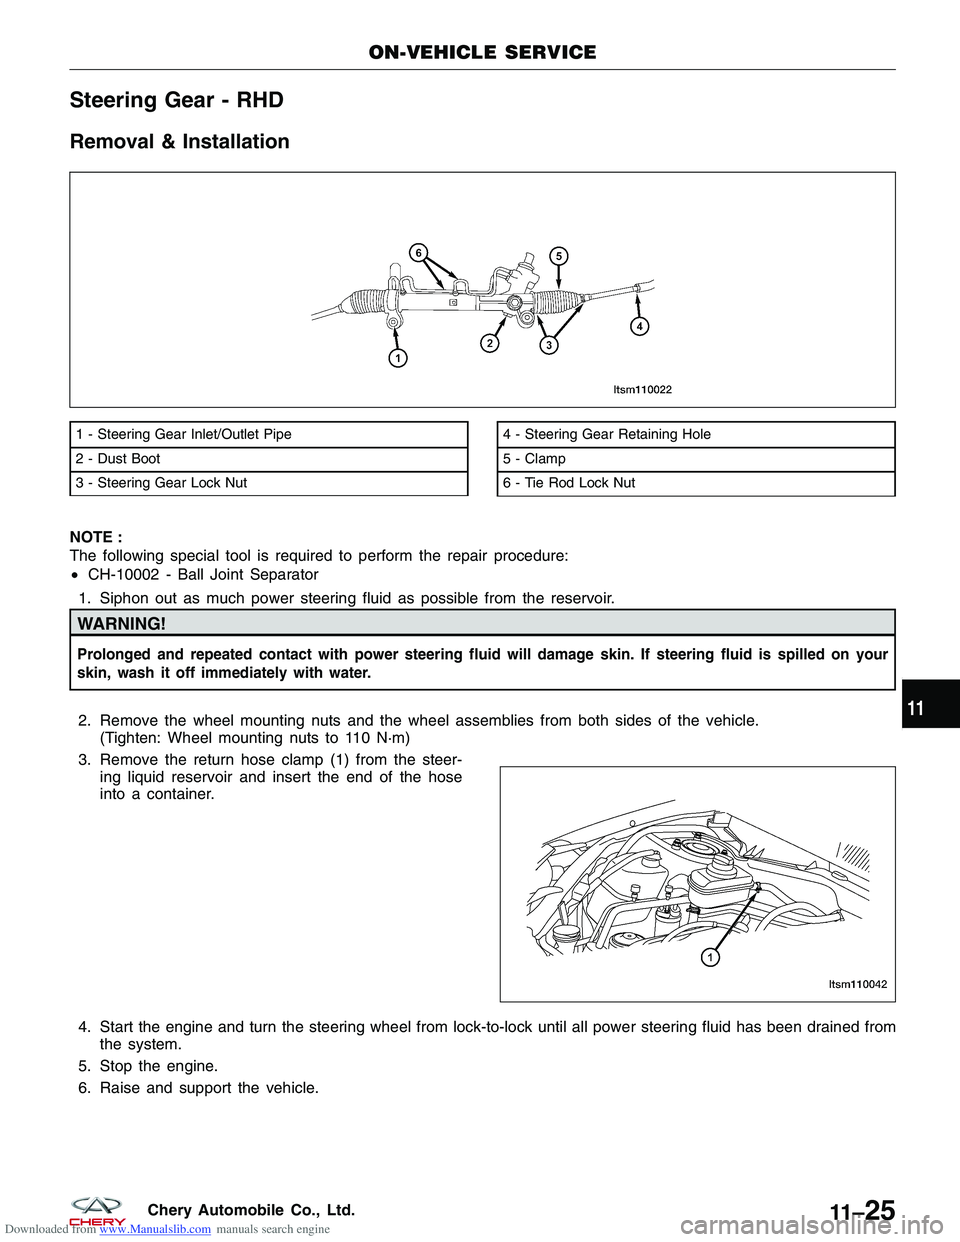
Downloaded from www.Manualslib.com manuals search engine Steering Gear - RHD
Removal & Installation
NOTE :
The following special tool is required to perform the repair procedure:
•CH-10002 - Ball Joint Separator
1. Siphon out as much power steering fluid as possible from the reservoir.
WARNING!
Prolonged and repeated contact with power steering fluid will damage skin. If steering fluid is spilled on your
skin, wash it off immediately with water.
2. Remove the wheel mounting nuts and the wheel assemblies from both sides of the vehicle. (Tighten: Wheel mounting nuts to 110 N·m)
3. Remove the return hose clamp (1) from the steer- ing liquid reservoir and insert the end of the hose
into a container.
4. Start the engine and turn the steering wheel from lock-to-lock until all power steering fluid has been drained from the system.
5. Stop the engine.
6. Raise and support the vehicle.
1 - Steering Gear Inlet/Outlet Pipe
2 - Dust Boot
3 - Steering Gear Lock Nut4 - Steering Gear Retaining Hole
5 - Clamp
6 - Tie Rod Lock Nut
ON-VEHICLE SERVICE
LTSM110022
LTSM110042
11
11 –25Chery Automobile Co., Ltd.
Page 1386 of 1903
Downloaded from www.Manualslib.com manuals search engine POWER STEERING PUMP
GENERAL INFORMATION11-32
Description 11-32
Operation 11-32
Specifications 11-32
DIAGNOSIS & TESTING11-33
Steering System Noise Troubleshooting
Chart 11-33
Insufficient Assist / Poor Return To Center
Troubleshooting Chart 11-33
ON-VEHICLE SERVICE11-34
Power Steering Pump - 1.6L & 1.8L &
2.0L 11-34
Removal & Installation 11-34 Power Steering Pump - 2.4L
11-35
Removal & Installation 11-35
Power Steering Fluid Reservoir 11-36
Removal & Installation 11-36
Power Steering Pressure and Return
Lines - 1.6L & 1.8L & 2.0L 11-37
Removal & Installation 11-37
Power Steering Pressure and Return
Lines - 2.4L 11-39
Removal & Installation 11-39
11
11 –31Chery Automobile Co., Ltd.
Page 1387 of 1903

Downloaded from www.Manualslib.com manuals search engine GENERAL INFORMATION
Description
The power steering pump is a constant flow rate and displacement vane type pump. The pump reservoir is detached
from the pump body. The pump is connected to the steering gear by the pressure and return lines.
Operation
The power steering pump is mounted to the engine and driven by the engine accessory drive belt. Power steering
fluid enters the pump from the reservoir. The power steering fluid is then trapped between the pump vanes and
moved to the high-pressure side of the pump creating a flow of steering fluid. The restriction of this flow by the
steering gear creates the pressure that provides the steering assist.
CAUTION:
•Operating the power steering with a low steering fluid level will damage the power steering sys-
tem.
• Holding the steering wheel in the full lock position for more than 3 seconds will damage the
power steering system.
Specifications
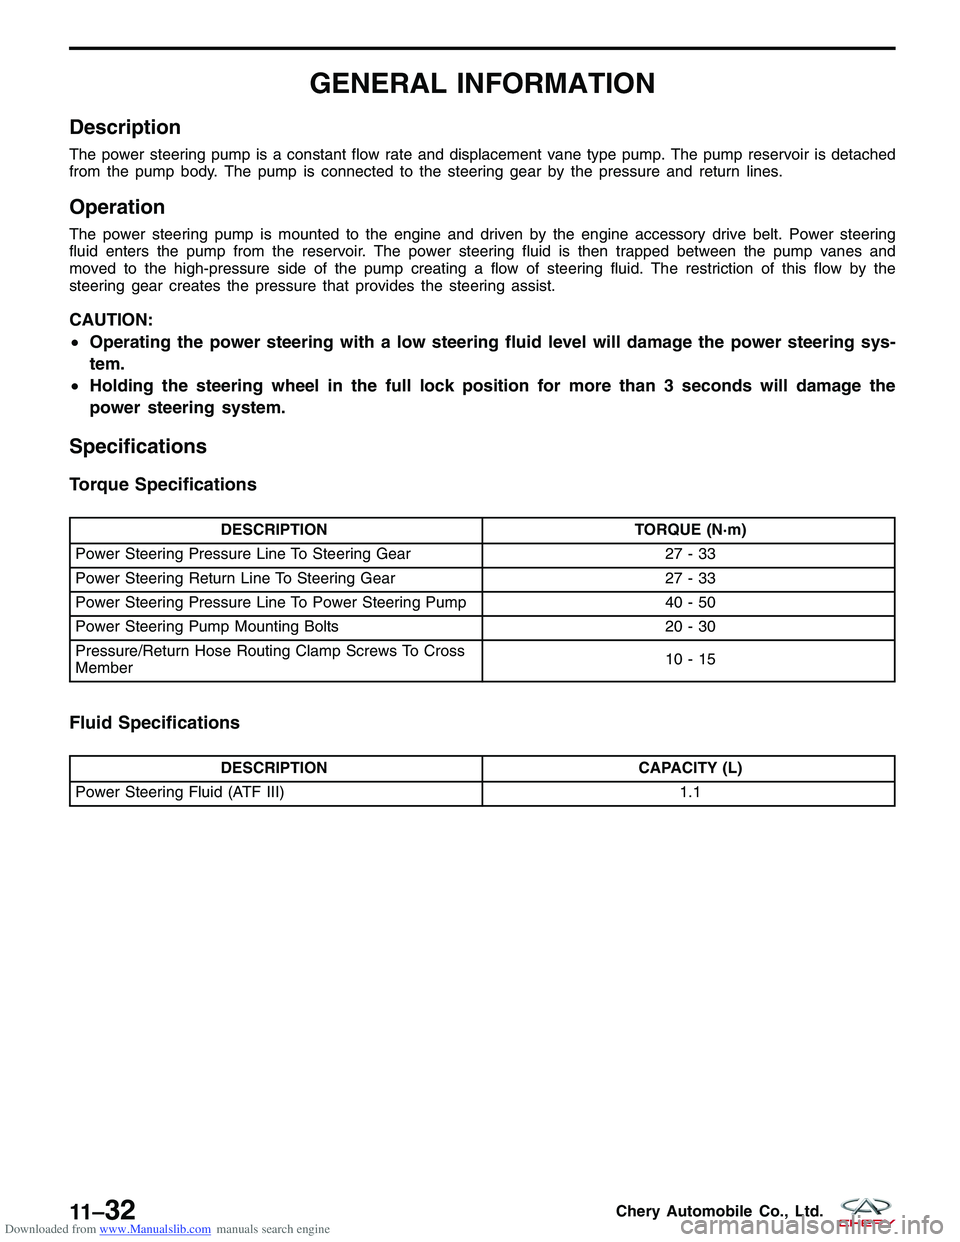
Torque Specifications
DESCRIPTION TORQUE (N·m)
Power Steering Pressure Line To Steering Gear 27 - 33
Power Steering Return Line To Steering Gear 27 - 33
Power Steering Pressure Line To Power Steering Pump 40 - 50
Power Steering Pump Mounting Bolts 20 - 30
Pressure/Return Hose Routing Clamp Screws To Cross
Member 10-15
Fluid Specifications
DESCRIPTION
CAPACITY (L)
Power Steering Fluid (ATF III) 1.1
11 –32Chery Automobile Co., Ltd.
Page 1388 of 1903

Downloaded from www.Manualslib.com manuals search engine DIAGNOSIS & TESTING
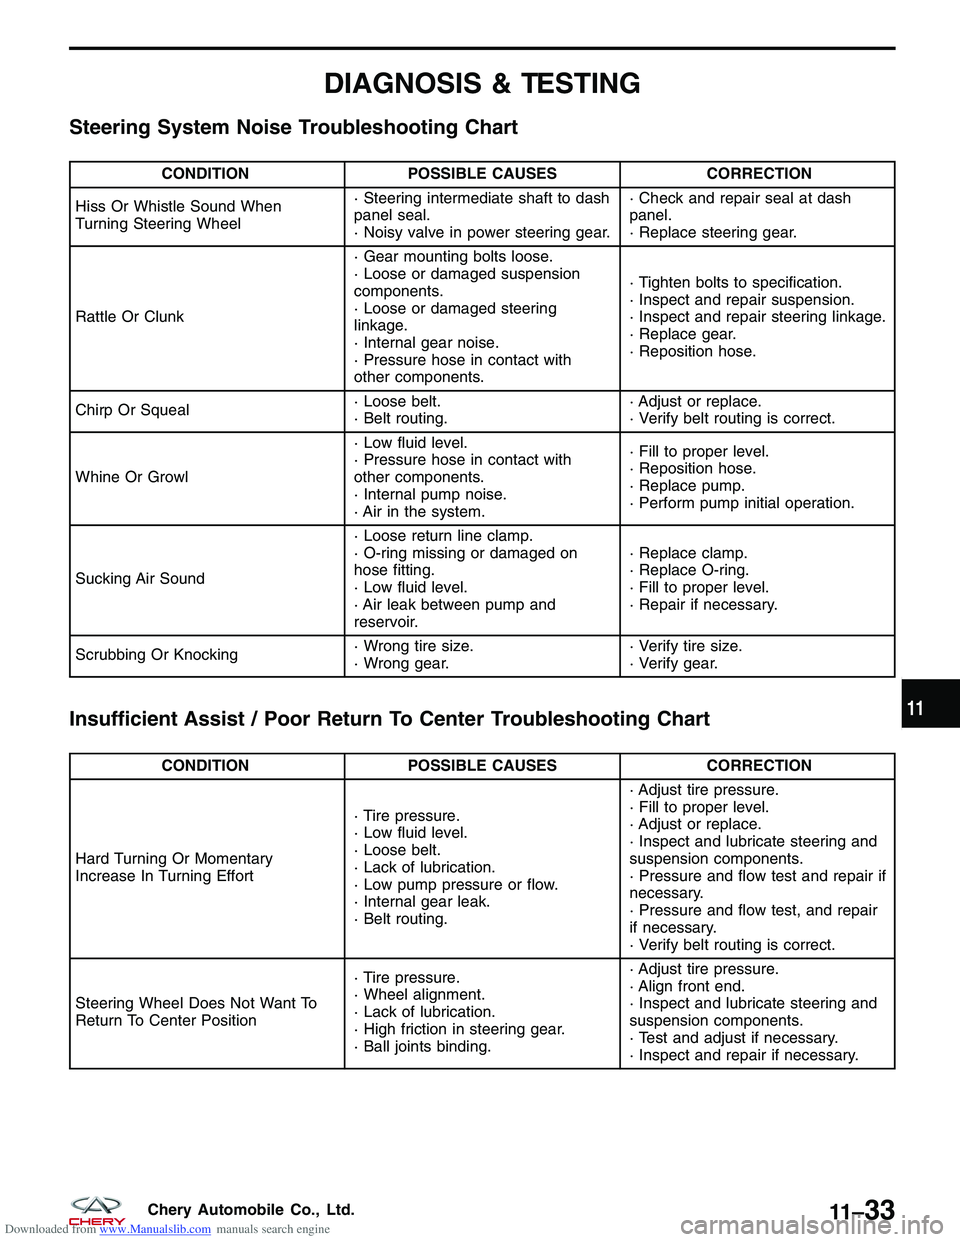
Steering System Noise Troubleshooting Chart
CONDITIONPOSSIBLE CAUSES CORRECTION
Hiss Or Whistle Sound When
Turning Steering Wheel · Steering intermediate shaft to dash
panel seal.
· Noisy valve in power steering gear.· Check and repair seal at dash
panel.
· Replace steering gear.
Rattle Or Clunk · Gear mounting bolts loose.
· Loose or damaged suspension
components.
· Loose or damaged steering
linkage.
· Internal gear noise.
· Pressure hose in contact with
other components.· Tighten bolts to specification.
· Inspect and repair suspension.
· Inspect and repair steering linkage.
· Replace gear.
· Reposition hose.
Chirp Or Squeal · Loose belt.
· Belt routing.· Adjust or replace.
· Verify belt routing is correct.
Whine Or Growl · Low fluid level.
· Pressure hose in contact with
other components.
· Internal pump noise.
· Air in the system.· Fill to proper level.
· Reposition hose.
· Replace pump.
· Perform pump initial operation.
Sucking Air Sound · Loose return line clamp.
· O-ring missing or damaged on
hose fitting.
· Low fluid level.
· Air leak between pump and
reservoir.· Replace clamp.
· Replace O-ring.
· Fill to proper level.
· Repair if necessary.
Scrubbing Or Knocking · Wrong tire size.
· Wrong gear.· Verify tire size.
· Verify gear.
Insufficient Assist / Poor Return To Center Troubleshooting Chart
CONDITION
POSSIBLE CAUSES CORRECTION
Hard Turning Or Momentary
Increase In Turning Effort · Tire pressure.
· Low fluid level.
· Loose belt.
· Lack of lubrication.
· Low pump pressure or flow.
· Internal gear leak.
· Belt routing.· Adjust tire pressure.
· Fill to proper level.
· Adjust or replace.
· Inspect and lubricate steering and
suspension components.
· Pressure and flow test and repair if
necessary.
· Pressure and flow test, and repair
if necessary.
· Verify belt routing is correct.
Steering Wheel Does Not Want To
Return To Center Position · Tire pressure.
· Wheel alignment.
· Lack of lubrication.
· High friction in steering gear.
· Ball joints binding.· Adjust tire pressure.
· Align front end.
· Inspect and lubricate steering and
suspension components.
· Test and adjust if necessary.
· Inspect and repair if necessary.
11
11 –33Chery Automobile Co., Ltd.
Page 1389 of 1903
Downloaded from www.Manualslib.com manuals search engine ON-VEHICLE SERVICE
Power Steering Pump - 1.6L & 1.8L & 2.0L
Removal & Installation
1. Siphon as much steering fluid as possible from the power steering fluid reservoir.
2. Raise and support the vehicle.
3. Remove the engine cover.
4. Remove the drive belt (See Accessory Drive Belt Removal & Installation in Section 02 Engine).
5. Remove the high pressure (1) and low pressurelines (2) from the power steering pump (drain
steering fluid from lines).
(Tighten: High pressure line to power steering
pump 40 - 50 N·m)
(Tighten: Low pressure line to power steering pump
40 - 50 N·m)
6. Remove the three power steering pump mounting bolts (1).
(Tighten: Power steering pump bolts to 20 - 30
N·m)
7. Remove the power steering pump.
8. Installation is in the reverse order of removal.
BESM110011
LTSM110045
11 –34Chery Automobile Co., Ltd.
Page 1390 of 1903
Downloaded from www.Manualslib.com manuals search engine Power Steering Pump - 2.4L
Removal & Installation
1. Siphon out as much power steering fluid as possible from the reservoir.
2. Raise and support the vehicle.
3. Remove the return hose clamp (1) from the steer-ing liquid reservoir and insert the end of the hose
into a container.
4. Start the engine and turn the steering wheel from lock-to-lock until all power steering fluid has been drained from the system.
5. Stop the engine.
6. Remove the engine lower shield.
7. Loosen the power steering pump belt adjustment bolt (1).
ON-VEHICLE SERVICE
LTSM110042
LTSM020185
11
11 –35Chery Automobile Co., Ltd.
Page 1391 of 1903
Downloaded from www.Manualslib.com manuals search engine 8. Remove the power steering pump inlet hose clamp(1), and then remove the pump inlet hose.
9. Remove the pump outlet pipe bolt (2).
10. Rotate the steering pump pulley until the bolt (1) access hole lines up with the bolt.
11. Remove the power steering pump retaining bolt. (Tighten: Power steering pump bolt to 20 - 30 N·m)
12. Remove the two bolts (1) on the other side of the power steering pump.
(Tighten: Power steering pump bolts to 20 - 30
N·m)
13. Remove the steering pump from the engine bracket.
14. Installation is in the reverse order of removal.
Installation Notes:
• Fill the power steering reservoir to the proper level.
• Check the system for leaks.
Power Steering Fluid Reservoir
Removal & Installation
1. Siphon as much steering fluid as possible from the power steering fluid reservoir.
ON-VEHICLE SERVICE
LTSM110032
LTSM110009
LTSM110010
11 –36Chery Automobile Co., Ltd.