Page 263 of 489
Parental Level
You can place an auditory restriction
by changing the parental control
level. The higher the level number,
the lower the restriction.
Highlight‘‘Parental Level ’’and press
the ENT button. You will see the
submenu. If you select ‘‘No ’’and
press the ENT button, the screen
goes back to the ‘‘Others ’’menu.
When you select and enter ‘‘Yes, ’’the
display changes as shown above. To
change the level, you need to enter
your four digit password. Select the
number for the first digit by pressing
the ▼,▲ ,
,or
button, and
enter it by pressing the ENT button.
Repeat this until all four digits are
filled. When you enter the fourth
number, the cursor automatically
moves to ‘‘ENT ’’on the display.
Press the ENT button on the control
panel.
CONTINUED
Rear Entertainment System
259
Feat ures
08/06/06 16:58:07 09 ACURA MDX MMC North America Owner's M 50 31STX620 enu
2009 MDX
Page 264 of 489
If the system does not recognize the
password you entered, you will see
the above display. Repeat the
parental control level steps until you
enter the correct password.
If you enter the password correctly,
you can then change the parental
control level.
Once you correctly enter the
password, press the
or
button to
change the level, and then press the
ENT button to enter your selection. Changing the Password
The password was set to
‘‘1111 ’’
when the vehicle left the factory.
Rear Entertainment System26008/06/06 16:58:07 09 ACURA MDX MMC North America Owner's M 50 31STX620 enu
2009 MDX
Page 265 of 489
To change the password, select
‘‘Password.’’ You will see the above
menu displayed. Select ‘‘Yes ’’by
pressing the
or
button, then
press the ENT button.
If you select ‘‘No, ’’and press the
ENT button, the display returns to
the ‘‘Others ’’menu.
Select the first digit by pressing the
▼ ,▲ ,
,or
button, and enter it
by pressing the ENT button. Repeat
this until all four digits are entered.
When you enter the fourth number,
the cursor automatically moves to
‘‘ ENT ’’on the display. Press the ENT
button on the control panel.
If the system does not recognize the
password you entered, you will see
the above display. Repeat the
password setting steps until you
enter the correct password.
CONTINUED
Rear Entertainment System
261
Feat ures
08/06/06 16:58:07 09 ACURA MDX MMC North America Owner's M 50 31STX620 enu
2009 MDX
Page 266 of 489
If you forget the password, select
‘‘Password,’’ and press the ▲button
10 times.
The display changes as shown above.
If you want to use the default
password (1111), select ‘‘Yes, ’’and
press the ENT button.
The message ‘‘Default password
setting applied ’’is displayed for 5
seconds. Remote Control
The rear control panel can be
detached from the ceiling unit and
used as a remote control. To remove
it from the ceiling unit, press the
release button. The control panel will
swing down partway. Pivot it down
further past the detent until it
detaches from the hinge. To reinstall
it, reverse the procedure.RELEASE BUTTON
Rear Entertainment System26208/06/06 16:58:07 09 ACURA MDX MMC North America Owner's M 50 31STX620 enu
2009 MDX
Page 269 of 489

DVD Player Error Messages
The chart on the right explains the
error messages you may see in the
display while playing a disc.
If you see an error message in the
display while playing a disc, press
the eject button. After ejecting the
disc, check it for damage or
deformation. If there is no damage,
insert the disc again.
The audio system will try to play the
disc. If there is still a problem, the
error message will reappear. Press
the eject button, and pull out the
disc.
Insert a different disc. If the new disc
plays, there is a problem with the
first disc. If the error message cycle
repeats and you cannot clear it, take
your vehicle to a dealer.Error Message Cause
Solution
DISC ERRORFOCUS Error Press the disc eject button, and remove the disc.
Check for an error indication. Insert the disc again.
If the code does not disappear or the disc cannot be
removed, consult your dealer.
MECH ERROR Mechanical Error Press the disc eject button, and remove the disc.
Check for an error indication. Insert the disc again.
If the code does not disappear or the disc cannot be
removed, consult your dealer.
HEAT ERROR High Temperature Will disappear when the temperature returns to
normal.
REGION ERR Invalid region code The disc is not playable in this unit. Eject the disc,
and insert a disc compatible with this system.
PARENT ERR Invalid parental
control level Reinsert the disc, and increase the parental control
level (see page259).
CONTINUED
Rear Entertainment System
265
Feat ures
08/06/06 16:58:07 09 ACURA MDX MMC North America Owner's M 50 31STX620 enu
2009 MDX
Page 277 of 489

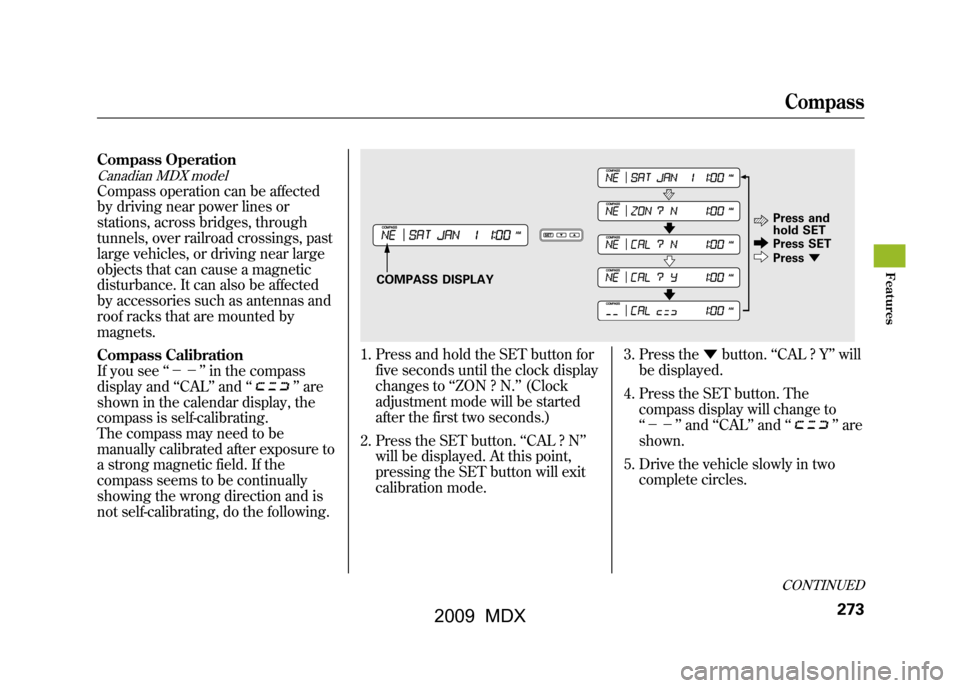
Compass OperationCanadian MDX modelCompass operation can be affected
by driving near power lines or
stations, across bridges, through
tunnels, over railroad crossings, past
large vehicles, or driving near large
objects that can cause a magnetic
disturbance. It can also be affected
by accessories such as antennas and
roof racks that are mounted by
magnets.
Compass Calibration
If you see‘‘-- ’’in the compass
display and ‘‘CAL ’’and ‘‘
’’are
shown in the calendar display, the
compass is self-calibrating.
The compass may need to be
manually calibrated after exposure to
a strong magnetic field. If the
compass seems to be continually
showing the wrong direction and is
not self-calibrating, do the following.
1. Press and hold the SET button for
five seconds until the clock display
changes to ‘‘ZON ? N. ’’(Clock
adjustment mode will be started
after the first two seconds.)
2. Press the SET button. ‘‘CAL ? N ’’
will be displayed. At this point,
pressing the SET button will exit
calibration mode. 3. Press the
▼button. ‘‘CAL ? Y ’’will
be displayed.
4. Press the SET button. The compass display will change to
‘‘-- ’’and ‘‘CAL ’’and ‘‘
’’are
shown.
5. Drive the vehicle slowly in two complete circles.
COMPASS DISPLAY Press and
hold SET
Press SET
Press
▼
CONTINUEDCompass
273
Feat ures
08/06/06 16:58:07 09 ACURA MDX MMC North America Owner's M 50 31STX620 enu
2009 MDX
Page 278 of 489

6. When the display goes from‘‘-- ’’to an actual heading, the
unit is calibrated and the display
returns to normal.
NOTE: Do this procedure in an open
area, away from buildings, power
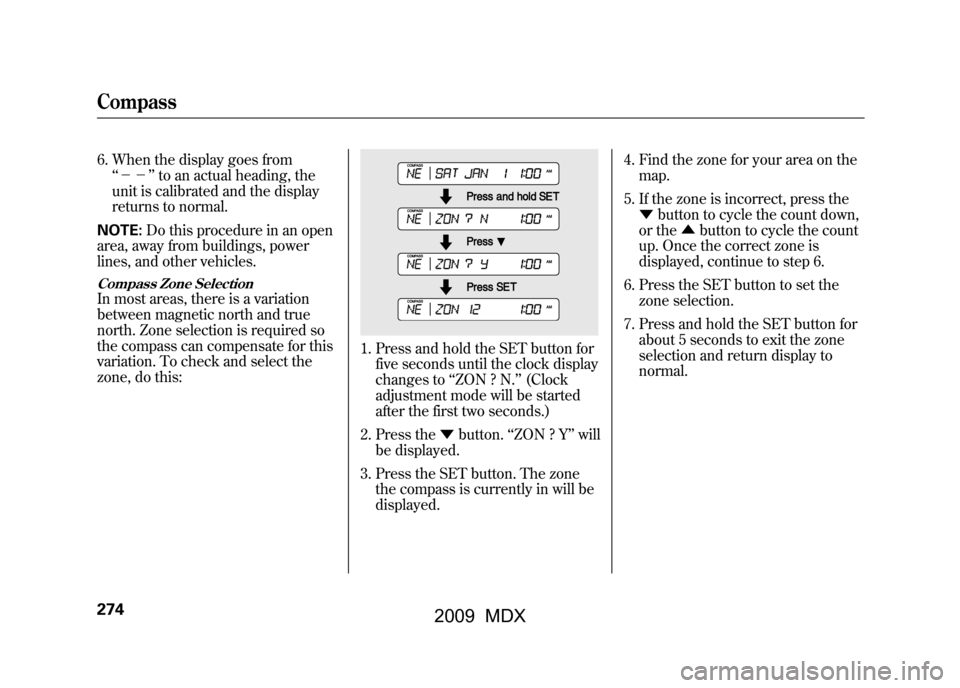
lines, and other vehicles.Compass Zone SelectionIn most areas, there is a variation
between magnetic north and true
north. Zone selection is required so
the compass can compensate for this
variation. To check and select the
zone, do this:
1. Press and hold the SET button for five seconds until the clock display
changes to ‘‘ZON ? N. ’’(Clock
adjustment mode will be started
after the first two seconds.)
2. Press the ▼button. ‘‘ZON ? Y’’ will
be displayed.
3. Press the SET button. The zone the compass is currently in will be
displayed. 4. Find the zone for your area on the
map.
5. If the zone is incorrect, press the ▼ button to cycle the count down,
or the ▲button to cycle the count
up. Once the correct zone is
displayed, continue to step 6.
6. Press the SET button to set the zone selection.
7. Press and hold the SET button for about 5 seconds to exit the zone
selection and return display to
normal.
Compass27408/06/06 16:58:07 09 ACURA MDX MMC North America Owner's M 50 31STX620 enu
2009 MDX
Page 283 of 489

Voice Control
HFL recognizes simple voice
commands, such as phone numbers
and names. It uses these commands
to automatically dial, receive, and
store numbers. For more information
on voice control, see Using Voice
Control on page282.
Bluetooth
®Wireless Technology
Bluetooth®is a registered trademark
of Bluetooth SIG, Inc.
Bluetooth is the wireless technology
that links your phone to the HFL.
The HFL uses a Class 2 Bluetooth,
which means the maximum range
between your phone and vehicle is
30 feet (10 meters). To use the HFL, your phone must
have approved Bluetooth capability
along with the Hands Free Profile.
This type of phone is available
through many phone makers and
cellular carriers. You can also find an
approved phone by visiting
www.acura.com/handsfreelink
,orby
calling the HandsFreeLink®
consumer support at 1-888-528-7876.
In Canada, visit
www.acura.ca
, or call
1-888-9-ACURA-9.
Incoming/Outgoing Calls
With a linked phone, HFL allows you
to send and receive calls in your
vehicle without holding the phone.
Phonebook
The HFL can store up to 50 names
and phone numbers in its
phonebook. With a linked phone,
you can then automatically dial any
name or number in the phonebook.
On models with navigation systemYour vehicle's HFL system has the
cellular phonebook import function.
This allows you to import your
cellular phonebook to the HFL.
Using the navigation system, you can
make a call directly and store a
desired number in the HFL from the
list shown on the navigation display.
For more information on how to
import the phonebook or to make a
call, see page289.On all modelsYou can also store the desired
number to the HFL directly from
your cell phone using the receive
contact function in the HFL.
CONTINUED
Bluetooth
®HandsFreeLink
®
279
Feat ures
08/06/06 16:58:07 09 ACURA MDX MMC North America Owner's M 50 31STX620 enu
2009 MDX