Page 73 of 108

PERIODIC MAINTENANCE AND MINOR REPAIR
6-24
6
EAU22270
Adjusting the rear brake light
switch The rear brake light switch, which is ac-
tivated by the brake pedal, is properly
adjusted when the brake light comes
on just before braking takes effect. If
necessary, adjust the brake light switch
as follows.
Turn the adjusting nut while holding the
rear brake light switch in place. To
make the brake light come on earlier,
turn the adjusting nut in direction (a). To
make the brake light come on later, turn
the adjusting nut in direction (b).
EAU22390
Checking the front and rear
brake pads The front and rear brake pads must be
checked for wear at the intervals spec-
ified in the periodic maintenance and
lubrication chart.
EAU36890
Front brake pads
Each front brake pad is provided with
wear indicators, which allows you to
check the brake pad wear without hav-
ing to disassemble the brake. To check
the brake pad wear, check the position
of the wear indicators while applying
the brake. If a brake pad has worn tothe point that a wear indicator almost
touches the brake disc, have a Yamaha
dealer replace the brake pads as a set.
EAU22500
Rear brake pads
Check each rear brake pad for damage
and measure the lining thickness. If a
brake pad is damaged or if the lining
thickness is less than 1.0 mm (0.04 in),
have a Yamaha dealer replace the
brake pads as a set.
1. Rear brake light switch
2. Rear brake light switch adjusting nut
1. Brake pad wear indicator
1. Lining thickness
U13SE0E0.book Page 24 Monday, August 27, 2007 4:53 PM
Page 74 of 108

PERIODIC MAINTENANCE AND MINOR REPAIR
6-25
6
EAU22580
Checking the brake fluid level Front brake
Rear brake
Insufficient brake fluid may allow air to
enter the brake system, possibly caus-
ing it to become ineffective.Before riding, check that the brake fluid
is above the minimum level mark and
replenish if necessary. A low brake fluid
level may indicate worn brake pads
and/or brake system leakage. If the
brake fluid level is low, be sure to check
the brake pads for wear and the brake
system for leakage.
Observe these precautions:
�
When checking the fluid level,
make sure that the top of the brake
fluid reservoir is level.
�
Use only the recommended quality
brake fluid, otherwise the rubber
seals may deteriorate, causing
leakage and poor braking perfor-
mance.
�
Refill with the same type of brake
fluid. Mixing fluids may result in a
harmful chemical reaction and
lead to poor braking performance.
�
Be careful that water does not en-
ter the brake fluid reservoir when
refilling. Water will significantly
lower the boiling point of the fluid
and may result in vapor lock.
�
Brake fluid may deteriorate paint-
ed surfaces or plastic parts. Al-
ways clean up spilled fluid
immediately.
�
As the brake pads wear, it is nor-
mal for the brake fluid level to grad-
ually go down. However, if the
brake fluid level goes down sud-
denly, have a Yamaha dealer
check the cause.
1. Minimum level mark
1. Minimum level mark
Recommended brake fluid:
DOT 4
U13SE0E0.book Page 25 Monday, August 27, 2007 4:53 PM
Page 75 of 108

PERIODIC MAINTENANCE AND MINOR REPAIR
6-26
6
EAU22730
Changing the brake fluid Have a Yamaha dealer change the
brake fluid at the intervals specified in
the NOTE after the periodic mainte-
nance and lubrication chart. In addition,
have the oil seals of the master cylin-
ders and calipers as well as the brake
hoses replaced at the intervals listed
below or whenever they are damaged
or leaking.�
Oil seals: Replace every two
years.
�
Brake hoses: Replace every four
years.
EAU22760
Drive chain slack The drive chain slack should be
checked before each ride and adjusted
if necessary.
EAU22773
To check the drive chain slack
1. Place the motorcycle on the side-
stand.NOTE:When checking and adjusting the drive
chain slack, there should be no weighton the motorcycle.
2. Shift the transmission into the neu-
tral position.
3. Move the rear wheel by pushing
the motorcycle to locate the tight-
est portion of the drive chain, and
then measure the drive chain slack
as shown.4. If the drive chain slack is incorrect,
adjust it as follows.
EAU39052
To adjust the drive chain slack
1. Loosen the axle nut and the lock-
nut on each side of the swingarm.
Drive chain slack:
30.0–45.0 mm (1.18–1.77 in)
1. Drive chain slack
U13SE0E0.book Page 26 Monday, August 27, 2007 4:53 PM
Page 76 of 108
. To loos-
en the drive chain, turn the adjust-
ing bolt")
PERIODIC MAINTENANCE AND MINOR REPAIR
6-27
62. To tighten the drive chain, turn the
adjusting bolt on each side of the
swingarm in direction (a). To loos-
en the drive chain, turn the adjust-
ing bolt on each side of the
swingarm in direction (b), and then
push the rear wheel forward.
NOTE:Using the alignment marks on each
chain puller, make sure that both chain
pullers are in the same position for
proper wheel alignment. Use the end of
the swingarm as the reference point forthe alignment marks.
CAUTION:
ECA10570
Improper drive chain slack will over-
load the engine as well as other vital
parts of the motorcycle and can lead
to chain slippage or breakage. To
prevent this from occurring, keep
the drive chain slack within thespecified limits.
3. Tighten the axle nut to the speci-
fied torque.
4. Tighten the adjusting bolts in direc-
tion (a) to their specified torque.
5. Tighten the locknuts to their speci-
fied torque.
EAU23022
Cleaning and lubricating the
drive chain The drive chain must be cleaned and
lubricated at the intervals specified in
the periodic maintenance and lubrica-
tion chart, otherwise it will quickly wear
out, especially when riding in dusty or
wet areas. Service the drive chain as
follows.CAUTION:
ECA10581
The drive chain must be lubricated
after washing the motorcycle andriding in the rain.
1. Clean the drive chain with kero-
sene and a small soft brush.CAUTION:
ECA11120
To prevent damaging the O-rings, do
not clean the drive chain with steam
cleaners, high-pressure washers orinappropriate solvents.
2. Wipe the drive chain dry.
3. Thoroughly lubricate the drive
chain with a special O-ring chain
lubricant.
1. Axle nut
2. Drive chain slack adjusting bolt
3. Locknut
4. Alignment marks
Tightening torque:
Axle nut:
110 Nm (11.0 m·kgf, 80 ft·lbf)
Tightening torque:
Drive chain slack adjusting bolt:
2 Nm (0.2 m·kgf, 1.4 ft·lbf)
Tightening torque:
Locknut:
16 Nm (1.6 m·kgf, 11 ft·lbf)
U13SE0E0.book Page 27 Monday, August 27, 2007 4:53 PM
Page 77 of 108

PERIODIC MAINTENANCE AND MINOR REPAIR
6-28
6
CAUTION:
ECA11110
Do not use engine oil or any other lu-
bricants for the drive chain, as they
may contain substances that coulddamage the O-rings.
EAU23100
Checking and lubricating the
cables The operation of all control cables and
the condition of the cables should be
checked before each ride, and the ca-
bles and cable ends should be lubricat-
ed if necessary. If a cable is damaged
or does not move smoothly, have a
Yamaha dealer check or replace it.
WARNING
EWA10720
Damage to the outer sheath may in-
terfere with proper cable operation
and will cause the inner cable to
rust. Replace a damaged cable as
soon as possible to prevent unsafeconditions.
EAU23111
Checking and lubricating the
throttle grip and cable The operation of the throttle grip should
be checked before each ride. In addi-
tion, the cable should be lubricated at
the intervals specified in the periodic
maintenance chart.
Recommended lubricant:
Engine oil
U13SE0E0.book Page 28 Monday, August 27, 2007 4:53 PM
Page 78 of 108
PERIODIC MAINTENANCE AND MINOR REPAIR
6-29
6
EAU44271
Checking and lubricating the
brake and shift pedals The operation of the brake and shift
pedals should be checked before each
ride, and the pedal pivots should be lu-
bricated if necessary.
EAU23142
Checking and lubricating the
brake and clutch levers Brake lever
Clutch lever
The operation of the brake and clutch
levers should be checked before each
ride, and the lever pivots should be lu-
bricated if necessary.
Recommended lubricant:
Lithium-soap-based grease
U13SE0E0.book Page 29 Monday, August 27, 2007 4:53 PM
Page 79 of 108
PERIODIC MAINTENANCE AND MINOR REPAIR
6-30
6
EAU23201
Checking and lubricating the
sidestand The operation of the sidestand should
be checked before each ride, and the
sidestand pivot and metal-to-metal
contact surfaces should be lubricated if
necessary.
WARNING
EWA10730
If the sidestand does not move up
and down smoothly, have a Yamahadealer check or repair it.
EAUM1650
Lubricating the swingarm piv-
ots The swingarm pivots must be lubricat-
ed at the intervals specified in the peri-
odic maintenance and lubrication chart.
Recommended lubricants:
Brake lever:
Silicone grease
Clutch lever:
Lithium-soap-based grease
Recommended lubricant:
Lithium-soap-based grease
Recommended lubricant:
Lithium-soap-based grease
U13SE0E0.book Page 30 Monday, August 27, 2007 4:53 PM
Page 80 of 108

PERIODIC MAINTENANCE AND MINOR REPAIR
6-31
6
EAU23271
Checking the front fork The condition and operation of the front
fork must be checked as follows at the
intervals specified in the periodic main-
tenance and lubrication chart.
To check the condition
WARNING
EWA10750
Securely support the vehicle so thatthere is no danger of it falling over.
Check the inner tubes for scratches,
damage and excessive oil leakage.
To check the operation
1. Place the vehicle on a level sur-
face and hold it in an upright posi-
tion.
2. While applying the front brake,
push down hard on the handlebars
several times to check if the front
fork compresses and rebounds
smoothly.
CAUTION:
ECA10590
If any damage is found or the front
fork does not operate smoothly,
have a Yamaha dealer check or re-pair it.
EAU23280
Checking the steering Worn or loose steering bearings may
cause danger. Therefore, the operation
of the steering must be checked as fol-
lows at the intervals specified in the pe-
riodic maintenance and lubrication
chart.
1. Place a stand under the engine to
raise the front wheel off the
ground.
WARNING
EWA10750
Securely support the vehicle so thatthere is no danger of it falling over.
2. Hold the lower ends of the front
fork legs and try to move them for-
ward and backward. If any free
play can be felt, have a Yamaha
dealer check or repair the steering.
U13SE0E0.book Page 31 Monday, August 27, 2007 4:53 PM
 1
1 2
2 3
3 4
4 5
5 6
6 7
7 8
8 9
9 10
10 11
11 12
12 13
13 14
14 15
15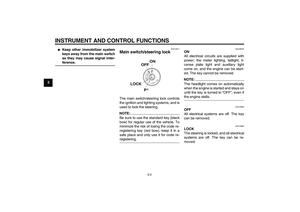 16
16 17
17 18
18 19
19 20
20 21
21 22
22 23
23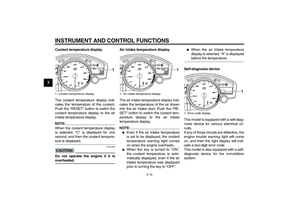 24
24 25
25 26
26 27
27 28
28 29
29 30
30 31
31 32
32 33
33 34
34 35
35 36
36 37
37 38
38 39
39 40
40 41
41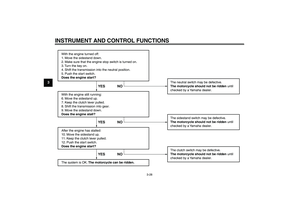 42
42 43
43 44
44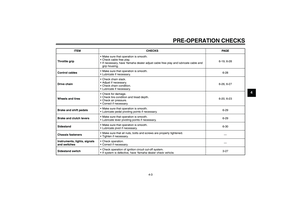 45
45 46
46 47
47 48
48 49
49 50
50 51
51 52
52 53
53 54
54 55
55 56
56 57
57 58
58 59
59 60
60 61
61 62
62 63
63 64
64 65
65 66
66 67
67 68
68 69
69 70
70 71
71 72
72 73
73 74
74 75
75 76
76 77
77 78
78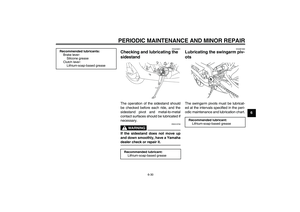 79
79 80
80 81
81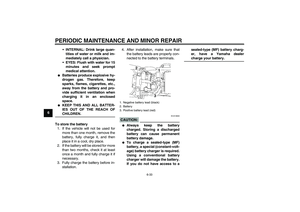 82
82 83
83 84
84 85
85 86
86 87
87 88
88 89
89 90
90 91
91 92
92 93
93 94
94 95
95 96
96 97
97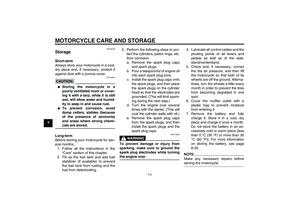 98
98 99
99 100
100 101
101 102
102 103
103 104
104 105
105 106
106 107
107
