Page 169 of 290
6-10
OPERATING YOUR VEHICLE
66J22-03E
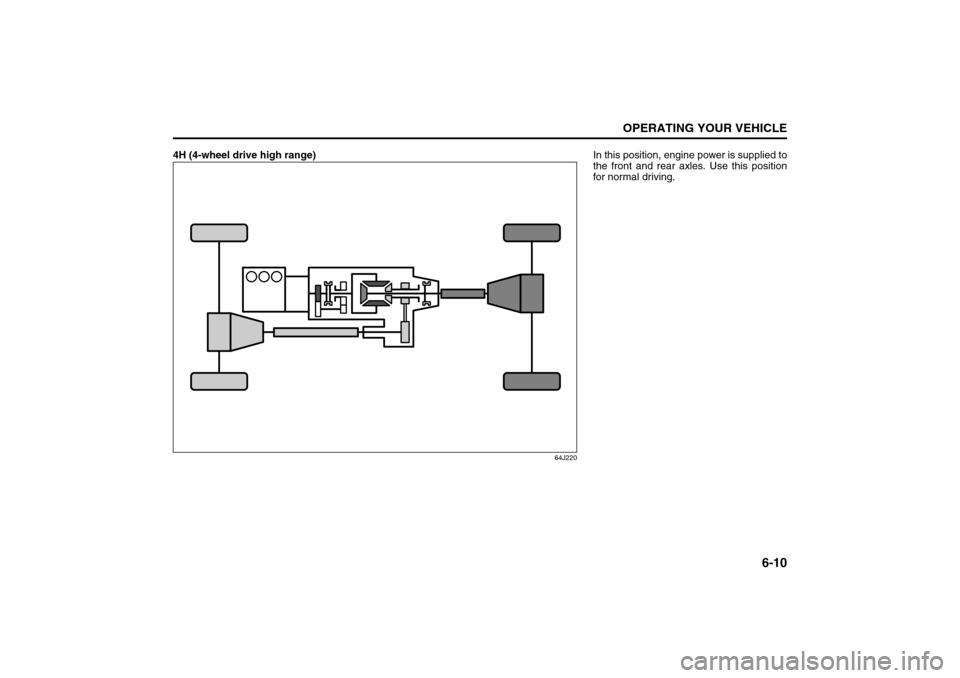
4H (4-wheel drive high range)
64J220
In this position, engine power is supplied to
the front and rear axles. Use this position
for normal driving.
Using the Transfer Switch: 10
Page 170 of 290
6-11OPERATING YOUR VEHICLE
66J22-03E
4H LOCK (4-wheel drive high range center differential lock)
64J221
In this position, engine power is supplied to
the front and rear axles and you get better
traction than when driving in “4H”. Use this
position when you need better traction
than “4H” provides, such as when driving
on slippery roads etc.
Using the Transfer Switch: 10
Page 171 of 290

6-12
OPERATING YOUR VEHICLE
66J22-03E
4L LOCK (4-wheel drive low range center differential lock)
64J222
In this position, engine power is supplied to
the front and rear axles and you get better
traction and more low-speed torque than
when driving in “4H”. Use this position
when you need better traction than “4H”
provides and more low-speed torque than
“4H LOCK” provides, such as when climb-
ing or descending steep, slippery hills etc.
NOTE:
When the transfer switch (if equipped) is
turned to the “4L LOCK” position, the
ESP
® systems (other than ABS) will be
canceled to provide improved vehicle trac-
tion, and the “ESP OFF” indicator light will
come on.
When the transfer switch (if equipped) is
turned to the “4L LOCK” position, brake-
traction control can be activated. Brake-
traction control brakes the spinning wheel
to distribute drive power to the other
wheels for increased climbing ability or for
better performance on a rolling hill or a
slippery surface.
ESP® is a registered trademark of
DaimlerChrysler AG.
Using the Transfer Switch: 10
Page 172 of 290

6-13OPERATING YOUR VEHICLE
66J22-03E
Transfer Switch OperationOperate the transfer switch according to
the appropriate procedure described
below:
From N to 4H
Stop the vehicle completely, place the
transmission in “N” (Neutral) and depress
the brake pedal and the clutch pedal fully
(if equipped), then push in and turn the
switch to shift into “4H”.
From 4H to 4H LOCK
You can operate the transfer switch either
when the vehicle is stopped or while the
vehicle is moving.
Position the front wheels straight ahead
and turn the switch to shift into “4H LOCK”.
If the vehicle is moving, we recommend
that the speed be less than 100 km/h (60
mph) during this operation.
NOTE:
When shifting between the transfer
switch position and the transfer gear
position is unmatched, all 4WD indica-
tors will blink and the buzzer will sound.
If it is difficult to shift between “4H” and
“4H LOCK” while the vehicle is moving,
try accelerating and decelerating your
vehicle several times after turning thetransfer switch. Be sure to wait until traf-
fic conditions allow you to accelerate and
decelerate safety before using this pro-
cedure.
From 4H LOCK to 4L LOCK
Stop the vehicle completely, place the
transmission in “N” (Neutral) and depress
the brake pedal and the clutch pedal fully
(if equipped), then push in and turn the
switch to shift into “4L LOCK”.
From 4L LOCK to 4H LOCK
Stop the vehicle completely, place the
transmission in “N” (Neutral) and depress
the brake pedal and the clutch pedal fully
(if equipped), then push in and turn the
switch to shift into “4H LOCK”.
From 4H LOCK to 4H
You can operate the transfer switch either
when the vehicle is stopped or while the
vehicle is moving.
Position the front wheels straight ahead
and turn the switch to shift into “4H”. If the
vehicle is moving, we recommend that the
speed be less than 100 km/h (60 mph) dur-
ing this operation.NOTE:
When shifting between the transfer
switch position and the transfer gear
position is unmatched, all 4WD indica-
tors will blink and the buzzer will sound.
If it is difficult to shift between “4H” and
“4H LOCK” while the vehicle is moving,
try accelerating and decelerating your
vehicle several times after turning the
transfer switch. Be sure to wait until traf-
fic conditions allow you to accelerate and
decelerate safety before using this pro-
cedure.
From 4H to N
64J209
Stop the vehicle completely, place the
transmission in “N” (Neutral) and depress
the brake pedal and the clutch pedal fully
(if equipped), then push in and turn the
switch to the mark (1) at the left of the “N”
position, and hold the switch in this posi-
CAUTION
Do not operate the transfer switch
while tires are racing.
CAUTION
Do not operate the transfer switch
while tires are racing.
(1)
Using the Transfer Switch: 10
Page 173 of 290

6-14
OPERATING YOUR VEHICLE
66J22-03E
tion for 5 seconds until the “N” indicator
blinks, then turn the switch to the “N” posi-
tion.
When you turn the transfer switch to the
“N” position, “N” indicator will come on with
the buzzer sound.
CAUTION
Be sure to stop the vehicle com-
pletely before operating the trans-
fer switch to shift between “N” and
“4H”, or between “4H LOCK” and
“4L LOCK”.
Do not shift between “4H” and “4H
LOCK” unless the front wheels are
in the straight-ahead position and
we recommend that the vehicle
speed be less than 100 km/h (60
mph).
Do not operate the transfer switch
while tires are racing.
Do not operate your vehicle in “4H
LOCK” or “4L LOCK” on dry, hard
surfaces.
(Continued)
CAUTION
(Continued)
Do not operate the vehicle while a
4WD mode indicator is blinking
except when shifting between “4H”
and “4L LOCK”.
If you operate the vehicle while a
4WD mode indicator is blinking, a
buzzer will sound and the transfer
will shift to “N” (Neutral) to prevent
transfer case damage.
In this case, use the following pro-
cedure.
1) Depress the clutch pedal fully (if
equipped) or shift the automatic
transmission gearshift lever to the
“N” position.
2) Turn the transfer switch to the
position previously selected.
3) Operate the transfer switch again.
Using the Transfer Switch: 10
Page 174 of 290
6-15OPERATING YOUR VEHICLE
66J22-03E
The basic operation for transfer switch
N: Neutral
4H: 4-wheel drive high range mode
4H LOCK: 4-wheel drive high range center differential lock mode
4L LOCK: 4-wheel drive low range center differential lock modeCurrent
PositionCurrent IndicatorTa r g e t
PositionTarget Indicator
N4H–
4H –N
4H LOCK
4H LOCK4H –
4L LOCK
4L LOCK 4H LOCK
Braking
60G165
The distance needed to bring any vehicle
to a halt increases with the speed of the
vehicle. The braking distance needed, for
example, at 60 km/h (37 mph) will be
approximately 4 times greater than the
braking distance needed at 30 km/h (19
mph). Start to brake the vehicle when there
is plenty of distance between your vehicle
and the stopping point, and slow down
gradually.
Using the Transfer Switch: 10
Page 175 of 290

6-16
OPERATING YOUR VEHICLE
66J22-03E
Power Assisted BrakesYour vehicle has power assisted brakes. If
power assistance is lost due to a stalled
engine or other failures, the system is still
fully operational on reserve power and you
can bring the vehicle to a complete stop by
pressing the brake pedal once and holding
it down. The reserve power is partly used
up when you depress the brake pedal and
reduces each time the pedal is pressed.
Apply smooth and even pressure to the
pedal. Do not pump the pedal.
Brake Assist SystemWhen you slam the brakes on, the brake
assist system judges as an emergency
stop and provides more powerful braking
for a driver who cannot hold down the
brake pedal firmly.
NOTE:
If you depress the brakes forcefully, you
may hear a clicking sound in the brake
pedal. This is normal and indicates that the
brake assist system is activated properly.
Anti-Lock Brake System (ABS)ABS will help you avoid skidding by elec-
tronically controlling braking pressure. It
will also help you maintain steering control
when braking on slippery surfaces or when
braking hard.
The ABS works automatically, so you do
not need any special braking technique.
Just push the brake pedal down without
pumping. The ABS will operate whenever it
senses that the wheels are locking up.
You may feel the brake pedal pulsate while
the ABS is operating.
NOTE:
The ABS will not work if vehicle speed is
under 5 – 6 km/h (3 – 4 mph).
WARNING
If water gets into the brake drums,
brake performance may become poor
and unpredictable. After driving
through water or washing the under-
side of the vehicle, test the brakes
while driving at a slow speed to see if
they have maintained their normal
effectiveness. If the brakes are less
effective than normal, dry them by
repeatedly applying the brakes while
driving slowly until the brakes have
regained their normal effectiveness.
WARNING
Even without reserve power in the
brake system, you can still stop the
vehicle by pressing the brake pedal
harder than normally required. How-
ever, the stopping distance may be
longer.
Using the Transfer Switch: 10
Braking: 6
Page 176 of 290

6-17OPERATING YOUR VEHICLE
66J22-03E
54G140
65D451
WARNING
On some types of loose surfaces
(such as gravel, snow-covered
roads, etc.), the stopping distance
required for an ABS-equipped vehi-
cle may be slightly greater than for
a comparable vehicle with a con-
ventional brake system. With a
conventional brake system, skid-
ding tires are able to “plow” the
gravel or snow layer, shortening
the stopping distance. ABS mini-
mizes this resistance effect. Allow
for extra stopping distance when
driving on loose surfaces.
On regular paved roads, some driv-
ers may be able to obtain slightly
shorter stopping distances with
conventional brake systems than
with ABS.
In both of the above conditions,
ABS will still offer the advantage of
helping you maintain directional
control. However, remember that
ABS will not compensate for bad
road or weather conditions or poor
driver judgment. Use good judg-
ment and do not drive faster than
conditions will safely allow.
WARNING
If the ABS warning light ((1) or (2)) on
the instrument panel comes on and
stays on while driving, there may be a
problem with the ABS system.
If this happens:
1) Pull off the road and stop care-
fully.
2) Turn the ignition switch to “LOCK”
and then start the engine again.
If the warning light comes on briefly
then turns off, the system is normal.
If the warning light still stays on,
have the system inspected by your
SUZUKI dealer immediately. If the
ABS system becomes inoperative,
the brake system will function as an
ordinary brake system that has no
ABS.
or
WARNING
If the ABS warning light ((1) or (2))
and the Brake system warning light
(3) on the instrument panel simulta-
neously stay on or come on when
driving, both anti-lock function and
rear brake force control function
(Proportioning valve function) of the
ABS system may have failed. This
could cause the rear wheels to skid
or the vehicle to spin during braking
on a slippery road or hard braking on
a dry paved road. If both warning
lights come on, drive carefully, avoid-
ing hard braking as much as possi-
ble, and ask your SUZUKI dealer to
inspect the ABS system immediately.
(1) (2)
(3)or
Braking: 6