2008 SUZUKI GRAND VITARA mirror
[x] Cancel search: mirrorPage 13 of 290

BEFORE DRIVING
2
66J22-03E
60G404
BEFORE DRIVINGKeys ...................................................................................... 2-1
Spare Tire Nut Lock (if equipped) ...................................... 2-1
Door Locks .......................................................................... 2-2
Windows .............................................................................. 2-14
Mirrors .................................................................................. 2-16
Seat Adjustment .................................................................. 2-17
Head Restraints ................................................................... 2-19
Seat Belts and Child Restraint Systems ........................... 2-20
Supplemental Restraint System (air bags) ....................... 2-37
Page 28 of 290

2-15BEFORE DRIVING
66J22-03E
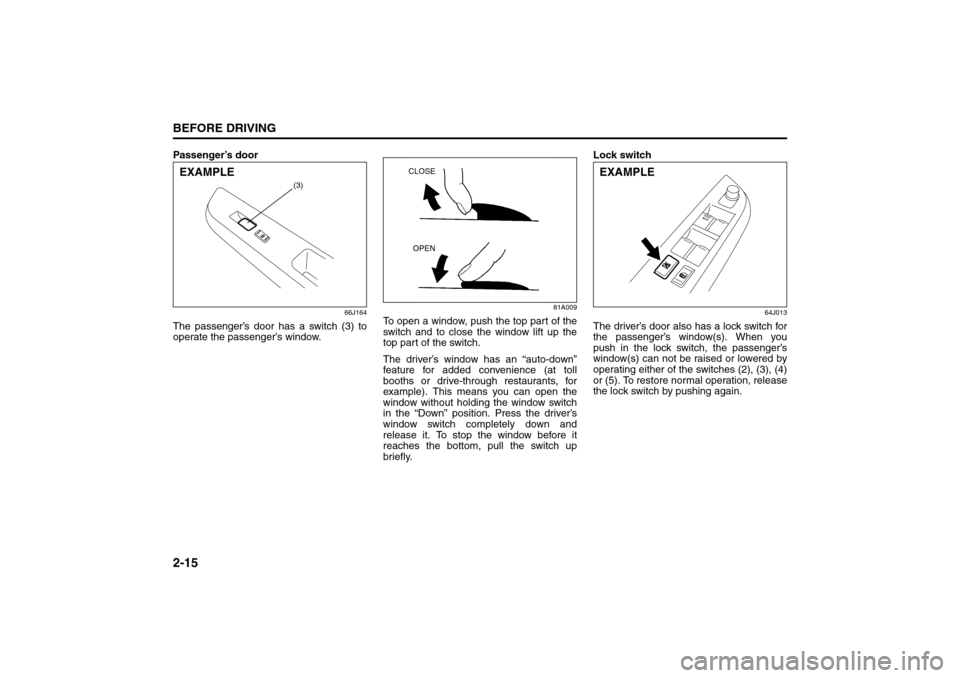
Passenger’s door
66J164
The passenger’s door has a switch (3) to
operate the passenger’s window.
81A009
To open a window, push the top part of the
switch and to close the window lift up the
top part of the switch.
The driver’s window has an “auto-down”
feature for added convenience (at toll
booths or drive-through restaurants, for
example). This means you can open the
window without holding the window switch
in the “Down” position. Press the driver’s
window switch completely down and
release it. To stop the window before it
reaches the bottom, pull the switch up
briefly.Lock switch
64J013
The driver’s door also has a lock switch for
the passenger’s window(s). When you
push in the lock switch, the passenger’s
window(s) can not be raised or lowered by
operating either of the switches (2), (3), (4)
or (5). To restore normal operation, release
the lock switch by pushing again.
(3)
EXAMPLE
CLOSE
OPEN
EXAMPLE
Windows: 3, 8
Mirrors: 3, 8
Page 29 of 290

2-16
BEFORE DRIVING
66J22-03E
NOTE:
If you drive with one of the rear windows
open, you may hear a loud sound caused
by air vibration. To reduce the sound, open
the driver’s or front passenger’s window, or
narrow the rear window opening.
MirrorsInside Rearview Mirror
65D410
65D409
You can adjust the inside rearview mirror
by hand so as to see the rear of your vehi-
cle in the mirror. To adjust the mirror, set
the selector tab (1) to the day position,
then move the mirror up, down or sideways
by hand to obtain the best view.
When driving at night, you can move the
selector tab to the night position to reduce
glare from the headlights of vehicles
behind you.
WARNING
You should always lock the passen-
ger’s window operation when there
are children in the vehicle. Children
can be seriously injured if they get
part of their body caught by the
window during operation.
To avoid injuring an occupant by
window entrapment, be sure no
part of the occupant’s body such
as hands or head is in the path of
the electric windows when closing
them.
Always remove the ignition key
when leaving the vehicle even if a
short time. Also do not leave chil-
dren alone in a parked vehicle.
Unattended children could use the
electric window switches and get
trapped by the window.
(1)
Day driving Night driving
WARNING
Always adjust the mirror with the
selector set to the day position.
Only use the night position if it is
necessary to reduce glare from the
headlights of vehicles behind you.
Be aware that in this position you
may not be able to see some
objects that could be seen in the
day position.
Mirrors: 3, 8
Page 30 of 290

2-17BEFORE DRIVING
66J22-03E
Outside Rearview Mirrors
64J014
Adjust the outside rearview mirrors so you
can just see the side of your vehicle in the
mirrors.
The passenger’s side mirror is a convex
(curved surface) mirror. Objects seen in
this mirror will look smaller and appear far-
ther away than when seen in a flat mirror.
Power Mirror Control (if equipped)
64J015
The switch to control the power rearview
mirrors is located on the driver’s door
panel. You can adjust the mirrors when the
ignition switch is in the “ACC” or “ON” posi-
tion. To adjust the mirrors:
1) Move the selector switch to the left or
right to select the mirror you wish to
adjust.
2) Press the outer part of the switch that
corresponds to the direction in which
you wish to move the mirror.
3) Return the selector switch to the center
position to help prevent unintended
adjustment.
Seat Adjustment
WARNING
Be careful when judging the size or
distance of a vehicle or other object
seen in the side convex mirror. Be
aware that objects look smaller and
appear farther away than when seen
in a flat mirror.
(1)
(3) (2)
(4) (2)
(4)(3) (1)
WARNING
Never attempt to adjust the driver’s
seat or seatback while driving. The
seat or seatback could move unex-
pectedly, causing loss of control.
Make sure that the driver’s seat and
seatback are properly adjusted
before you start driving.
WARNING
To avoid excessive seat belt slack,
which reduces the effectiveness of
the seat belts as a safety device,
make sure that the seats are adjusted
before the seat belts are fastened.
Seat Adjustment: 14
Page 75 of 290

INSTRUMENT PANEL
4
66J22-03E
60G406
INSTRUMENT PANELInstrument Panel ................................................................. 4-1
Instrument Cluster .............................................................. 4-2
Warning and Indicator Lights ............................................ 4-3
A/T Selector Position Indicator (if equipped) ................... 4-11
Speedometer/Odometer/Tripmeter/Brightness
Control ................................................................................. 4-11
Tachometer .......................................................................... 4-13
Fuel Gauge ........................................................................... 4-13
Temperature Gauge ............................................................ 4-14
“PASS AIR BAG OFF” Indicator ........................................ 4-14
Hazard Warning Switch ...................................................... 4-15
Rear Window Defroster and Outside Rearview Mirrors
Defroster (if equipped) Switch ........................................... 4-15
Front Fog Light Switch (if equipped) ................................ 4-16
“ESP OFF” Switch ............................................................... 4-16
Transfer Switch (if equipped) ............................................. 4-17
Glove Box ............................................................................ 4-17
Information Display ............................................................. 4-17
Theft Deterrent Light ........................................................... 4-21
Automatic Heating and Air Conditioning System
(Climate Control) ................................................................. 4-21
Audio Systems .................................................................... 4-28
Page 90 of 290

4-15INSTRUMENT PANEL
66J22-03E
Hazard Warning Switch
64J054
Push in the hazard warning switch to acti-
vate the hazard warning lights. All four turn
signal lights and both turn signal indicators
will flash simultaneously. To turn off the
lights, push the switch again.
Use the hazard warning lights to warn
other traffic during emergency parking or
when your vehicle could otherwise become
a traffic hazard.
Rear Window Defroster and
Outside Rearview Mirrors
Defroster (if equipped) Switch
66J248
When the rear window is fogged, push this
switch to clear the window.
64J258
If the outside rearview mirror has the mark
(2), it is also equipped with the outside
rearview mirrors defroster. When you push
the switch (1), both the outside rearview
mirrors defroster and the rear window
defroster will operate simultaneously.An indicator light will be lit when the
defroster is on. The defroster will only work
when the engine is running. To turn off the
defroster, push the switch again.
(1)
(2)
CAUTION
The rear window defroster and the
outside rearview mirrors use a large
amount of electricity. Be sure to turn
off the defroster after the window has
become clear.
Hazard Warning Switch: 8
Instrument Light Brightness Control: Rear Window Defroster and Outside Rearview Mirrors Defroster Switch: 8
Page 91 of 290

4-16
INSTRUMENT PANEL
66J22-03E
Front Fog Light Switch
(if equipped)
64J058
The front fog light comes on when the fog
light switch is pushed in with:
the lighting switch turned to the third
position and the beams set to the low
beam position, or
the auto-on headlight system on and the
beams set to the low beam position.
“ESP OFF” Switch
66J039
ESP
® is a registered trademark of
DaimlerChrysler AG.
The “ESP OFF” switch is located on the
center of the instrument panel. You can
turn the ESP
® systems (other than ABS)
on or off using this switch.
To turn off the ESP
® systems (other than
ABS), push and hold the “ESP OFF” switch
until the “ESP OFF” indicator light comes
on.
To turn on all of the ESP
® systems, push
the “ESP OFF” switch again. The “ESP
OFF” indicator light will go out.
NOTE:
If the vehicle speed is greater than
approximately 30 km/h (19 mph), theESP
® systems (other than ABS) will turn
on automatically.
If the transfer switch (if equipped) is
turned to the “4L LOCK” position, the
ESP® systems (other than ABS) will be
canceled automatically.
If the ESP
® systems operates continu-
ously, such as when driving on slippery
roads, the traction control functions of
the ESP
® systems may be canceled
temporarily to avoid overheating the
brake pads. After a short period of time,
the ESP® systems (other than ABS) will
turn on automatically and the “ESP OFF”
indicator light will go out.
For details of the ESP
® systems, refer to
“Electronic Stability Program (ESP
®)” in
the “OPERATING YOUR VEHICLE” sec-
tion.
Rear Window Defroster and Outside Rearview Mirrors Defroster Switch: 8Front Fog Light Switch: 8
“ESP OFF” Switch:
Page 161 of 290

6-2
OPERATING YOUR VEHICLE
66J22-03E
Daily Inspection ChecklistBefore Driving1) Make sure that windows, mirrors, lights
and reflectors are clean and unob-
structed.
2) Visually check the tires for the following
points:
– the depth of the tread groove
– abnormal wear, cracks and damage
– loose wheel nuts
– existence of foreign material such as
nails, stones, etc.
Refer to “Tires” in “INSPECTION AND
MAINTENANCE” section for details.
3) Look for fluid, oil leaks.
NOTE:
It is normal for water to drip from the air
conditioning system after use.
4) Make sure the hood is fully closed and
latched.
5) Check the headlights, turn signal lights,
brake lights and horn for proper opera-
tion.
6) Lock all doors.
7) Adjust the seat and adjustable head
restraints (if equipped).
8) Check the brake pedal and the parking
brake lever.
9) Adjust the mirrors.
10)Make sure that you and all passengers
have properly fastened your seat belts.11)Make sure that all warning lights come
on as the key is turned to the “ON” or
“START” position.
12)Check all gauges.
13)Make sure that the BRAKE SYSTEM
WARNING light turns off when the
parking brake is released.
Once a week, or each time you fill your fuel
tank, perform the following under-hood
checks:
1) Engine oil level
2) Coolant level
3) Brake fluid level
4) Power steering (if equipped) fluid level
5) Windshield washer fluid level
6) Hood latch operation
Pull the hood release handle inside the
vehicle. Make sure that you cannot
open the hood all the way without
releasing the secondary latch. Be sure
to close the hood securely after check-
ing for proper latch operation. See the
item “All Latches, Hinges and Locks” of
“CHASSIS AND BODY” in the “Periodic
Maintenance Schedule” in the
“INSPECTION AND MAINTENANCE”
section for lubrication schedule.
Starting the EngineBefore Starting the Engine1) Make sure the parking brake is set fully.
2) Manual Transmission – Shift into “N”
(Neutral) and depress the clutch pedal
all the way to the floor.
Hold it while starting the engine.
Automatic Transmission – If the gear-
shift lever is not in “P” (Park) position,
shift into “P”. (If you need to re-start the
engine while the vehicle is moving, shift
into “N”.)
NOTE:
The engine of manual transmission vehicle
will not start unless the clutch pedal is
depressed.
NOTE:
Automatic transmission vehicles have a
starter interlock device which is designed
to keep the starter from operating if the
transmission is in any of the drive posi-
tions.
WARNING
Make sure the hood is fully closed
and latched before driving. If it is not,
it can fly up unexpectedly during
driving, obstructing your view and
resulting in an accident.
WARNING
Make sure that the parking brake is
set fully and the transmission is in
Neutral (or Park for vehicles with an
automatic transmission) before
attempting to start the engine.
Daily Inspection Checklist: NO
Starting the Engine: 1