Page 129 of 290
4-54
INSTRUMENT PANEL
66J22-03E
Error display
This unit has a number of self-diagnostic functions to protect the system.
If a problem should occur, the display shows the type of error. Refer to the table below and take proper measures to correct the problem.
If the problem is corrected, the unit will operate normally.
If an error display not listed above appears, turn off the unit and contact your SUZUKI dealer. Error display Measures to be taken
CD/CD changer “Mechanical error”.
This error display indicates a mechanical failure in the CD changer
(failure to change or eject a disc).
The mechanism is probably damaged. Contact your authorized
SUZUKI dealer.
CD/CD changer “Focus error”.
The pick-up-focus is not properly functioning during playback due to
damage on the disc or for other reasons.
Check disc for damage.
CD/CD changer “Disc error”.
The CD is inserted upside down or only an eight-centimeter CD
adapter is equipped.
Check disc for correct loading.
Page 130 of 290
4-55INSTRUMENT PANEL
66J22-03E
MEMO
Page 131 of 290

OTHER CONTROLS AND EQUIPMENT
5
66J22-03E
60G407
OTHER CONTROLS AND EQUIPMENTParking Brake Lever ........................................................... 5-1
Pedals ................................................................................... 5-1
Gearshift Lever .................................................................... 5-2
Fuel Filler Cap ..................................................................... 5-3
Folding Seats ....................................................................... 5-4
Armrest ................................................................................ 5-7
Sun Visor ............................................................................. 5-7
Interior Light Switch ........................................................... 5-7
Spot Light ............................................................................ 5-8
Luggage Compartment Light ............................................. 5-9
Front Seat Heater (if equipped) .......................................... 5-9
Assist Grips (if equipped) .................................................. 5-10
Coat Hooks (if equipped) .................................................... 5-11
Sunroof (if equipped) .......................................................... 5-11
Engine Hood ........................................................................ 5-13
Cup Holder and Storage Bin (if equipped) ........................ 5-14
Overhead Console Box (if equipped) ................................ 5-15
Accessory Socket (if equipped) ......................................... 5-16
Cigarette Lighter and Ashtray ............................................ 5-17
Frame Hooks ....................................................................... 5-17
Tire Changing Tool ............................................................. 5-18
Shopping Hook (if equipped) ............................................. 5-19
Front Seat Back Pocket (if equipped) ............................... 5-19
Luggage Restraint Loops (if equipped) ............................ 5-19
Luggage Compartment Cover ............................................ 5-20
Underfloor Bins (if equipped) ............................................ 5-23
Roof Rails or Roof Rack Anchors (if equipped) ............... 5-23
HomeLink® (if equipped) .................................................... 5-25
Page 132 of 290

5-1OTHER CONTROLS AND EQUIPMENT
66J22-03E
Parking Brake Lever
64J081
(1) To set
(2) To release
(3) To release
The parking brake lever is located between
the seats. To set the parking brake, hold
the brake pedal down and pull the parking
brake lever all the way up. To release the
parking brake, hold the brake pedal down,
pull up slightly on the parking brake lever,
push the button on the end of the lever
with your thumb and lower the lever to its
original position.
For automatic transmission vehicles,
always set the parking brake before mov-
ing the gearshift lever to the “P” (Park)
position. If you park on an incline and shift
into “P” before you set the parking brake,
the weight of the vehicle may make it diffi-cult to shift out of “P” when you are ready
to drive the vehicle. When preparing to
drive the vehicle, move the gearshift lever
out of the “P” position before releasing the
parking brake.
PedalsManual transmission
64J082
Automatic transmission
64J083
EXAMPLE
(2)
(3)(1)
WARNING
Never drive your vehicle with the
parking brake set: rear brake effec-
tiveness can be reduced from over-
heating, brake life may be
shortened or permanent brake
damage may result.
If the parking brake does not hold
the vehicle securely or does not
fully release, have your vehicle
inspected immediately by an autho-
rized SUZUKI dealer.
WARNING
Always set the parking brake fully
before leaving your vehicle or it may
roll, causing injury or damage. When
parking, make sure the gearshift
lever for manual transmission vehi-
cles is in 1st gear or “R” (Reverse)
and the gearshift lever for automatic
transmission vehicles is in “P”
(Park). Never leave the transfer lever
in “N” (Neutral) when you are parked.
Remember, even though the trans-
mission is in gear or in Park, you
must set the parking brake fully.
(1)(2)(3)
EXAMPLE
(2)(3)
EXAMPLE
Parking Brake Lever: 6
Pedals: 6
Page 133 of 290

5-2
OTHER CONTROLS AND EQUIPMENT
66J22-03E
Clutch Pedal (1)(For manual transmission)
The clutch pedal is used to disengage the
drive to the wheels when starting the
engine, stopping or shifting the gearshift
lever or transfer lever. Depressing the
pedal disengages the clutch.Brake Pedal (2)Your SUZUKI vehicle is equipped with
front disc brakes and rear drum brakes.
Depressing the brake pedal applies both
sets of brakes.
You may hear occasional brake squeal
when you apply the brakes. This is a nor-
mal condition caused by environmental
factors such as cold, wet, snow, etc.
Accelerator Pedal (3)This pedal controls the speed of the
engine. Depressing the accelerator pedal
increases power output and speed.
Gearshift LeverManual transmission
65D449
5-speed automatic transmission
66J046
CAUTION
Do not drive with your foot resting on
the clutch pedal. It could result in
excessive clutch wear or clutch dam-
age.
WARNING
If brake squeal is excessive and
occurs each time the brakes are
applied, you should have the brakes
checked by your SUZUKI dealer.
WARNING
Do not “ride” the brakes by applying
them continuously or resting your
foot on the pedal. This will result in
overheating of the brakes which
could cause unpredictable braking
action, longer stopping distances or
permanent brake damage.
Pedals: 6
Gearshift Lever: 10
Page 134 of 290

5-3OTHER CONTROLS AND EQUIPMENT
66J22-03E
Your vehicle is equipped with either a
manual transmission or automatic trans-
mission. The gearshift lever for each trans-
mission type is shown in the illustrations.
For details on how to use the transmission,
refer to the “Using the Transmission” in
“OPERATING YOUR VEHICLE” section.
Fuel Filler Cap
64J085
64J253
The fuel filler cap is located on the right
rear side of the vehicle. The fuel filler door
can be unlocked by pulling up on the
opener lever located on the outboard sideof the driver’s seat and can be locked by
simply closing the door.
60G069
To remove the fuel filler cap:
1) Open the fuel filler door.
2) Remove the cap by turning it counter-
clockwise.
To reinstall the fuel filler cap:
1) Turn the cap clockwise until you hear
several clicks.
2) Close the fuel filler door.
EXAMPLE
WARNING
Remove the fuel filler cap slowly. The
fuel may be under pressure and may
spray out, causing injury.Open Close
Gearshift Lever: 10
Fuel Filler Cap: 5
Page 135 of 290

5-4
OTHER CONTROLS AND EQUIPMENT
66J22-03E
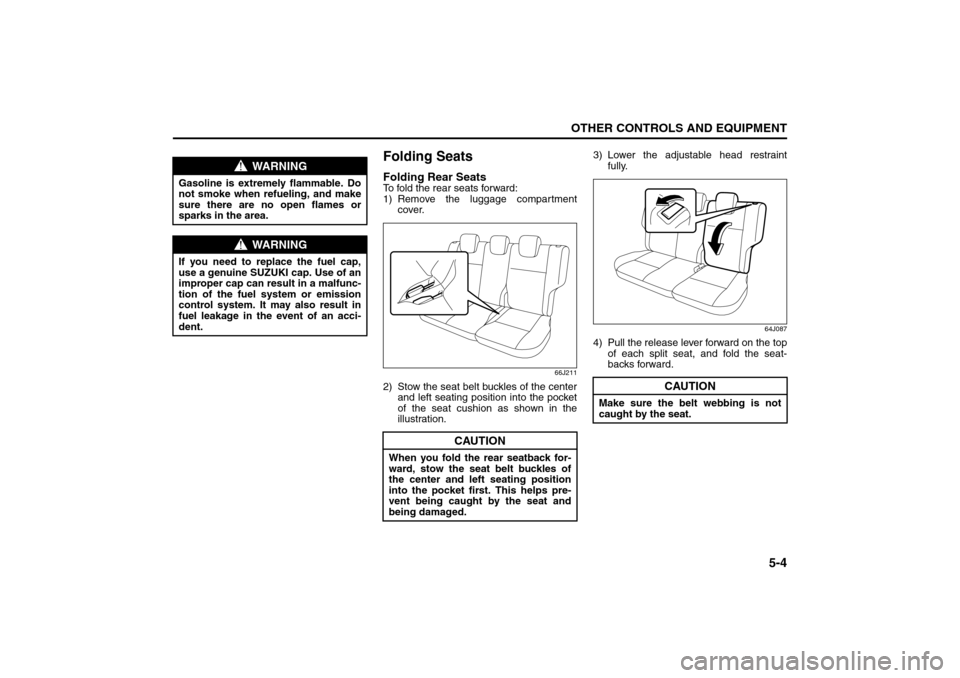
Folding SeatsFolding Rear SeatsTo fold the rear seats forward:
1) Remove the luggage compartment
cover.
66J211
2) Stow the seat belt buckles of the center
and left seating position into the pocket
of the seat cushion as shown in the
illustration.3) Lower the adjustable head restraint
fully.
64J087
4) Pull the release lever forward on the top
of each split seat, and fold the seat-
backs forward.
WARNING
Gasoline is extremely flammable. Do
not smoke when refueling, and make
sure there are no open flames or
sparks in the area.
WARNING
If you need to replace the fuel cap,
use a genuine SUZUKI cap. Use of an
improper cap can result in a malfunc-
tion of the fuel system or emission
control system. It may also result in
fuel leakage in the event of an acci-
dent.
CAUTION
When you fold the rear seatback for-
ward, stow the seat belt buckles of
the center and left seating position
into the pocket first. This helps pre-
vent being caught by the seat and
being damaged.
CAUTION
Make sure the belt webbing is not
caught by the seat.
Fuel Filler Cap: 5
Folding Seats: 14
Page 136 of 290
5-5OTHER CONTROLS AND EQUIPMENT
66J22-03E
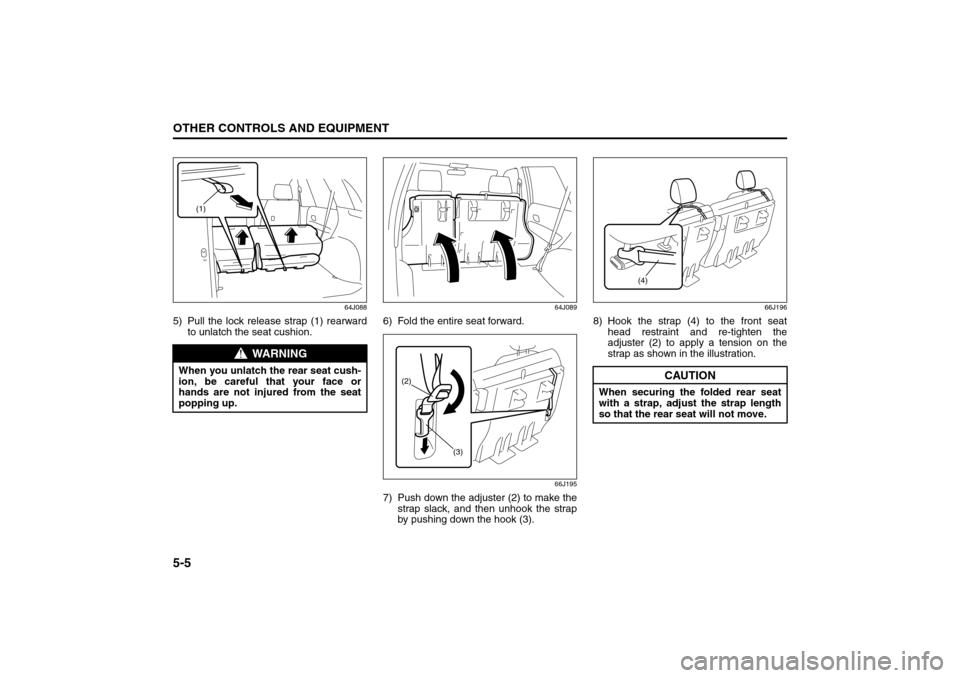
64J088
5) Pull the lock release strap (1) rearward
to unlatch the seat cushion.
64J089
6) Fold the entire seat forward.
66J195
7) Push down the adjuster (2) to make the
strap slack, and then unhook the strap
by pushing down the hook (3).
66J196
8) Hook the strap (4) to the front seat
head restraint and re-tighten the
adjuster (2) to apply a tension on the
strap as shown in the illustration.
WARNING
When you unlatch the rear seat cush-
ion, be careful that your face or
hands are not injured from the seat
popping up.
(1)
(2)
(3)
CAUTION
When securing the folded rear seat
with a strap, adjust the strap length
so that the rear seat will not move.
(4)
Folding Seats: 14