Page 25 of 75
 Columbus Navigation System Manual Selector key MEDIA23
The main MEDIA menuOverview of the main MEDIA menuDepending on the selected media source, the main MEDIA menu is
provided as Audio Menu ⇒ fig. 8 or Video DVD menu ⇒ fig.")
Selector key MEDIA23
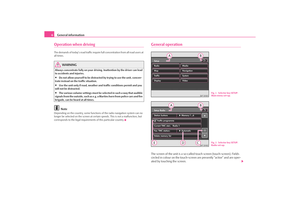
The main MEDIA menuOverview of the main MEDIA menuDepending on the selected media source, the main MEDIA menu is
provided as Audio Menu ⇒ fig. 8 or Video DVD menu ⇒ fig. 9 . Calling up the main MEDIA menu and changing media source
– Press the selector key to switch to the main
MEDIA menu. The
last used media source will continue to play.
– If video and audio sources are curren tly selectable at the unit, use the
range selector key to change between the last audio and the
last video source.
Unit keys (Hard keys) for controlling the current audio or video source
The arrow keys on unit or will always affect the currently heard audio
source, irrespective of the current menu used.
– pressing this briefly changes over to the beginning of the current title or
chapter, repeated pressing changes over to the beginning of the previous title or
chapter.
– briefly pressing this changes ov er to the next title or chapter.
When in the menu of the currently played audio source it is also possible to change
titles using the setting up button.
Function keys for controlling the current audio or video source – pressing this briefly changes over to the beginning of the current title or
chapter, repeated pressing changes over to the beginning of the previous title or
chapter.
– briefly pressing this changes over to the next title or chapter.
– Pause: The play function is stoppe d in the current position - the symbol
changes to , – pressing will continue the play function in this position.
Selectable audio sources in the audio menu – changes over to an inserted CD/DVD.
– changes over to an inserted memory card.
– changes to the audio data stor ed on the internal hard disk ⇒page 26. MP3
data and unprotected WMA data can be stored on the hard disk from all selectable
media (CD, DVD, memory card).
or * – changes over to an additionally connected external audio
source*. Operating an externally connected audio source is possible, with certain
Fig. 8 Main MEDIA menu:
Audio Menu.Fig. 9 Main MEDIA menu:
Video DVD Menu.
MEDIA
MEDIA
A3
CDSD cardHDDAUX
BT audio
s2u4.6.book Page 23 Wednesday, August 13, 2008 7:57 AM
Page 26 of 75
 Columbus Navigation System Manual Selector key MEDIA
24restrictions, via the radio navigation unit and depends largely on the type of the
connection.
Selectable video sources in the Video DVD menu
– changes over to an optionally c")
Selector key MEDIA
24restrictions, via the radio navigation unit and depends largely on the type of the
connection.
Selectable video sources in the Video DVD menu
– changes over to an optionally connected external video source.
– if a TV Tuner* is connected, it is changed in the TV mode ⇒page 33.
– changes over to a Video-DVD ⇒page 31 inserted into the internal CD/DVD
drive.
Additional function keys in the audio menu
– changes over into the Video DVD menu and plays the last selected video
source.
– opens a pop-up window in which the repeating function determines
whether the or the (in audio CD operation) respectively the current (in the MP3 operation ⇒page 26) should be repeated.
– opens a pop-up window in which the random play function Mix or the
automatic play Scan can be started or the ca pacity of the hard disk HDD capacity
can be displayed.
– opens the title list of the current audio source in order to choose
another title or audio source.
Additional function keys in the Video DVD menu
– changes to the Audio menu and plays the last selected video source.
– switches over the Video DVD played in the internal CD/DVD drive to the
menu selection of the film and also opens the incorporated menu control.
– opens a set-up menu to adapt the display set-ups for the current film. – opens the chapter selection for th e Video DVD played in the internal
CD/DVD drive.
Inserting or ejecting a CD/DVDInserting a CD/DVD
– Push a CD/DVD with the written side facing up as far as possible into
the CD/DVD case until it is automatically drawn in. The play function
will start automatically.
Ejecting a CD/DVD
– Press the button to move the CD/DVD in the internal CD/DVD drive into the Eject position.If a CD/DVD is not removed when ejected, it will be reinserted after approximately
ten seconds for safety reasons.
Playable MP3 and WMA data can also be stored on the hard disk of the unit
⇒ page 29.
WMA Data (Windows Media Audio)
The copyright of audi o data compressed by Windows Media Audio, can also be
protected by the DRM procedure ( Digital Rights Management). Such WMA data is
not supported by the unit.Inserting or removing a memory card Inserting a memory card
– Push the memory card into the me mory card case with the trimmed
edge to the front right (horizontal case) or to the front top (vertical
case), until it is locked in position . The play function will start automat-
ically.
Taking out a memory card
– Press against the spring resistance of the inserted memory card, the memory card “skips” back into the Eject position.
AVTVDVDVideoRepeat
title
CD
folderExtrasSelectionAudioMenuDisplayChapter
s2u4.6.book Page 24 Wednesday, August 13, 2008 7:57 AM
Page 27 of 75
 Columbus Navigation System Manual Selector key MEDIA25
Destination entry from the memory card *
– You can enter the destinations from the SD card using the function in theNavigation menu . The destinations must
only be stored on")
Selector key MEDIA25
Destination entry from the memory card *
– You can enter the destinations from the SD card using the function in theNavigation menu . The destinations must
only be stored on the SD card in the corresponding format.
Only MP3 data and unprotected WMA data can be read from the SD card. All other
data is ignored.
Playable MP3 and WMA data can also be stored on the hard disk of the unit
⇒ page 29.
Memory card empty or data not readable
If a memory card is inserted, on which no audio data has been stored, it will not be
switched over into the memory card mode after the loading procedure. When in
the Audio menu the function key remains inactive on the top line of the
touch-screen and the function cannot be seleced ⇒page 23, fig. 8 .
Requirements of the memory card
Memory cards measuring 32 mm x 24 mm x 2.1 mm or 1.4 mm can be inserted into
the memory card case.
All other physically suitable memory card s such as SDHC memory cards (“Secure
Digital High-Capacity Memory Cards”) can not be read.Audio menu Selecting title or audio sourceChanging the audio source
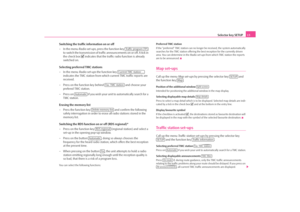
– Press the selector key to switch to the main MEDIA menu. If
the last selected was a video source, press the set-up key
again to open the Audio menu.
– When in the Audio menu the play function of the last played audio
source will continue from the last played point. – Press one of the top function keys
to select the corresponding audio
source. The play function of the se lected audio source will continue
from the last played point.
Opening the selection menu of the available audio sources
–When in the Audio menu press the function key to display
the title list of the currently played audio source. The currently played
track is shown as highlighted.
– Press on the function key as of ten as necessary until the selection
menu of the available audio sources has opened.
– Press on the left of the audio source display , or the content of these folders or data carriers will then be
indicated.
Changing track or selecting track manuallyPress the selector key to switch to the main MEDIA menu. If the
last selected was a video source, press the set-up key again to
open the Audio menu .
Select track
– Briefly press on the arrow keys on the unit or in the Audio menu
or press on the function keys on the screen or .
Fa s t re ve rse / fo r w a rd
– Keep pressing the arrow keys at the unit or or the function keys on the touch-screen or .
– Release the corresponding key if th e desired title sequence has been
reached.
Import destinations
SD card
MEDIA
MEDIA
Selection
CD
SD card
HDD
MEDIA
MEDIA
s2u4.6.book Page 25 Wednesday, August 13, 2008 7:57 AM
Page 28 of 75
 Columbus Navigation System Manual Selector key MEDIA
26
Audio CD/DVD
– Press the function key to display the title list of the currently played audio CD/DVD.
– Select the title from the title list by pressing .
– Use the func")
Selector key MEDIA
26
Audio CD/DVD
– Press the function key to display the title list of the currently played audio CD/DVD.
– Select the title from the title list by pressing .
– Use the function key to switch from the title list back into the selec- tion menu or the selection menu of the available audio sources.
MP3 Data: Select track
– Press on the function key , in order to display the title list with the currently played title and, if necessary, to display the sub-folder
contained in this folder.
– Press on the display of a data folder to open it.
– Press the function key to open the appropriate higher priority folder.
– By pressing several times, you will switch folder by folder to the selection menu of the available audio sources. There you can search
for titles of another audio source.
Repeat track
–Open the Audio menu ⇒ page 23.
– Press the function key .
– Press on in the pop-up window to automatically repeat the current track at the end.
– If you press on (Audio CD mode) or (MP3 operation) in the pop-up window the titles of the current CD or the current folder are
repeated automatically.
Random play function – When in the Audio menu press the function key .
– Press on in the pop-up window. All titles of the current audio source will now be played in random order.
– Use the function key to terminate the function of the current title. The normal play function continues with the current title.Automatic play (Scan function)– When in the Audio menu press the function key .
– Press on in the pop-up window. All the titles of the current audio source are played for approximately 10 seconds.
– Press to terminate the play function of the current title. The normal play function continues with the current title.Alternatively, start and end the automatic play by briefly pressing the set button .
Note
In the Audio menu , press on the function key and afterwards on
in the pop-up window, the informat ion relating to the assigned or
free memory space on the hard disk will appear on the screen.MP3 dataGeneral information for MP3 operationRequirements for the MP3 data and data carrier•
650 MB and 700 MB CD-ROM, CD-R, CD-RW.
•
4.7 GB DVDs and up to 8.5 GB Double Layer DVDs.
Selection
Track ...
Selection
Repeat
Tr a c k
CD
folder
MIX
Extras
Mix
Mix
Extras
Scan
Scan
A8
Extras
HDD capacity
s2u4.6.book Page 26 Wednesday, August 13, 2008 7:57 AM
Page 29 of 75
 Columbus Navigation System Manual Selector key MEDIA27
•
The CDs/DVDs must correspond to the ISO 9660 Level 2 standard as well as the
Joliet data system (single and multi-session).
•
Data names must be no longer than 64 character")
Selector key MEDIA27
•
The CDs/DVDs must correspond to the ISO 9660 Level 2 standard as well as the
Joliet data system (single and multi-session).
•
Data names must be no longer than 64 characters.
•
The list structure is restricted to a depth of 8 list levels.
•
The name of the artist, the album and the title of the reproduced MP3 data can
be shown as ID3 tag, providing this information is available. The list and data name
will be displayed if there is no ID3 tag.
•
Play lists are not supported.
•
WMA data (Windows Media Audio) can also be played even if the copyright is
additionally protected by the DRM procedure ( Digital Rights Management). Such
WMA data is not supported by the unit.
•
The operation and behaviour of playable WMA data conforms to the MP3 data
and will not be described further.
Bit rate (data flow per time unit)
•
The system supports MP3 data with bit ra tes of 32 to 320 KB/s as well as MP3
data with variable bit rates.
•
The indicated playing time data with variable bit rates is not reliable.
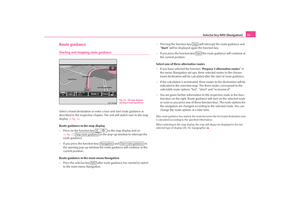
Playing sequence of MP3 data and foldersThe unit plays the MP3 data stored on a data carrier in a certain sequence ⇒fig. 10 .
The illustration shows an example of a typical MP3 CD containing the titles
(Tracks
), folder (Folder
) and sub-folder. When setting up you can stipulate if
MP3 data from all folders and sub-folders can be played.
Fig. 10 Possible structure of
a MP3 CD.
s2u4.6.book Page 27 Wednesday, August 13, 2008 7:57 AM
Page 30 of 75
 Columbus Navigation System Manual Selector key MEDIA
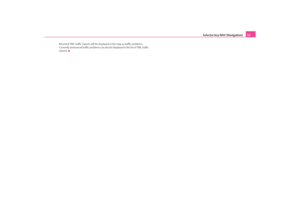
28External sources*AUX-IN and MEDIA-IN inputInput AUX-IN
– Activate the AUX-IN socket in the menu Setup Media by pressing the
function key .
– The input for external audio so")
Selector key MEDIA
28External sources*AUX-IN and MEDIA-IN inputInput AUX-IN
– Activate the AUX-IN socket in the menu Setup Media by pressing the
function key .
– The input for external audio sources AUX-IN is located under the armrest of the front seats.
– External audio sources, which are no t connected to the AUX-IN socket,
cannot be operated via the radio.
Input MDI - Multimedia socket (MEDIA-IN)
– Activate the MEDIA-IN socket in the menu Setup Media by pressing
the function key .
– The input MDI is located in the glove box. – Audio data in MP3, WMA, OGG Vorbis and AAC format from the
external data sticker, connected to the multimedia socket, can be
played via the radio.
– External audio sources, which are connected to the AUX-IN socket,
can be operated via the radio.
It is possible to play back external audio sources via the loudspeakers of the radio
in the vehicle.
You can select another audio source on the ra dio at any time. As long as the external
audio source is not switched off, it re mains always active in the background.
Please refer to the Owner's manual of the respective manufacturer for the opera-
tion of the external audio source.
If a MEDIA-IN socket is additionally installed, the button is displayed
instead of the function key in the Audio menu. Please note that an audio
source connected to the AUX-IN socket can on ly be replayed, if there is currently no
data carrier connected to the MEDIA-IN socket.
Use the standard jack plug 3.5 mm for the AUX-IN socket. If the external audio
source does not have this jack plug, you must use an adapter.
Adjust the play function volume of the external audio source
The play function volume of the external audio source can be changed via the
volume control on the radio.
Depending on the connected audio source the output volume on the external
audio source can be changed.
You can also change the input sensitivity of the external audio source, in order for
the play function volume of the external audio source to adapt to other audio
sources or to avoid distortions of the play function volume.
Adapter
A special adapter is required to connect audio sources via the input MDI.
We recommend that you purchase an adap ter for connecting the USB devices, the
devices with Mini USB output or an iPOD, at a Škoda Service Partner.
Fig. 11 AUX-IN and MEDIA-
IN socket
AUX
MEDIA-IN
MEDIA-IN
AUX
s2u4.6.book Page 28 Wednesday, August 13, 2008 7:57 AM
Page 31 of 75
 Columbus Navigation System Manual Selector key MEDIA29
Conditions for proper connection•
Only USB devices with the spec ification 2.0 can be connected.
•
The version of the file allocation tabl e FAT (File Allocation Table) of the")
Selector key MEDIA29
Conditions for proper connection•
Only USB devices with the spec ification 2.0 can be connected.
•
The version of the file allocation tabl e FAT (File Allocation Table) of the
connected device must be FAT16 (< 2 GB) or FAT32 (> 2 GB).
•
In order to replay from a unit with a hard disk (HDD) which includes a large data
volume, it can lead to a time delay when reading in the overview of the music data.
•
In order to replay from a unit, which includes a complicated folder structure, it
can lead to a time delay when readin g in the overview of the music data.
•
The folder structure in the connected unit must not exceed a depth of 8 levels.
One folder must not contain more than 1°000° data.
•
A USB extension cable or USB distributo r (HUB) must not be used to connect
the unit.
WARNING
•
On no account place an external audio source on the dash panel. You
could make sudden manoeuvres in th e passenger compartment and injure
the occupants.
•
On no account place an external audio source close to the airbags. You
could be thrown back in the passen ger compartment by the airbags being
deployed and injure the occupants.
•
You must not hold the external audio source in the hand or on the knees
while driving. You could make sudden manoeuvres in the passenger
compartment and injure the occupants.
•
Always guide the connection cable of th e external audio source in such a
way that is does not restrict you when driving.Caution
The AUX-IN socket must only be used for audio sources!
Note
•
The external audio source, which is conne cted via AUX-IN, can only be used if
no unit is connected via MDI at the same time.
•
If an external audio source is connected via AUX-IN, which is equipped with an
adapter for external power supply, it can o ccur that the audio signal is interrupted.
This depends on the quality of the adapter which is used.
•
The loudspeakers in the vehicle are matched to a power output of the radio of
30°W.
Storing and processing audio data (HDD)Storing MP3 and WMA data on the hard disk (HDD)Selecting titles or folders to be stored
– Check the available audio sources fo r titles or folders which you may
wish to store on the hard disk. You can select the complete contents of
an installed data carrier for storing on the hard disk in the selection
window of the available audio sources.
– If you press the function key behind the display of a title or folder, a pop-up window will open.
– Pressing in the pop-up window will start the play function.
– Press in the pop-up window to store the respective title or
folder on the hard disk.
– Press in the following pop-up window for confirmation that you have taken note of the message.
Selecting storage space and store titles
– Press , if the title or folder should be stored
directly on the first level, which is the root folder of the hard disk. In
this connection please observe ⇒page 27, “Playing sequence of MP3
data and folders”.
Play
CopyContinueDrop file/folder here
s2u4.6.book Page 29 Wednesday, August 13, 2008 7:57 AM
Page 32 of 75
 Columbus Navigation System Manual Selector key MEDIA
30
– Or press if a new folder should be created for the title or folder. Choose a name for this folder from the following menu. The
newly created folder is opened and the name")
Selector key MEDIA
30
– Or press if a new folder should be created for the title or folder. Choose a name for this folder from the following menu. The
newly created folder is opened and the name you choose will be indi-
cated in the title line.
– You can now create another folder (one folder has a maximum of
seven sub-folders) or you can store the selected title or folder in the
currently described folder. Press the function key to open the
appropriate higher priority folder.
– Press the function key if you wish to store the title
or folder at the selected point.
– Press to abort the storing process of the currently stored title. Once the storing process has been completed, the pop-up window
will close automatically.Storing 100 music titles of av erage length of time (3 - 5 minutes) will take approxi-
mately 40 minutes.
If the unit is switched off during the storing process, the storing process will be
terminated with the last fully stored title.
Functions and progress display during the memory procedure
You can continue listening to this or anot her audio source while storing other audio
data.
Data names with a length of max. 32 characters can be displayed.
The function key is blocked in the Audio menu during the saving process.
If the function key is pressed regardless, a pop-up window will open
instead of the selection menu where the progress of the saving process is displayed.
If you press in the pop-up window, the storing process will be aborted with
the last fully stored title. Press the se lector key twice to close the pop-up
window and continue the storing process.
Editing stored audio data (titles) and foldersSelect title or folder
– Open the selection menu of the available audio sources ⇒page 25.
– Press the function key to disp lay the stored titles and folders
on the hard disk.
– Select the title or folder to be pr ocessed. Press on the display of a
folder to open it. Press the function key to open the
appropriate higher priority folder. The names of the currently opened
folders are displayed in the title line.
– Press the function key behind the display of the title or folder you wish to process. A po p-up window will open.
– The play function can be started and the title or folder can be copied, renamed or erased via the pop-up window.Function keys in the pop-up window:
– starts the play function of the selected title or folder ⇒page 27, “Playing
sequence of MP3 data and folders”.
– stores a copy of the title or folder ⇒page 29, “Selecting storage space and
store titles”.
– opens the entry mask to change the title or folder name.
– erases the selected title or folder after renewed confirmation.
New folder
Drop file/folder here
Cancel
SelectionSelection
Cancel
MEDIA
HDD
... Name
PlayCopyRenameDelete
s2u4.6.book Page 30 Wednesday, August 13, 2008 7:57 AM