2008 SKODA OCTAVIA window
[x] Cancel search: windowPage 5 of 75
General information3
General informationEquipment overview
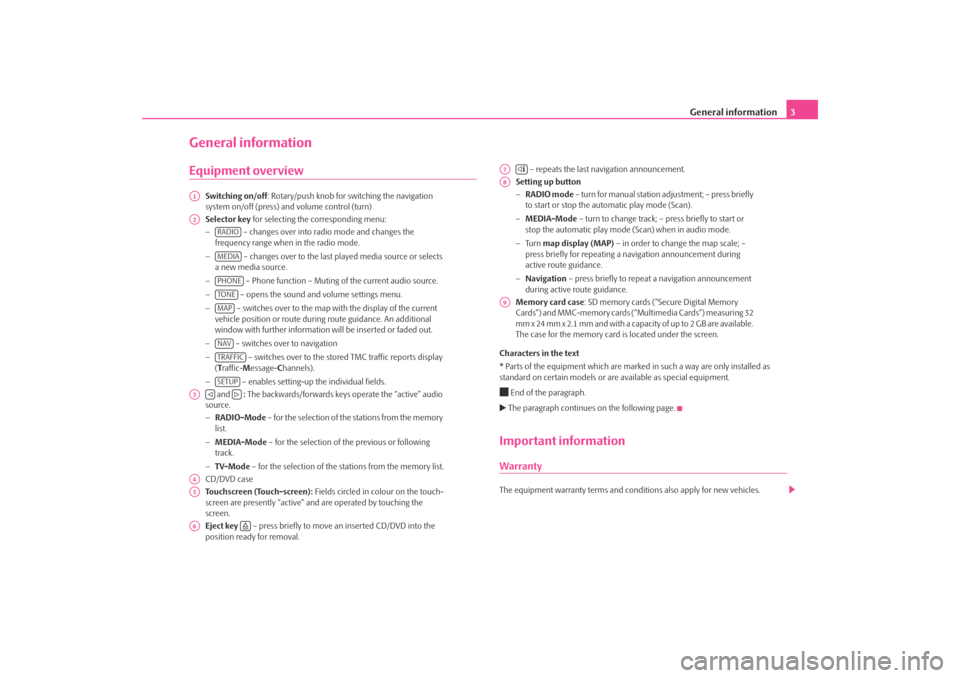
Switching on/off: Rotary/push knob for switching the navigation
system on/off (press) and volume control (turn)
Selector key for selecting the corresponding menu:
− – changes over into radio mode and changes the
frequency range when in the radio mode.
− – changes over to the last played media source or selects
a new media source.
− – Phone function – Muting of the current audio source.
− – opens the sound and volume settings menu.
− – switches over to the map with the display of the current
vehicle position or route during route guidance. An additional
window with further information will be inserted or faded out.
− – switches over to navigation
− – switches over to the stor ed TMC traffic reports display
( T raffic- Message- Channels).
− – enables setting-up the individual fields.
and : The backwards/forwards keys operate the “active” audio
source.
− RADIO-Mode – for the selection of the stations from the memory
list.
− MEDIA-Mode – for the selection of the previous or following
track.
− TV-Mode – for the selection of the st ations from the memory list.
CD/DVD case
Touchscreen (Touch-screen): Fields circled in colour on the touch-
screen are presently “active” and are operated by touching the
screen.
Eject key – press briefly to move an inserted CD/DVD into the
position ready for removal. – repeats the last navigation announcement.
Setting up button
− RADIO mode – turn for manual station adjustment; – press briefly
to start or stop the automatic play mode (Scan).
− MEDIA-Mode – turn to change track; – press briefly to start or
stop the automatic play mode (Scan) when in audio mode.
− Tu r n map display (MAP) – in order to change the map scale; –
press briefly for repeating a na vigation announcement during
active route guidance.
− Navigation – press briefly to repeat a navigation announcement
during active route guidance.
Memory card case : SD memory cards (“Secure Digital Memory
Cards”) and MMC-memory cards (“Multimedia Cards”) measuring 32
mm x 24 mm x 2.1 mm and with a capacity of up to 2 GB are available.
The case for the memory card is located under the screen.
Characters in the text
* Parts of the equipment which are marked in such a way are only installed as
standard on certain models or are available as special equipment.
End of the paragraph. The paragraph continues on the following page.Important informationWarrantyThe equipment warranty te rms and conditions also apply for new vehicles.
A1A2
RADIOMEDIAPHONETO NEMAPNAVTRAFFICSETUP
A3
A4A5A6
A7
A8A9
s2u4.6.book Page 3 Wednesday, August 13, 2008 7:57 AM
Page 7 of 75
General information5
•
The DVD drive installed into this unit uses a Dolby Digital
® Audio coding system
and MLP Lossless
® for highest reproduction quality even with standard Audio
DVDs. “Dolby
®”, “MLP Lossless
®” and the Double-D-Symbol are trademarks of
Dolby Laboratories
®.
•
With the help of “DTS
®” and “DTS 2.0
®” the surrounding sound of a DVD is
transformed and replayed in best stereo quality. “DTS
®” and “DTS 2.0
®” are regis-
tered trademarks of DTS, Inc.
•
WMA audio data (Windows Media Audio) can also be replayed by the unit and
stored on the hard disk (HDD) providing this has not been protected by the DRM
procedure copyright (Digital Rights Management). The operation and behaviour of
the unit complies with the MP3 compressed audio data and are not described
further.
Screen careTreat the screen with great care, because dents and scratches can occur through
finger pressure or contact with sharp objects.
The screen can be cleaned with a soft cl oth and finger marks can be wiped away
with pure alcohol.
Note
Do not use solvent such as turpentine or petrol as they will attack the screen
surface.
s2u4.6.book Page 5 Wednesday, August 13, 2008 7:57 AM
Page 9 of 75
General information7
“Function keys” on the screen
– Active fields on the touch-screen, which call up a function or a menu,
are called “function keys”.
– When in the main menu press, for example Set-up on the func-
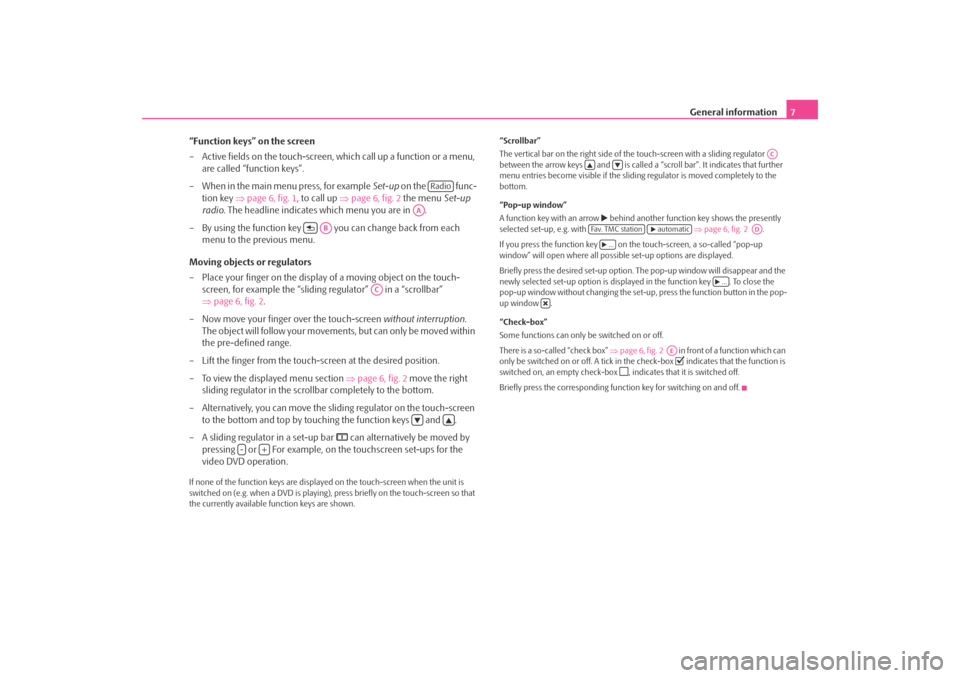
tion key ⇒page 6, fig. 1 , to call up ⇒page 6, fig. 2 the menu Set-up
radio . The headline indicates which menu you are in .
– By using the function key you can change back from each menu to the previous menu.
Moving objects or regulators
– Place your finger on the display of a moving object on the touch-
screen, for example the “sliding regulator” in a “scrollbar”
⇒ page 6, fig. 2 .
– Now move your finger over the touch-screen without interruption.
The object will follow your movement s, but can only be moved within
the pre-defined range.
– Lift the finger from the touch-screen at the desired position.
– To view the displayed menu section ⇒page 6, fig. 2 move the right
sliding regulator in the scrollbar completely to the bottom.
– Alternatively, you can move the slid ing regulator on the touch-screen
to the bottom and top by touchi ng the function keys and .
– A sliding regulator in a set-up bar
can alternatively be moved by
pressing or For example, on the touchscreen set-ups for the
video DVD operation.
If none of the function keys are displa yed on the touch-screen when the unit is
switched on (e.g. when a DVD is playing), press briefly on the touch-screen so that
the currently available function keys are shown. “Scrollbar”
The vertical bar on the right side of th
e touch-screen with a sliding regulator
between the arrow keys and is called a “scroll bar”. It indicates that further
menu entries become visible if the slidin g regulator is moved completely to the
bottom.
“Pop-up window”
A function key with an arrow
behind another function key shows the presently
selected set-up, e.g. with ⇒ page 6, fig. 2 .
If you press the function key on the touch-screen, a so-called “pop-up
window” will open where all possible set-up options are displayed.
Briefly press the desired set-up option. Th e pop-up window will disappear and the
newly selected set-up option is displayed in the function key . To close the
pop-up window without changing the set-up, press the function button in the pop-
up window .
“Check-box”
Some functions can only be switched on or off.
There is a so-called “check box” ⇒page 6, fig. 2 in front of a function which can
only be switched on or off. A tick in the check-box
indicates that the function is
switched on, an empty check-box
, indicates that it is switched off.
Briefly press the corresponding function key for switching on and off.
Radio
AA
AB
AC
-
+
AC
Fa v. T M C s t a t i o n
automatic
AD
...
...
AE
s2u4.6.book Page 7 Wednesday, August 13, 2008 7:57 AM
Page 10 of 75
General information
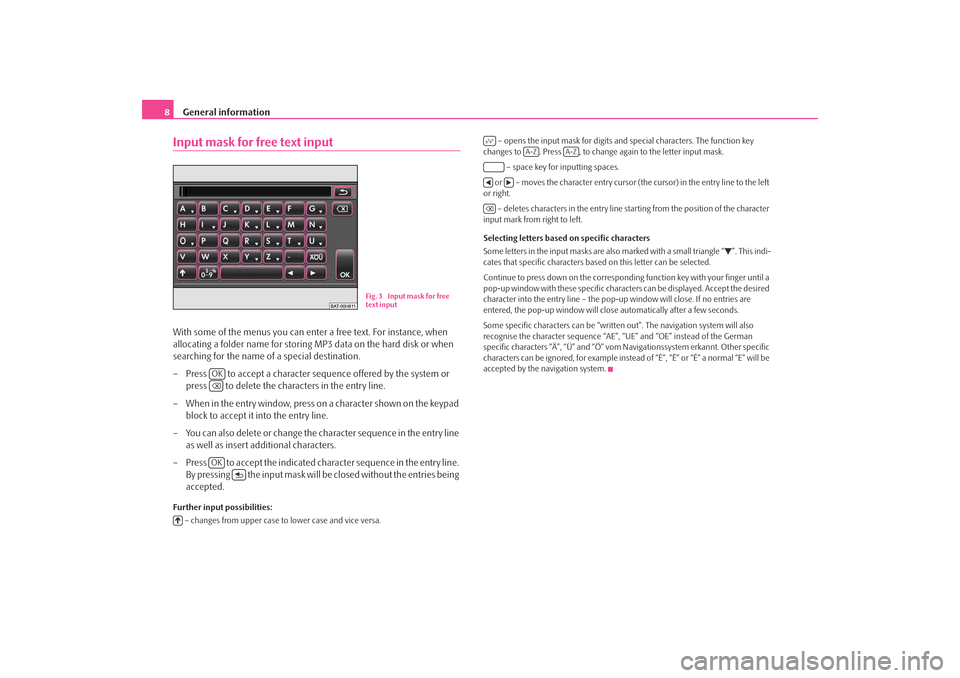
8Input mask for free text inputWith some of the menus you can enter a free text. For instance, when
allocating a folder name for storing MP3 data on the hard disk or when
searching for the name of a special destination.
– Press to accept a character sequ ence offered by the system or
press to delete the characters in the entry line.
– When in the entry window, press on a character shown on the keypad block to accept it into the entry line.
– You can also delete or change the character sequence in the entry line as well as insert additional characters.
– Press to accept the indicated character sequence in the entry line. By pressing the input mask will be closed without the entries being
accepted.Further input possibilities:
– changes from upper case to lower case and vice versa. – opens the input mask for digits and special characters. The function key
changes to . Press , to change again to the letter input mask.
– space key for inputting spaces.
or – moves the character entry cursor (the cursor) in the entry line to the left
or right.
– deletes characters in the entry line st arting from the position of the character
input mark from right to left.
Selecting letters based on specific characters
Some letters in the input masks are also marked with a small triangle “
”. This indi-
cates that specific characters base d on this letter can be selected.
Continue to press down on the correspondin g function key with your finger until a
pop-up window with these specific characte rs can be displayed. Accept the desired
character into the entry line – the pop-up window will close. If no entries are
entered, the pop-up window will clos e automatically after a few seconds.
Some specific characters can be “written out”. The navigation system will also
recognise the character sequence “AE”, “UE” and “OE” instead of the German
specific characters “Ä”, “Ü” and “Ö” vom Navigationssystem erkannt. Other specific
characters can be ignored, for example instead of “É”, “Ê” or “È” a normal “E” will be
accepted by the navigation system.
Fig. 3 Input mask for free
text input
OKOK
A-Z
A-Z
s2u4.6.book Page 8 Wednesday, August 13, 2008 7:57 AM
Page 14 of 75
Selector key SETUP
12Selector key SETUPMain menu set-ups (Setup)– Press the selector key to open the main menu Set-ups.Overview of the set-up menus
– When in the radio mode, carry out set-ups for the function of the arrow
keys , for the displayed memory keys, the memory list and the TMC traffic reports
⇒ page 12, “Radio set-ups”.
– Carry out set-ups for the map display and select symbols for the display in
the map ⇒page 13, “Map set-ups”.
– Select preferred TMC station and determine the area for TMC
announcements ⇒page 13, “Traffic station set-ups”.
– Adjust the brightness of the touc h-screen, day/night design of the map
display and select/deselect the confirmation tone for the key depression stroke
⇒ page 14, “Touch-screen set-ups”.
– Determine the set-ups for the play and display of MP3 data and activate
or deactivate the external connections ⇒page 14, “Media set-ups”.
– Determine the set-ups for receiving driving recommendations, define
or change an address to a home address and start a virtual demonstration drive
with a manually set starting point ⇒page 15, “Navigation set-ups”.
– Change the system set-ups such as voice response and time and take
back or erase stored set-ups in individual areas ⇒page 15, “System set-ups”.
– Carry out set-ups for voice response with an inserted Video DVD and
adjust the aspect ratio of the touch-screen. It is also possible to adjust the audio
video standard ⇒page 16, “Video set-ups”when operating an external media
source as well as carrying out the set-ups for the TV operation.
– Update the phone book in the unit, erase all call lists and modify the
assignment of the shortcut keys ⇒page 16, “Phone set-ups”.
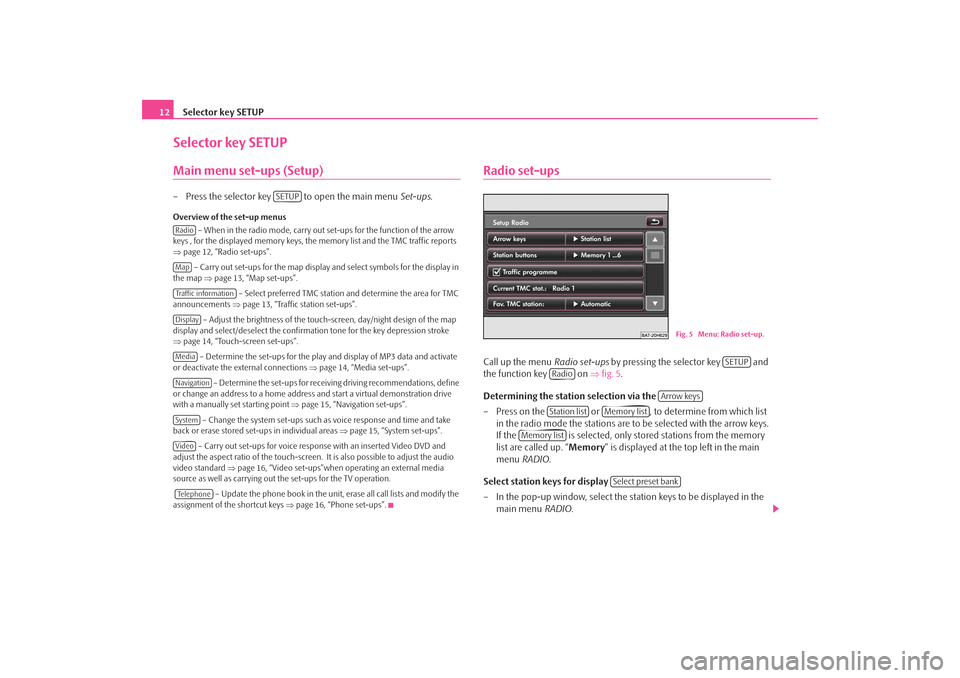
Radio set-upsCall up the menu Radio set-ups by pressing the selector key and
the function key on ⇒fig. 5 .
Determining the station selection via the
– Press on the or , to determine from which list in the radio mode the stations are to be selected with the arrow keys.
If the is selected, only stor ed stations from the memory
list are called up. “ Memory” is displayed at the top left in the main
menu RADIO .
Select station keys for display
– In the pop-up window, select the st ation keys to be displayed in the
main menu RADIO.
SETUP
RadioMapTraffic informationDisplayMediaNavigationSystemVideoTe l e p h o n e
Fig. 5 Menu: Radio set-up.
SETUP
Radio
Arrow keys
Station list
Memory list
Memory list
Select preset bank
s2u4.6.book Page 12 Wednesday, August 13, 2008 7:57 AM
Page 15 of 75
Selector key SETUP13
Switching the traffic information on or off
– In the menu Radio set-ups, press the function key
to switch the transmission of traffic announcements on or off. A tick in
the check box
indicates that the traffic radio function is already
switched on.
Selecting preferred TMC stations
– In the menu Radio set-ups the function key
indicates the TMC station from which current TMC traffic reports are
received.
– Press on the function key behind and choose your
prefered TMC station.
– Press on if you wish your unit to automatically search for a TMC station.
Erasing the memory list
– Press the function key and confirm the following
safety interrogation in order to eras e all radio stations stored in the
memory list.
Switching the RDS function on or off (RDS regional)*
– Press on the function key (regional station) and select a
set-up in the opening pop-up window.
– Press on the button , doing so always chooses the frequency for the heard radio station, which offers the best reception
at the present time.
– When pressing on the button , the unit attempts to hold a radio station emitting regionally long enough until the reception quality is
so bad, that there is a risk of a program loss.
You can select the following functions: Preferred TMC station
If the “preferred” TMC station can no long
er be received, the system automatically
searches for the TMC station offering the best reception for the currently driven
area. You can determine in the Radio set-ups from which TMC station the reports
are to be announced.
Map set-upsCall up the menu Map set-ups by pressing the selector key and
the function key .Position of the additional window
Intended for positioning the additional window in the map display.
Selecting displayable map details
Press to select a map detail which is to be displayed. Selected map details are indi-
cated by a tick in the check box
and at the bottom in the entry line.
Display favourite symbol
If the checkbox is activated
, the destinations stored as favourite destination will
be displayed in the map with the symbol of the selected favourite destination.
Traffic station set-upsCall up the menu Traffic station set-ups by pressing the selector key
and the function key .Selecting preferred TMC station
Press on if you wish your unit to automatically search for a TMC station.
Selecting displayable announcements
Press if, during route guidance, only the TMC traffic announcements
relating to the traffic problems along your route should be dislayed. If you press on
, all current TMC traffic announcements are displayed.
Traffic program (TP)
Current TMC station: ...
Fa v. T M C s t a t i o n
Automatic
Delete memory list
RDS regional
Automatic
Fix
SETUP
Map
Split screenMap details
SETUP
Traffic informationFa v. T M C s t a t i o n
Automatic
TMC filter
On route
All announcements
s2u4.6.book Page 13 Wednesday, August 13, 2008 7:57 AM
Page 16 of 75
Selector key SETUP
14Switching the traffic announcements on or off
A tick in the check box
indicates that the traffic radio function is already switched
on.
Touch-screen set-upsCall up the menu Touch-screen set-ups by pressing the selector key
and the function key .
Brightness
– Press on the function key behind and select a setting
in the pop-up window.
– Press the function key if the brightness of the touch-screen
should automatically be adapted to the current light conditions via the
sensors on the unit.
– Press one of the other function keys to manually adjust the brightness of the touch-screen.
Day/Night
– Press on the function key behind and select a setting in the pop-up window.
– Press the function key if switching the headlights on and off should also change the map display from night to day design.
– Press the function key or to manually determine the night and day design of the map display.
Confirmation tone
– Press on the function key behind and select a
setting in the pop-up window. – Press or to switch the tone for confirmation of a function key
operation on the touch-screen on or off.
Note
Please note that manual adjustment of the touch-screen in unfavourable condi-
tions can lead to the displays in the touc h-screen no longer being clearly visible.Media set-upsCall up the menu Media set-ups by pressing the selector key and
the function key .
– Activate the check boxes before entering details
, by pressing the
corresponding function key.
Function keys in the menu – Media set-ups
– for the playback of an optional external audio* or video source*,
if a TV tuner is installed.
– for the playback of an external audio source*.
- Setting of the input sensitivity for an external source*. – according to the set-ups the title and performer name
or only the data and folder name will be displayed for audio CDs with CD texts and
in the MP3 operation.
– plays all MP3 data one after the other
according to the sequence on the played medium, which are stored in the folders
and sub-folders.
* - enables a wireless transfer of MP3 data to the telephone
preinstallation.
Traffic program (TP)
SETUP
Display
Brightness level
Automatic
Day/Night
AutomaticDay
Night
Confirmation tone
On
Off
SETUP
Media
Activate AV inputActivate AUX inputAUX input levelDeactivate artist/track nameScan/Mix/Repeat including subfolderActivate Bluetooth audio
s2u4.6.book Page 14 Wednesday, August 13, 2008 7:57 AM
Page 17 of 75
Selector key SETUP15
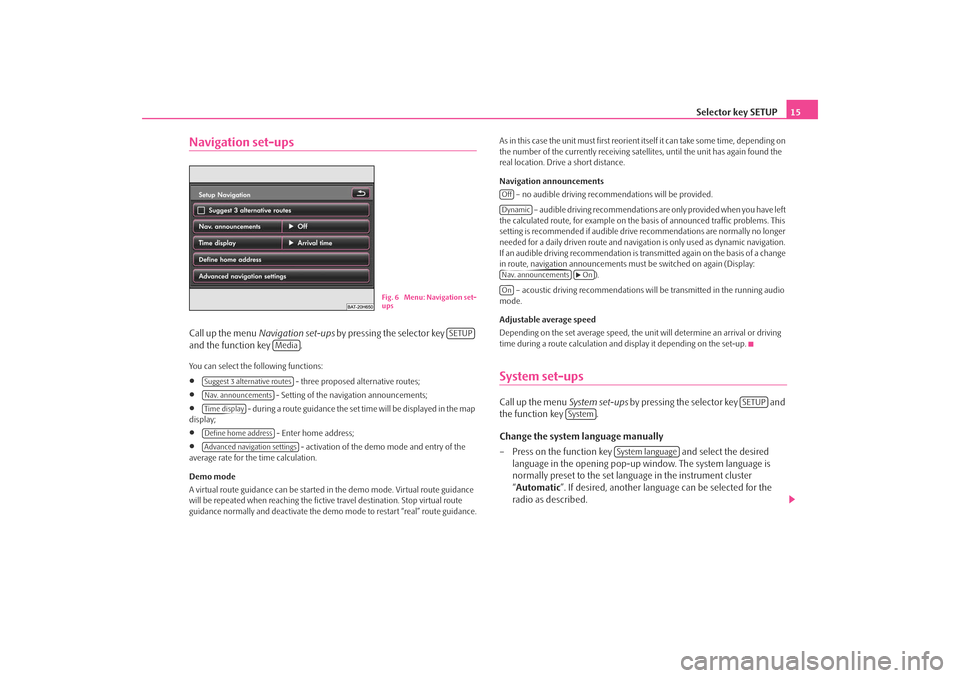
Navigation set-upsCall up the menu Navigation set-ups by pressing the selector key
and the function key .You can select the following functions:•
- three proposed alternative routes;
•
- Setting of the navigation announcements;
•
- during a route guidance the set time will be displayed in the map
display;
•
- Enter home address;
•
- activation of the demo mode and entry of the
average rate for the time calculation.
Demo mode
A virtual route guidance can be started in the demo mode. Virtual route guidance
will be repeated when reaching the fictiv e travel destination. Stop virtual route
guidance normally and deactivate the demo mode to restart “real” route guidance. As in this case the unit must first reorient itself it can take some time, depending on
the number of the currently receiving satellites, until the unit has again found the
real location. Drive a short distance.
Navigation announcements
– no audible driving recomme ndations will be provided.
– audible driving recommendations are only provided when you have left
the calculated route, for example on the basis of announced traffic problems. This
setting is recommended if audible drive recommendations are normally no longer
needed for a daily driven route and navigati on is only used as dynamic navigation.
If an audible driving recommendation is transmitted again on the basis of a change
in route, navigation announcements mu st be switched on again (Display:
).
– acoustic driving recommendations wi ll be transmitted in the running audio
mode.
Adjustable average speed
Depending on the set average speed, the unit will determine an arrival or driving
time during a route calculation and display it depending on the set-up.
System set-upsCall up the menu System set-ups by pressing the selector key and
the function key .
Change the system language manually
– Press on the function key and select the desired
language in the opening pop-up window. The system language is
normally preset to the set language in the instrument cluster
“ Automatic ”. If desired, another langua ge can be selected for the
radio as described.
Fig. 6 Menu: Navigation set-
ups
SETUP
Media
Suggest 3 alternative routesNav. announcementsTime displayDefine home addressAdvanced navigation settings
OffDynamicNav. announcements
On
On
SETUP
System
System language
s2u4.6.book Page 15 Wednesday, August 13, 2008 7:57 AM