Page 17 of 75
 Columbus Navigation System Manual Selector key SETUP15
Navigation set-upsCall up the menu Navigation set-ups by pressing the selector key
and the function key .You can select the following functions:•
- three proposed alternati")
Selector key SETUP15
Navigation set-upsCall up the menu Navigation set-ups by pressing the selector key
and the function key .You can select the following functions:•
- three proposed alternative routes;
•
- Setting of the navigation announcements;
•
- during a route guidance the set time will be displayed in the map
display;
•
- Enter home address;
•
- activation of the demo mode and entry of the
average rate for the time calculation.
Demo mode
A virtual route guidance can be started in the demo mode. Virtual route guidance
will be repeated when reaching the fictiv e travel destination. Stop virtual route
guidance normally and deactivate the demo mode to restart “real” route guidance. As in this case the unit must first reorient itself it can take some time, depending on
the number of the currently receiving satellites, until the unit has again found the
real location. Drive a short distance.
Navigation announcements
– no audible driving recomme ndations will be provided.
– audible driving recommendations are only provided when you have left
the calculated route, for example on the basis of announced traffic problems. This
setting is recommended if audible drive recommendations are normally no longer
needed for a daily driven route and navigati on is only used as dynamic navigation.
If an audible driving recommendation is transmitted again on the basis of a change
in route, navigation announcements mu st be switched on again (Display:
).
– acoustic driving recommendations wi ll be transmitted in the running audio
mode.
Adjustable average speed
Depending on the set average speed, the unit will determine an arrival or driving
time during a route calculation and display it depending on the set-up.
System set-upsCall up the menu System set-ups by pressing the selector key and
the function key .
Change the system language manually
– Press on the function key and select the desired
language in the opening pop-up window. The system language is
normally preset to the set language in the instrument cluster
“ Automatic ”. If desired, another langua ge can be selected for the
radio as described.
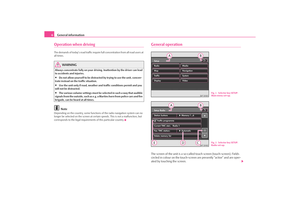
Fig. 6 Menu: Navigation set-
ups
SETUP
Media
Suggest 3 alternative routesNav. announcementsTime displayDefine home addressAdvanced navigation settings
OffDynamicNav. announcements
On
On
SETUP
System
System language
s2u4.6.book Page 15 Wednesday, August 13, 2008 7:57 AM
Page 18 of 75
 Columbus Navigation System Manual Selector key SETUP
16
Changing system set-ups
– Press on one of the function keys and select the desired setting in the pop-up window.
– You will therefore set a voice response for the spoken text")
Selector key SETUP
16
Changing system set-ups
– Press on one of the function keys and select the desired setting in the pop-up window.
– You will therefore set a voice response for the spoken text and the displays in the touch-screen, chan ge the distance and temperature
setting or the time and date format.
Resetting the factory settings on the unit
– Press on the function key in the menu System set-ups .
– Now find the settings you wish to reset.
– If you press on the function key and confirm the following safety interrogation the selected settings will reset the factory settings
and all the stored data will be erased.
Time display*
– Press on the function key in the menu System set-ups .
– Time display in the operating modes radio, media and map.“ Time ” and “ Date” settings need only be carr ied out manually under certain
circumstances. Time and date will norma lly be accepted automatically from the
vehicle into the unit.Video set-upsVideo set-ups is called up by pressing the selector key and the
function key .
Changing voice response
– Press the function key , or in
the menu Video set-ups and select the desired language in the pop-up
window. – Pressing will fully switch
off the display of sub-titles.
Changing the aspect ratio of the touch-screen display
– The currently set aspect ratio is visible behind the function key .
– Press on the function key and on or in the pop- up window. All video data will now be replayed in the set aspect ratio.
Set-ups for vehicles with TV tuner
If a TV tuner is connected to the unit, you will find here further set-up possibilities.Phone set-upsCall up the menu Phone set-ups by pressing the selector key and
the function key .
Updating phone data in the unit
– Press on the function key to update all entries in
the unit, the phone book of the mobile phone or the SIM card entered
since the last connection. This procedure can take a few minutes.
– Confirm the following safety interrogation. The “old” data in the phone book can still be selected at the unit while the data is being
updated.
Deleting call lists
– Press the function key .
– If you confirm the following safe ty interrogation by pressing ,
the stored call numbers of all calls made and calls accepted in the unit
will be deleted.
Fa c t o r y s e t t i n g s
Reset
Time display
SETUP
Video
Audio language
Menu language
Subtitle
Off
DVD-Format
DVD format
4:3
16:9
SETUP
Te l e p h o n e
Load telephone book
Delete call list
Delete
s2u4.6.book Page 16 Wednesday, August 13, 2008 7:57 AM
Page 19 of 75
Selector key SETUP17
Modifying assigned shortcut keys
– Press the function key to modify the assigned shortcut keys.
– To change the assignment of a particular shortcut key, select the respective shortcut key by pressing the key in the following menu.
Note
The selection possibilities of the phone set-up depend on the relevant telephone
preinstallation.
Speed dial
s2u4.6.book Page 17 Wednesday, August 13, 2008 7:57 AM
Page 20 of 75
 Columbus Navigation System Manual RADIO selector key
18RADIO selector keyRadio modeSelecting a radio stationAll radio stations with strong reception are automatically stored in the list
of stations. The list of stations is automatica")
RADIO selector key
18RADIO selector keyRadio modeSelecting a radio stationAll radio stations with strong reception are automatically stored in the list
of stations. The list of stations is automatically updated on a regular basis.
Call up main menu RADIO and choose frequency range
– Press the selector key to call up the main RADIO menu. The
currently heard radio station is indicated at the top of the touch-
screen.
– Press the selector key to change the frequency range. Alterna- tively, press on the function key in the main menu RADIO and
on or in the pop-up window. The current frequency range is
indicated on the top left on the touch-screen. Changing radio station
– When pressing the arrow keys on th
e unit or the arrow keys on the
touch-screen of the main menu RADIO ⇒ fig. 7 , you change to the
previous or following station.
Selecting a radio station from the station list
– Press the function key to display all radio stations that can currently be received. The list “skips” directly to the display of the
currently heard radio station.
Scan function
– Press the set button on the bottom right of unit to start the auto-
matic play for the current frequency range. All radio stations with
strong reception are automatically played for approximately five
seconds according to the sequence in the station list.
– Alternatively, press on the function key and press on in the pop-up window.
– Press the set button or function key again to end the auto- matic play of the currently heard radio station.
Manual station finding
– Turn the set button , to adjust a radio station manually via its station
frequency. The scale of the selected frequency range is inserted in the
frequency band in the lower part of the touch-screen.
– Briefly press the Set button to terminate the manual frequency selec- tion and to display once again the lower function keys.
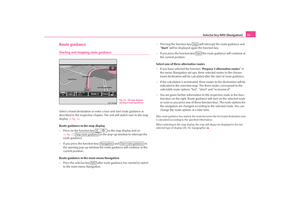
Fig. 7 Main menu RADIO
RADIO
RADIO
Band
FM
AM
A3
Station list
A8
Extras
Scan
A8
Scan
A8
s2u4.6.book Page 18 Wednesday, August 13, 2008 7:57 AM
Page 21 of 75
 Columbus Navigation System Manual RADIO selector key19
Note
•
If “ memory ” appears at the top left of the touch-screen, you can only change
over to the stations stored in the memory list with the help of the arrow keys.
Storin")
RADIO selector key19
Note
•
If “ memory ” appears at the top left of the touch-screen, you can only change
over to the stations stored in the memory list with the help of the arrow keys.
Storing a radio stationStoring a radio station on a displayed station key
– Continue to press one of the six station keys to displayed in the main menu RADIO until a signal tone sounds. The currently heard
radio station is then stored on this station key.
Storing a radio station
– Press the function key in the main menu RADIO to open the
memory list ⇒page 18, fig. 7 .
– Press the function key to ensure that the displayed radio station (Example: “ Radio 2”) is safely stored in a memory space.
– Select a memory space from the list by pressing the respective key in the menu select memory space. If a memory space is selected, which
already holds a radio station, it will be overwritten.
Deleting a radio station from the memory list
–Open the memory list.
– Press the function key behind the station you wish to delete.
– Confirm the safety interrogation by pressing to remove the station finally from the memory list.
Calling up a stored radio stationIf the currently heard radio station is already stored in the memory list, the
memory space number is displayed behind the description of the
frequency range ( FM or AM).
Calling up a station via the station keys
– Briefly press one of the six station keys to displayed in the main menu RADIO until a signal tone sounds.
Calling up a stored stations from the memory list
– Press to open the memory list.
– Press the display of the desire d station in the memory list.RDS functionRDS (“Radio Data System”) serves to transmit program identification and additional
services therefore also enabling automatic tracking of stations.
In the event of sufficiently satisfactory reception the suitable RDS radio stations will
display the station name instead of the station frequency.
If a radio station sends additional inform ation via the RDS function while a station
is being stored, it can occur that the name of the radio station is later displayed
incorrectly in the memory list.
Changing station name
You can manually adapt the station name.
Choose the stored radio station and wait until the correct name is displayed on the
touch-screen. Continue to press on the display of the station name between the
arrow keys until “ Station name stored ” is displayed.
1 ...
6 ...
Memory
Save
Delete
1 ...
6 ...
Memory
s2u4.6.book Page 19 Wednesday, August 13, 2008 7:57 AM
Page 22 of 75
 Columbus Navigation System Manual RADIO selector key
20Traffic information function TPSwitching traffic information TP (Traffic Program) on or off
– Press the selector key to call up the main RADIO menu.
– Press the function ke")
RADIO selector key
20Traffic information function TPSwitching traffic information TP (Traffic Program) on or off
– Press the selector key to call up the main RADIO menu.
– Press the function key .
– Briefly press on in the opening pop-up window to switch the traffic information on or off. The display “ TP” in combination with a station name (e. g. in the station or memory
list), indicates a traffic information station.
Irrespective of which radio station is heard, an additional receiver part in the unit
ensures that a traffic information station can always be received as long as the traffic
information function is switched on.
The functionality of the function for the traffic information “ TP” is displayed at the
top right in the touchscreen.
If no traffic information st ation can be received becaus e, for example, radio recep-
tion is interrupted in general, “ No TP” will be displayed instead of “TP ”. Remember
that car parks, tunnels, high buildings or mountains can interrupt the radio signal
up to the total loss of reception.
Incoming traffic announcement
If you wish to interrupt the transmission of the traffic announcement, press on the
function key in the pop-up window Traffic announcement. The traffic infor-
mation function remains available and a following traffic announcement is made
again while the audio mode is in op eration. Pressing the function key
will switch off the traffic information function permanently.
RADIO
Extras
TP
Cancel
TP deactivateds2u4.6.book Page 20 Wednesday, August 13, 2008 7:57 AM
Page 23 of 75
 Columbus Navigation System Manual Selector key TRAFFIC21
Selector key TRAFFICDisplaying TMC traffic reportsTMC traffic reports are used during route guidance, depending on set-up
for the automatic optimization of the route, to repor")
Selector key TRAFFIC21
Selector key TRAFFICDisplaying TMC traffic reportsTMC traffic reports are used during route guidance, depending on set-up
for the automatic optimization of the route, to report possible traffic
problems.
– Press the function key to display the current traffic reports in a list.
– Press on the display of a traffic report to show it in a detailed display.
– You can browse though all the traffic information received In the detailed display, also in sequence by using the arrow keys.From which TMC station the reports are to be announced can be determined in the
Radio set-ups .
During route guidance all set-up dependin g TMC traffic reports are displayed in the
surrounding area of the location or only th ose specified on the calculated route list.
Traffic problems are illustrated in the de tailed display and in the map by a corre-
sponding symbol. The direction, in which a traffic problem is found in the map will
be displayed by an arrow in the symbol.
In the event of a traffic problem an alternative route can also be calculated manu-
ally.
Note
•
The unit has a continuous background of TMC traffic reports providing a TMC
station at the current location can be rece ived. The station you are listening to does
not have to be a TMC station.
•
TMC traffic reports can only be evaluate d and displayed by the unit if the navi-
gation data for the currentl y driven area is stored in the unit memory or can be
called up via an inserted navigation DVD.
•
The quality of the dynamic route guidance depends on the transmitted traffic
announcements. The radio stations broadcas ting this information are responsible
for the content.
•
TMC traffic reports are necessary for the dynamic Navigation.
•
There may not be any advantantage in avoiding the traffic jam if, as a result of
the TMC traffic reports, the dive rsion is also heavily congested.
TRAFFIC
s2u4.6.book Page 21 Wednesday, August 13, 2008 7:57 AM
Page 24 of 75
 Columbus Navigation System Manual Selector key MEDIA
22Selector key MEDIAGeneral information for CD/DVD operationAudio-CDs (CD-A) and Audio-DVDs, MP3-CDs and MP3-DVDs as well as Video-
DVDs can be played in the internal CD/DVD drive.")
Selector key MEDIA
22Selector key MEDIAGeneral information for CD/DVD operationAudio-CDs (CD-A) and Audio-DVDs, MP3-CDs and MP3-DVDs as well as Video-
DVDs can be played in the internal CD/DVD drive.
CD not legible
If the unit cannot read an inserted CD/DVD, “ CD fault will be displayed for a short
period of time. Please check the CD. ” or “incorrect data format. Data cannot be
read. ” and the CD/DVD is reinserted into the initial position after a few seconds.
If the CD/DVD is not taken out within 10 se conds, it is drawn in again for safety
reasons.
WARNING
•
The CD player is a 1st class laser produc t. There is a definite risk of injury
from invisible laser beams if it is opened.
•
The CD player contains no parts that have to be serviced or repaired.
Please contact your specialist garage if a mechanical defect occurs or the CD
player has to be repaired.Caution
•
Inserting a second CD/DVD while a CD/D VD is being ejected can destroy the
CD/DVD drive in the unit. Please note that the CD/DVD ejection lasts a few seconds
after pressing the Eject key During this time the lock in front of the CD/DVD
case is open. It is essential that you wa it until the CD/DVD has been fully ejected
before you try to insert a new CD/DVD.
•
If the CD/DVD drive becomes mechanical ly defective or a CD/DVD has been
inserted incorrectly or not fully, “ CD fault will be displayed. Please check the CD. ”
and then the “ DVD drive the fault ” indicated on the touch-screen. Please check
the CD/DVD and place it again correctl y and fully into the drive. If a “DVD drive
fault ” is indicated again, please contact your Škoda dealer.
•
If the inside temperature of the unit is too high, no CDs or DVDs will be
accepted. The unit switches into the last active operating mode.Note
•
If the function key is inactive, no new Audio CD/DVD has been inserted or
an inserted Audio CD/DVD is not readable.
•
It is possible that CDs protected by copyright and self-made CD-R, CD-RW and
DVD-RWs are not returned at all or only in certain circumstances.
•
WMA audio data (Windows Media Audio) can also be replayed by the unit and
stored on the hard disk (HDD) providing this has not been protected by the DRM
procedure copyright (Digital Rights Management). The operation and behaviour of
the unit complies with the MP3 compressed audio data and are not described
further.
•
Please observe the following information for the MP3 operation ⇒page 26.
•
Please comply with the national legal copyright requirements in your country.
•
The DVD drive installed into this unit uses a Dolby Digital
® Audio coding system
and MLP Lossless
® for highest reproduction quality even with standard Audio
DVDs. “Dolby
®”, “MLP Lossless
®” and the Double-D-Symbol are trademarks of
Dolby Laboratories
®.
•
With the help of “DTS
®” and “DTS 2.0
®” the surrounding sound of a DVD is
transformed and replayed in best stereo quality. “DTS
®” and “DTS 2.0
®” are regis-
tered trademarks of DTS, Inc.
CD
s2u4.6.book Page 22 Wednesday, August 13, 2008 7:57 AM


 Columbus Navigation System Manual Selector key SETUP17
Modifying assigned shortcut keys
– Press the function key to modify the assigned shortcut keys.
– To change the assignment of a particular shortcut key, select the respect")