Page 9 of 75
 Columbus Navigation System Manual General information7
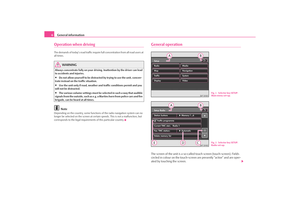
“Function keys” on the screen
– Active fields on the touch-screen, which call up a function or a menu,
are called “function keys”.
– When in the main menu press, for")
General information7
“Function keys” on the screen
– Active fields on the touch-screen, which call up a function or a menu,
are called “function keys”.
– When in the main menu press, for example Set-up on the func-
tion key ⇒page 6, fig. 1 , to call up ⇒page 6, fig. 2 the menu Set-up
radio . The headline indicates which menu you are in .
– By using the function key you can change back from each menu to the previous menu.
Moving objects or regulators
– Place your finger on the display of a moving object on the touch-
screen, for example the “sliding regulator” in a “scrollbar”
⇒ page 6, fig. 2 .
– Now move your finger over the touch-screen without interruption.
The object will follow your movement s, but can only be moved within
the pre-defined range.
– Lift the finger from the touch-screen at the desired position.
– To view the displayed menu section ⇒page 6, fig. 2 move the right
sliding regulator in the scrollbar completely to the bottom.
– Alternatively, you can move the slid ing regulator on the touch-screen
to the bottom and top by touchi ng the function keys and .
– A sliding regulator in a set-up bar
can alternatively be moved by
pressing or For example, on the touchscreen set-ups for the
video DVD operation.
If none of the function keys are displa yed on the touch-screen when the unit is
switched on (e.g. when a DVD is playing), press briefly on the touch-screen so that
the currently available function keys are shown. “Scrollbar”
The vertical bar on the right side of th
e touch-screen with a sliding regulator
between the arrow keys and is called a “scroll bar”. It indicates that further
menu entries become visible if the slidin g regulator is moved completely to the
bottom.
“Pop-up window”
A function key with an arrow
behind another function key shows the presently
selected set-up, e.g. with ⇒ page 6, fig. 2 .
If you press the function key on the touch-screen, a so-called “pop-up
window” will open where all possible set-up options are displayed.
Briefly press the desired set-up option. Th e pop-up window will disappear and the
newly selected set-up option is displayed in the function key . To close the
pop-up window without changing the set-up, press the function button in the pop-
up window .
“Check-box”
Some functions can only be switched on or off.
There is a so-called “check box” ⇒page 6, fig. 2 in front of a function which can
only be switched on or off. A tick in the check-box
indicates that the function is
switched on, an empty check-box
, indicates that it is switched off.
Briefly press the corresponding function key for switching on and off.
Radio
AA
AB
AC
-
+
AC
Fa v. T M C s t a t i o n
automatic
AD
...
...
AE
s2u4.6.book Page 7 Wednesday, August 13, 2008 7:57 AM
Page 10 of 75
 Columbus Navigation System Manual General information
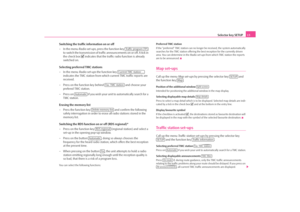
8Input mask for free text inputWith some of the menus you can enter a free text. For instance, when
allocating a folder name for storing MP3 data on the hard disk or when
search")
General information
8Input mask for free text inputWith some of the menus you can enter a free text. For instance, when
allocating a folder name for storing MP3 data on the hard disk or when
searching for the name of a special destination.
– Press to accept a character sequ ence offered by the system or
press to delete the characters in the entry line.
– When in the entry window, press on a character shown on the keypad block to accept it into the entry line.
– You can also delete or change the character sequence in the entry line as well as insert additional characters.
– Press to accept the indicated character sequence in the entry line. By pressing the input mask will be closed without the entries being
accepted.Further input possibilities:
– changes from upper case to lower case and vice versa. – opens the input mask for digits and special characters. The function key
changes to . Press , to change again to the letter input mask.
– space key for inputting spaces.
or – moves the character entry cursor (the cursor) in the entry line to the left
or right.
– deletes characters in the entry line st arting from the position of the character
input mark from right to left.
Selecting letters based on specific characters
Some letters in the input masks are also marked with a small triangle “
”. This indi-
cates that specific characters base d on this letter can be selected.
Continue to press down on the correspondin g function key with your finger until a
pop-up window with these specific characte rs can be displayed. Accept the desired
character into the entry line – the pop-up window will close. If no entries are
entered, the pop-up window will clos e automatically after a few seconds.
Some specific characters can be “written out”. The navigation system will also
recognise the character sequence “AE”, “UE” and “OE” instead of the German
specific characters “Ä”, “Ü” and “Ö” vom Navigationssystem erkannt. Other specific
characters can be ignored, for example instead of “É”, “Ê” or “È” a normal “E” will be
accepted by the navigation system.
Fig. 3 Input mask for free
text input
OKOK
A-Z
A-Z
s2u4.6.book Page 8 Wednesday, August 13, 2008 7:57 AM
Page 11 of 75
 Columbus Navigation System Manual General information9
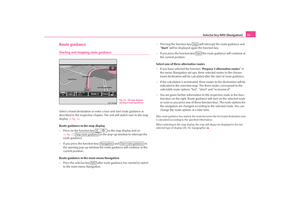
Input masks for digit entry– Press to accept an indicated character sequence or press , to
delete the characters in the entry line from right to left.
– Press one of the")
General information9
Input masks for digit entry– Press to accept an indicated character sequence or press , to
delete the characters in the entry line from right to left.
– Press one of the to function ke ys in the input mask to accept the
corresponding digit into the entry line.
– Press when the correct number is indicated in the entry line. By pressing the input mask will be closed without the entries being
accepted.Special functions*Parking aid
If your vehicle is equipped wi th “parking aid” and after it is activated, the distance
to the obstacle is shown on the screen.
Climatronic
If your vehicle is equipped with climatroni c, a feedback is received on the screen
when changing the settings. Display of time
You can switch the display of the time on or off in the menu
System set-ups.
Switching the system on and off– The system is switched on or off by turning / pressing the rotary / push
knob .The last active audio source before switching off will be repeated.
If the key is pulled out of the ignition lo ck with the unit switched on, the unit wil
switch off automatically.
You can then switch the unit on again. When the ignition is switched off, the unit
switches off automatically after approx. one hour (discharge protection of the
vehicle battery). This process can be repeated as often as necessary.Anti-theft protectionThe anti-theft coding of your navigation system prevents an operation of
the system after a voltage interruption, e.g. during a vehicle repair or after
theft. After disconnecting the batt ery, disconnecting the navigation
system from the on-board voltage of the vehicle and after a fuse failure,
the code must be entered before the vehicle can be used again.
Enter code
– If a keypad appears after switching on with the command to enter the code, the unit can be unlocked by entering the correct four-digit code
number. The number of the possible attempts is shown in the second
touch-screen line.
– Press a digit from to on the digit block displayed on the touch- screen. The digit is accepted in the entry line.
Fig. 4 Input masks for digit
entry
OK
0
9
OK
A1
0
9
s2u4.6.book Page 9 Wednesday, August 13, 2008 7:57 AM
Page 12 of 75
 Columbus Navigation System Manual General information
10
– After a four-digit order has been entered, the group of digits will turn grey (inactive) and no further digits can be accepted in the entry line.
– Press on the touch-sc")
General information
10
– After a four-digit order has been entered, the group of digits will turn grey (inactive) and no further digits can be accepted in the entry line.
– Press on the touch-screen to erase the digits in the entry line from right to left and thereby corr ect your input, if necessary.
– If the correct code number is displayed in the entry line, press .Code number
The code number can only be called up “onl ine” via the Škoda system, as this guar-
antees even more effective anti-theft protection. Please contact your Škoda dealer
if necessary.
Incorrect code number
If an incorrect code is confirmed afte r input, the procedure can be repeated one
more time . The number of possible attempts is shown in the second line on the
touch-screen.
If the code number is entered incorrectl y for the second time, the unit will be
blocked for approx. one hour. It is possible to enter again the safety code after one
hour has expired, when the unit and the ignition have been switched on.
If two invalid attempts are then made agai n, the navigation system will be blocked
again for an hour.
The cycle - two attempts, blocked for an hour - will continue to apply.
Note
The code is normally stored in the instrument cluster. This ensures that it is auto-
matically decoded (convenience coding). Ma nual input of the code is normally not
necessary.
OK
s2u4.6.book Page 10 Wednesday, August 13, 2008 7:57 AM
Page 13 of 75
 Columbus Navigation System Manual Range selector key TONE11
Range selector key TONESound settings By pressing the button , you can select the following parameters:•
- Setting of height, middle and depth;
•
- Volume ratio (left")
Range selector key TONE11
Range selector key TONESound settings By pressing the button , you can select the following parameters:•
- Setting of height, middle and depth;
•
- Volume ratio (left and right = balance), (front and rear = fader);
•
- , , ,
and * - Swi tch on v olume , volume of traffic announce-
ments, telephone calls and the parking aid;
•
- Speed dependent volume adaptation;
•
- switching on or off the confirmation tone when operating
the screen;
•
* - Activating the external DVD source;
•
* - Selecting the program type (lin ear, language, rock, classical,
dance);
•
* - setting of the surround-sound.
GALA function
Your radio increases automatically its volu me with the increasing vehicle speed. A
higher setting value results in a stronger volume increase.
Volume decrease for park distance control (PDC) *
If your vehicle is equipped with “parki ng aid”, the volume is automatically
decreased to a pre-defined value, wh en the “parking aid” is active.
Navigation announcements – audible driving recommendations from the navigation system are played
during the audio operation at a pre-set volume.
– audible driving recommendations are only provided when you have left
the calculated route, for example on the basis of announced traffic problems. This
setting is recommended if audible drive recommendations are normally no longer
needed for a daily driven route and navigati on is only used as dynamic navigation.
If an audible driving recommendation is transmitted again on the basis of a change in route, navigation announcements mu
st be switched on again (Display:
).
– no audible driving recommendations of the navigation system will be
transmitted.
TO NE
Treble-Mid-BassBalance FaderVo lume
Startup volume
Traffic announcements
Navigation
Te l e p h o n e v o l u m e
PDC level
GALAConfirmation toneAV outputEQ settingsSurround
OnDynamic
Nav. announcements
On
Off
s2u4.6.book Page 11 Wednesday, August 13, 2008 7:57 AM
Page 14 of 75
 Columbus Navigation System Manual Selector key SETUP
12Selector key SETUPMain menu set-ups (Setup)– Press the selector key to open the main menu Set-ups.Overview of the set-up menus
– When in the radio mode, carry out set-ups")
Selector key SETUP
12Selector key SETUPMain menu set-ups (Setup)– Press the selector key to open the main menu Set-ups.Overview of the set-up menus
– When in the radio mode, carry out set-ups for the function of the arrow
keys , for the displayed memory keys, the memory list and the TMC traffic reports
⇒ page 12, “Radio set-ups”.
– Carry out set-ups for the map display and select symbols for the display in
the map ⇒page 13, “Map set-ups”.
– Select preferred TMC station and determine the area for TMC
announcements ⇒page 13, “Traffic station set-ups”.
– Adjust the brightness of the touc h-screen, day/night design of the map
display and select/deselect the confirmation tone for the key depression stroke
⇒ page 14, “Touch-screen set-ups”.
– Determine the set-ups for the play and display of MP3 data and activate
or deactivate the external connections ⇒page 14, “Media set-ups”.
– Determine the set-ups for receiving driving recommendations, define
or change an address to a home address and start a virtual demonstration drive
with a manually set starting point ⇒page 15, “Navigation set-ups”.
– Change the system set-ups such as voice response and time and take
back or erase stored set-ups in individual areas ⇒page 15, “System set-ups”.
– Carry out set-ups for voice response with an inserted Video DVD and
adjust the aspect ratio of the touch-screen. It is also possible to adjust the audio
video standard ⇒page 16, “Video set-ups”when operating an external media
source as well as carrying out the set-ups for the TV operation.
– Update the phone book in the unit, erase all call lists and modify the
assignment of the shortcut keys ⇒page 16, “Phone set-ups”.
Radio set-upsCall up the menu Radio set-ups by pressing the selector key and
the function key on ⇒fig. 5 .
Determining the station selection via the
– Press on the or , to determine from which list in the radio mode the stations are to be selected with the arrow keys.
If the is selected, only stor ed stations from the memory
list are called up. “ Memory” is displayed at the top left in the main
menu RADIO .
Select station keys for display
– In the pop-up window, select the st ation keys to be displayed in the
main menu RADIO.
SETUP
RadioMapTraffic informationDisplayMediaNavigationSystemVideoTe l e p h o n e
Fig. 5 Menu: Radio set-up.
SETUP
Radio
Arrow keys
Station list
Memory list
Memory list
Select preset bank
s2u4.6.book Page 12 Wednesday, August 13, 2008 7:57 AM
Page 15 of 75
 Columbus Navigation System Manual Selector key SETUP13
Switching the traffic information on or off
– In the menu Radio set-ups, press the function key
to switch the transmission of traffic announcements on or off. A tick in
the")
Selector key SETUP13
Switching the traffic information on or off
– In the menu Radio set-ups, press the function key
to switch the transmission of traffic announcements on or off. A tick in
the check box
indicates that the traffic radio function is already
switched on.
Selecting preferred TMC stations
– In the menu Radio set-ups the function key
indicates the TMC station from which current TMC traffic reports are
received.
– Press on the function key behind and choose your
prefered TMC station.
– Press on if you wish your unit to automatically search for a TMC station.
Erasing the memory list
– Press the function key and confirm the following
safety interrogation in order to eras e all radio stations stored in the
memory list.
Switching the RDS function on or off (RDS regional)*
– Press on the function key (regional station) and select a
set-up in the opening pop-up window.
– Press on the button , doing so always chooses the frequency for the heard radio station, which offers the best reception
at the present time.
– When pressing on the button , the unit attempts to hold a radio station emitting regionally long enough until the reception quality is
so bad, that there is a risk of a program loss.
You can select the following functions: Preferred TMC station
If the “preferred” TMC station can no long
er be received, the system automatically
searches for the TMC station offering the best reception for the currently driven
area. You can determine in the Radio set-ups from which TMC station the reports
are to be announced.
Map set-upsCall up the menu Map set-ups by pressing the selector key and
the function key .Position of the additional window
Intended for positioning the additional window in the map display.
Selecting displayable map details
Press to select a map detail which is to be displayed. Selected map details are indi-
cated by a tick in the check box
and at the bottom in the entry line.
Display favourite symbol
If the checkbox is activated
, the destinations stored as favourite destination will
be displayed in the map with the symbol of the selected favourite destination.
Traffic station set-upsCall up the menu Traffic station set-ups by pressing the selector key
and the function key .Selecting preferred TMC station
Press on if you wish your unit to automatically search for a TMC station.
Selecting displayable announcements
Press if, during route guidance, only the TMC traffic announcements
relating to the traffic problems along your route should be dislayed. If you press on
, all current TMC traffic announcements are displayed.
Traffic program (TP)
Current TMC station: ...
Fa v. T M C s t a t i o n
Automatic
Delete memory list
RDS regional
Automatic
Fix
SETUP
Map
Split screenMap details
SETUP
Traffic informationFa v. T M C s t a t i o n
Automatic
TMC filter
On route
All announcements
s2u4.6.book Page 13 Wednesday, August 13, 2008 7:57 AM
Page 16 of 75
 Columbus Navigation System Manual Selector key SETUP
14Switching the traffic announcements on or off
A tick in the check box
indicates that the traffic radio function is already switched
on.
Touch-screen set-upsCall up the menu")
Selector key SETUP
14Switching the traffic announcements on or off
A tick in the check box
indicates that the traffic radio function is already switched
on.
Touch-screen set-upsCall up the menu Touch-screen set-ups by pressing the selector key
and the function key .
Brightness
– Press on the function key behind and select a setting
in the pop-up window.
– Press the function key if the brightness of the touch-screen
should automatically be adapted to the current light conditions via the
sensors on the unit.
– Press one of the other function keys to manually adjust the brightness of the touch-screen.
Day/Night
– Press on the function key behind and select a setting in the pop-up window.
– Press the function key if switching the headlights on and off should also change the map display from night to day design.
– Press the function key or to manually determine the night and day design of the map display.
Confirmation tone
– Press on the function key behind and select a
setting in the pop-up window. – Press or to switch the tone for confirmation of a function key
operation on the touch-screen on or off.
Note
Please note that manual adjustment of the touch-screen in unfavourable condi-
tions can lead to the displays in the touc h-screen no longer being clearly visible.Media set-upsCall up the menu Media set-ups by pressing the selector key and
the function key .
– Activate the check boxes before entering details
, by pressing the
corresponding function key.
Function keys in the menu – Media set-ups
– for the playback of an optional external audio* or video source*,
if a TV tuner is installed.
– for the playback of an external audio source*.
- Setting of the input sensitivity for an external source*. – according to the set-ups the title and performer name
or only the data and folder name will be displayed for audio CDs with CD texts and
in the MP3 operation.
– plays all MP3 data one after the other
according to the sequence on the played medium, which are stored in the folders
and sub-folders.
* - enables a wireless transfer of MP3 data to the telephone
preinstallation.
Traffic program (TP)
SETUP
Display
Brightness level
Automatic
Day/Night
AutomaticDay
Night
Confirmation tone
On
Off
SETUP
Media
Activate AV inputActivate AUX inputAUX input levelDeactivate artist/track nameScan/Mix/Repeat including subfolderActivate Bluetooth audio
s2u4.6.book Page 14 Wednesday, August 13, 2008 7:57 AM