2008 NISSAN TIIDA connector d2
[x] Cancel search: connector d2Page 1440 of 2771
EC-366
< SERVICE INFORMATION >
DTC P0453 EVAP CONTROL SYSTEM PRESSURE SENSOR
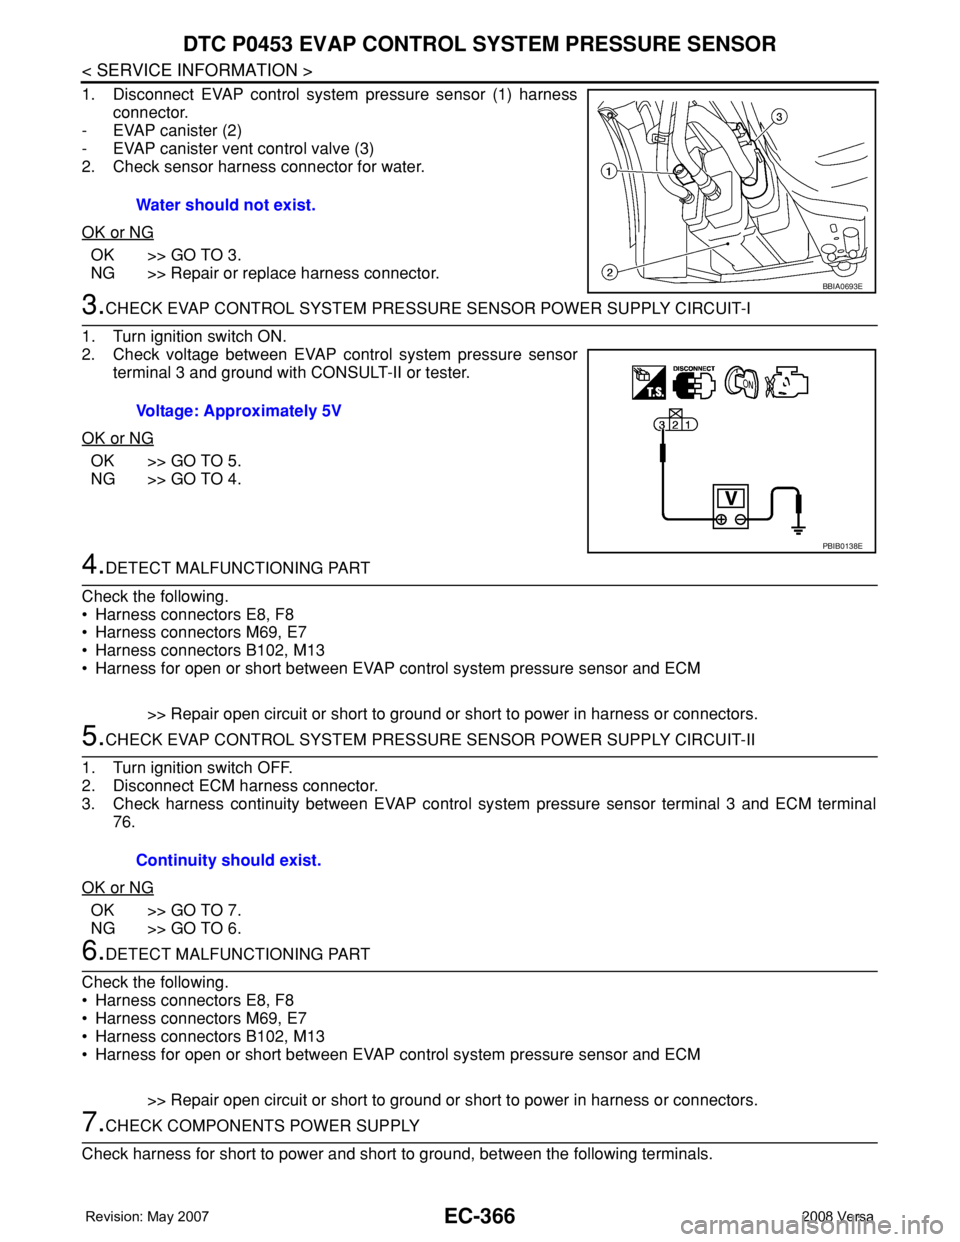
1. Disconnect EVAP control system pressure sensor (1) harness
connector.
- EVAP canister (2)
- EVAP canister vent control valve (3)
2. Check sensor harness connector for water.
OK or NG
OK >> GO TO 3.
NG >> Repair or replace harness connector.
3.CHECK EVAP CONTROL SYSTEM PRESSURE SENSOR POWER SUPPLY CIRCUIT-I
1. Turn ignition switch ON.
2. Check voltage between EVAP control system pressure sensor
terminal 3 and ground with CONSULT-II or tester.
OK or NG
OK >> GO TO 5.
NG >> GO TO 4.
4.DETECT MALFUNCTIONING PART
Check the following.
• Harness connectors E8, F8
• Harness connectors M69, E7
• Harness connectors B102, M13
• Harness for open or short between EVAP control system pressure sensor and ECM
>> Repair open circuit or short to ground or short to power in harness or connectors.
5.CHECK EVAP CONTROL SYSTEM PRESSURE SENSOR POWER SUPPLY CIRCUIT-II
1. Turn ignition switch OFF.
2. Disconnect ECM harness connector.
3. Check harness continuity between EVAP control system pressure sensor terminal 3 and ECM terminal
76.
OK or NG
OK >> GO TO 7.
NG >> GO TO 6.
6.DETECT MALFUNCTIONING PART
Check the following.
• Harness connectors E8, F8
• Harness connectors M69, E7
• Harness connectors B102, M13
• Harness for open or short between EVAP control system pressure sensor and ECM
>> Repair open circuit or short to ground or short to power in harness or connectors.
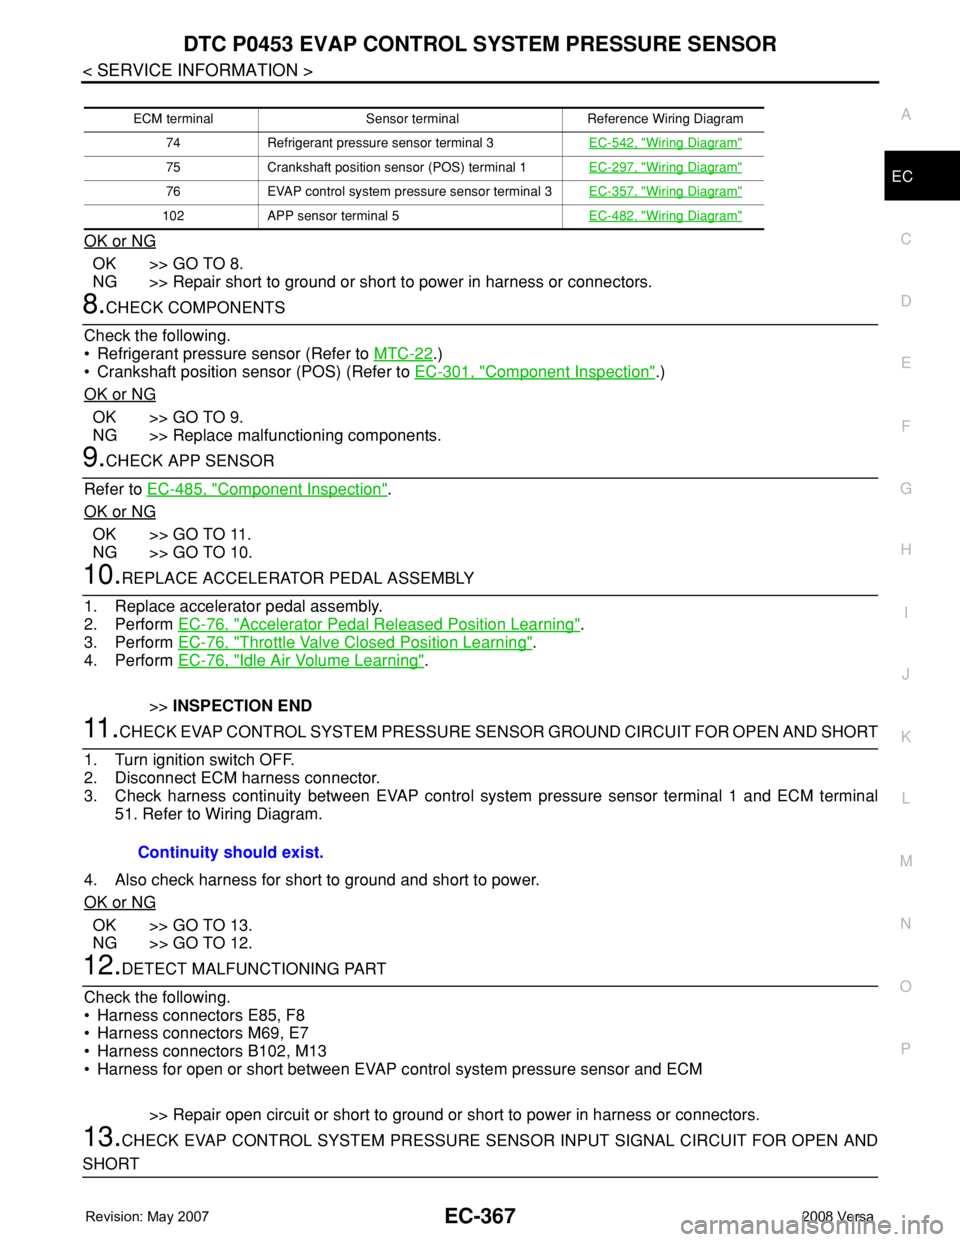
7.CHECK COMPONENTS POWER SUPPLY
Check harness for short to power and short to ground, between the following terminals.Water should not exist.
BBIA0693E
Voltage: Approximately 5V
PBIB0138E
Continuity should exist.
Page 1441 of 2771
DTC P0453 EVAP CONTROL SYSTEM PRESSURE SENSOR
EC-367
< SERVICE INFORMATION >
C
D
E
F
G
H
I
J
K
L
MA
EC
N
P O
OK or NG
OK >> GO TO 8.
NG >> Repair short to ground or short to power in harness or connectors.
8.CHECK COMPONENTS
Check the following.
• Refrigerant pressure sensor (Refer to MTC-22
.)
• Crankshaft position sensor (POS) (Refer to EC-301, "
Component Inspection".)
OK or NG
OK >> GO TO 9.
NG >> Replace malfunctioning components.
9.CHECK APP SENSOR
Refer to EC-485, "
Component Inspection".
OK or NG
OK >> GO TO 11.
NG >> GO TO 10.
10.REPLACE ACCELERATOR PEDAL ASSEMBLY
1. Replace accelerator pedal assembly.
2. Perform EC-76, "
Accelerator Pedal Released Position Learning".
3. Perform EC-76, "
Throttle Valve Closed Position Learning".
4. Perform EC-76, "
Idle Air Volume Learning".
>>INSPECTION END
11 .CHECK EVAP CONTROL SYSTEM PRESSURE SENSOR GROUND CIRCUIT FOR OPEN AND SHORT
1. Turn ignition switch OFF.
2. Disconnect ECM harness connector.
3. Check harness continuity between EVAP control system pressure sensor terminal 1 and ECM terminal
51. Refer to Wiring Diagram.
4. Also check harness for short to ground and short to power.
OK or NG
OK >> GO TO 13.
NG >> GO TO 12.
12.DETECT MALFUNCTIONING PART
Check the following.
• Harness connectors E85, F8
• Harness connectors M69, E7
• Harness connectors B102, M13
• Harness for open or short between EVAP control system pressure sensor and ECM
>> Repair open circuit or short to ground or short to power in harness or connectors.
13.CHECK EVAP CONTROL SYSTEM PRESSURE SENSOR INPUT SIGNAL CIRCUIT FOR OPEN AND
SHORT
ECM terminal Sensor terminal Reference Wiring Diagram
74 Refrigerant pressure sensor terminal 3EC-542, "
Wiring Diagram"
75 Crankshaft position sensor (POS) terminal 1EC-297, "Wiring Diagram"
76 EVAP control system pressure sensor terminal 3EC-357, "Wiring Diagram"
102 APP sensor terminal 5EC-482, "Wiring Diagram"
Continuity should exist.
Page 1442 of 2771
EC-368
< SERVICE INFORMATION >
DTC P0453 EVAP CONTROL SYSTEM PRESSURE SENSOR
1. Check harness continuity between ECM terminal 42 and EVAP control system pressure sensor terminal
2. Refer to Wiring Diagram.
2. Also check harness for short to ground and short to power.
OK or NG
OK >> GO TO 15.
NG >> GO TO 14.
14.DETECT MALFUNCTIONING PART
Check the following.
• Harness connectors E8, F8
• Harness connectors M69, E7
• Harness connectors B102, M13
• Harness for open or short between ECM and EVAP control system pressure sensor
>> Repair open circuit or short to ground or short to power in harness or connectors.
15.CHECK RUBBER TUBE
1. Disconnect rubber tube connected to EVAP canister vent control valve.
2. Check the rubber tube for clogging, vent and kinked.
OK or NG
OK >> GO TO 16.
NG >> Clean the rubber tube using an air blower, repair or replace rubber tube.
16.CHECK EVAP CANISTER VENT CONTROL VALVE
Refer to EC-343, "
Component Inspection".
OK or NG
OK >> GO TO 17.
NG >> Replace EVAP canister vent control valve.
17.CHECK EVAP CONTROL SYSTEM PRESSURE SENSOR
Refer to EC-369, "
Component Inspection".
OK or NG
OK >> GO TO 18.
NG >> Replace EVAP control system pressure sensor.
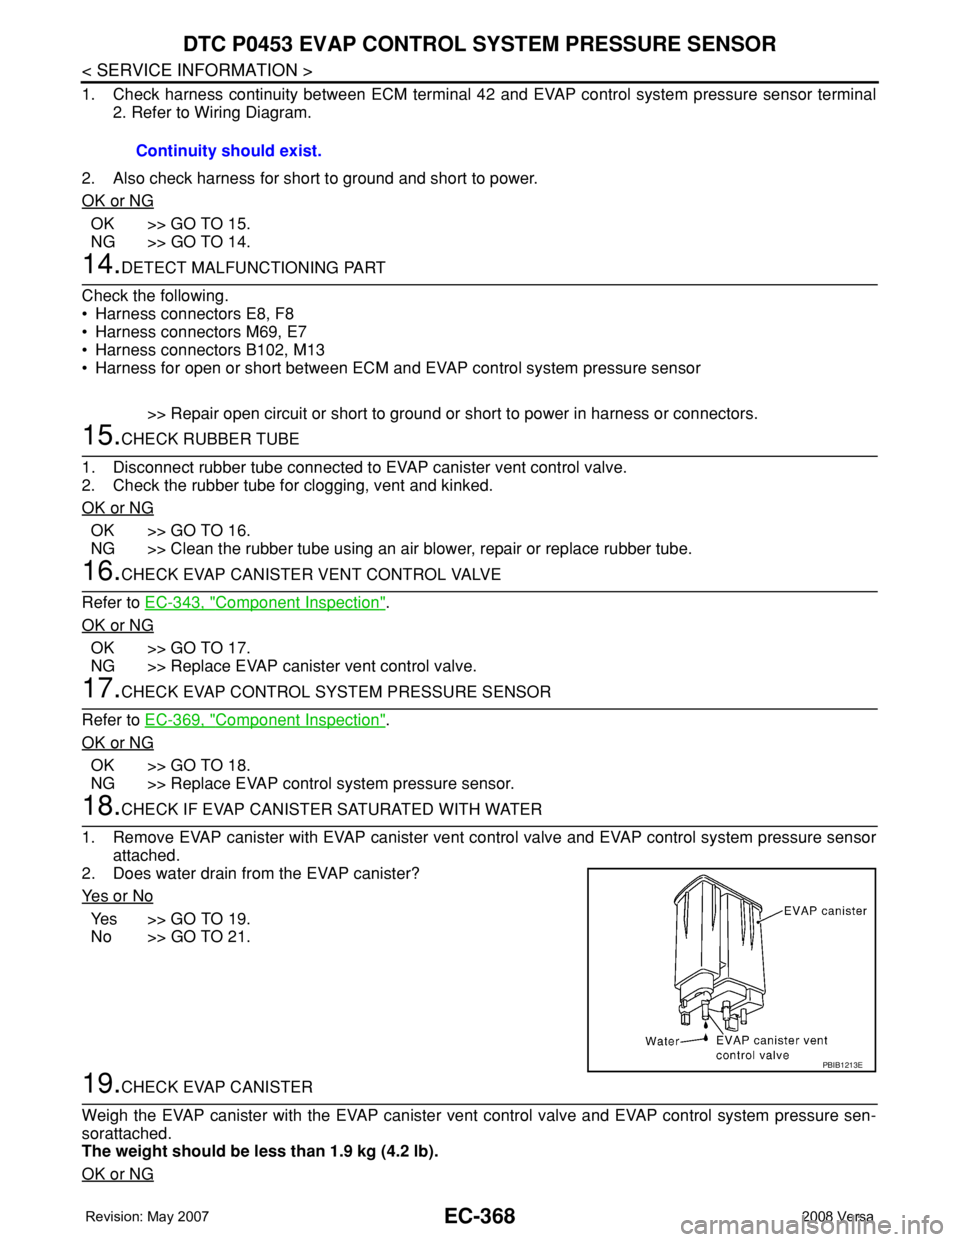
18.CHECK IF EVAP CANISTER SATURATED WITH WATER
1. Remove EVAP canister with EVAP canister vent control valve and EVAP control system pressure sensor
attached.
2. Does water drain from the EVAP canister?
Ye s o r N o
Yes >> GO TO 19.
No >> GO TO 21.
19.CHECK EVAP CANISTER
Weigh the EVAP canister with the EVAP canister vent control valve and EVAP control system pressure sen-
sorattached.
The weight should be less than 1.9 kg (4.2 lb).
OK or NG
Continuity should exist.
PBIB1213E
Page 1443 of 2771

DTC P0453 EVAP CONTROL SYSTEM PRESSURE SENSOR
EC-369
< SERVICE INFORMATION >
C
D
E
F
G
H
I
J
K
L
MA
EC
N
P O
OK >> GO TO 21.
NG >> GO TO 20.
20.DETECT MALFUNCTIONING PART
Check the following.
• EVAP canister for damage
• EVAP hose connected to EVAP canister for clogging or poor connection
>> Repair hose or replace EVAP canister.
21.CHECK INTERMITTENT INCIDENT
Refer to EC-136
.
>>INSPECTION END
Component InspectionINFOID:0000000001702877
EVAP CONTROL PRESSURE SENSOR
1. Remove EVAP control system pressure sensor with its harness connector connected from EVAP canister.
Always replace O-ring with a new one.
2. Install a vacuum pump to EVAP control system pressure sensor.
3. Turn ignition switch ON and check output voltage between ECM
terminal 42 (EVAP control system pressure sensor signal) and
ground under the following conditions.
CAUTION:
• Always calibrate the vacuum pump gauge when using it.
• Do not apply below -93.3 kPa (-700 mmHg, -27.56 inHg) or
pressure over 101.3 kPa (760 mmHg, 29.92 inHg).
4. If NG, replace EVAP control system pressure sensor.
Applied vacuum kPa
(mmHg, inHg)Voltage V
Not applied 1.8 - 4.8
-26.7 (-200, -7.87) 2.1 to 2.5V lower than above value
PBIB3314E
Page 1459 of 2771
DTC P0460 FUEL LEVEL SENSOR
EC-385
< SERVICE INFORMATION >
C
D
E
F
G
H
I
J
K
L
MA
EC
N
P O
DTC P0460 FUEL LEVEL SENSOR
Component DescriptionINFOID:0000000001702885
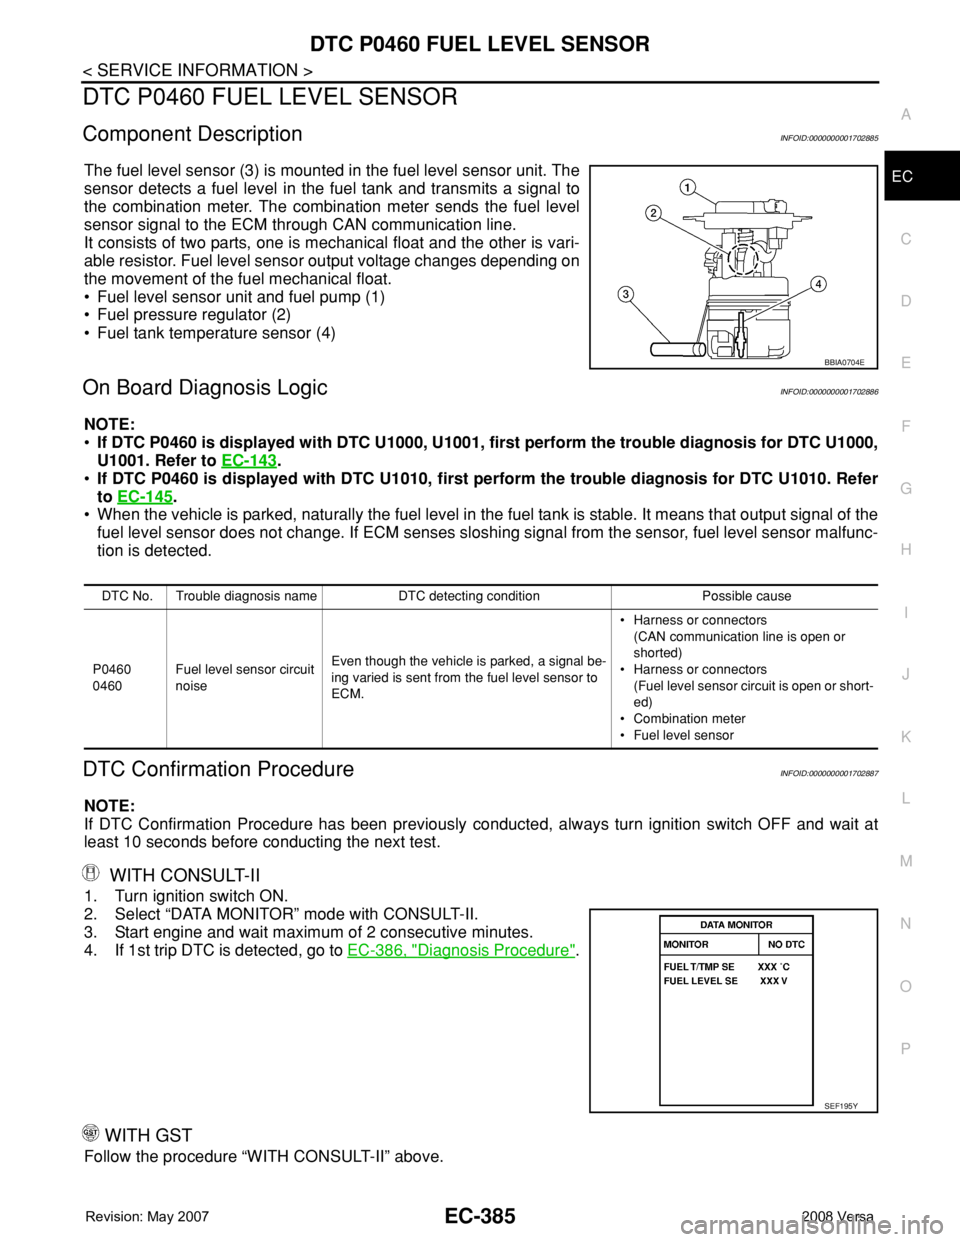
The fuel level sensor (3) is mounted in the fuel level sensor unit. The
sensor detects a fuel level in the fuel tank and transmits a signal to
the combination meter. The combination meter sends the fuel level
sensor signal to the ECM through CAN communication line.
It consists of two parts, one is mechanical float and the other is vari-
able resistor. Fuel level sensor output voltage changes depending on
the movement of the fuel mechanical float.
• Fuel level sensor unit and fuel pump (1)
• Fuel pressure regulator (2)
• Fuel tank temperature sensor (4)
On Board Diagnosis LogicINFOID:0000000001702886
NOTE:
•If DTC P0460 is displayed with DTC U1000, U1001, first perform the trouble diagnosis for DTC U1000,
U1001. Refer to EC-143
.
•If DTC P0460 is displayed with DTC U1010, first perform the trouble diagnosis for DTC U1010. Refer
to EC-145
.
• When the vehicle is parked, naturally the fuel level in the fuel tank is stable. It means that output signal of the
fuel level sensor does not change. If ECM senses sloshing signal from the sensor, fuel level sensor malfunc-
tion is detected.
DTC Confirmation ProcedureINFOID:0000000001702887
NOTE:
If DTC Confirmation Procedure has been previously conducted, always turn ignition switch OFF and wait at
least 10 seconds before conducting the next test.
WITH CONSULT-II
1. Turn ignition switch ON.
2. Select “DATA MONITOR” mode with CONSULT-II.
3. Start engine and wait maximum of 2 consecutive minutes.
4. If 1st trip DTC is detected, go to EC-386, "
Diagnosis Procedure".
WITH GST
Follow the procedure “WITH CONSULT-II” above.
BBIA0704E
DTC No. Trouble diagnosis name DTC detecting condition Possible cause
P0460
0460Fuel level sensor circuit
noiseEven though the vehicle is parked, a signal be-
ing varied is sent from the fuel level sensor to
ECM.• Harness or connectors
(CAN communication line is open or
shorted)
• Harness or connectors
(Fuel level sensor circuit is open or short-
ed)
• Combination meter
• Fuel level sensor
SEF195Y
Page 1461 of 2771
DTC P0461 FUEL LEVEL SENSOR
EC-387
< SERVICE INFORMATION >
C
D
E
F
G
H
I
J
K
L
MA
EC
N
P O
DTC P0461 FUEL LEVEL SENSOR
Component DescriptionINFOID:0000000001702890
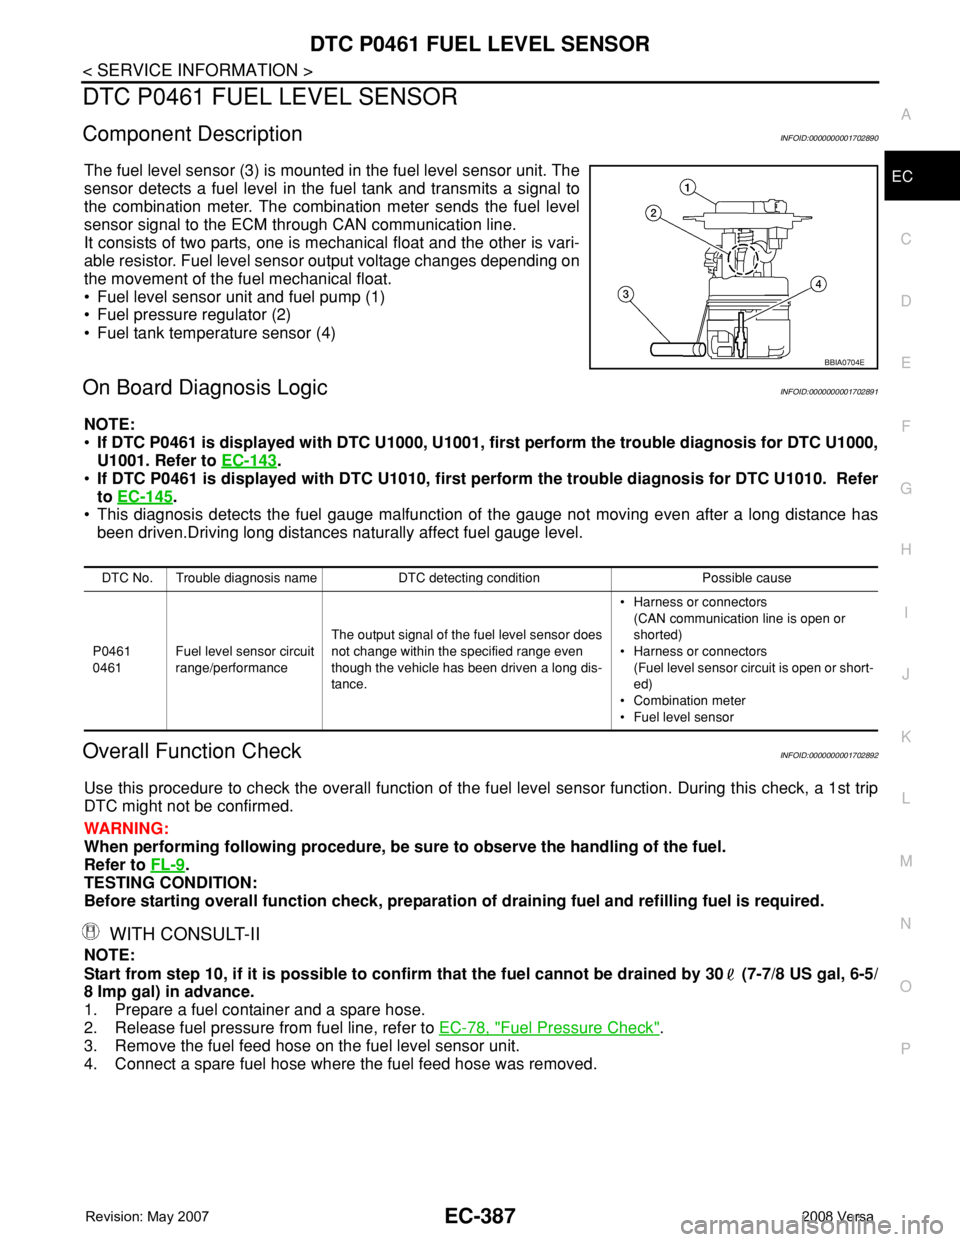
The fuel level sensor (3) is mounted in the fuel level sensor unit. The
sensor detects a fuel level in the fuel tank and transmits a signal to
the combination meter. The combination meter sends the fuel level
sensor signal to the ECM through CAN communication line.
It consists of two parts, one is mechanical float and the other is vari-
able resistor. Fuel level sensor output voltage changes depending on
the movement of the fuel mechanical float.
• Fuel level sensor unit and fuel pump (1)
• Fuel pressure regulator (2)
• Fuel tank temperature sensor (4)
On Board Diagnosis LogicINFOID:0000000001702891
NOTE:
•If DTC P0461 is displayed with DTC U1000, U1001, first perform the trouble diagnosis for DTC U1000,
U1001. Refer to EC-143
.
•If DTC P0461 is displayed with DTC U1010, first perform the trouble diagnosis for DTC U1010. Refer
to EC-145
.
• This diagnosis detects the fuel gauge malfunction of the gauge not moving even after a long distance has
been driven.Driving long distances naturally affect fuel gauge level.
Overall Function CheckINFOID:0000000001702892
Use this procedure to check the overall function of the fuel level sensor function. During this check, a 1st trip
DTC might not be confirmed.
WARNING:
When performing following procedure, be sure to observe the handling of the fuel.
Refer to FL-9
.
TESTING CONDITION:
Before starting overall function check, preparation of draining fuel and refilling fuel is required.
WITH CONSULT-II
NOTE:
Start from step 10, if it is possible to confirm that the fuel cannot be drained by 30 (7-7/8 US gal, 6-5/
8 Imp gal) in advance.
1. Prepare a fuel container and a spare hose.
2. Release fuel pressure from fuel line, refer to EC-78, "
Fuel Pressure Check".
3. Remove the fuel feed hose on the fuel level sensor unit.
4. Connect a spare fuel hose where the fuel feed hose was removed.
BBIA0704E
DTC No. Trouble diagnosis name DTC detecting condition Possible cause
P0461
0461Fuel level sensor circuit
range/performanceThe output signal of the fuel level sensor does
not change within the specified range even
though the vehicle has been driven a long dis-
tance.• Harness or connectors
(CAN communication line is open or
shorted)
• Harness or connectors
(Fuel level sensor circuit is open or short-
ed)
• Combination meter
• Fuel level sensor
Page 1463 of 2771
DTC P0462, P0463 FUEL LEVEL SENSOR
EC-389
< SERVICE INFORMATION >
C
D
E
F
G
H
I
J
K
L
MA
EC
N
P O
DTC P0462, P0463 FUEL LEVEL SENSOR
Component DescriptionINFOID:0000000001702895
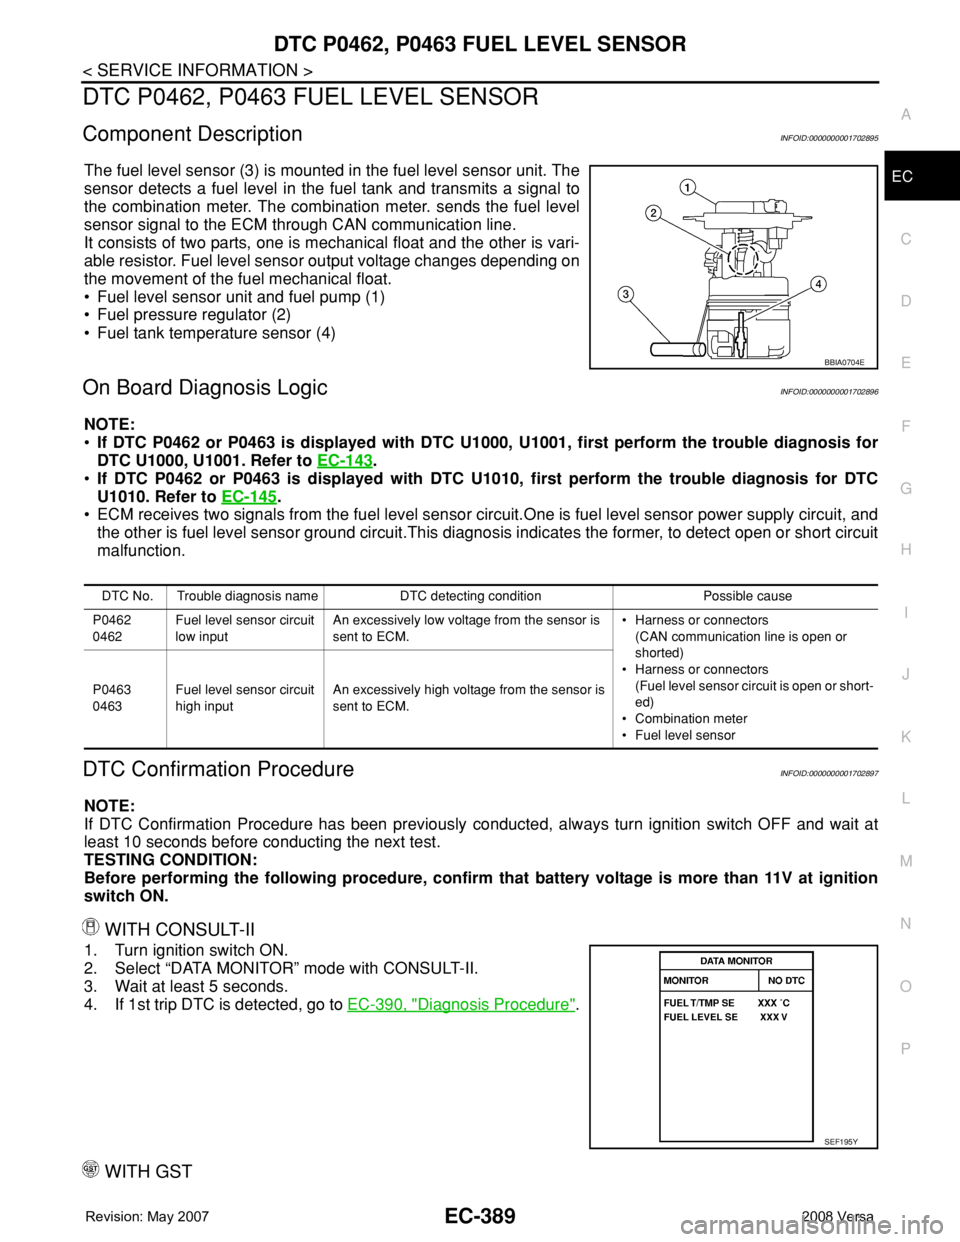
The fuel level sensor (3) is mounted in the fuel level sensor unit. The
sensor detects a fuel level in the fuel tank and transmits a signal to
the combination meter. The combination meter. sends the fuel level
sensor signal to the ECM through CAN communication line.
It consists of two parts, one is mechanical float and the other is vari-
able resistor. Fuel level sensor output voltage changes depending on
the movement of the fuel mechanical float.
• Fuel level sensor unit and fuel pump (1)
• Fuel pressure regulator (2)
• Fuel tank temperature sensor (4)
On Board Diagnosis LogicINFOID:0000000001702896
NOTE:
•If DTC P0462 or P0463 is displayed with DTC U1000, U1001, first perform the trouble diagnosis for
DTC U1000, U1001. Refer to EC-143
.
•If DTC P0462 or P0463 is displayed with DTC U1010, first perform the trouble diagnosis for DTC
U1010. Refer to EC-145
.
• ECM receives two signals from the fuel level sensor circuit.One is fuel level sensor power supply circuit, and
the other is fuel level sensor ground circuit.This diagnosis indicates the former, to detect open or short circuit
malfunction.
DTC Confirmation ProcedureINFOID:0000000001702897
NOTE:
If DTC Confirmation Procedure has been previously conducted, always turn ignition switch OFF and wait at
least 10 seconds before conducting the next test.
TESTING CONDITION:
Before performing the following procedure, confirm that battery voltage is more than 11V at ignition
switch ON.
WITH CONSULT-II
1. Turn ignition switch ON.
2. Select “DATA MONITOR” mode with CONSULT-II.
3. Wait at least 5 seconds.
4. If 1st trip DTC is detected, go to EC-390, "
Diagnosis Procedure".
WITH GST
BBIA0704E
DTC No. Trouble diagnosis name DTC detecting condition Possible cause
P0462
0462Fuel level sensor circuit
low inputAn excessively low voltage from the sensor is
sent to ECM.• Harness or connectors
(CAN communication line is open or
shorted)
• Harness or connectors
(Fuel level sensor circuit is open or short-
ed)
• Combination meter
• Fuel level sensor P0463
0463Fuel level sensor circuit
high inputAn excessively high voltage from the sensor is
sent to ECM.
SEF195Y
Page 1465 of 2771
DTC P0500 VSS
EC-391
< SERVICE INFORMATION >
C
D
E
F
G
H
I
J
K
L
MA
EC
N
P O
DTC P0500 VSS
DescriptionINFOID:0000000001702900
NOTE:
•If DTC P0500 is displayed with DTC U1000 or U1001, first perform the trouble diagnosis for DTC
U1000, U1001. Refer to EC-143
.
•If DTC P0500 is displayed with DTC U1010, first perform the trouble diagnosis for DTC U1010. Refer
to EC-145
.
The vehicle speed signal is sent to the combination meter from “ABS actuator and electric unit (control unit)”
through CAN communication line. The combination meter then sends a signal to the ECM through CAN com-
munication line.
On Board Diagnosis LogicINFOID:0000000001702901
FAIL-SAFE MODE
When the malfunction is detected, ECM enters fail-safe mode.
DTC Confirmation ProcedureINFOID:0000000001702902
CAUTION:
Always drive vehicle at a safe speed.
NOTE:
If DTC Confirmation Procedure has been previously conducted, always turn ignition switch OFF and wait at
least 10 seconds before conducting the next test.
TESTING CONDITION:
Steps 1 and 2 may be conducted with the drive wheels lifted in the shop or by driving the vehicle. If a
road test is expected to be easier, it is unnecessary to lift the vehicle.
WITH CONSULT-II
1. Start engine.
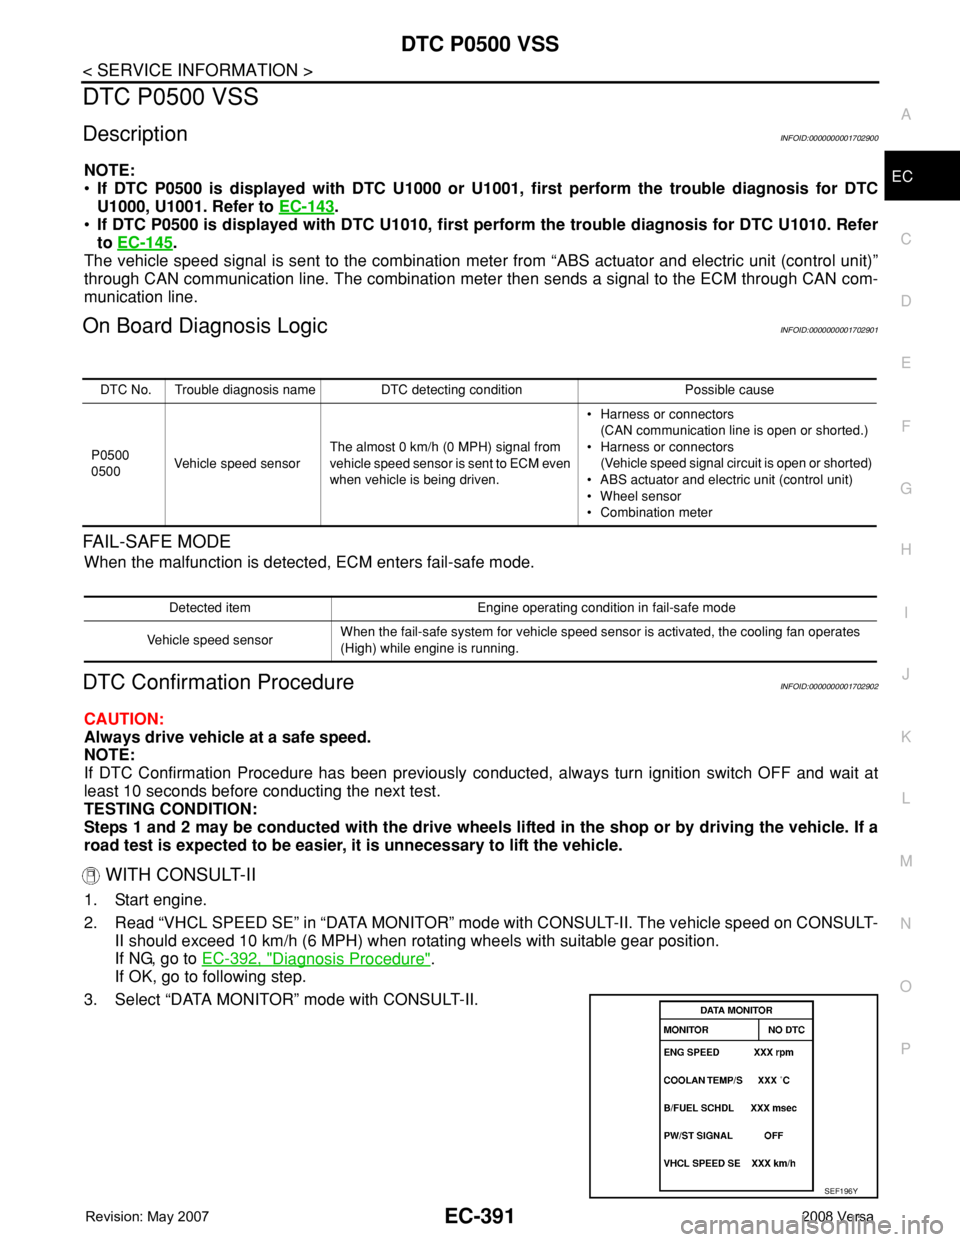
2. Read “VHCL SPEED SE” in “DATA MONITOR” mode with CONSULT-II. The vehicle speed on CONSULT-
II should exceed 10 km/h (6 MPH) when rotating wheels with suitable gear position.
If NG, go to EC-392, "
Diagnosis Procedure".
If OK, go to following step.
3. Select “DATA MONITOR” mode with CONSULT-II.
DTC No. Trouble diagnosis name DTC detecting condition Possible cause
P0500
0500Vehicle speed sensorThe almost 0 km/h (0 MPH) signal from
vehicle speed sensor is sent to ECM even
when vehicle is being driven.• Harness or connectors
(CAN communication line is open or shorted.)
• Harness or connectors
(Vehicle speed signal circuit is open or shorted)
• ABS actuator and electric unit (control unit)
• Wheel sensor
• Combination meter
Detected item Engine operating condition in fail-safe mode
Vehicle speed sensorWhen the fail-safe system for vehicle speed sensor is activated, the cooling fan operates
(High) while engine is running.
SEF196Y