Page 295 of 2771
REPAIR FOR COMPONENT PARTS
AT-283
< SERVICE INFORMATION >
D
E
F
G
H
I
J
K
L
MA
B
AT
N
O
P
4. Set Tool A on spring retainer assembly, and install snap ring (1)
while compressing spring retainer assembly.
CAUTION:
Set SST directly over return springs.
5. Install dish plates, driven plates, drive plates and retaining plate.
(1): Snap ring
(2): Retaining plate
(3): Drive plate
(4): Driven plate
(5): Dish plate
Drive plate/Driven plate: 2/2
CAUTION:
Be careful with the order of plates.
NOTE:
Install two dish plates fitting each installation direction with
reverse clutch drum groove displaced slightly.
6. Install snap ring (1) using a flat-bladed screwdriver A.Tool number: KV31103200 (J-39186)
SCIA7988E
SCIA7003J
SAT170D
SCIA7024J
Page 296 of 2771
AT-284
< SERVICE INFORMATION >
REPAIR FOR COMPONENT PARTS
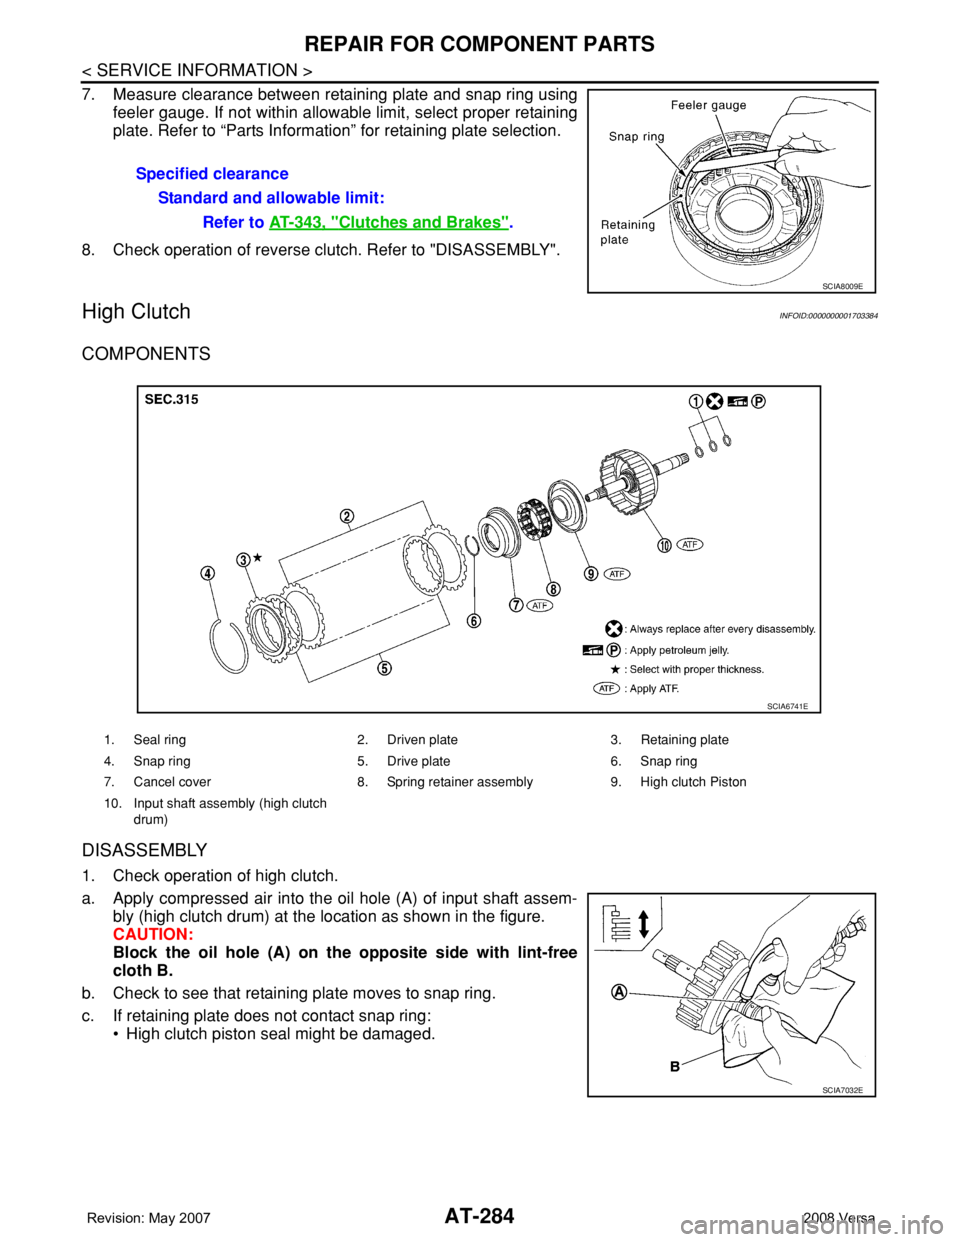
7. Measure clearance between retaining plate and snap ring using
feeler gauge. If not within allowable limit, select proper retaining
plate. Refer to “Parts Information” for retaining plate selection.
8. Check operation of reverse clutch. Refer to "DISASSEMBLY".
High ClutchINFOID:0000000001703384
COMPONENTS
DISASSEMBLY
1. Check operation of high clutch.
a. Apply compressed air into the oil hole (A) of input shaft assem-
bly (high clutch drum) at the location as shown in the figure.
CAUTION:
Block the oil hole (A) on the opposite side with lint-free
cloth B.
b. Check to see that retaining plate moves to snap ring.
c. If retaining plate does not contact snap ring:
• High clutch piston seal might be damaged.Specified clearance
Standard and allowable limit:
Refer to AT-343, "
Clutches and Brakes".
SCIA8009E
1. Seal ring 2. Driven plate 3. Retaining plate
4. Snap ring 5. Drive plate 6. Snap ring
7. Cancel cover 8. Spring retainer assembly 9. High clutch Piston
10. Input shaft assembly (high clutch
drum)
SCIA6741E
SCIA7032E
Page 297 of 2771
REPAIR FOR COMPONENT PARTS
AT-285
< SERVICE INFORMATION >
D
E
F
G
H
I
J
K
L
MA
B
AT
N
O
P
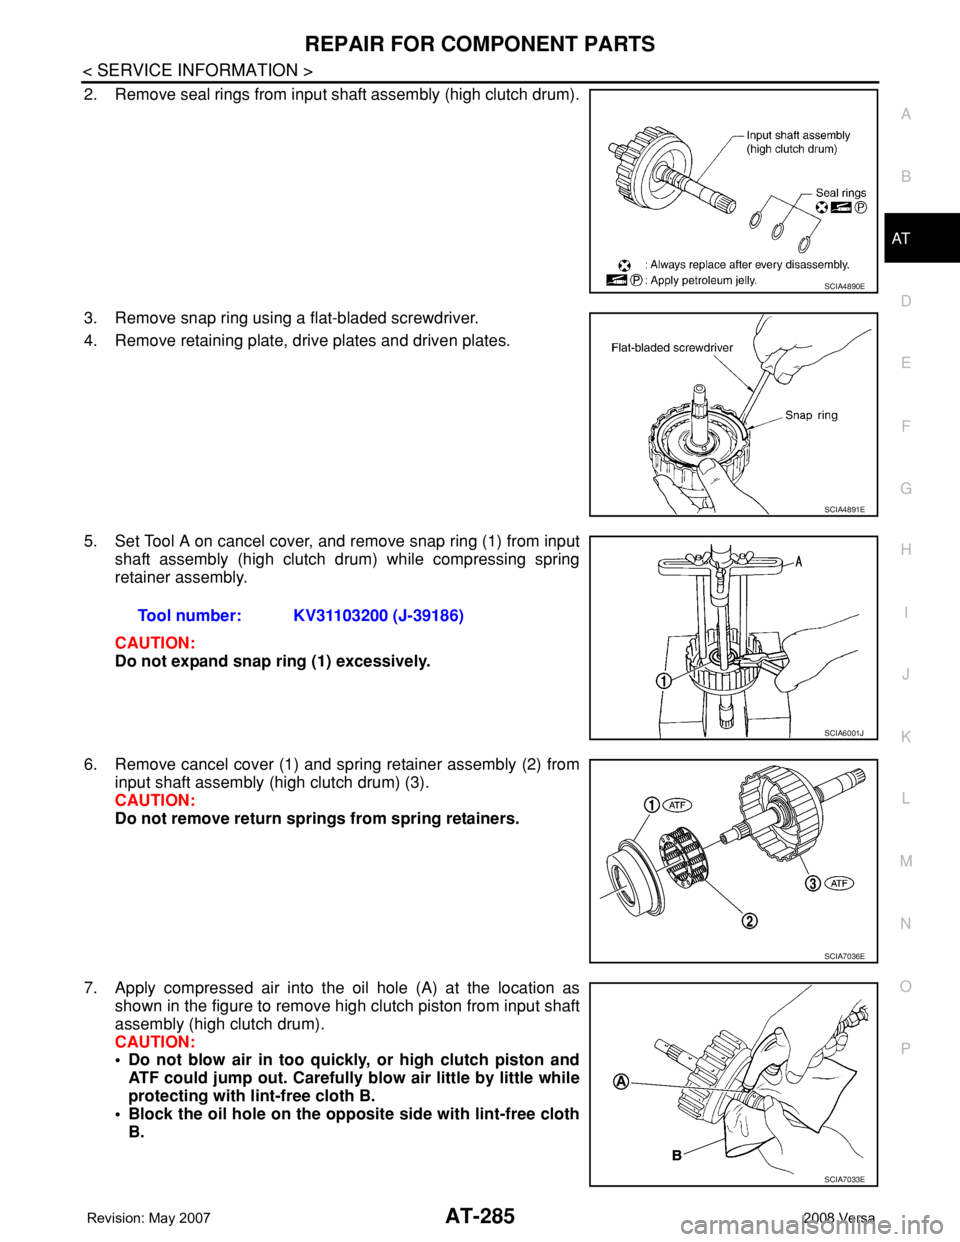
2. Remove seal rings from input shaft assembly (high clutch drum).
3. Remove snap ring using a flat-bladed screwdriver.
4. Remove retaining plate, drive plates and driven plates.
5. Set Tool A on cancel cover, and remove snap ring (1) from input
shaft assembly (high clutch drum) while compressing spring
retainer assembly.
CAUTION:
Do not expand snap ring (1) excessively.
6. Remove cancel cover (1) and spring retainer assembly (2) from
input shaft assembly (high clutch drum) (3).
CAUTION:
Do not remove return springs from spring retainers.
7. Apply compressed air into the oil hole (A) at the location as
shown in the figure to remove high clutch piston from input shaft
assembly (high clutch drum).
CAUTION:
• Do not blow air in too quickly, or high clutch piston and
ATF could jump out. Carefully blow air little by little while
protecting with lint-free cloth B.
• Block the oil hole on the opposite side with lint-free cloth
B.
SCIA4890E
SCIA4891E
Tool number: KV31103200 (J-39186)
SCIA6001J
SCIA7036E
SCIA7033E
Page 298 of 2771
AT-286
< SERVICE INFORMATION >
REPAIR FOR COMPONENT PARTS
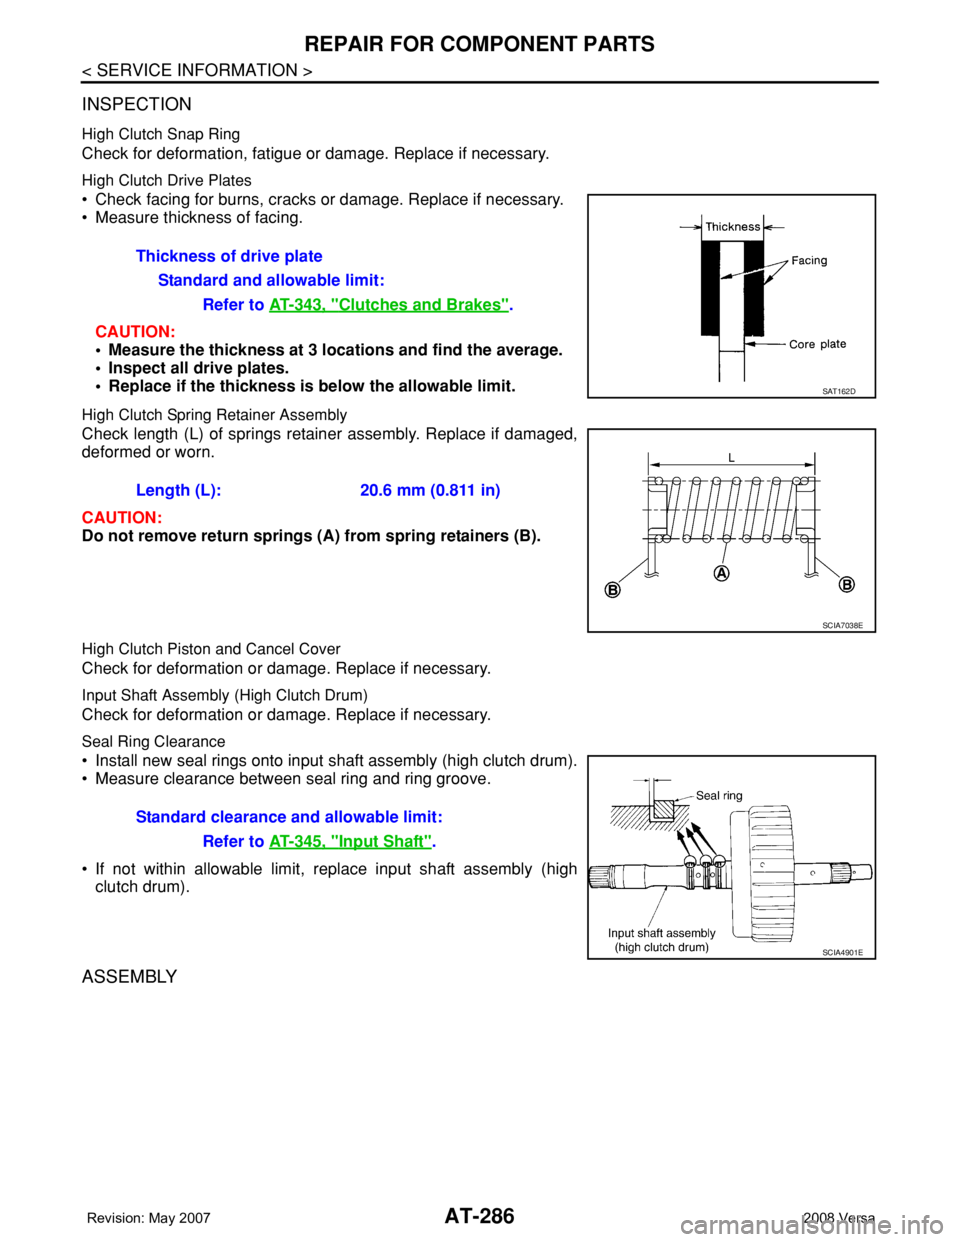
INSPECTION
High Clutch Snap Ring
Check for deformation, fatigue or damage. Replace if necessary.
High Clutch Drive Plates
• Check facing for burns, cracks or damage. Replace if necessary.
• Measure thickness of facing.
CAUTION:
• Measure the thickness at 3 locations and find the average.
• Inspect all drive plates.
• Replace if the thickness is below the allowable limit.
High Clutch Spring Retainer Assembly
Check length (L) of springs retainer assembly. Replace if damaged,
deformed or worn.
CAUTION:
Do not remove return springs (A) from spring retainers (B).
High Clutch Piston and Cancel Cover
Check for deformation or damage. Replace if necessary.
Input Shaft Assembly (High Clutch Drum)
Check for deformation or damage. Replace if necessary.
Seal Ring Clearance
• Install new seal rings onto input shaft assembly (high clutch drum).
• Measure clearance between seal ring and ring groove.
• If not within allowable limit, replace input shaft assembly (high
clutch drum).
ASSEMBLY
Thickness of drive plate
Standard and allowable limit:
Refer to AT-343, "
Clutches and Brakes".
SAT162D
Length (L): 20.6 mm (0.811 in)
SCIA7038E
Standard clearance and allowable limit:
Refer to AT-345, "
Input Shaft".
SCIA4901E
Page 299 of 2771
REPAIR FOR COMPONENT PARTS
AT-287
< SERVICE INFORMATION >
D
E
F
G
H
I
J
K
L
MA
B
AT
N
O
P
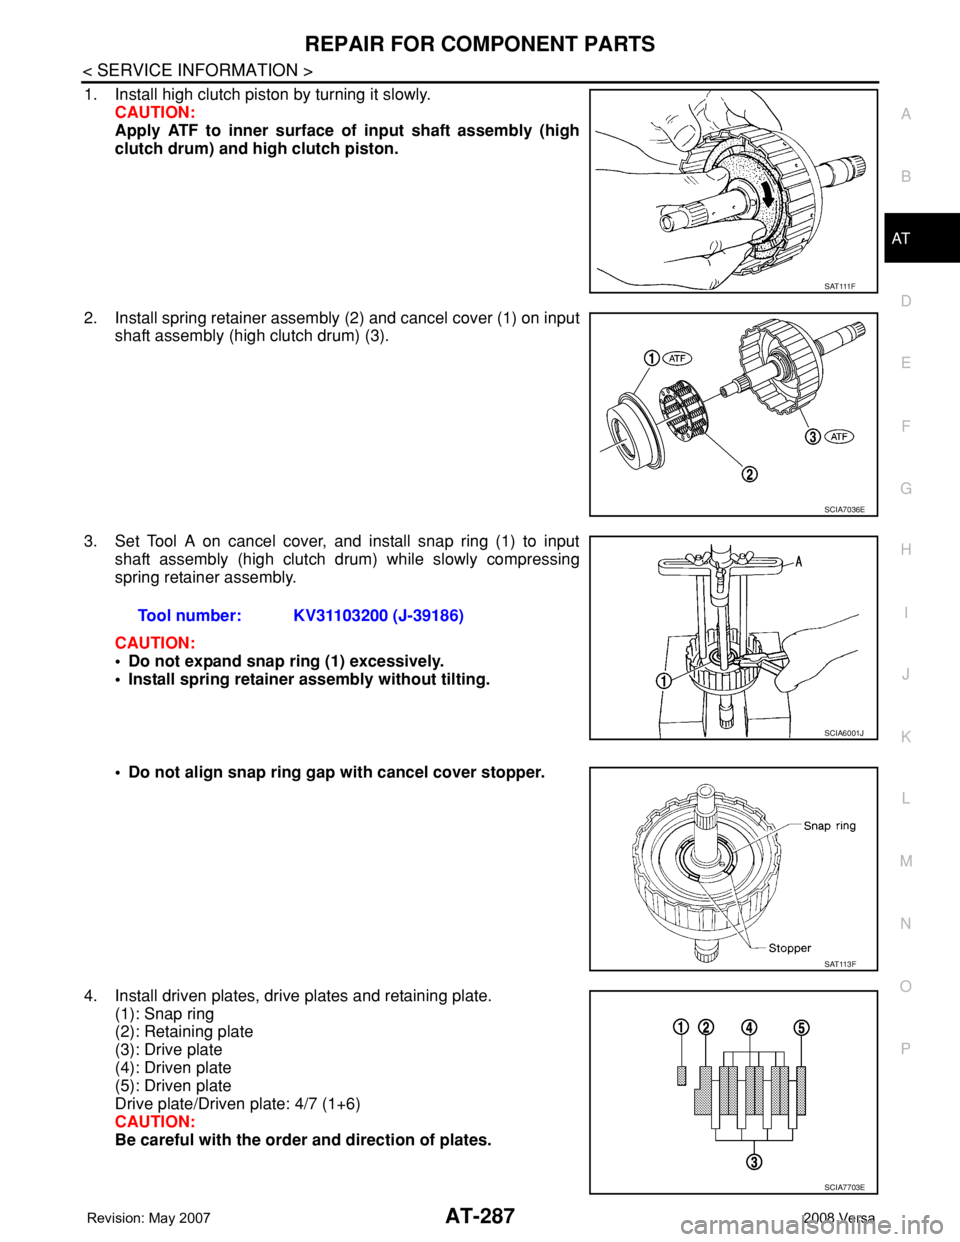
1. Install high clutch piston by turning it slowly.
CAUTION:
Apply ATF to inner surface of input shaft assembly (high
clutch drum) and high clutch piston.
2. Install spring retainer assembly (2) and cancel cover (1) on input
shaft assembly (high clutch drum) (3).
3. Set Tool A on cancel cover, and install snap ring (1) to input
shaft assembly (high clutch drum) while slowly compressing
spring retainer assembly.
CAUTION:
• Do not expand snap ring (1) excessively.
• Install spring retainer assembly without tilting.
• Do not align snap ring gap with cancel cover stopper.
4. Install driven plates, drive plates and retaining plate.
(1): Snap ring
(2): Retaining plate
(3): Drive plate
(4): Driven plate
(5): Driven plate
Drive plate/Driven plate: 4/7 (1+6)
CAUTION:
Be careful with the order and direction of plates.
S AT 111 F
SCIA7036E
Tool number: KV31103200 (J-39186)
SCIA6001J
SAT113F
SCIA7703E
Page 300 of 2771
AT-288
< SERVICE INFORMATION >
REPAIR FOR COMPONENT PARTS
5. Install snap ring using a flat-bladed screwdriver.
6. Set dial indicator A on retaining plate (1), and measure clear-
ance between retaining plate (1) and snap ring (2). If not within
allowable limit, select proper retaining plate (1). Refer to “Parts
Information” for retaining plate selection.
7. Check operation of high clutch. Refer to "DISASSEMBLY".
8. Install seal rings to input shaft assembly (high clutch drum).
CAUTION:
Roll paper around seal rings to prevent seal rings from spread-
ing.
Forward and Overrun ClutchesINFOID:0000000001703385
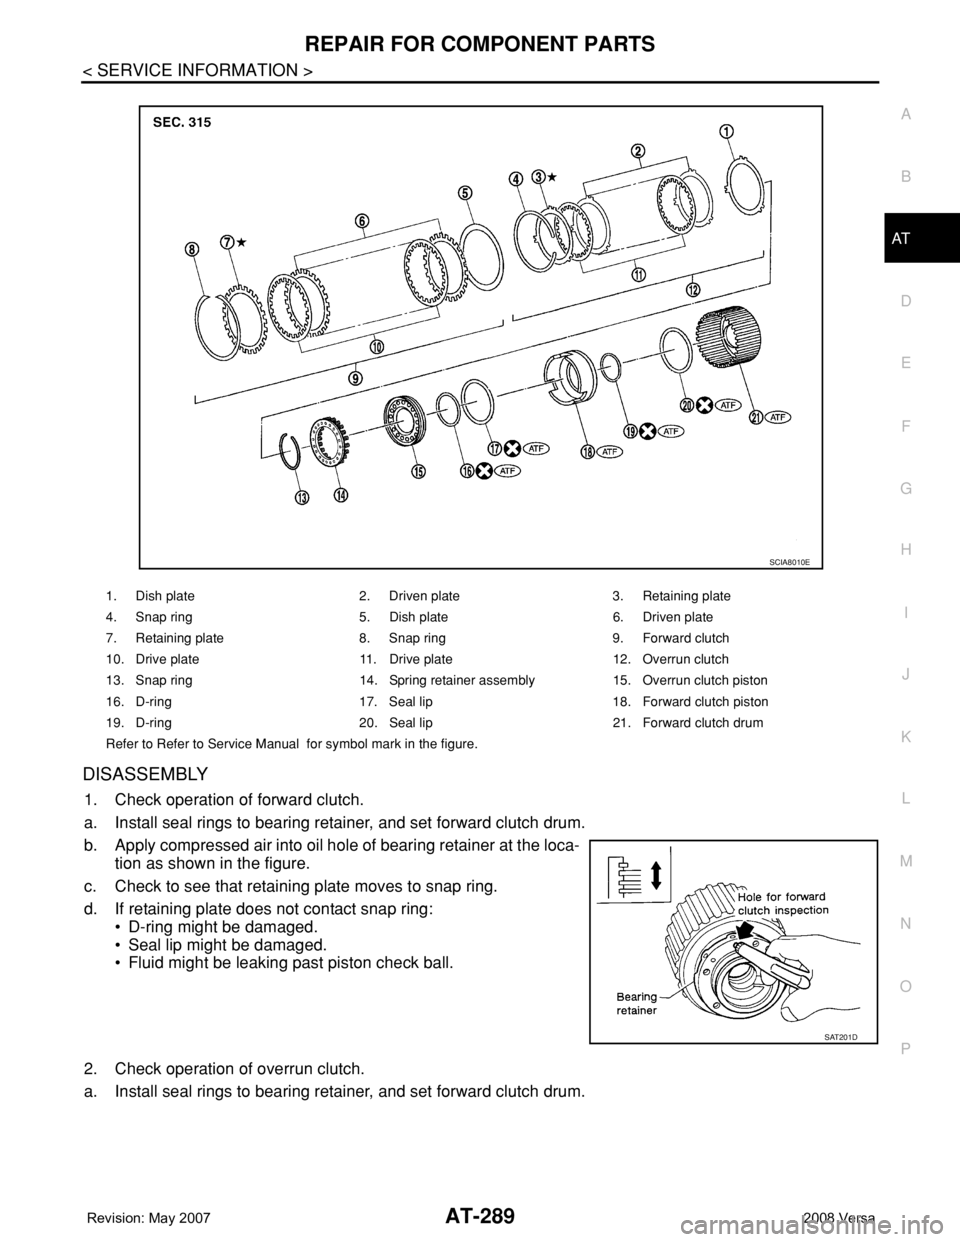
COMPONENTS
SCIA4891E
Specified clearance
Standard and allowable limit:
Refer to AT-343, "
Clutches and Brakes".
SCIA5858E
SCIA4890E
SAT198D
Page 301 of 2771
REPAIR FOR COMPONENT PARTS
AT-289
< SERVICE INFORMATION >
D
E
F
G
H
I
J
K
L
MA
B
AT
N
O
P
DISASSEMBLY
1. Check operation of forward clutch.
a. Install seal rings to bearing retainer, and set forward clutch drum.
b. Apply compressed air into oil hole of bearing retainer at the loca-
tion as shown in the figure.
c. Check to see that retaining plate moves to snap ring.
d. If retaining plate does not contact snap ring:
• D-ring might be damaged.
• Seal lip might be damaged.
• Fluid might be leaking past piston check ball.
2. Check operation of overrun clutch.
a. Install seal rings to bearing retainer, and set forward clutch drum.
1. Dish plate 2. Driven plate 3. Retaining plate
4. Snap ring 5. Dish plate 6. Driven plate
7. Retaining plate 8. Snap ring 9. Forward clutch
10. Drive plate 11. Drive plate 12. Overrun clutch
13. Snap ring 14. Spring retainer assembly 15. Overrun clutch piston
16. D-ring 17. Seal lip 18. Forward clutch piston
19. D-ring 20. Seal lip 21. Forward clutch drum
Refer to Refer to Service Manual for symbol mark in the figure.
SCIA8010E
SAT201D
Page 302 of 2771
AT-290
< SERVICE INFORMATION >
REPAIR FOR COMPONENT PARTS
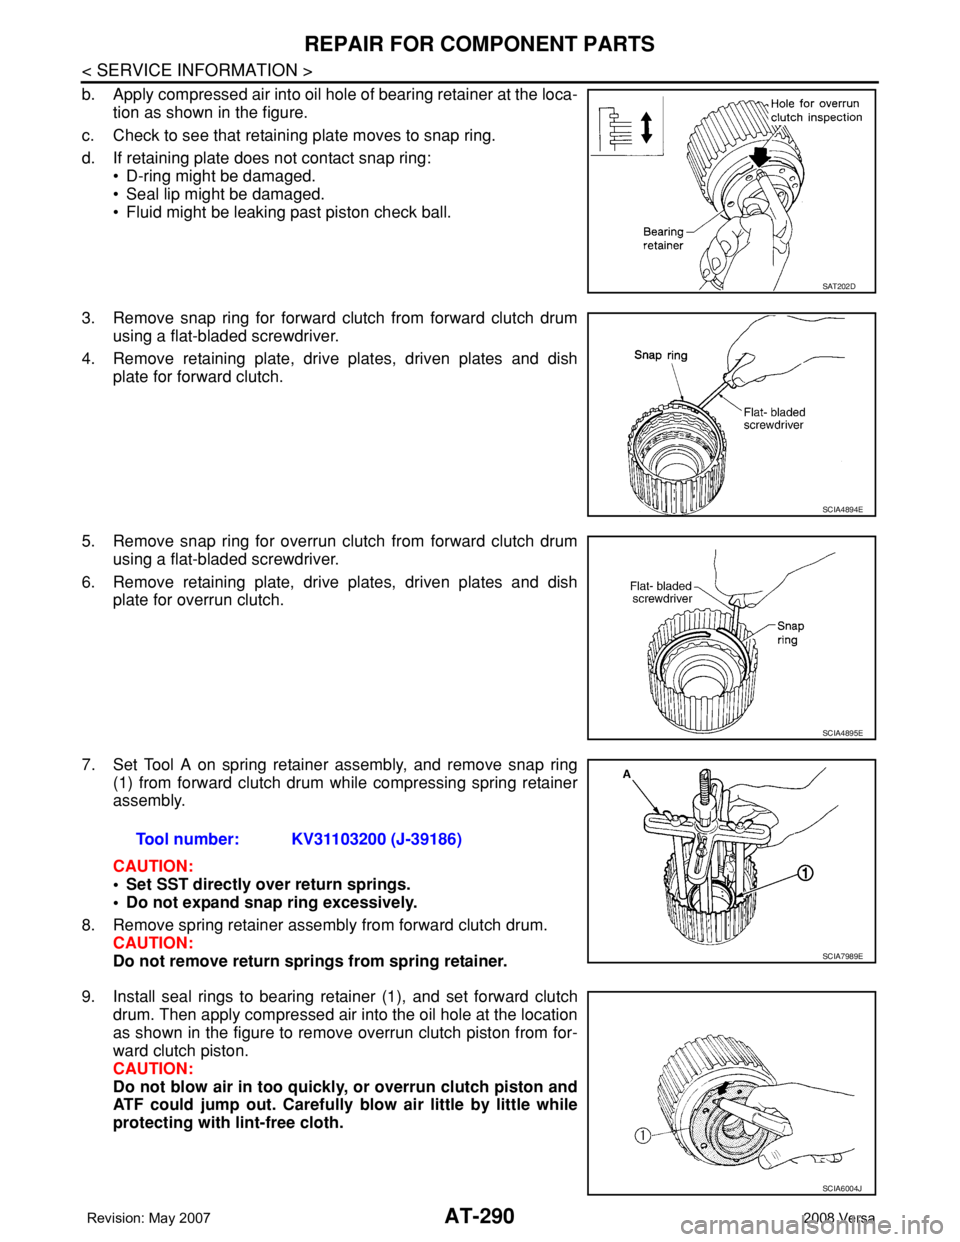
b. Apply compressed air into oil hole of bearing retainer at the loca-
tion as shown in the figure.
c. Check to see that retaining plate moves to snap ring.
d. If retaining plate does not contact snap ring:
• D-ring might be damaged.
• Seal lip might be damaged.
• Fluid might be leaking past piston check ball.
3. Remove snap ring for forward clutch from forward clutch drum
using a flat-bladed screwdriver.
4. Remove retaining plate, drive plates, driven plates and dish
plate for forward clutch.
5. Remove snap ring for overrun clutch from forward clutch drum
using a flat-bladed screwdriver.
6. Remove retaining plate, drive plates, driven plates and dish
plate for overrun clutch.
7. Set Tool A on spring retainer assembly, and remove snap ring
(1) from forward clutch drum while compressing spring retainer
assembly.
CAUTION:
• Set SST directly over return springs.
• Do not expand snap ring excessively.
8. Remove spring retainer assembly from forward clutch drum.
CAUTION:
Do not remove return springs from spring retainer.
9. Install seal rings to bearing retainer (1), and set forward clutch
drum. Then apply compressed air into the oil hole at the location
as shown in the figure to remove overrun clutch piston from for-
ward clutch piston.
CAUTION:
Do not blow air in too quickly, or overrun clutch piston and
ATF could jump out. Carefully blow air little by little while
protecting with lint-free cloth.
SAT202D
SCIA4894E
SCIA4895E
Tool number: KV31103200 (J-39186)
SCIA7989E
SCIA6004J