Page 1 of 32
2008
350Z
QUICK REFERENCE GUIDE
SHIFT_obsession
Page 2 of 32
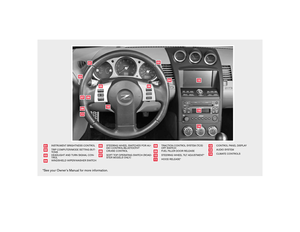
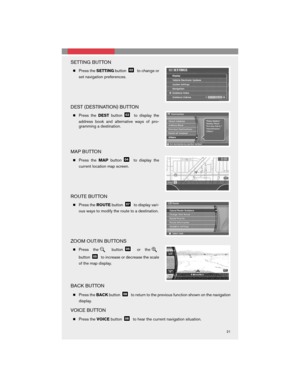
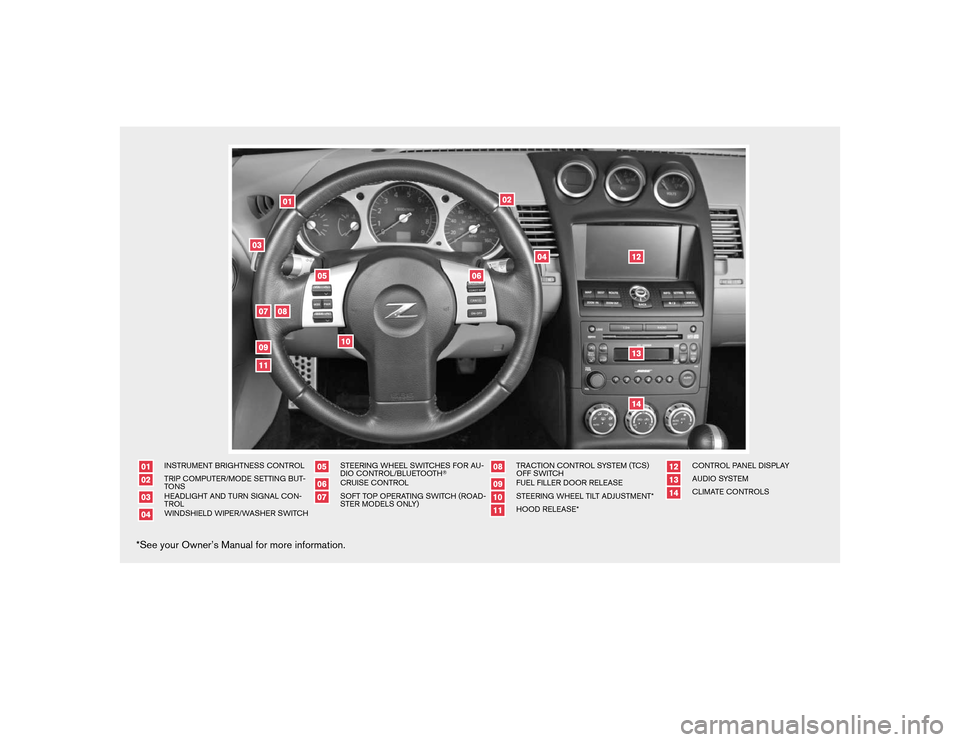
INSTRUMENT BRIGHTNESS CONTROLTRIP COMPUTER/MODE SETTING BUT-
TONSHEADLIGHT AND TURN SIGNAL CON-
TROLWINDSHIELD WIPER/WASHER SWITCH
STEERING WHEEL SWITCHES FOR AU-
DIO CONTROL/BLUETOOTH�CRUISE CONTROLSOFT TOP OPERATING SWITCH (ROAD-
STER MODELS ONLY)
TRACTION CONTROL SYSTEM (TCS)
OFF SWITCHFUEL FILLER DOOR RELEASESTEERING WHEEL TILT ADJUSTMENT*HOOD RELEASE*
CONTROL PANEL DISPLAYAUDIO SYSTEMCLIMATE CONTROLS
*See your Owner’s Manual for more information.
Page 3 of 32

TABLE OF CONTENTS
Remote Keyless Entry System..........................2
Windshield Wiper/Washer Switch.......................2
Headlight and Turn Signal Control.......................3
RPM Shift Indicator (manual transmission only)................4
Steering Wheel Switches for Audio Control/Bluetooth�
(if so equipped)..................................4
Cruise Control (if so equipped).........................5
Screw-in Recovery Hook.............................5
Auto Climate Control...............................6
Rear Floor Box...................................7
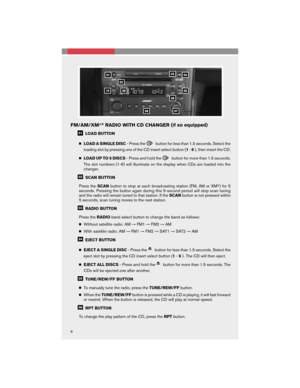
FM/AM/XM�* Radio with CD Changer (if so equipped)...........8
Clock Set/Adjustment...............................9
Trip Computer..................................10
Automatic Transmission (if so equipped)...................10
6-Speed Manual Transmission (if so equipped)...............11
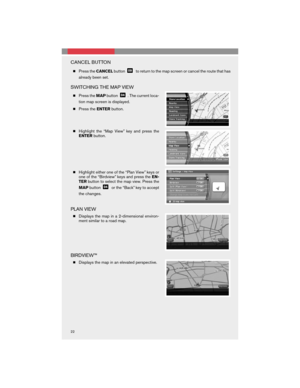
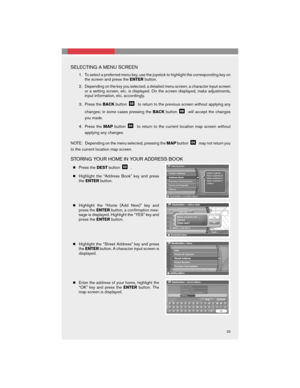
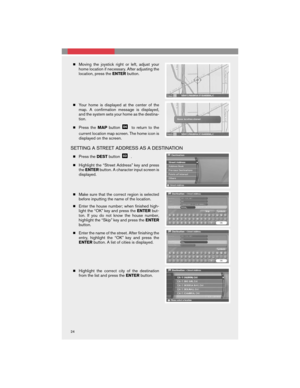
Control Panel Display with Navigation System (if so equipped)......11
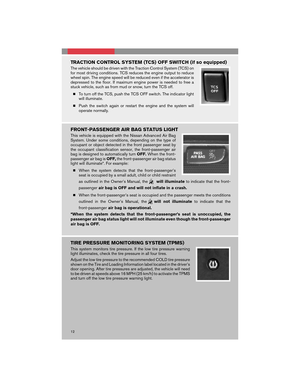
Traction Control System (TCS) Off Switch (if so equipped)........12
Front-Passenger Air Bag Status Light....................12
Tire Pressure Monitoring System (TPMS)..................12
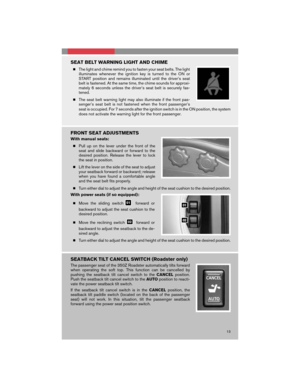
Seat Belt Warning Light and Chime......................13
Front Seat Adjustments.............................13
Seatback Tilt Cancel Switch (Roadster only)................13
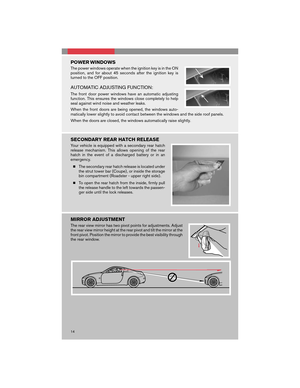
Power Windows.................................14
Secondary Rear Hatch Release........................14
Mirror Adjustment................................14
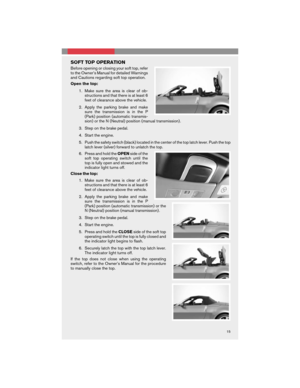
Soft Top Operation...............................15
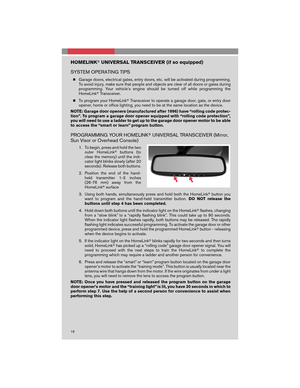
Homelink�Universal Transceiver (if so equipped)..............16
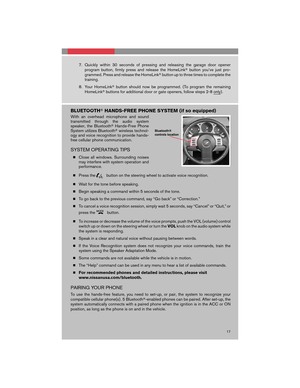
Bluetooth�Hands-Free Phone System (if so equipped)..........17
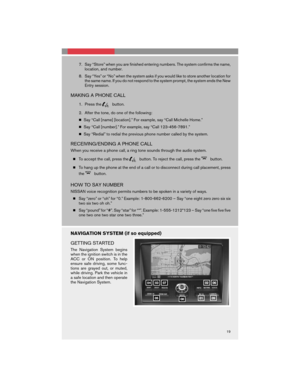
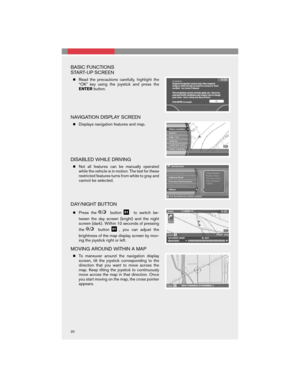
Navigation System (if so equipped)......................19
This easy-to-use Quick Reference Guide is intended to help you more fully
appreciate some of the unique features and functions of your new vehicle.
However, it is not intended to replace your Owner’s Manual. The Owner’s
Manual contains more detailed information to help you better understand the
important safety warnings, features, operation, and maintenance of your
vehicle.
Page 4 of 32

REMOTE KEYLESS ENTRY SYSTEM
LOCK DOORS
Press the
button to lock all doors.
UNLOCK DOORS
Press the
button once to unlock the driver’s door
only. Press the button again within 5 seconds to unlock
all doors.
RELEASING TRUNK LID
Press and hold the trunk release button for longer than 0.5 seconds to open the trunk
lid.
USING THE PANIC ALARM
Press and hold the
button for longer than 0.5 seconds. The panic alarm will
sound and the headlights will stay on for 30 seconds. The panic alarm stops when it
has run for 30 seconds or when any button is pressed on the keyfob.
OPENING THE WINDOWS
Windows can be lowered using the keyfob while approaching the vehicle.
�Press and hold the
button. The driver’s and passenger’s windows will be lowered.
�To stop lowering windows at any time, release the
.
�Continue to press and hold the
button until windows are fully open.
SILENCING THE HORN BEEP FEATURE
�To deactivate: Press and hold theandbuttons for at least 2 seconds.
�To activate: Press and hold the
andbuttons for at least 2 seconds.
WINDSHIELD WIPER/WASHER SWITCH
�The ignition switch must be in the ON position to
activate the windshield wipers.
�Move the lever to the following positions to operate
the windshield wipers:
Intermittent(INT)– Front wipers operate in-
termittently and can be further adjusted by
twisting the time control ring
.
Low Speed(LO)– Continuous low-speed
operation of front wipers.
High Speed(HI)– Continuous high-speed
operation of front wipers.
2
Page 5 of 32
– Lift the lever up for one sweep of the front wipers.
Rear Wipers(REAR)– Twist the end section to operate the first(INT)or second
(ON)speed settings for the rear wipers.
�The washer fun")
Mist(MIST)– Lift the lever up for one sweep of the front wipers.
Rear Wipers(REAR)– Twist the end section to operate the first(INT)or second
(ON)speed settings for the rear wipers.
�The washer function activates the washer fluid and several sweeps of the wipers:
●For FRONT WASHER, pull lever toward you.
●For REAR WIPER, push lever away from you.
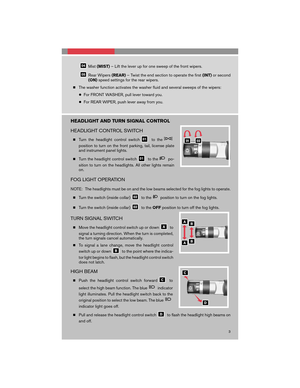
HEADLIGHT AND TURN SIGNAL CONTROL
HEADLIGHT CONTROL SWITCH
�Turn the headlight control switchto the
position to turn on the front parking, tail, license plate
and instrument panel lights.
�Turn the headlight control switch
to thepo-
sition to turn on the headlights. All other lights remain
on.
FOG LIGHT OPERATION
NOTE: The headlights must be on and the low beams selected for the fog lights to operate.
�Turn the switch (inside collar)
to theposition to turn on the fog lights.
�Turn the switch (inside collar)
to theOFFposition to turn off the fog lights.
TURN SIGNAL SWITCH
�Move the headlight control switch up or downto
signal a turning direction. When the turn is completed,
the turn signals cancel automatically.
�To signal a lane change, move the headlight control
switch up or down
to the point where the indica-
tor light begins to flash, but the headlight control switch
does not latch.
HIGH BEAM
�Push the headlight control switch forwardto
select the high beam function. The blue
indicator
light illuminates. Pull the headlight switch back to the
original position to select the low beam. The blue
indicator light goes off.
�Pull and release the headlight control switch
to flash the headlight high beams on
and off.
3
Page 6 of 32

The engine RPM shift indicator light (REV) is located in
the tachometer
. When driving, it indicates ‘shift
point’, or time to up-shift.
�Set or deac")
RPM SHIFT INDICATOR (manual transmission only)
The engine RPM shift indicator light (REV) is located in
the tachometer
. When driving, it indicates ‘shift
point’, or time to up-shift.
�Set or deactivate the engine RPM shift point using
the trip computer display.
�REV indicator will flash when the engine speed is
within 500 RPM of the set shift point.
�REV light will illuminate when the engine speed
matches the set shift point RPM.
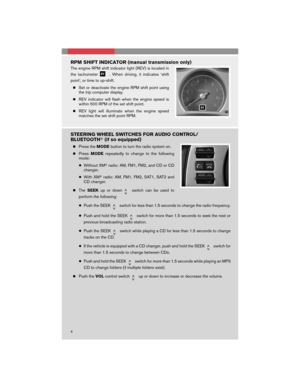
STEERING WHEEL SWITCHES FOR AUDIO CONTROL/
BLUETOOTH�(if so equipped)
�Press theMODEbutton to turn the radio system on.
�PressMODErepeatedly to change to the following
mode:
●Without XM�radio: AM, FM1, FM2, and CD or CD
changer.
●With XM�radio: AM, FM1, FM2, SAT1, SAT2 and
CD changer.
�TheSEEKup or down
switch can be used to
perform the following:
●Push the SEEK
switch for less than 1.5 seconds to change the radio frequency.
●Push and hold the SEEK
switch for more than 1.5 seconds to seek the next or
previous broadcasting radio station.
●Push the SEEK
switch while playing a CD for less than 1.5 seconds to change
tracks on the CD.
●If the vehicle is equipped with a CD changer, push and hold the SEEK
switch for
more than 1.5 seconds to change between CDs.
●Push and hold the SEEK
switch for more than 1.5 seconds while playing an MP3
CD to change folders (if multiple folders exist) .
�Push theVOLcontrol switch
up or down to increase or decrease the volume.
01
4
Page 7 of 32

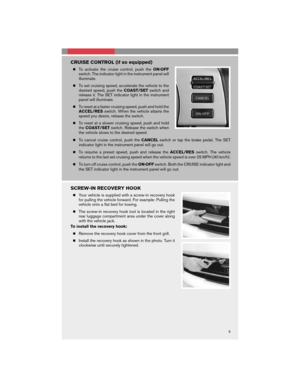
�To activate the cruise control, push theON·OFF
switch. The indicator light in the instrument panel will
illuminate.
�To set cruising speed, accelerate the vehicle to")
CRUISE CONTROL (if so equipped)
�To activate the cruise control, push theON·OFF
switch. The indicator light in the instrument panel will
illuminate.
�To set cruising speed, accelerate the vehicle to the
desired speed, push theCOAST/SETswitch and
release it. The SET indicator light in the instrument
panel will illuminate.
�To reset at a faster cruising speed, push and hold the
ACCEL/RESswitch. When the vehicle attains the
speed you desire, release the switch.
�To reset at a slower cruising speed, push and hold
theCOAST/SETswitch. Release the switch when
the vehicle slows to the desired speed.
�To cancel cruise control, push theCANCELswitch or tap the brake pedal. The SET
indicator light in the instrument panel will go out.
�To resume a preset speed, push and release theACCEL/RESswitch. The vehicle
returns to the last set cruising speed when the vehicle speed is over 25 MPH (40 km/h) .
�To turn off cruise control, push theON·OFFswitch. Both the CRUISE indicator light and
the SET indicator light in the instrument panel will go out.
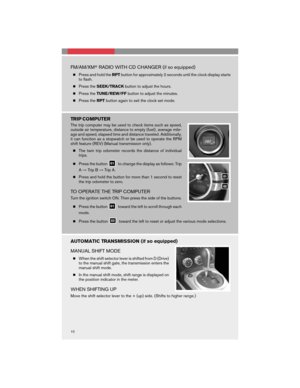
SCREW-IN RECOVERY HOOK
�Your vehicle is supplied with a screw-in recovery hook
for pulling the vehicle forward. For example: Pulling the
vehicle onto a flat bed for towing.
�The screw-in recovery hook tool is located in the right
rear luggage compartment area under the cover along
with the vehicle jack.
To install the recovery hook:
�Remove the recovery hook cover from the front grill.
�Install the recovery hook as shown in the photo. Turn it
clockwise until securely tightened.
5
Page 8 of 32

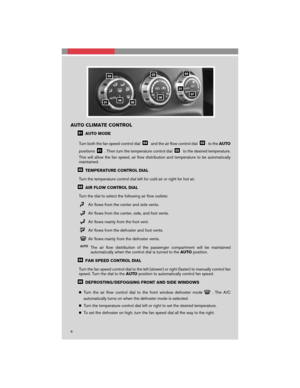
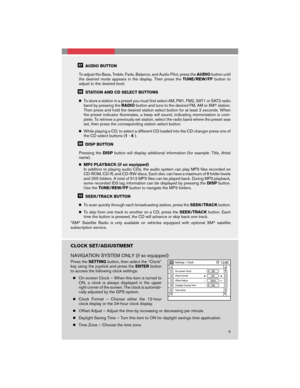
AUTO CLIMATE CONTROL
AUTO MODE
Turn both the fan speed control dial
and the air flow control dialto theAUTO
positions
. Then turn the temperature control dialto the desired temperature.
This will allow the fan speed, air flow distribution and temperature to be automatically
maintained.
TEMPERATURE CONTROL DIAL
Turn the temperature control dial left for cold air or right for hot air.
AIR FLOW CONTROL DIAL
Turn the dial to select the following air flow outlets:
Air flows from the center and side vents.
Air flows from the center, side, and foot vents.
Air flows mainly from the foot vent.
Air flows from the defroster and foot vents.
Air flows mainly from the defroster vents.
The air flow distribution of the passenger compartment will be maintained
automatically when the control dial is turned to theAUTOposition.
FAN SPEED CONTROL DIAL
Turn the fan speed control dial to the left (slower) or right (faster) to manually control fan
speed. Turn the dial to theAUTOposition to automatically control fan speed.
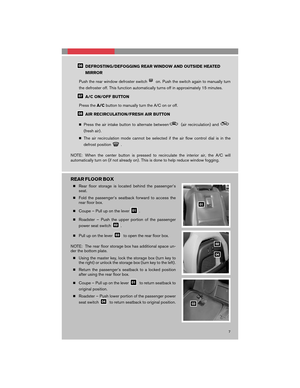
DEFROSTING/DEFOGGING FRONT AND SIDE WINDOWS
�Turn the air flow control dial to the front window defroster mode
. The A/C
automatically turns on when the defroster mode is selected.
�Turn the temperature control dial left or right to set the desired temperature.
�To set the defroster on high, turn the fan speed dial all the way to the right.
6