2008 MERCEDES-BENZ SL ROADSTER display
[x] Cancel search: displayPage 190 of 317
Tyre
sand wheels 187
i
If yo uarecarrying adefla tedt yreint he
vehicle, yo umayonl yreactivate the tyre
pressure monitor if:
R the deflate dtyreisnol ongerint he vehi-
cle
R yo uh avea djusted the tyr epressure cor-
rectly
Callin gupt he tyre pressure using the
on-board computer X
Make sure tha tthe key is in position 2in
the ignition lock.
X Press the jork button to select the
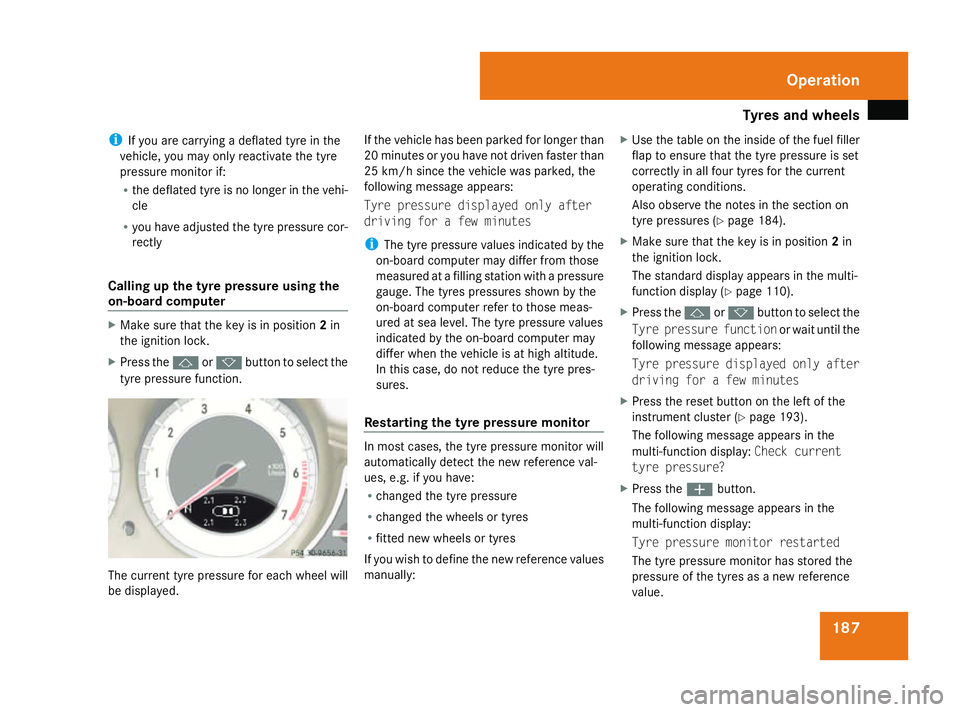
tyr ep ressure function. Th
ec urrent tyr epressure for each whee lwill
be displayed. If the vehicl
ehasbeen parked for longe rthan
20 minute soryouhave not driven faste rthan
25 km/h since the vehicl ewasparked ,the
following message appears:
Tyr epressure displayed onl yafter
drivin gfor afew minutes
i Thet yrep ressure values indicated by the
on-board computer ma ydiffe rf romt hose
measured at afillin gstatio nwithap ressure
gauge. Th etyres pressures shown by the
on-board computer refer to those meas-
ured at se alevel.T he tyrep ressure values
indicated by the on-board computer may
diffe rwhent he vehicl eisathigha ltitude.
In thi scase, d onot reduc ethe tyr epres-
sures.
Restarting the tyre pressure monitor In mos
tcases, t he tyrepressure monitor will
automaticall ydetect the new reference val-
ues, e.g .ifyouhave:
R change dthe tyr epressure
R change dthe wheels or tyres
R fitted new wheels or tyres
If yo uwishtod efinethe new reference values
manually: X
Use the table on the insid eofthe fuel filler
flap to ensur ethatthe tyr epressure is set
correctly in al lfou rtyres for the current
operating conditions.
Als oo bser ve the note sinthe sectio non
tyr ep ressures (Y page 184).
X Make sure tha tthe key is in position 2in
the ignition lock.
Th es tandard displa yappears in the multi-
functio ndisplay ( Ypage 110).
X Press the jork button to select the
Tyr epressure function or wait untilthe
following message appears:
Tyr epressure displayed onl yafter
drivin gfor afew minutes
X Press the reset button on the left of the
instrumen tcluste r(Ypage 193).
Th ef ollowing message appear sinthe
multi-functio ndisplay: Check current
tyr epressure?
X Press the æbutton.
Th ef ollowing message appear sinthe
multi-functio ndisplay:
Tyr epressure monito rrestarted
Th et yrep ressure monitor ha sstored the
pressure of the tyres as anew reference
value. Operation
230_AKB; 5; 4, en-GB
bjanott,
Version: 2.9.6
2008-04-08T15:09:54+02:0
0-Seite 187 ZDateiname: 6515_3089_02_buchblock.pdf; preflight
Page 191 of 317
Tyre
sand wheels 188
If yo
uwishtoc ancel the restart:
X Press the çbutton.
If the following message appear sinthe multi-
functio ndisplay:
R Reactivat etyrep ressure monitor
after correctin gtyrep ressure
R Please correc tthe tyr epressure
X Check the tyr epressure on al lfou rw heels
and correc tasn ecessary.
X Star tthe tyr epressure monitor again. Interchanging the wheels
G
Ris
kofa ccident
Interchange the front and rea rwheel sonly
if the yhavet he same dimensions :for exam-
pl es ize, offset, etc.
After every whee linterchange/change,
have the tightening torque checked at a
qualifie dspecialis tworkshop tha thas the
necessary specialis tknowledg eand tools
to carry ou tthe work required .Mercedes-
Benz recommend sthaty ou usea
Mercedes-Benz Service Centre for thi spur-
pose .Inp articular, work relevant to safety or on safety-related systems must be car-
ried ou
tataqualifie dspecialis tworkshop.
Th ew heel scould work loos eiftheya renot
tightened to atorque of 130Nm .
For safety reasons, Mercedes-Benz recom-
mends tha tyou onlyusewhee lbolts of the
correc tsizew hich have been approved for
Mercedes-Benz vehicles.
Th ew earp attern sont he front and rea rtyres
diffe rdepen ding on the operating conditions.
Interchange the wheels befor eaclear wear
pattern ha sformed on the tyres .Front tyres
typicall ywearm oreont he shoulders and the
rea rtyres in the centre.
Interchange the wheels every 5,000 km to
10,000 km depending on the degre eoftyre
wear ,provide dthatthe vehicl ehasthe same
size front and rea rtyres .Don ot revers ethe
directio noftyrer otation.
Clea nthe contact surfaces of the whee land
the brake disc thoroughly every tim eawheel
is interchanged. Check the tyr epressure and,
if necessary ,restar tthe tyr epressure loss
warning syste morthe tyrepressure moni-
tor*. !
On vehicles fitted with atyrep ressure
monitor* ,electroni ccomponents ar eloc a-
ted in the wheel.
Tyre fitting tools shoul dnot be applie din
the area of the valve, as thi scould damage
the electroni ccomponents.
Alway shavet he wheels interchanged/
change dataqualified specialis tworkshop,
e.g .aM ercedes-Benz Service Centre. Operation
*optional
230_AKB; 5; 4, en-GB
bjanott,
Version: 2.9.6 2008-04-08T15:09:54+02:00-Seite 188 Dateiname: 6515_3089_02_buchblock.pdf; preflight
Page 196 of 317
Service
193Driving abroad
Points to remember
An extensive Mercedes-Benz Service network
is also available in other countries. You can
obtain the relevant workshop directories
from any Mercedes-Benz Service Centre.
Only low-octane fuel is available in certain
countries.
You can find further information about fuel
grades on (Y page 175). Symmetrical dipped beam
If your journey takes you to countries where
vehicles are driven on the opposite side of the
road to the countryinw hich the vehicle is
registered, your headlamps must be switched
to symmetrical dipped beam or be partially
masked. Oncoming traffic will be dazzled
less.
X Vehicles with headlamps that cannot be
switched over: mask the headlamps with
special masking tape.
i You can obtain this masking tape from a
qualified specialist workshop, e.g. a
Mercedes-Benz Service Centre. !
Mercedes-Benz recommends that you
only use genuine Mercedes-Benz masking
tape. Your headlamps could otherwise be
damaged.
Remove the masking tape when you are
once again driving on the same side of the
road as in the countryinw hich your vehicle
is registered.
X Vehicles with headlamps that can be
switched over: have the headlamps
switched over at aqualified specialist work-
shop, e.g. aMercedes-Benz Service
Centre. G
Risk of accident
Have your headlamps switched back to
asymmetrical dipped beam if you visit a
countryinw hich traffic drives on the same
side of the road as in the countryinw hich
your vehicle was registered. You may oth-
erwise dazzle the oncomingt raffic and
could cause an accident. Service
ASSYST PLUS service interval display
ASSYST, the service interval display,t ells you
when the next service is due. Whenever a
service is due, the following message appears
in the multi-function display:
Service Ain..d ays
Service Ain..km
Service Adue now
The symbol and the letter indicate which type
of service is due:
9 Short service A
½ Long service B
The service interval display ASSYST does not
record any periods of time during which the
battery is disconnected. In order to maintain
the time-dependen tservice schedule, you
should call up the service due date and make
an ote of it before disconnectingt he battery.
The alternative is to subtract the battery dis-
connection periods from the service date
shown on the display. Operation
230_AKB; 5; 4, en-GB
bjanott
,V ersion: 2.9.6
2008-04-08T15:09:54+02:00
-Seite 193 ZDateiname: 6515_3089_02_buchblock.pdf; preflight
Page 197 of 317
Care
194 Fading out th
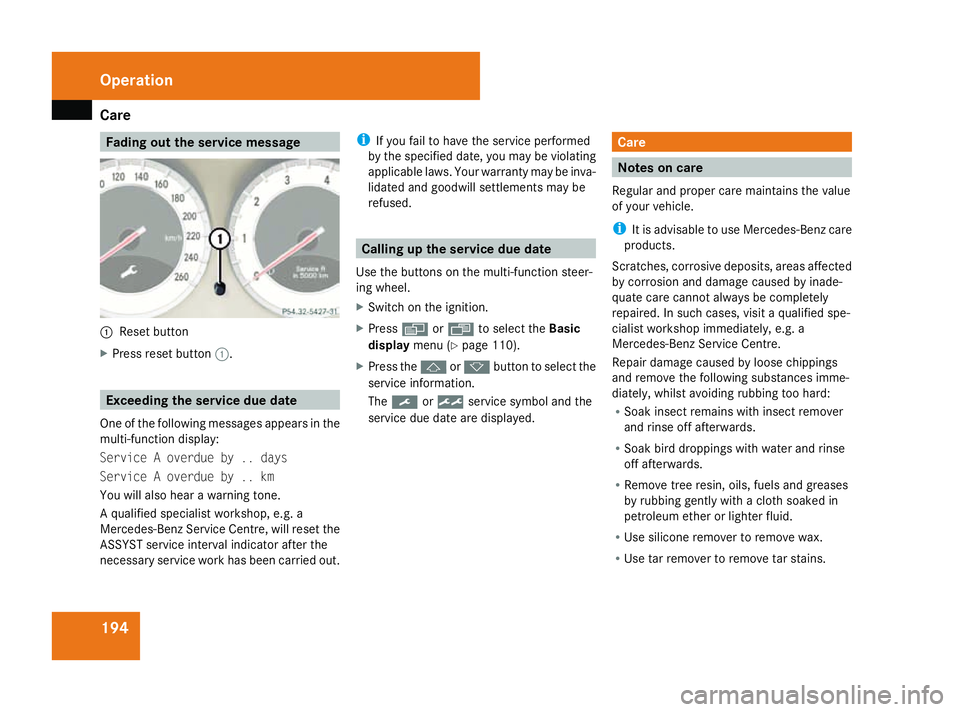
eservice message 1
Reset button
X Pres srese tbutton 1. Exceeding th
eservice du edate
One of th efollowing messages appears in the
multi-functio ndisplay:
Service Aoverdue by .. days
Service Aoverdue by .. km
You will also hear awarning tone.
Aq ualified specialist workshop, e.g .a
Mercedes-Ben zServic eCentre, will rese tthe
ASSYS Tservice interval indicator after the
necessar yservice work has been carried out. i
If you fail to have th eservice performed
by th especified date, you may be violating
applicabl elaws. Your warranty may be inva-
lidated and goodwill settlements may be
refused. Calling up th
eservice du edate
Use th ebuttons on th emulti-functio nsteer-
ing wheel.
X Switch on th eignition.
X Press èorÿ to selec tthe Basic
display menu(Ypage 110).
X Pres sthe j ork button to selec tthe
service information.
The 9 or½ service symbol and the
service due date are displayed. Care
Notes on care
Regular and prope rcarem aintain sthe value
of your vehicle.
i It is advisabl etouse Mercedes-Ben zcare
products.
Scratches, corrosive deposits, areas affected
by corrosion and damage caused by inade-
quate car ecannot always be completely
repaired. In such cases ,visit aqualified spe-
cialis tworkshop immediately, e.g .a
Mercedes-Ben zServic eCentre.
Repair damage caused by loose chippings
and remove th efollowing substances imme-
diately, whilst avoidin grubbin gtoo hard:
R Soak insect remain swith insect remover
and rinse off afterwards.
R Soak bird droppings with water and rinse
off afterwards.
R Remov etreer esin, oils, fuels and greases
by rubbin ggently with acloths oaked in
petroleum ether or lighter fluid.
R Use silicone remover to remove wax.
R Use tar remover to remove tar stains. Operation
230_AKB; 5; 4, en-GB
bjanott
,V ersion: 2.9.6
2008-04-08T15:09:54+02:00
-Seite 194 Dateiname: 6515_3089_02_buchblock.pdf; preflight
Page 202 of 317
199
Wher
ewillIfind...? ........................... 200
Display messages ............................. 202
Troubleshooting ................................ 230
Locking/unlocking in an emer-
gency ................................................. 255
Changin gthe batteries ..................... 258
Changin gthe bulbs ........................... 259
Replacing th ewiper blades ..............264
Flat tyre ............................................. 266
Battery ............................................... 276
Towing an dtow-starting .................. 280
Fuses .................................................. 283 Practical advice
230_AKB
;5;4,en-GB
bjanott ,V ersion:2.9.6
2008-04-08T15:09:54+02:00
-Seite 199 Dateiname: 6515_3089_02_buchblock.pdf; preflight
Page 205 of 317
Displa
ymessages 202
X
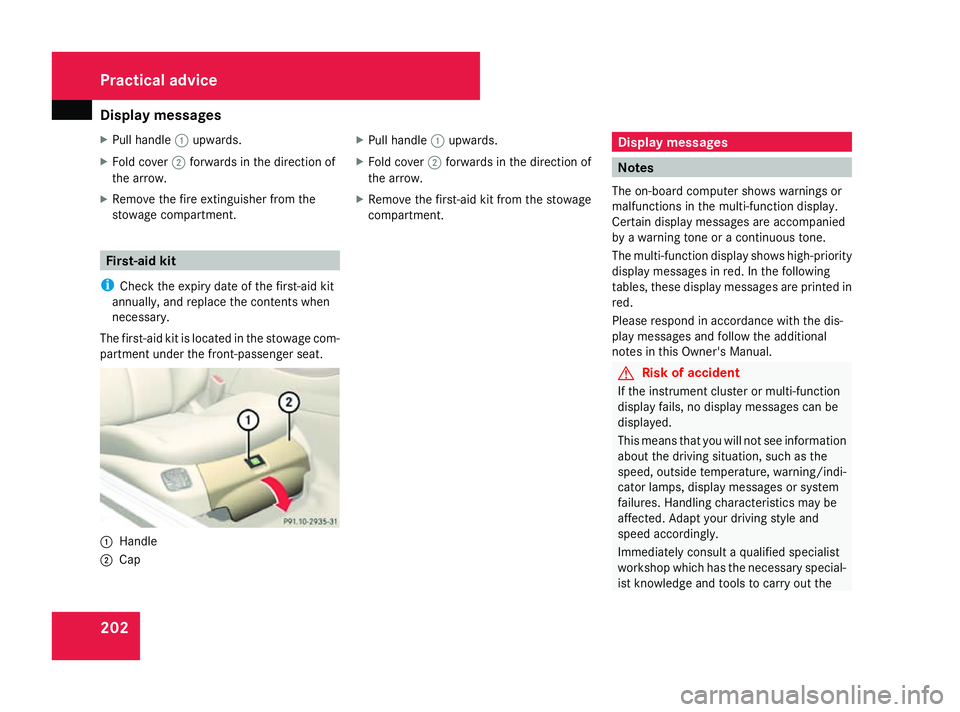
Pull handle 1upwards.
X Fol dc over 2forward sinthe direction of
the arrow.
X Remov ethe fire extinguishe rfromt he
stowage compartment. First-ai
dkit
i Check the expir ydateoft he first-ai dkit
annually ,and replac ethe contents when
necessary.
Th efirst-ai dkit is located in the stowage com-
partment unde rthe front-passenge rseat. 1
Handle
2 Cap X
Pull handle 1upwards.
X Fold cover 2forw ards in the direction of
the arro w.
X Remove the first-aid ki tfromt he sto wage
comp artment. Display messages
Notes
The on-board compute rshows warning sor
malfunction sinthemulti-function display.
Certain display messages are accompanied
by aw arning tone or acontinuous tone.
The multi-function display shows high-priority
display messages in red. In th efollowing
tables, these display messages are printe din
red.
Please respon dinaccordanc ewith th edis-
play messages and follow th eadditional
note sint hisO wner' sManual. G
Ris
kofa ccident
If th einstrumen tcluste rorm ulti-function
display fails ,nodisplay messages can be
displayed.
This mean stha tyou will no tsee information
about th edriving situation, such as the
speed ,outside temperature, warning/indi-
cator lamps ,display messages or system
failures. Handlin gcharacteristics may be
affected. Adap tyour driving style and
speed accordingly.
Immediately consult aqualified specialist
workshop whic hhas th enecessar yspecial-
ist knowledg eand tools to carry out the Practical advice
230_AKB
;5;4,en-GB
bjanott ,V ersion: 2.9.6
2008-04-08T15:09:54+02:00
-Seite 202 Dateiname: 6515_3089_02_buchblock.pdf; preflight
Page 206 of 317
Displa
ymessages 203work required
.Mercedes-Benz recom-
mends tha tyou useaM ercedes-Benz
Service Centre for thi spurpose .Inparticu-
lar, work relevant to safety or on safety-
related systems must be carried ou tata
qualifie dspecialis tworkshop.
When yo ustopa nd park the vehicle, please
observe the instructions provide dfor SBC
Hol d(Ypage 137) an dparking (Y page 97).
Th ef ollowing table scontai nallthe display
messages. Hidin
gdispla ymessages Afte
rafewseconds, the on-board computer
automaticall yhides some lo wpriorit ydisplay
messages .Other messages remain visibl ein
the multi-function displa yuntil yo uhidet hem
yourself.
Som ehighp riorit ydisplay messages cannot
be hidden. Th emulti-function displa yshows
these messages continuousl yuntil the cau-
se soft he messages have been remedied. Us
ethe buttons on the multi-function steer-
ing wheel.
X Us ethe è, ·,jork button
to select another display.
Th eo n-board computer save scertai ndis-
play messages in the messagememory
(Y page 115). Tex
tmessages G
Ris
kofa cciden tand injury
Th eo pera ting safety of your vehicl ecould be compromise difservice work is carried ou timproperly. Youc ould lose control of the vehicle,
thereby causing an accident. Safety systems ma yalson ot be able to protect yo uorothersasi ntended.
Alway shavem aintenance work carried ou tataqualifie dspecialis tworksho pwhich hast he necessar yspecialis tknowledg eand tools to
carry ou tthe work required.
Mercedes-Benz recommends tha tyou useaM ercedes-Benz Service Centre for thi spurpose.
In particular, work relevant to safety or on safety-related systems must be carried ou tataqualifie dspecialis tworkshop. Practical advi
ce
230_AKB; 5; 4, en-GB
bjanott,
Version: 2.9.6
2008-04-08T15:09:54+02:0
0-Seite203 ZDateiname: 6515_3089_02_buchblock.pdf; preflight
Page 207 of 317
Displa
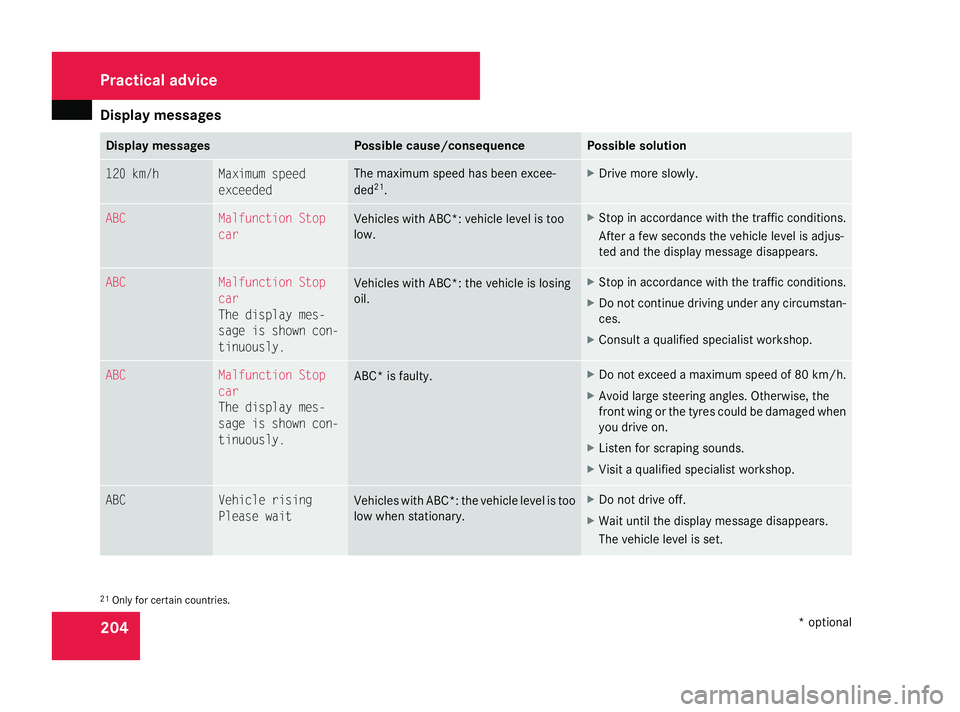
ymessages 204 Display messages Possible cause/consequence Possible solution
12
0k m/h Maximu
mspeed
exceeded Th
em aximum spee dhasbeen excee-
ded 21
. X
Drive mor eslowly. ABC Malfunctio
nStop
car Vehicles with ABC*: vehicl
elevel is too
low. X
Stop in accordance with the traffi cconditions.
Afte rafewsecond sthe vehicl elevel is adjus-
ted an dthe displa ymessage disappears. ABC Malfunctio
nStop
car
Th ed isplay mes-
sage is show ncon-
tinuously. Vehicles with ABC*: the vehicl
eislosing
oil. X
Stop in accordance with the traffi cconditions.
X Do not continu edrivin gunder anyc ircumstan-
ces.
X Consult aqualified specialis tworkshop. ABC Malfunctio
nStop
car
Th ed isplay mes-
sage is show ncon-
tinuously. ABC
*isf aulty. X
Do not excee damaximum spee dof80k m/h.
X Avoid large steering angles .Otherwise ,the
front wing or the tyre scould be damage dwhen
yo ud rive on.
X Liste nfor scraping sounds.
X Visi taq ualified specialis tworkshop. ABC Vehicl
erising
Please wait Vehicles with ABC*: the vehicl
elevel is too
lo ww hens tationary. X
Do not driv eoff.
X Wait until the displa ymessage disappears.
Th ev ehicle leveliss et. 21
Onl yfor certai ncountries. Practical advi
ce
*optional
230_AKB; 5; 4, en-GB
bjanott,
Version: 2.9.6
2008-04-08T15:09:54+02:0
0-Seite204 Dateiname: 6515_3089_02_buchblock.pdf; preflight