Page 274 of 317

Flat tyre
271The vehicl
emustbep laced on stand sifyou
intend to wor kunder it.
Mak esuret hatthe jackisp laced on afirm,
non-slip ,level surface. Do no tuse wooden
blocks or similar items as jacking supports.
Otherwise ,the jackw ill no tbea ble to ach-
iev eits load-bearin gcapacity due to the
restricted height.
Do no tstart th eengineata ny time while
th ew hee lisb eingchanged. G
Risk of accident
If you fail to position th ejackc orrectly,t he
vehicl emay:
R slip of fthe jack
R injur eyou or others
R be damaged
It is thus important to ensur ethatthe jack
is positioned correctl yint he respective
jacking points .Befor epositionin gthe jack,
remove any dir ttha tm ay hav ecollecte din
th ej acking points.
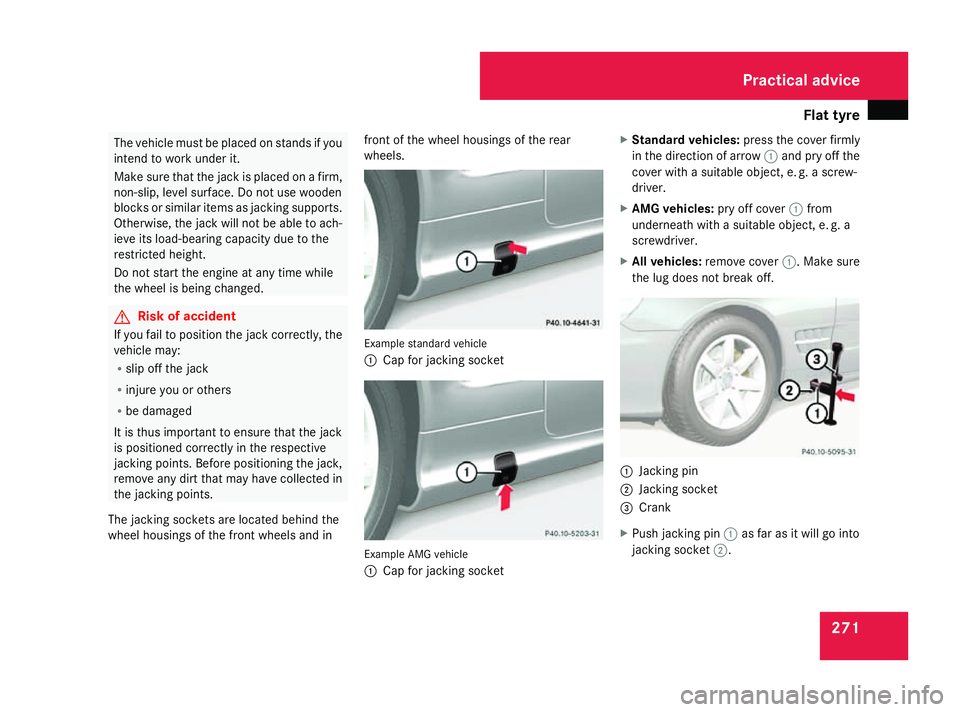
The jacking sockets are locate dbehin dthe
whee lhousings of th efront wheels and in fron
toft hewhee lhousings of th erear
wheels. Example standar
dvehicle
1 Cap for jackin gsocket Example AMG vehicle
1
Cap for jackin gsocket X
Standar dvehicles: pressthe cover firmly
in th edirectio nofarrow1and pry off the
cover with asuitable object ,e.g.a screw-
driver.
X AMG vehicles: pry off cover1from
underneat hwithasuitable object ,e.g.a
screwdriver.
X All vehicles: remove cover 1.Make sure
th el ug does not break off. 1
Jacking pin
2 Jacking socket
3 Crank
X Push jackin gpin1 as far as it will go into
jackin gsocket 2. Practical advice
230_AKB
;5;4,en-GB
bjanott, Version:2.9.6
2008-04-08T15:09:54+02:00
-Seite 271 ZDateiname: 6515_3089_02_buchblock.pdf; preflight
Page 275 of 317

Flat tyre
272
X
Mak esuret hatthe base of th ejackisp osi-
tioned directl yunder jacking point 1.
X Hold th ejac kint hisp osition and tur ncrank
3 clockwise until th efootoft hejack
touches th eground .The jac kmustthen
stand vertically, eve nonaslope.
X Tur ncrank 3 until th etyreisr aised amax-
imum of 3cmfromt heground.
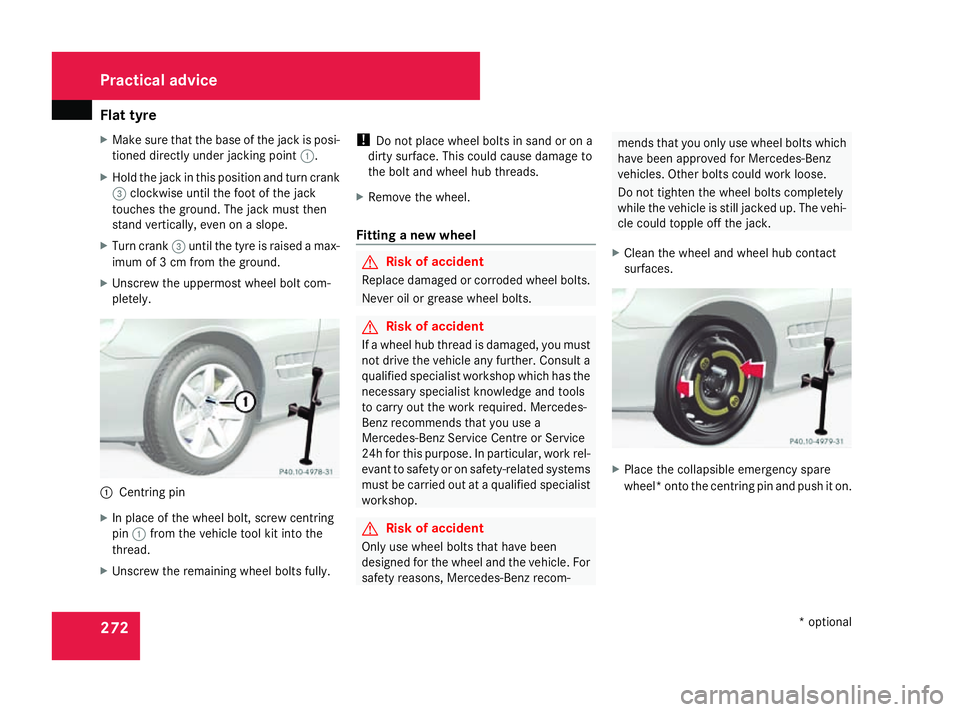
X Unscrew th euppermos twhee lbolt com-
pletely. 1
Centrin gpin
X In place of th ewheel bolt ,screw centring
pin 1from th evehicle tool kit int othe
thread.
X Unscrew th eremainin gwheel bolt sfully. !
Do not place wheel bolt sinsandorona
dirt ysurface. This could cause damage to
th eb olt and wheel hub threads.
X Remov ethe wheel.
Fitting anew wheel G
Risk of accident
Replace damaged or corrode dwheel bolts.
Never oil or greas ewheel bolts. G
Risk of accident
If aw heel hub thread is damaged ,you must
not driv ethe vehicle any further. Consult a
qualifie dspecialist workshop whic hhas the
necessar yspecialist knowledge and tools
to carry out th ework required. Mercedes-
Ben zrecommend sthaty ou use a
Mercedes-Ben zServic eCentre or Service
24 hfor this purpose. In particular ,work rel-
evan ttosafety or on safety-related systems
must be carried out at aqualifie dspecialist
workshop. G
Risk of accident
Only use wheel bolt sthath ave been
designed for th ewheel and th evehicle. For
safety reasons ,Mercedes-Ben zrecom- mends that you onl
yuse wheel bolt swhich
have been approved for Mercedes-Benz
vehicles .Other bolt scould work loose.
Do not tighten th ewheel bolt scompletely
while th evehicle is still jacked up. The vehi-
cle could topple off th ejack.
X Clean th ewheel and wheel hub contact
surfaces. X
Place th ecollapsible emergency spare
wheel* ont othe centring pin and push it on. Practical advice
*optional
230_AKB
;5;4,en-GB
bjanott, Version:2.9.6
2008-04-08T15:09:54+02:00
-Seite 272 Dateiname: 6515_3089_02_buchblock.pdf; preflight
Page 277 of 317

Flat tyre
274The air pump can be operate
dagain once
it has cooled down.
If th etyrep ressur eistoohigh:
X Ope nthe pressur erelease screw on the
pressur egauge until th etyrep ressur eis
correct.
X Disconnect th eelectric air pump and stow
it away.
Lowering th evehicle X
Lower th evehicle. To do this, tur nthe crank
of th ejacka nti-clockwise until th evehicle
is standin gfirmly on th eground again.
X Pull th ejacko ut of th ejacking socket.
X Plac ethe jacktoo neside. X
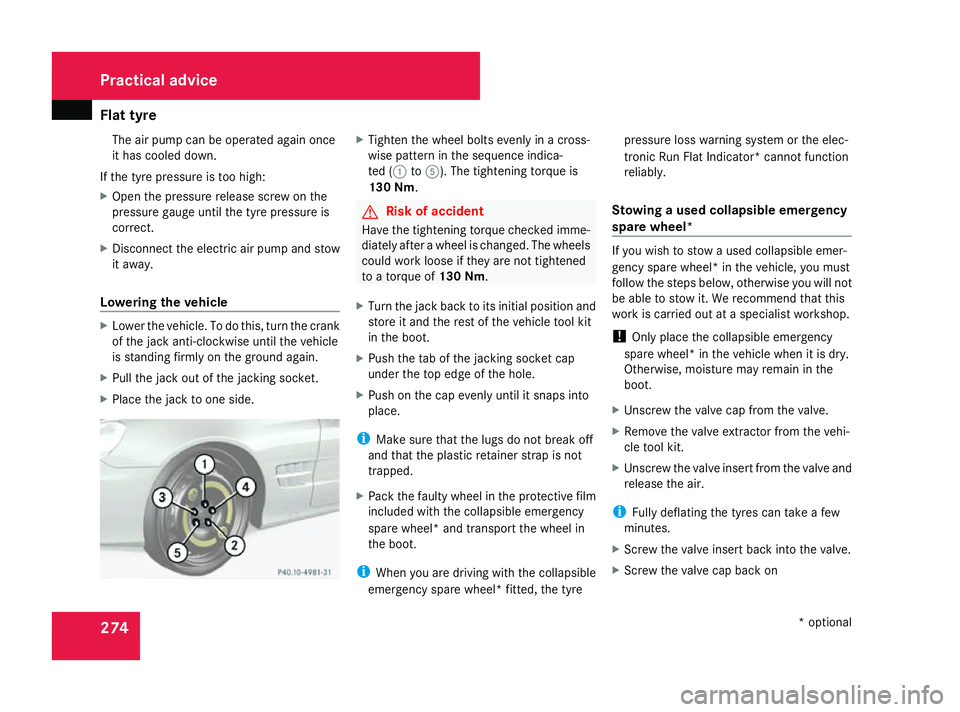
Tighte nthe whee lbolt se venl yinac ross-
wise pattern in th esequence indica-
te d( 1to 5). The tightenin gtorque is
130 Nm . G
Risk of accident
Hav ethe tightenin gtorque checke dimme-
diately after awhee lisc hanged. The wheels
could wor kloos eift heya re no ttightened
to atorque of 130 Nm .
X Tur nthe jackb acktoi tsinitial position and
store it and th erestoft hevehicl etoolkit
in th eboot.
X Push th etab of th ejacking socke tcap
under th etop edge of th ehole.
X Push on th ecap evenl yuntil it snaps into
place.
i Mak esuret hatthe lugs do no tbreak off
and that th eplastic retainer strap is not
trapped.
X Pac kthe fault ywhee lint heprotective film
included wit hthe collapsible emergency
spar ewheel* and transpor tthe whee lin
th eb oot.
i Whe nyou are drivin gwitht he collapsible
emergenc yspar ew heel* fitted, th etyre pressur
elossw arnin gsystem or th eelec-
tronic Run Fla tInd icator* canno tfunction
reliably.
Stowing ausedc ollapsible emergency
spar ewheel* If you wish to stow
aused collapsible emer-
gency spar ewheel* in th evehicle, you must
follow th esteps below, otherwise you will not
be able to stow it .Werecommen dthatthis
wor kisc arriedout at aspecialist workshop.
! Only plac ethe collapsible emergency
spar ewheel* in th evehicl ewhen it is dry.
Otherwise ,moisture may remain in the
boot.
X Unscrew th evalvec ap from th evalve.
X Remove th evalvee xtractor from thevehi-
cle tool kit.
X Unscrew th evalv eins ertfro mt hevalv eand
release th eair.
i Fullydeflatin gthe tyres can tak eafew
minutes.
X Screw th evalveinsertb acki ntot he valve.
X Screw th evalvec ap bac kon Practical advice
*optional
230_AKB; 5; 4, en-GB
bjanott
,V ersion: 2.9.6
2008-04-08T15:09:54+02:00
-Seite 274 Dateiname: 6515_3089_02_buchblock.pdf; preflight