2008 MERCEDES-BENZ SL ROADSTER seats
[x] Cancel search: seatsPage 66 of 317
63
Opening and closing
...........................64
Key positions ....................................... 73
Seats .................................................... 74
Steering wheel .................................... 78
Mirrors ................................................. 80
Memor yfunctions ............................... 82
Seat belts ............................................. 83
Lights ................................................... 87
Windscreen wipers .............................92
Side windows ...................................... 93Driving and parking
............................95
Automatic transmission .....................98
Instrument cluster ............................105
On-boar dcomputer .......................... 106
Driving systems ................................ 124
Air conditioning ................................. 144
Opening/closing the roof .................154
Loading and stowing ........................159
Features ............................................. 165 Controls
230_AKB
;5;4,en-GB
bjanott, Version:2.9.6
2008-04-08T15:09:54+02:0
0-Seite 63 Dateiname: 6515_3089_02_buchblock.pdf; preflight
Page 77 of 317
Seats
74 Seats
Points to remember
G
Risk of injury
The seats can still be adjusted when there
is no key in the ignition lock. For this rea-
son, children should never be left unsuper-
vised in the vehicle. They could become
trapped when adjusting aseat. G
Risk of accident
Only adjust the driver's seat when the vehi-
cle is stationary. You will otherwise be dis-
tracted from the road and traffic conditions
and you could lose control of the vehicle as
ar esult of the seat moving. This could
cause an accident. G
Risk of injury
Make sure that nobody can become trap-
ped when you adjust the seat.
Observe the notes concerning the airbag
system.
Secure children as recommended; see
"Children in the vehicle" section.
! When you move the seats, make sure that
there are no objectsint he footwell orbehind the seats. Otherwise, you could
damage the seats and the objects.
i The head restraint scannot be removed. Adjusting the seat electrically
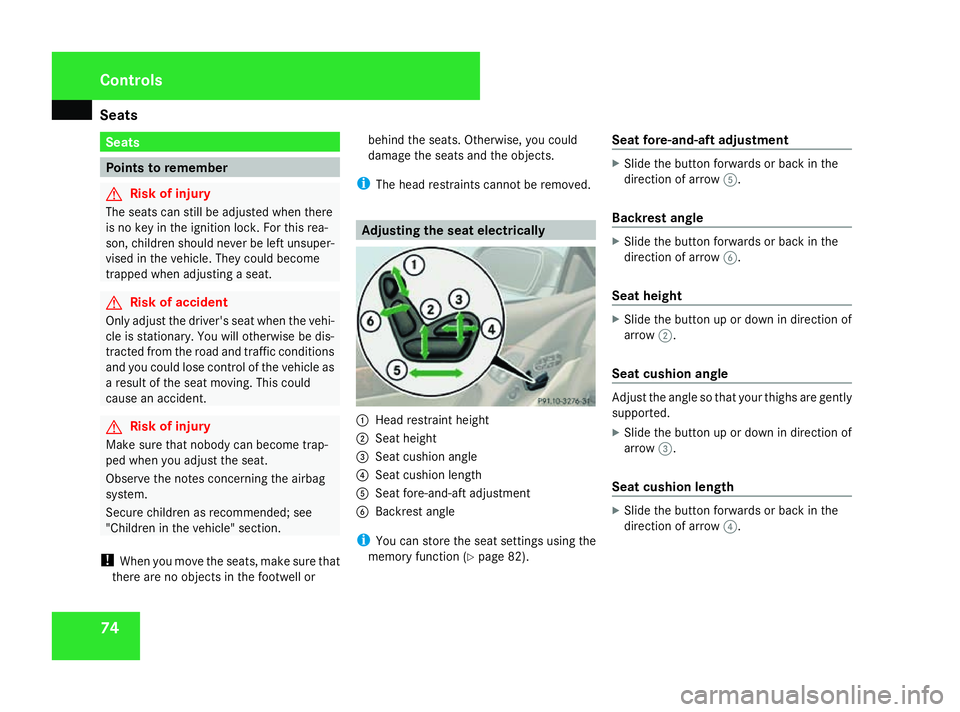
1
Head restraint height
2 Seat height
3 Seat cushion angle
4 Seat cushion length
5 Seat fore-and-aft adjustment
6 Backrest angle
i You can store the seat settings using the
memory function (Y page 82). Seat fore-and-aft adjustment X
Slide the button forwards or back in the
direction of arrow 5.
Backrest angle X
Slide the button forwards or back in the
direction of arrow 6.
Seat height X
Slide the button up or down in direction of
arrow 2.
Seat cushiona ngle Adjust the angle so that yourt
highs are gently
supported.
X Slide the button up or down in direction of
arrow 3.
Seat cushionl ength X
Slide the button forwards or back in the
direction of arrow 4. Controls
230_AKB; 5; 4, en-GB
bjanott,
Version: 2.9.6
2008-04-08T15:09:54+02:00
-Seite 74 Dateiname: 6515_3089_02_buchblock.pdf; preflight
Page 78 of 317
Seats
75
Head restraint height G
Risk of injury
Make sure that the central area of the head
restraint supports the back of your head at
about eye level. You could seriously injure
your neck if your head is not correctly sup-
ported by the head restraint in the event of
an accident. Never travel without acor-
rectly adjusted and engaged head restraint.
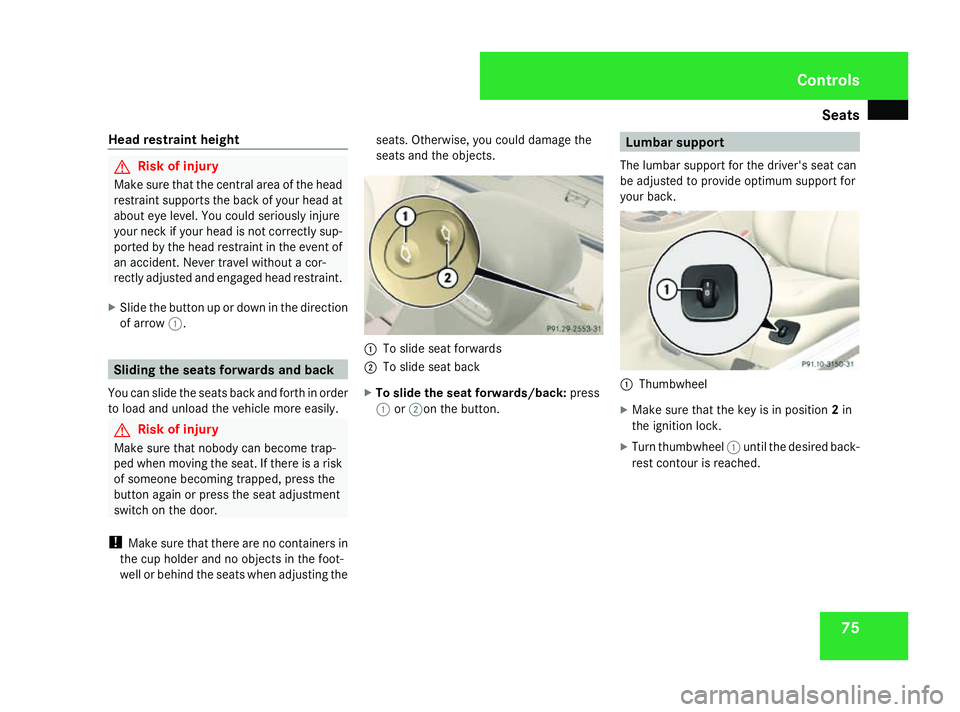
X Slide the button up or down in the direction
of arrow 1. Sliding the seats forwardsa
nd back
You can slide the seats back and forth in order
to load and unload the vehicle more easily. G
Risk of injury
Make sure that nobody can become trap-
ped when moving the seat. If there is arisk
of someone becoming trapped, press the
button again or press the seat adjustment
switch on the door.
! Make sure that there are no containers in
the cup holder and no objectsint he foot-
well or behind the seats when adjusting the seats. Otherwise, you could damage the
seats and the objects.
1
To slide seat forwards
2 To slide seat back
X To slide the seat forwards/back: press
1 or2on the button. Lumbar support
The lumbar support for the driver's seat can
be adjusted to provide optimum support for
your back. 1
Thumbwheel
X Make sure that the key is in position 2in
the ignition lock.
X Turn thumbwheel 1until the desired back-
rest contour is reached. Controls
230_AKB; 5; 4, en-GB
bjanott
,V ersion: 2.9.6
2008-04-08T15:09:54+02:00
-Seite 75 ZDateiname: 6515_3089_02_buchblock.pdf; preflight
Page 79 of 317
Seats
76 Multi-contour seat*
You can set the contour of the seat to provide
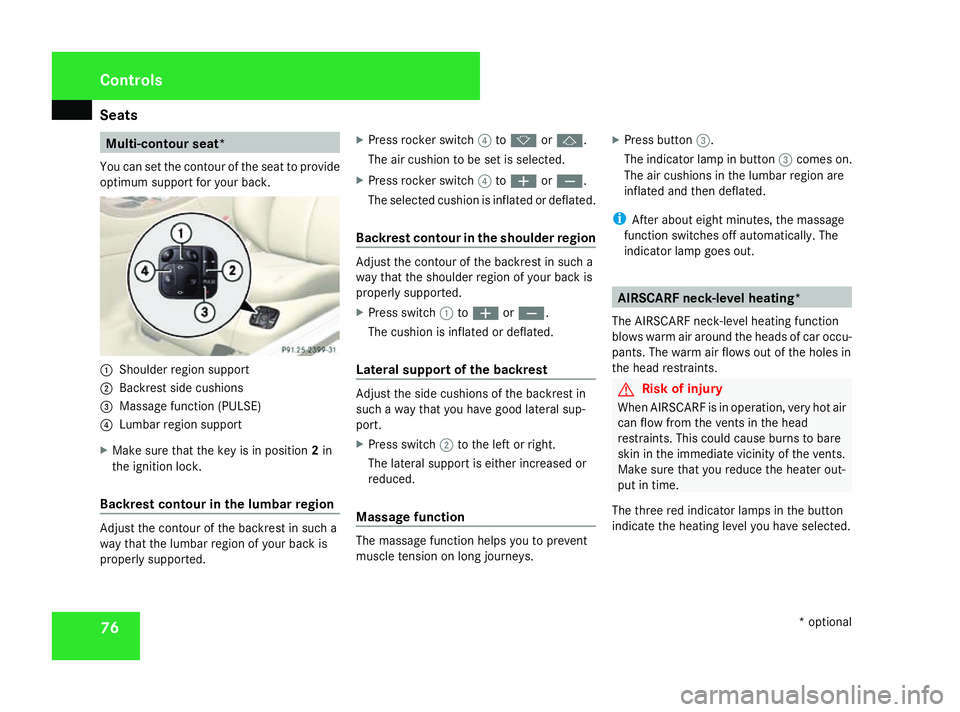
optimum support for your back. 1
Shoulder region support
2 Backrest side cushions
3 Massage function (PULSE)
4 Lumbarr egion support
X Make sure that the key is in position 2in
the ignition lock.
Backrest contour in the lumbar region Adjust the contour of the backrest in such a
way that the lumbar region of yourb
ack is
properly supported. X
Press rocker switch 4tok orj.
The air cushion to be set is selected.
X Press rocker switch 4toæ orç.
The selected cushion is inflated or deflated.
Backrest contour in the shoulder region Adjust the contour of the backrest in such a
way that the shoulder region of yourb
ack is
properly supported.
X Press switch 1toæ orç.
The cushion is inflated or deflated.
Lateral support of the backrest Adjust the side cushions of the backrest in
such
away that you have good lateral sup-
port.
X Press switch 2to the left or right.
The lateral support is either increased or
reduced.
Massage function The massage function helps you to prevent
muscle tension on long journeys.X
Press button 3.
The indicator lamp in button 3comes on.
The air cushions in the lumbar region are
inflated and then deflated.
i After aboute ight minutes, the massage
function switches off automatically.T he
indicator lamp goes out. AIRSCARF neck-level heating*
The AIRSCARF neck-level heating function
blowsw arm air around the headsofc ar occu-
pants. The warm air flows out of the holes in
the head restraints. G
Risk of injury
When AIRSCARF is in operation, very hot air
can flow from the vents in the head
restraints. This could cause burns to bare
skin in the immediate vicinity of the vents.
Make sure that you reduce the heater out-
put in time.
The three red indicator lamps in the button
indicate the heating level you have selected. Controls
*optional
230_AKB; 5; 4, en-GB
bjanott,
Version: 2.9.6 2008-04-08T15:09:54+02:00-Seite 76 Dateiname: 6515_3089_02_buchblock.pdf; preflight
Page 80 of 317
Seats
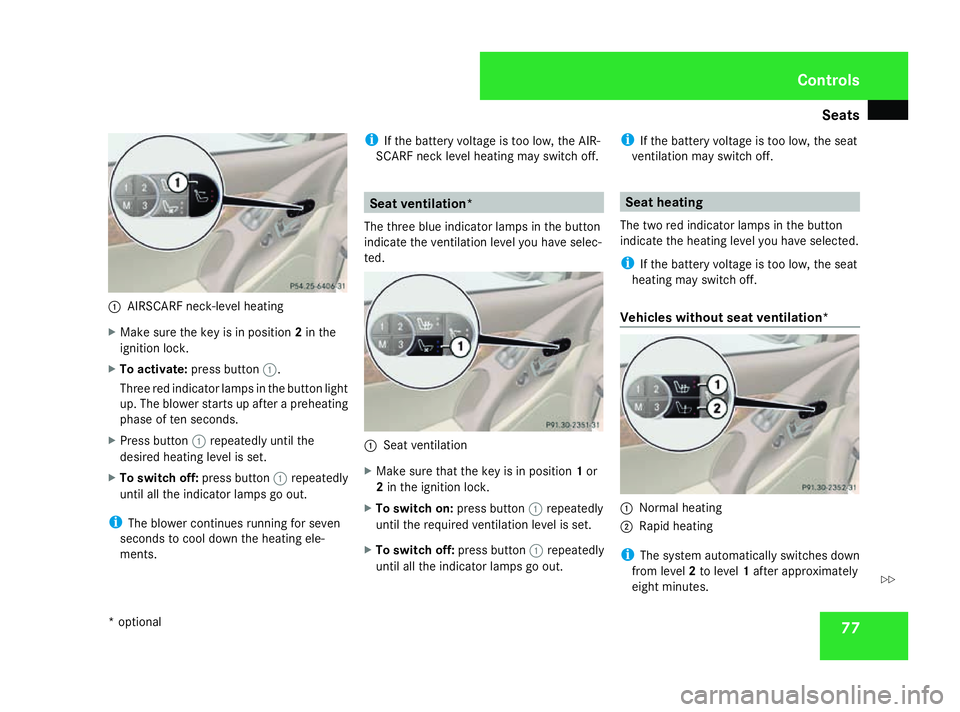
771
AIRSCARF neck-level heating
X Make sure the key is in position 2in the
ignition lock.
X To activate: press button 1.
Three red indicator lamps in the button light
up. The blower starts up after apreheating
phase of ten seconds.
X Press button 1repeatedly until the
desired heating level is set.
X To switch off: press button1repeatedly
until all the indicator lamps go out.
i The blower continues running for seven
seconds to cool down the heating ele-
ments. i
If the battery voltage is too low, the AIR-
SCARF neck level heating may switch off. Seat ventilation*
The three bluei ndicator lamps in the button
indicate the ventilation level you have selec-
ted. 1
Seat ventilation
X Make sure that the key is in position 1or
2 in the ignition lock.
X To switch on: press button1repeatedly
until the required ventilation level is set.
X To switch off: press button1repeatedly
until all the indicator lamps go out. i
If the battery voltage is too low, the seat
ventilation may switch off. Seat heating
The two red indicator lamps in the button
indicate the heating level you have selected.
i If the battery voltage is too low, the seat
heating may switch off.
Vehicles without seat ventilation* 1
Normal heating
2 Rapid heating
i The system automatically switches down
from level 2to level 1after approximately
eight minutes. Controls
*o ptional
230_AKB; 5; 4, en-GB
bjanott,
Version: 2.9.6 2008-04-08T15:09:54+02:00-Seite 77 ZDateiname: 6515_3089_02_buchblock.pdf; preflight
Page 87 of 317
Seat belts
84 hip joints–n
ot across your abdomen. If
necessary, push down the belt strap
slightly and then retighten it in the roll-up
direction.
R Do not route the belt strap across sharp
or fragile objects, especially if these are
located on or in your clothing, e.g. spec-
tacles, pencils, keys, etc. The seat belt
strap could be damaged and tear in an
accident and you or other vehicle occu-
pants could be injured.
R Only one person should use each seat
belt at any one time. Children must never
travel sittingont he lap of other occu-
pants. It would not be possible to restrain
the child in the event of asudden change
in direction, braking or an accident. This
could result in severe or even fatal inju-
ries to the child and other occupants.
R Persons less than 1.50 mtall cannot
wear the seat belts correctly. For this
reason, secure persons less than 1.50 m
tall in specially designed, suitable
restraint systems.
R Children less than 1.50 mtall or under
12 years of age cannot wear the seat
belts properly. Therefore, always secure
these children in suitable child restraint systems on suitable vehicle seats. You
can find more information under "Chil-
dren in the vehicle" in the "Safety" sec-
tion of the Owner's Manual. Follow the
manufacturer's installation instructions
when fitting the child restraint system.
R Do not secure any objectsw ithaseat belt
if the seat belt is also being used by one
of the vehicle's occupants. G
Risk of injury
The seat belt does not offer the intended
level of protection unless the backrest is
almost vertical. Under certain circumstan-
ces this could cause severe or even fatal
injuries.
Before startingaj ourney, make sure that
the seat is properly adjusted and that the
backrest is almost vertical. G
Risk of injury
Ad irty or damaged seat belt or aseat belt
that has been subjected to aload in an
accident or modified no longer offers the
intended level of protection. Under certain
circumstances this could cause severe or
even fatal injuries. For this reason, check regularly that the
seat belts are not damaged or dirty.
Always have damaged seat belts or seat
belts that have been subjected to
aload in
an accident replaced at aqualified special-
ist workshop. Choose aqualified specialist
workshop which has the necessary special-
ist knowledge and tools for the work
required. Mercedes-Benz recommends
that you use aMercedes-Benz Service
Centre for this purpose.
For safety reasons, Mercedes-Benz recom-
mends that you only use seat belts which
have been approved by Mercedes-Benz for
your vehicle. Controls
230_AKB; 5; 4, en-GB
bjanott
,V ersion: 2.9.6
2008-04-08T15:09:54+02:00
-Seite 84 Dateiname: 6515_3089_02_buchblock.pdf; preflight